Quickstart#
This is a minimal Tidy3D script showing the FDTD simulation of a dielectric cube in the presence of a point dipole.
Before running this notebook, make sure to have:
[1]:
# import packages and authenticate (if needed)
import matplotlib.pylab as plt
import numpy as np
import tidy3d as td
import tidy3d.web as web

# web.configure("YOUR API KEY GOES HERE")
First, we use the convenience class FreqRange to define the basic frequency-related parameters of the simulation.
[2]:
lda0 = 0.75  # wavelength of interest (length scales are micrometers in Tidy3D)
freq0 = td.C_0 / lda0  # frequency of interest
fwidth = freq0 / 10.0  # desired freq. bandwidth

freq_range = td.FreqRange(freq0=freq0, fwidth=fwidth)  # set frequency range
Create a Structure from a Geometry like this rectangular prism Box and assign a Medium to represent its optical properties.
[3]:
square = td.Structure(
    geometry=td.Box(center=(0, 0, 0), size=(1.5, 1.5, 1.5)), medium=td.Medium(permittivity=2.0)
)
Create a Source. In this case, it is a PointDipole, which is a uniform current source with a zero size.
[4]:
# create source
source = td.PointDipole(
    center=(-1.5, 0, 0),  # position of the dipole
    source_time=freq_range.to_gaussian_pulse(),  # time profile of the source
    polarization="Ey",  # polarization of the dipole
)
Create a Monitor like a FieldMonitor to record electromagnetic fields in the frequency domain at freq0.
[5]:
# create monitor
monitor = td.FieldMonitor(
    center=(0, 0, 0),  # center of the monitor
    size=(td.inf, td.inf, 0),  # size of the monitor
    freqs=freq_range.freqs(num_points=1),  # frequency points to record the fields at
    name="fields",
)
All these components are used to create a Tidy3D Simulation:
[6]:
sim = td.Simulation(
    size=(4, 3, 3),  # simulation domain size
    grid_spec=td.GridSpec.auto(
        min_steps_per_wvl=25
    ),  # automatic nonuniform FDTD grid with 25 grids per wavelength in the material
    structures=[square],
    sources=[source],
    monitors=[monitor],
    run_time=3e-13,  # physical simulation time in second
)
[7]:
# visualize in 3D
sim.plot_3d()
[8]:
print(
    f"simulation grid is shaped {sim.grid.num_cells} for {int(np.prod(sim.grid.num_cells) / 1e6)} million cells."
)
simulation grid is shaped [179, 147, 147] for 3 million cells.
The python web API is used to run your simulation quickly in the cloud. The output data is stored in a SimulationData container.
[9]:
# run simulation
data = td.web.run(sim, task_name="quickstart", path="data/data.hdf5", verbose=True)
07:23:40 UTC Created task 'quickstart' with resource_id
             'fdve-fe74f8ae-8cde-476c-8db1-ca4e7c7c7a6a' and task_type 'FDTD'.
             View task using web UI at
             'https://tidy3d.simulation.cloud/workbench?taskId=fdve-fe74f8ae-8cd
             e-476c-8db1-ca4e7c7c7a6a'.
Task folder: 'default'.
07:23:42 UTC Estimated FlexCredit cost: 0.025. This assumes the FDTD solver runs
             for the full simulation time; if early shutoff is reached, the
             billed cost can be lower. Use 'web.real_cost(task_id)' to get the
             billed FlexCredit cost after a simulation run.
status = queued
             To cancel the simulation, use 'web.abort(task_id)' or
             'web.delete(task_id)' or abort/delete the task in the web UI.
             Terminating the Python script will not stop the job running on the
             cloud.
07:23:56 UTC starting up solver
running solver
07:23:58 UTC early shutoff detected at 31%, exiting.
status = postprocess
07:24:01 UTC status = success
07:24:03 UTC View simulation result at
             'https://tidy3d.simulation.cloud/workbench?taskId=fdve-fe74f8ae-8cd
             e-476c-8db1-ca4e7c7c7a6a'.
07:24:04 UTC Loading results from data/data.hdf5
[10]:
# see the log
print(data.log)
[07:23:51] INFO: Auto meshing using wavelength 0.7519 defined from sources.
           INFO: Auto meshing using wavelength 0.7519 defined from sources.
           INFO: Auto meshing using wavelength 0.7519 defined from sources.
[07:23:52] USER: Simulation domain Nx, Ny, Nz: [179, 147, 147]
           USER: Applied symmetries: (0, 0, 0)
           USER: Number of computational grid points: 4.0184e+06.
           USER: Subpixel averaging method: SubpixelSpec()
           USER: Number of time steps: 7.5090e+03
           USER: Automatic shutoff factor: 1.00e-05
           USER: Time step (s): 3.9959e-17
           USER:

           USER: Compute source modes time (s):     0.2004
           USER: Rest of setup time (s):            0.2214
[07:23:53] USER: Compute monitor modes time (s):    0.0002
[07:23:56] USER: Solver time (s):                   2.6350
           USER: Time-stepping speed (cells/s):     4.87e+09
           USER: Loading data for monitor fields
           USER: Post-processing time (s):          0.2674

 ====== SOLVER LOG ======

Processing grid and structures...
Building FDTD update coefficients...
Solver setup time (s):             0.6459

Running solver for 7509 time steps...
- Time step    300 / time 1.20e-14s (  4 % done), field decay: 1.00e+00
- Time step    600 / time 2.40e-14s (  8 % done), field decay: 1.00e+00
- Time step    901 / time 3.60e-14s ( 12 % done), field decay: 1.00e+00
- Time step   1201 / time 4.80e-14s ( 16 % done), field decay: 3.09e-01
- Time step   1501 / time 6.00e-14s ( 20 % done), field decay: 3.09e-01
- Time step   1802 / time 7.20e-14s ( 24 % done), field decay: 1.73e-03
- Time step   2102 / time 8.40e-14s ( 28 % done), field decay: 1.25e-05
- Time step   2400 / time 9.59e-14s ( 31 % done), field decay: 1.81e-07
Field decay smaller than shutoff factor, exiting solver.
Time-stepping time (s):            1.9824
Data write time (s):               0.0043
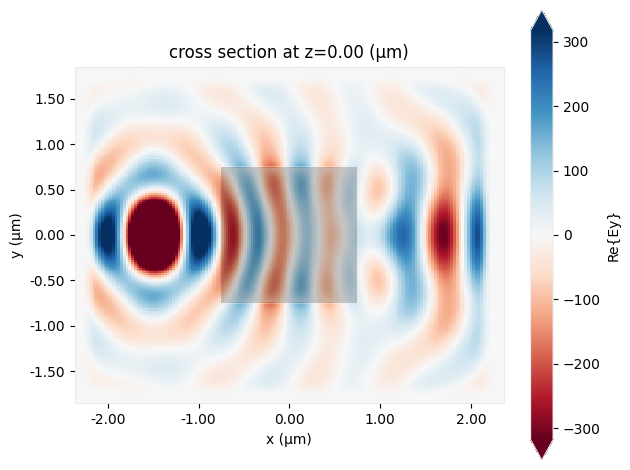
This monitor data can be easily plotted through available plot methods. You can also save, modify, and custom plot the raw FieldData and more.
[11]:
# plot the field data stored in the monitor
ax = data.plot_field("fields", "Ey", z=0)
See all our examples to help you with your own designs!