

Grid and Pack
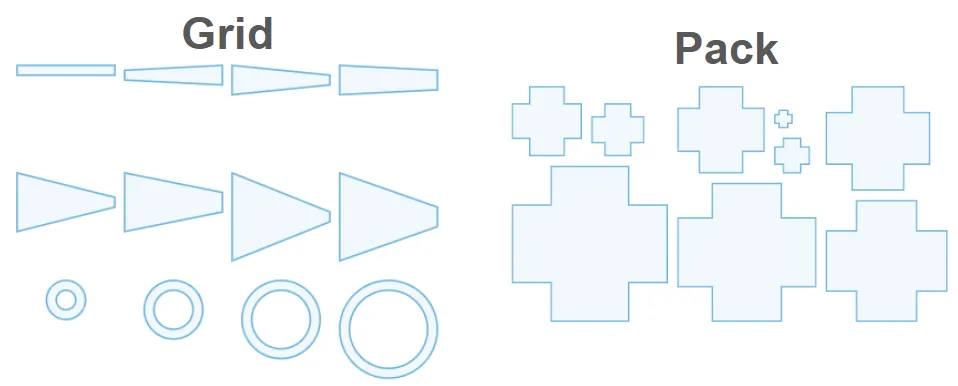
This notebook demonstrates how to arrange layout primitives and components using photonforge.grid_layout() and photonforge.pack_layout(). The grid_layout function is ideal for creating structured arrays, such as parameter sweeps, with precise control over spacing and alignment. In contrast, pack_layout provides a flexible way to efficiently organize a large number of arbitrary shapes into compact bins, optimizing space usage based on customizable heuristics. Together, these tools enable powerful layout automation workflows.
import numpy as npimport photonforge as pf
tech = pf.basic_technology()pf.config.default_technology = techThe grid_layout() function arranges a list (or 2D array) of objects—such as components, shapes, or references—into a structured grid. This is particularly useful for visualizing parameter sweeps or organizing elements for inspection and comparison.
In the following example, we create a diverse set of layout elements by combining linear tapers (with varying input/output widths) and circular rings (with varying radius). These are then arranged in a grid to demonstrate the flexibility and expressiveness of grid_layout.
from photonforge import Circle, grid_layoutfrom photonforge.stencil import linear_taper
# Create a list to hold taper components with different width combinationsshape_list = []for width1 in [1, 3, 6, 9]:    for width2 in [1, 2]:        # Create a taper of length 10 with varying input/output widths        D = linear_taper(length=10, widths=(width1, width2))        shape_list.append(D)
# Add several circular rings to the shape listfor radius in [2, 3, 4, 5]:    # Create a ring with given outer and inner radius    ring = Circle(radius=radius, inner_radius=radius - 1)    shape_list.append(ring)
# Arrange all shapes in a gridc = grid_layout(shape_list)
# Visualize the arranged grid layoutc
You can control the grid layout using several arguments:
gapsets horizontal and vertical spacing between items.shapedefines the number of columns and rows in the grid.align_xandalign_ycontrol the alignment of each object within its grid cell.directionspecifies the order in which items fill the grid (e.g., left-to-right then top-to-bottom).layerassigns a common layer to all included geometry if applicable.
# Set 1 unit gap, align left/top, direction left-to-right then top-to-bottom# Add resulting layout to layer (2, 0)c = grid_layout(    shape_list,    gap=(1, 1),    shape=(4, 3),    align_x="center",    align_y="top",    direction="lr-tb",    layer=(2, 0),)
# Visualize the arranged grid layoutc
The pack_layout() function arranges a sequence of objects—such as components, shapes, or references—into one or more rectangular bins, optimizing for space utilization. This is especially useful when you need to fit a collection of primitives into a constrained area or when exploring different packing heuristics.
In the following example, we construct a list of cross-shaped primitives with increasing arm lengths, then pack them into a bin without explicit size limits. The result shows how we can efficiently place all shapes into a single packed component.
from photonforge import pack_layoutfrom photonforge.stencil import cross
# Set random seed for reproducibilitynp.random.seed(4)
# Create a list of crosses with varying arm lengths and widthsD_list = [cross(arm_length=i, arm_width=i) for i in range(1, 10)]
# Pack the crosses into binsD_packed_list = pack_layout(D_list)
# Extract the first packed component (only one bin created)D = D_packed_list[0]
# Visualize the packed layoutD
You can control the packing behavior with several arguments:
gapsets the minimum distance between adjacent items.aspect_ratiodefines the desired width:height ratio of each bin.grow_factordetermines how aggressively the bin size increases during packing; values closer to 1 yield tighter fits at the cost of extra computation.sortingspecifies how to order objects before packing (e.g.,"area"to place larger items first).allow_rotationenables or disables 90° rotations of shapes to improve fit.methodselects a heuristic for choosing free slots (e.g.,"blsf"for Best Long Side Fit).layerassigns a common layer to all packed geometry if desired.nameprovides a template for naming bins when multiple are generated.
# Pack the crosses into bins with specified parametersD_packed_list = pack_layout(    D_list,  # List of shapes to pack    gap=1.25,  # Minimum distance between adjacent shapes    aspect_ratio=2,  # Desired width:height ratio of each bin    grow_factor=1.05,  # Controls incremental bin size increase    sorting="area",  # Sort shapes by area before packing    method="blsf",  # Use best long side fit heuristic    allow_rotation=False,  # Do not rotate shapes during packing    layer=(2, 0),)
# Extract the first packed component (only one bin created)D = D_packed_list[0]
# Visualize the packed layoutD
As another example, we define a parametric component that connects two grating couplers using an s_bend waveguide.
from photonforge.parametric import s_bendfrom photonforge.stencil import as_component
@pf.parametric_component()# Define a parametric component: 2 gratings connected by an s-benddef s_bend_grating(length=20.0, offset=5.0):    c = pf.Component()
    # Create the first grating component using the stencil    grating = as_component(        stencil="grating",        layer=(2, 0),        period=0.6,        num_periods=10,        width=5,        taper_length=10,        taper_width=0.5,    )
    # Add a slab layer around the grating using envelope    slab = pf.envelope(        grating,        offset=1,        trim_x_min=True,        trim_x_max=True,    )    grating.add((1, 0), slab)
    # Automatically detect and assign ports to the grating    grating.add_port(grating.detect_ports([tech.ports["Strip"]]))
    # Add two grating references to the main component    g_ref1 = c.add_reference(grating)    g_ref2 = c.add_reference(grating)
    # Create an s-bend with specified length and offset    sb = s_bend(port_spec="Strip", length=length, offset=offset)    ref_sb = c.add_reference(sb)
    # Connect s-bend input to first grating and output to second grating    ref_sb.connect("P0", g_ref1["P0"])    g_ref2.connect("P0", ref_sb["P1"])
    return c
# Instantiate the component and visualize itc = s_bend_grating()c;fill:%23221f20;font-weight:bold;font-size:0.688000px;}.terminal{fill:none;stroke:%23805080;stroke-width:0.086000;}.dashed{stroke-dasharray:0.430000,0.258000;}.port{fill:none;stroke:%23805080;stroke-width:0.172000;}.virtual-connection{fill:none;stroke:%23907090;stroke-width:0.129000;}.layer_5_0{stroke:%23998573;fill:url(%23pat-layer_5_0);fill-opacity:0.492;}.label_5_0{fill:%23998573;}.layer_3_0{stroke:%238851ad;fill:url(%23pat-layer_3_0);fill-opacity:0.492;}.label_3_0{fill:%238851ad;}.layer_4_0{stroke:%23535e59;fill:url(%23pat-layer_4_0);fill-opacity:0.492;}.label_4_0{fill:%23535e59;}.layer_1_0{stroke:%23858d89;fill:url(%23pat-layer_1_0);fill-opacity:0.492;}.label_1_0{fill:%23858d89;}.layer_2_0{stroke:%235b98b9;fill:url(%23pat-layer_2_0);fill-opacity:0.492;}.label_2_0{fill:%235b98b9;}</style><defs><path id=%22port-symbol%22 class=%22port%22 d=%22M 0,-0.344000 L 0.516000,0 0,0.344000%22 /><path id=%22ref-port-symbol%22 class=%22port%22 style=%22stroke-opacity:0.33;%22 d=%22M 0,-0.258000 C 0.344000,-0.258000 0.344000,0.258000 0,0.258000%22 /><circle id=%22port-bend-symbol%22 style=%22stroke-width:0;stroke:none;fill:%23805080;fill-opacity:1;%22 cx=%220%22 cy=%220%22 r=%220.154800%22 /><circle id=%22connection-symbol%22 style=%22stroke-width:0;stroke:none;fill:%23907090;fill-opacity:1;%22 cx=%220%22 cy=%220%22 r=%220.180600%22 /><pattern id=%22pat-layer_5_0%22 patternUnits=%22userSpaceOnUse%22 width=%220.430000%22 height=%220.430000%22 patternTransform=%22translate(0.025294,0.384737)%22><line x1=%220.430000%22 y1=%220%22 x2=%220%22 y2=%220.430000%22 style=%22stroke:%23998573;stroke-width:0.043000%22 /><line x1=%220.645000%22 y1=%220.215000%22 x2=%220.215000%22 y2=%220.645000%22 style=%22stroke:%23998573;stroke-width:0.043000%22 /><line x1=%220.215000%22 y1=%22-0.215000%22 x2=%22-0.215000%22 y2=%220.215000%22 style=%22stroke:%23998573;stroke-width:0.043000%22 /></pattern><pattern id=%22pat-layer_3_0%22 patternUnits=%22userSpaceOnUse%22 width=%220.258000%22 height=%220.258000%22 patternTransform=%22translate(0.060706,0.190105)%22><circle cx=%220.129000%22 cy=%220.129000%22 r=%220.043000%22 style=%22stroke:none;fill:%238851ad;fill-opacity:1.0%22 /></pattern><pattern id=%22pat-layer_4_0%22 patternUnits=%22userSpaceOnUse%22 width=%220.430000%22 height=%220.430000%22 patternTransform=%22translate(0.278235,0.135789)%22><line x1=%220.215000%22 y1=%220%22 x2=%220.215000%22 y2=%220.430000%22 style=%22stroke:%23535e59;stroke-width:0.043000%22 /><line x1=%220%22 y1=%220.215000%22 x2=%220.430000%22 y2=%220.215000%22 style=%22stroke:%23535e59;stroke-width:0.043000%22 /></pattern><pattern id=%22pat-layer_1_0%22 patternUnits=%22userSpaceOnUse%22 width=%220.430000%22 height=%220.430000%22 patternTransform=%22translate(0.177059,0.248947)%22><circle cx=%220.215000%22 cy=%220.215000%22 r=%220.043000%22 style=%22stroke:none;fill:%23858d89;fill-opacity:1.0%22 /></pattern><pattern id=%22pat-layer_2_0%22 patternUnits=%22userSpaceOnUse%22 width=%220.430000%22 height=%220.430000%22 patternTransform=%22translate(0.354118,0.067895)%22><line x1=%220%22 y1=%220%22 x2=%220.430000%22 y2=%220.430000%22 style=%22stroke:%235b98b9;stroke-width:0.043000%22 /><line x1=%22-0.215000%22 y1=%220.215000%22 x2=%220.215000%22 y2=%220.645000%22 style=%22stroke:%235b98b9;stroke-width:0.043000%22 /><line x1=%220.215000%22 y1=%22-0.215000%22 x2=%220.645000%22 y2=%220.215000%22 style=%22stroke:%235b98b9;stroke-width:0.043000%22 /></pattern><g id=%22C1%22 data-name=%22as_component__PNGCOJINIPILRSBFUVHAAAKRQR7F7X5DOV45DHY3HPYOUZICQITA%22><path class=%22layer_1_0%22 d=%22M 9.889000,3.500000 0.000000,1.275000 0.000000,-1.275000 9.889000,-3.500000 16.000000,-3.500000 16.000000,3.500000 z%22 /><path class=%22layer_2_0%22 d=%22M 0.000000,-0.250000 10.000000,-2.500000 10.000000,2.500000 0.000000,0.250000 z%22 /><rect class=%22layer_2_0%22 x=%2210.300000%22 y=%22-2.500000%22 width=%220.300000%22 height=%225.000000%22 /><rect class=%22layer_2_0%22 x=%2210.900000%22 y=%22-2.500000%22 width=%220.300000%22 height=%225.000000%22 /><rect class=%22layer_2_0%22 x=%2211.500000%22 y=%22-2.500000%22 width=%220.300000%22 height=%225.000000%22 /><rect class=%22layer_2_0%22 x=%2212.100000%22 y=%22-2.500000%22 width=%220.300000%22 height=%225.000000%22 /><rect class=%22layer_2_0%22 x=%2212.700000%22 y=%22-2.500000%22 width=%220.300000%22 height=%225.000000%22 /><rect class=%22layer_2_0%22 x=%2213.300000%22 y=%22-2.500000%22 width=%220.300000%22 height=%225.000000%22 /><rect class=%22layer_2_0%22 x=%2213.900000%22 y=%22-2.500000%22 width=%220.300000%22 height=%225.000000%22 /><rect class=%22layer_2_0%22 x=%2214.500000%22 y=%22-2.500000%22 width=%220.300000%22 height=%225.000000%22 /><rect class=%22layer_2_0%22 x=%2215.100000%22 y=%22-2.500000%22 width=%220.300000%22 height=%225.000000%22 /><rect class=%22layer_2_0%22 x=%2215.700000%22 y=%22-2.500000%22 width=%220.300000%22 height=%225.000000%22 /></g><g id=%22C2%22 data-name=%22s_bend_l_20P0_o_5P0_p_Strip%22><path class=%22layer_1_0%22 d=%22M 0.000000,-1.250000 0.551000,-1.243000 1.102000,-1.223000 1.652000,-1.189000 2.201000,-1.142000 2.749000,-1.081000 3.295000,-1.007000 3.840000,-0.920000 4.381000,-0.819000 4.921000,-0.705000 5.457000,-0.578000 5.990000,-0.438000 6.520000,-0.285000 7.045000,-0.119000 7.566000,0.060000 8.083000,0.252000 8.595000,0.456000 9.102000,0.673000 9.603000,0.902000 10.099000,1.144000 10.588000,1.397000 11.023000,1.622000 11.464000,1.837000 11.909000,2.041000 12.360000,2.233000 12.815000,2.415000 13.274000,2.585000 13.738000,2.744000 14.205000,2.892000 14.675000,3.028000 15.149000,3.153000 15.626000,3.266000 16.105000,3.367000 16.587000,3.457000 17.071000,3.534000 17.556000,3.600000 18.043000,3.654000 18.531000,3.696000 19.020000,3.726000 19.510000,3.744000 20.000000,3.750000 20.000000,6.250000 19.449000,6.243000 18.898000,6.223000 18.348000,6.189000 17.799000,6.142000 17.251000,6.081000 16.705000,6.007000 16.160000,5.920000 15.619000,5.819000 15.079000,5.705000 14.543000,5.578000 14.010000,5.438000 13.480000,5.285000 12.955000,5.119000 12.434000,4.940000 11.917000,4.748000 11.405000,4.544000 10.898000,4.327000 10.397000,4.098000 9.901000,3.856000 9.412000,3.603000 8.977000,3.378000 8.536000,3.163000 8.091000,2.960000 7.640000,2.767000 7.185000,2.585000 6.726000,2.415000 6.262000,2.256000 5.795000,2.108000 5.325000,1.972000 4.851000,1.847000 4.374000,1.734000 3.895000,1.633000 3.413000,1.543000 2.929000,1.466000 2.444000,1.400000 1.957000,1.346000 1.469000,1.304000 0.980000,1.274000 0.490000,1.256000 0.000000,1.250000 z%22 /><path class=%22layer_2_0%22 d=%22M 0.000000,-0.250000 0.527000,-0.244000 1.053000,-0.224000 1.579000,-0.192000 2.103000,-0.147000 2.627000,-0.089000 3.149000,-0.018000 3.669000,0.065000 4.187000,0.162000 4.702000,0.270000 5.215000,0.392000 5.724000,0.526000 6.230000,0.672000 6.732000,0.831000 7.230000,1.002000 7.724000,1.185000 8.213000,1.381000 8.697000,1.588000 9.176000,1.807000 9.650000,2.037000 10.118000,2.279000 10.575000,2.516000 11.037000,2.741000 11.505000,2.955000 11.978000,3.157000 12.456000,3.348000 12.938000,3.527000 13.425000,3.694000 13.915000,3.849000 14.409000,3.992000 14.907000,4.123000 15.407000,4.242000 15.911000,4.348000 16.416000,4.442000 16.924000,4.524000 17.434000,4.593000 17.945000,4.649000 18.458000,4.693000 18.972000,4.725000 19.486000,4.744000 20.000000,4.750000 20.000000,5.250000 19.473000,5.244000 18.947000,5.224000 18.421000,5.192000 17.897000,5.147000 17.373000,5.089000 16.851000,5.018000 16.331000,4.935000 15.813000,4.838000 15.298000,4.730000 14.785000,4.608000 14.276000,4.474000 13.770000,4.328000 13.268000,4.169000 12.770000,3.998000 12.276000,3.815000 11.787000,3.619000 11.303000,3.412000 10.824000,3.193000 10.350000,2.963000 9.882000,2.721000 9.426000,2.484000 8.963000,2.259000 8.495000,2.045000 8.022000,1.843000 7.544000,1.652000 7.062000,1.473000 6.575000,1.306000 6.085000,1.151000 5.591000,1.008000 5.093000,0.877000 4.593000,0.758000 4.089000,0.652000 3.584000,0.558000 3.076000,0.476000 2.566000,0.407000 2.055000,0.351000 1.542000,0.307000 1.029000,0.275000 0.514000,0.256000 0.000000,0.250000 z%22 /></g></defs><g transform=%22scale(1 -1)%22><g id=%22C0%22 data-name=%22s_bend_grating%22><use transform=%22translate(0.000000 0.000000)%22 href=%22%23C1%22 /><use transform=%22translate(-20.000000 -5.000000) rotate(180.000000)%22 href=%22%23C1%22 /><use transform=%22translate(0.000000 0.000000) rotate(180.000000)%22 href=%22%23C2%22 /></g></g></svg>)
%22><rect x=%22-30.00%22 y=%22-30.00%22 width=%2260.00%22 height=%2260.00%22 fill=%22%23f4f5f7%22 stroke=%22%23232530%22 stroke-width=%221%22/><circle cx=%22-30.00%22 cy=%220.00%22 r=%224%22 fill=%22%2300643c%22 stroke=%22%2300643c%22 stroke-width=%221%22/></g><text x=%22357.25%22 y=%220.00%22 font-size=%226.5%22 fill=%22%23434756%22 font-weight=%22400%22 text-anchor=%22start%22 dominant-baseline=%22middle%22 stroke=%22%23ffffff%22 stroke-width=%222.27%22 stroke-linejoin=%22round%22 paint-order=%22stroke%22>P0</text><text x=%22384.00%22 y=%220.00%22 font-size=%226.5%22 fill=%22%23232530%22 font-weight=%22400%22 text-anchor=%22middle%22 dominant-baseline=%22middle%22 stroke=%22%23ffffff%22 stroke-width=%222.27%22 stroke-linejoin=%22round%22 paint-order=%22stroke%22>as_component</text><text x=%22384.00%22 y=%2231.80%22 font-size=%229%22 fill=%22%23232530%22 font-weight=%22400%22 text-anchor=%22middle%22 dominant-baseline=%22hanging%22 stroke=%22%23ffffff%22 stroke-width=%223.15%22 stroke-linejoin=%22round%22 paint-order=%22stroke%22>as_component_1</text><g transform=%22matrix(-1 -1.22465e-16 1.22465e-16 -1 0.000 0.000)%22><rect x=%22-30.00%22 y=%22-30.00%22 width=%2260.00%22 height=%2260.00%22 fill=%22%23f4f5f7%22 stroke=%22%23232530%22 stroke-width=%221%22/><circle cx=%22-30.00%22 cy=%220.00%22 r=%224%22 fill=%22%2300643c%22 stroke=%22%2300643c%22 stroke-width=%221%22/></g><text x=%2226.75%22 y=%220.00%22 font-size=%226.5%22 fill=%22%23434756%22 font-weight=%22400%22 text-anchor=%22end%22 dominant-baseline=%22middle%22 stroke=%22%23ffffff%22 stroke-width=%222.27%22 stroke-linejoin=%22round%22 paint-order=%22stroke%22>P0</text><text x=%220.00%22 y=%220.00%22 font-size=%226.5%22 fill=%22%23232530%22 font-weight=%22400%22 text-anchor=%22middle%22 dominant-baseline=%22middle%22 stroke=%22%23ffffff%22 stroke-width=%222.27%22 stroke-linejoin=%22round%22 paint-order=%22stroke%22>as_component</text><text x=%220.00%22 y=%2231.80%22 font-size=%229%22 fill=%22%23232530%22 font-weight=%22400%22 text-anchor=%22middle%22 dominant-baseline=%22hanging%22 stroke=%22%23ffffff%22 stroke-width=%223.15%22 stroke-linejoin=%22round%22 paint-order=%22stroke%22>as_component_2</text><g transform=%22matrix(-1 -1.22465e-16 1.22465e-16 -1 192.000 0.000)%22><use href=%22%23g-s-bend%22 transform=%22translate(-30.00 -30.00) scale(1.2)%22/><circle cx=%22-30.00%22 cy=%2212.54%22 r=%224%22 fill=%22%2300643c%22 stroke=%22%2300643c%22 stroke-width=%221%22/><circle cx=%2230.00%22 cy=%22-13.28%22 r=%224%22 fill=%22%2300643c%22 stroke=%22%2300643c%22 stroke-width=%221%22/></g><text x=%22192.00%22 y=%2231.80%22 font-size=%229%22 fill=%22%23232530%22 font-weight=%22400%22 text-anchor=%22middle%22 dominant-baseline=%22hanging%22 stroke=%22%23ffffff%22 stroke-width=%223.15%22 stroke-linejoin=%22round%22 paint-order=%22stroke%22>s_bend_l_20P0_o_5P0_p_Strip_1</text><g fill=%22none%22 stroke-width=%222%22></g></svg>)
As an example, assume that we want to evaluate different s-bend geometries on a single test chip, we generate 100 instances of the s_bend_grating component with randomized length and offset parameters. We then use pack_layout() to efficiently organize these instances within a confined chip area. The packing function ensures that the layout is space-efficient, adheres to spacing constraints, and splits the components into bins if necessary. This approach is ideal for layout prototyping and measurement-ready chip designs.
# Set a random seed for reproducibilitynp.random.seed(2)
# Create a list of s-bend grating components with random length and offsetD_list = []for n in range(100):    (length, offset) = tuple(np.random.rand(2) * n + 2)    sg = s_bend_grating(length=length, offset=offset)    D_list.append(sg)
# Pack the components into bins using spatial heuristicsD_packed_list = pack_layout(    D_list,  # List of s-bend grating components to pack    gap=5,  # Minimum spacing between adjacent components    aspect_ratio=1,  # Use square bins    max_size=(400, 400),  # Limit bin size to 400×400    grow_factor=1.1,  # Controls bin size growth during packing    sorting="best",  # Use smart heuristic for placement order    method="bssf",  # Best Short Side Fit for packing efficiency)
# Print how many bins were created during packingprint(len(D_packed_list))2c = pf.grid_layout(D_packed_list)c;fill:%23221f20;font-weight:bold;font-size:18.895448px;}.terminal{fill:none;stroke:%23805080;stroke-width:2.361931;}.dashed{stroke-dasharray:11.809655,7.085793;}.port{fill:none;stroke:%23805080;stroke-width:4.723862;}.virtual-connection{fill:none;stroke:%23907090;stroke-width:3.542897;}.layer_5_0{stroke:%23998573;fill:url(%23pat-layer_5_0);fill-opacity:0.492;}.label_5_0{fill:%23998573;}.layer_3_0{stroke:%238851ad;fill:url(%23pat-layer_3_0);fill-opacity:0.492;}.label_3_0{fill:%238851ad;}.layer_4_0{stroke:%23535e59;fill:url(%23pat-layer_4_0);fill-opacity:0.492;}.label_4_0{fill:%23535e59;}.layer_1_0{stroke:%23858d89;fill:url(%23pat-layer_1_0);fill-opacity:0.492;}.label_1_0{fill:%23858d89;}.layer_2_0{stroke:%235b98b9;fill:url(%23pat-layer_2_0);fill-opacity:0.492;}.label_2_0{fill:%235b98b9;}</style><defs><path id=%22port-symbol%22 class=%22port%22 d=%22M 0,-9.447724 L 14.171586,0 0,9.447724%22 /><path id=%22ref-port-symbol%22 class=%22port%22 style=%22stroke-opacity:0.33;%22 d=%22M 0,-7.085793 C 9.447724,-7.085793 9.447724,7.085793 0,7.085793%22 /><circle id=%22port-bend-symbol%22 style=%22stroke-width:0;stroke:none;fill:%23805080;fill-opacity:1;%22 cx=%220%22 cy=%220%22 r=%224.251476%22 /><circle id=%22connection-symbol%22 style=%22stroke-width:0;stroke:none;fill:%23907090;fill-opacity:1;%22 cx=%220%22 cy=%220%22 r=%224.960055%22 /><pattern id=%22pat-layer_5_0%22 patternUnits=%22userSpaceOnUse%22 width=%2211.809655%22 height=%2211.809655%22 patternTransform=%22translate(0.694686,10.566533)%22><line x1=%2211.809655%22 y1=%220%22 x2=%220%22 y2=%2211.809655%22 style=%22stroke:%23998573;stroke-width:1.180966%22 /><line x1=%2217.714483%22 y1=%225.904828%22 x2=%225.904828%22 y2=%2217.714483%22 style=%22stroke:%23998573;stroke-width:1.180966%22 /><line x1=%225.904828%22 y1=%22-5.904828%22 x2=%22-5.904828%22 y2=%225.904828%22 style=%22stroke:%23998573;stroke-width:1.180966%22 /></pattern><pattern id=%22pat-layer_3_0%22 patternUnits=%22userSpaceOnUse%22 width=%227.085793%22 height=%227.085793%22 patternTransform=%22translate(1.667245,5.221111)%22><circle cx=%223.542897%22 cy=%223.542897%22 r=%221.180966%22 style=%22stroke:none;fill:%238851ad;fill-opacity:1.0%22 /></pattern><pattern id=%22pat-layer_4_0%22 patternUnits=%22userSpaceOnUse%22 width=%2211.809655%22 height=%2211.809655%22 patternTransform=%22translate(7.641541,3.729365)%22><line x1=%225.904828%22 y1=%220%22 x2=%225.904828%22 y2=%2211.809655%22 style=%22stroke:%23535e59;stroke-width:1.180966%22 /><line x1=%220%22 y1=%225.904828%22 x2=%2211.809655%22 y2=%225.904828%22 style=%22stroke:%23535e59;stroke-width:1.180966%22 /></pattern><pattern id=%22pat-layer_1_0%22 patternUnits=%22userSpaceOnUse%22 width=%2211.809655%22 height=%2211.809655%22 patternTransform=%22translate(4.862799,6.837169)%22><circle cx=%225.904828%22 cy=%225.904828%22 r=%221.180966%22 style=%22stroke:none;fill:%23858d89;fill-opacity:1.0%22 /></pattern><pattern id=%22pat-layer_2_0%22 patternUnits=%22userSpaceOnUse%22 width=%2211.809655%22 height=%2211.809655%22 patternTransform=%22translate(9.725598,1.864682)%22><line x1=%220%22 y1=%220%22 x2=%2211.809655%22 y2=%2211.809655%22 style=%22stroke:%235b98b9;stroke-width:1.180966%22 /><line x1=%22-5.904828%22 y1=%225.904828%22 x2=%225.904828%22 y2=%2217.714483%22 style=%22stroke:%235b98b9;stroke-width:1.180966%22 /><line x1=%225.904828%22 y1=%22-5.904828%22 x2=%2217.714483%22 y2=%225.904828%22 style=%22stroke:%235b98b9;stroke-width:1.180966%22 /></pattern><g id=%22C1%22 data-name=%22PACK_0%22><use transform=%22translate(108.755000 75.024000)%22 href=%22%23C3%22 /><use transform=%22translate(238.493000 61.387000)%22 href=%22%23C4%22 /><use transform=%22translate(366.836000 15.203000)%22 href=%22%23C5%22 /><use transform=%22translate(347.594000 63.794000)%22 href=%22%23C6%22 /><use transform=%22translate(216.183000 143.772000)%22 href=%22%23C7%22 /><use transform=%22translate(86.102000 167.087000)%22 href=%22%23C8%22 /><use transform=%22translate(318.732000 104.987000)%22 href=%22%23C9%22 /><use transform=%22translate(378.609000 95.220000)%22 href=%22%23C10%22 /><use transform=%22translate(377.214000 146.888000)%22 href=%22%23C11%22 /><use transform=%22translate(316.963000 134.423000)%22 href=%22%23C12%22 /><use transform=%22translate(313.502000 150.704000)%22 href=%22%23C13%22 /><use transform=%22translate(376.510000 178.943000)%22 href=%22%23C14%22 /><use transform=%22translate(182.570000 224.991000)%22 href=%22%23C15%22 /><use transform=%22translate(71.406000 228.104000)%22 href=%22%23C16%22 /><use transform=%22translate(274.376000 180.348000)%22 href=%22%23C17%22 /><use transform=%22translate(313.376000 164.704000)%22 href=%22%23C18%22 /><use transform=%22translate(363.827000 271.143000)%22 href=%22%23C19%22 /><use transform=%22translate(271.761000 217.873000)%22 href=%22%23C20%22 /><use transform=%22translate(266.602000 243.176000)%22 href=%22%23C21%22 /><use transform=%22translate(62.747000 370.294000)%22 href=%22%23C22%22 /><use transform=%22translate(36.680000 391.468000)%22 href=%22%23C23%22 /><use transform=%22translate(27.351000 271.104000)%22 href=%22%23C24%22 /><use transform=%22translate(19.199000 243.171000)%22 href=%22%23C25%22 /><use transform=%22translate(62.908000 243.166000)%22 href=%22%23C26%22 /><use transform=%22translate(77.206000 391.455000)%22 href=%22%23C27%22 /><use transform=%22translate(69.435000 270.490000)%22 href=%22%23C28%22 /><use transform=%22translate(125.215000 243.126000)%22 href=%22%23C29%22 /><use transform=%22translate(181.855000 250.315000)%22 href=%22%23C30%22 /><use transform=%22translate(124.795000 263.703000)%22 href=%22%23C31%22 /><use transform=%22translate(139.877000 363.222000)%22 href=%22%23C32%22 /><use transform=%22translate(202.695000 271.013000)%22 href=%22%23C33%22 /><use transform=%22translate(119.855000 391.362000)%22 href=%22%23C34%22 /><use transform=%22translate(273.668000 275.873000)%22 href=%22%23C35%22 /><use transform=%22translate(202.591000 290.259000)%22 href=%22%23C36%22 /><use transform=%22translate(177.746000 389.208000)%22 href=%22%23C37%22 /><use transform=%22translate(195.865000 356.401000)%22 href=%22%23C38%22 /><use transform=%22translate(226.834000 389.988000)%22 href=%22%23C39%22 /><use transform=%22translate(249.373000 354.524000)%22 href=%22%23C40%22 /><use transform=%22translate(278.689000 391.414000)%22 href=%22%23C41%22 /><use transform=%22translate(354.013000 351.707000)%22 href=%22%23C42%22 /><use transform=%22translate(332.776000 389.399000)%22 href=%22%23C43%22 /><use transform=%22translate(378.793000 368.733000)%22 href=%22%23C44%22 /><use transform=%22translate(378.697000 384.613000)%22 href=%22%23C45%22 /></g><g id=%22C2%22 data-name=%22PACK_1%22><use transform=%22translate(62.315000 43.688000)%22 href=%22%23C46%22 /><use transform=%22translate(144.462000 50.187000)%22 href=%22%23C47%22 /><use transform=%22translate(60.808000 62.650000)%22 href=%22%23C48%22 /><use transform=%22translate(224.988000 33.754000)%22 href=%22%23C49%22 /><use transform=%22translate(303.158000 67.093000)%22 href=%22%23C50%22 /><use transform=%22translate(347.210000 6.153000)%22 href=%22%23C51%22 /><use transform=%22translate(346.179000 25.209000)%22 href=%22%23C52%22 /><use transform=%22translate(345.551000 70.031000)%22 href=%22%23C53%22 /><use transform=%22translate(220.647000 64.939000)%22 href=%22%23C54%22 /><use transform=%22translate(135.975000 74.436000)%22 href=%22%23C55%22 /><use transform=%22translate(53.731000 113.994000)%22 href=%22%23C56%22 /><use transform=%22translate(209.859000 107.806000)%22 href=%22%23C57%22 /><use transform=%22translate(127.412000 135.532000)%22 href=%22%23C58%22 /><use transform=%22translate(51.966000 158.240000)%22 href=%22%23C59%22 /><use transform=%22translate(282.286000 96.099000)%22 href=%22%23C60%22 /><use transform=%22translate(344.791000 114.282000)%22 href=%22%23C61%22 /><use transform=%22translate(281.733000 152.070000)%22 href=%22%23C62%22 /><use transform=%22translate(347.883000 144.170000)%22 href=%22%23C63%22 /><use transform=%22translate(347.875000 202.993000)%22 href=%22%23C64%22 /><use transform=%22translate(197.996000 158.622000)%22 href=%22%23C65%22 /><use transform=%22translate(122.065000 160.038000)%22 href=%22%23C66%22 /><use transform=%22translate(48.904000 203.991000)%22 href=%22%23C67%22 /><use transform=%22translate(267.781000 193.330000)%22 href=%22%23C68%22 /><use transform=%22translate(190.934000 215.953000)%22 href=%22%23C69%22 /><use transform=%22translate(116.726000 202.185000)%22 href=%22%23C70%22 /><use transform=%22translate(107.195000 226.185000)%22 href=%22%23C71%22 /><use transform=%22translate(32.994000 229.375000)%22 href=%22%23C72%22 /><use transform=%22translate(244.344000 207.825000)%22 href=%22%23C73%22 /><use transform=%22translate(297.629000 227.433000)%22 href=%22%23C74%22 /><use transform=%22translate(244.119000 240.675000)%22 href=%22%23C75%22 /><use transform=%22translate(347.598000 217.727000)%22 href=%22%23C76%22 /><use transform=%22translate(346.876000 239.456000)%22 href=%22%23C77%22 /><use transform=%22translate(297.216000 243.314000)%22 href=%22%23C78%22 /><use transform=%22translate(347.985000 254.963000)%22 href=%22%23C79%22 /><use transform=%22translate(159.800000 232.005000)%22 href=%22%23C80%22 /><use transform=%22translate(84.471000 249.591000)%22 href=%22%23C81%22 /><use transform=%22translate(29.704000 292.053000)%22 href=%22%23C82%22 /><use transform=%22translate(26.353000 349.254000)%22 href=%22%23C83%22 /><use transform=%22translate(65.999000 345.703000)%22 href=%22%23C84%22 /><use transform=%22translate(72.972000 360.420000)%22 href=%22%23C85%22 /><use transform=%22translate(78.229000 291.085000)%22 href=%22%23C86%22 /><use transform=%22translate(111.193000 323.529000)%22 href=%22%23C87%22 /><use transform=%22translate(106.290000 343.026000)%22 href=%22%23C88%22 /><use transform=%22translate(112.779000 360.107000)%22 href=%22%23C89%22 /><use transform=%22translate(148.374000 342.427000)%22 href=%22%23C90%22 /><use transform=%22translate(190.746000 262.021000)%22 href=%22%23C91%22 /><use transform=%22translate(158.611000 360.381000)%22 href=%22%23C92%22 /><use transform=%22translate(239.791000 272.536000)%22 href=%22%23C93%22 /><use transform=%22translate(190.480000 278.667000)%22 href=%22%23C94%22 /><use transform=%22translate(288.168000 274.084000)%22 href=%22%23C95%22 /><use transform=%22translate(236.336000 303.528000)%22 href=%22%23C96%22 /><use transform=%22translate(190.312000 294.057000)%22 href=%22%23C97%22 /><use transform=%22translate(188.215000 308.718000)%22 href=%22%23C98%22 /><use transform=%22translate(150.743000 323.153000)%22 href=%22%23C99%22 /><use transform=%22translate(188.168000 339.522000)%22 href=%22%23C100%22 /><use transform=%22translate(204.178000 355.816000)%22 href=%22%23C101%22 /><use transform=%22translate(227.782000 324.576000)%22 href=%22%23C102%22 /></g><g id=%22C10%22 data-name=%22s_bend_grating_l_22P87709954684953_o_19P426045169736863%22><use transform=%22translate(0.000000 0.000000)%22 href=%22%23C103%22 /><use transform=%22translate(-22.877000 -19.426000) rotate(180.000000)%22 href=%22%23C103%22 /><use transform=%22translate(0.000000 0.000000) rotate(180.000000)%22 href=%22%23C104%22 /></g><g id=%22C100%22 data-name=%22s_bend_grating_l_2P7941461764090545_o_4P3689338250504015%22><use transform=%22translate(0.000000 0.000000)%22 href=%22%23C105%22 /><use transform=%22translate(-2.794000 -4.369000) rotate(180.000000)%22 href=%22%23C105%22 /><use transform=%22translate(0.000000 0.000000) rotate(180.000000)%22 href=%22%23C106%22 /></g><g id=%22C101%22 data-name=%22s_bend_grating_l_8P567188175084212_o_4P294211239573949%22><use transform=%22translate(0.000000 0.000000)%22 href=%22%23C107%22 /><use transform=%22translate(-8.567000 -4.294000) rotate(180.000000)%22 href=%22%23C107%22 /><use transform=%22translate(0.000000 0.000000) rotate(180.000000)%22 href=%22%23C108%22 /></g><g id=%22C102%22 data-name=%22s_bend_grating_l_2P6139459021135276_o_3P857812899051991%22><use transform=%22translate(0.000000 0.000000)%22 href=%22%23C109%22 /><use transform=%22translate(-2.614000 -3.858000) rotate(180.000000)%22 href=%22%23C109%22 /><use transform=%22translate(0.000000 0.000000) rotate(180.000000)%22 href=%22%23C110%22 /></g><g id=%22C11%22 data-name=%22s_bend_grating_l_21P481707346218204_o_39P66841566513163%22><use transform=%22translate(0.000000 0.000000)%22 href=%22%23C111%22 /><use transform=%22translate(-21.482000 -39.668000) rotate(180.000000)%22 href=%22%23C111%22 /><use transform=%22translate(0.000000 0.000000) rotate(180.000000)%22 href=%22%23C112%22 /></g><g id=%22C12%22 data-name=%22s_bend_grating_l_63P780358429199104_o_17P43557226765684%22><use transform=%22translate(0.000000 0.000000)%22 href=%22%23C113%22 /><use transform=%22translate(-63.780000 -17.436000) rotate(180.000000)%22 href=%22%23C113%22 /><use transform=%22translate(0.000000 0.000000) rotate(180.000000)%22 href=%22%23C114%22 /></g><g id=%22C13%22 data-name=%22s_bend_grating_l_60P318642339837965_o_4P2810720453640965%22><use transform=%22translate(0.000000 0.000000)%22 href=%22%23C115%22 /><use transform=%22translate(-60.319000 -4.281000) rotate(180.000000)%22 href=%22%23C115%22 /><use transform=%22translate(0.000000 0.000000) rotate(180.000000)%22 href=%22%23C116%22 /></g><g id=%22C14%22 data-name=%22s_bend_grating_l_26P007750533977603_o_20P05451364216402%22><use transform=%22translate(0.000000 0.000000)%22 href=%22%23C117%22 /><use transform=%22translate(-26.008000 -20.055000) rotate(180.000000)%22 href=%22%23C117%22 /><use transform=%22translate(0.000000 0.000000) rotate(180.000000)%22 href=%22%23C118%22 /></g><g id=%22C15%22 data-name=%22s_bend_grating_l_59P46769185907971_o_69P21865965332317%22><use transform=%22translate(0.000000 0.000000)%22 href=%22%23C119%22 /><use transform=%22translate(-59.468000 -69.219000) rotate(180.000000)%22 href=%22%23C119%22 /><use transform=%22translate(0.000000 0.000000) rotate(180.000000)%22 href=%22%23C120%22 /></g><g id=%22C16%22 data-name=%22s_bend_grating_l_55P406362799608324_o_49P01747695263928%22><use transform=%22translate(0.000000 0.000000)%22 href=%22%23C121%22 /><use transform=%22translate(-55.406000 -49.017000) rotate(180.000000)%22 href=%22%23C121%22 /><use transform=%22translate(0.000000 0.000000) rotate(180.000000)%22 href=%22%23C122%22 /></g><g id=%22C17%22 data-name=%22s_bend_grating_l_54P80573663526856_o_17P6441418334774%22><use transform=%22translate(0.000000 0.000000)%22 href=%22%23C123%22 /><use transform=%22translate(-54.806000 -17.644000) rotate(180.000000)%22 href=%22%23C123%22 /><use transform=%22translate(0.000000 0.000000) rotate(180.000000)%22 href=%22%23C124%22 /></g><g id=%22C18%22 data-name=%22s_bend_grating_l_2P0_o_2P0%22><use transform=%22translate(0.000000 0.000000)%22 href=%22%23C125%22 /><use transform=%22translate(-2.000000 -2.000000) rotate(180.000000)%22 href=%22%23C125%22 /><use transform=%22translate(0.000000 0.000000) rotate(180.000000)%22 href=%22%23C126%22 /></g><g id=%22C19%22 data-name=%22s_bend_grating_l_52P450875024070655_o_80P20011691535046%22><use transform=%22translate(0.000000 0.000000)%22 href=%22%23C127%22 /><use transform=%22translate(-52.451000 -80.200000) rotate(180.000000)%22 href=%22%23C127%22 /><use transform=%22translate(0.000000 0.000000) rotate(180.000000)%22 href=%22%23C128%22 /></g><g id=%22C20%22 data-name=%22s_bend_grating_l_52P190958560507134_o_25P52456617773406%22><use transform=%22translate(0.000000 0.000000)%22 href=%22%23C129%22 /><use transform=%22translate(-52.191000 -25.525000) rotate(180.000000)%22 href=%22%23C129%22 /><use transform=%22translate(0.000000 0.000000) rotate(180.000000)%22 href=%22%23C130%22 /></g><g id=%22C21%22 data-name=%22s_bend_grating_l_47P03179990737647_o_13P302659402417369%22><use transform=%22translate(0.000000 0.000000)%22 href=%22%23C131%22 /><use transform=%22translate(-47.032000 -13.303000) rotate(180.000000)%22 href=%22%23C131%22 /><use transform=%22translate(0.000000 0.000000) rotate(180.000000)%22 href=%22%23C132%22 /></g><g id=%22C22%22 data-name=%22s_bend_grating_l_46P747308973320706_o_87P15053580434504%22><use transform=%22translate(0.000000 0.000000)%22 href=%22%23C133%22 /><use transform=%22translate(-46.747000 -87.151000) rotate(180.000000)%22 href=%22%23C133%22 /><use transform=%22translate(0.000000 0.000000) rotate(180.000000)%22 href=%22%23C134%22 /></g><g id=%22C23%22 data-name=%22s_bend_grating_l_20P679921342869044_o_9P173886706093302%22><use transform=%22translate(0.000000 0.000000)%22 href=%22%23C135%22 /><use transform=%22translate(-20.680000 -9.174000) rotate(180.000000)%22 href=%22%23C135%22 /><use transform=%22translate(0.000000 0.000000) rotate(180.000000)%22 href=%22%23C136%22 /></g><g id=%22C24%22 data-name=%22s_bend_grating_l_11P350811098896934_o_15P928035871547447%22><use transform=%22translate(0.000000 0.000000)%22 href=%22%23C137%22 /><use transform=%22translate(-11.351000 -15.928000) rotate(180.000000)%22 href=%22%23C137%22 /><use transform=%22translate(0.000000 0.000000) rotate(180.000000)%22 href=%22%23C138%22 /></g><g id=%22C25%22 data-name=%22s_bend_grating_l_3P1986186946980926_o_3P0673091004114665%22><use transform=%22translate(0.000000 0.000000)%22 href=%22%23C139%22 /><use transform=%22translate(-3.199000 -3.067000) rotate(180.000000)%22 href=%22%23C139%22 /><use transform=%22translate(0.000000 0.000000) rotate(180.000000)%22 href=%22%23C140%22 /></g><g id=%22C26%22 data-name=%22s_bend_grating_l_6P7093456035712835_o_3P061840072266738%22><use transform=%22translate(0.000000 0.000000)%22 href=%22%23C141%22 /><use transform=%22translate(-6.709000 -3.062000) rotate(180.000000)%22 href=%22%23C141%22 /><use transform=%22translate(0.000000 0.000000) rotate(180.000000)%22 href=%22%23C142%22 /></g><g id=%22C27%22 data-name=%22s_bend_grating_l_3P5259196604153296_o_9P160943707743149%22><use transform=%22translate(0.000000 0.000000)%22 href=%22%23C143%22 /><use transform=%22translate(-3.526000 -9.161000) rotate(180.000000)%22 href=%22%23C143%22 /><use transform=%22translate(0.000000 0.000000) rotate(180.000000)%22 href=%22%23C144%22 /></g><g id=%22C28%22 data-name=%22s_bend_grating_l_5P083673371543964_o_15P314294585535968%22><use transform=%22translate(0.000000 0.000000)%22 href=%22%23C145%22 /><use transform=%22translate(-5.084000 -15.314000) rotate(180.000000)%22 href=%22%23C145%22 /><use transform=%22translate(0.000000 0.000000) rotate(180.000000)%22 href=%22%23C146%22 /></g><g id=%22C29%22 data-name=%22s_bend_grating_l_25P307395541161384_o_3P02203767398771%22><use transform=%22translate(0.000000 0.000000)%22 href=%22%23C147%22 /><use transform=%22translate(-25.307000 -3.022000) rotate(180.000000)%22 href=%22%23C147%22 /><use transform=%22translate(0.000000 0.000000) rotate(180.000000)%22 href=%22%23C148%22 /></g><g id=%22C3%22 data-name=%22s_bend_grating_l_92P75474658383037_o_71P52415984115277%22><use transform=%22translate(0.000000 0.000000)%22 href=%22%23C149%22 /><use transform=%22translate(-92.755000 -71.524000) rotate(180.000000)%22 href=%22%23C149%22 /><use transform=%22translate(0.000000 0.000000) rotate(180.000000)%22 href=%22%23C150%22 /></g><g id=%22C30%22 data-name=%22s_bend_grating_l_19P64001537827034_o_13P32394611371446%22><use transform=%22translate(0.000000 0.000000)%22 href=%22%23C151%22 /><use transform=%22translate(-19.640000 -13.324000) rotate(180.000000)%22 href=%22%23C151%22 /><use transform=%22translate(0.000000 0.000000) rotate(180.000000)%22 href=%22%23C152%22 /></g><g id=%22C31%22 data-name=%22s_bend_grating_l_10P589024240315336_o_8P577175069015508%22><use transform=%22translate(0.000000 0.000000)%22 href=%22%23C153%22 /><use transform=%22translate(-10.589000 -8.577000) rotate(180.000000)%22 href=%22%23C153%22 /><use transform=%22translate(0.000000 0.000000) rotate(180.000000)%22 href=%22%23C154%22 /></g><g id=%22C32%22 data-name=%22s_bend_grating_l_40P13032507222786_o_80P07897531259376%22><use transform=%22translate(0.000000 0.000000)%22 href=%22%23C155%22 /><use transform=%22translate(-40.130000 -80.079000) rotate(180.000000)%22 href=%22%23C155%22 /><use transform=%22translate(0.000000 0.000000) rotate(180.000000)%22 href=%22%23C156%22 /></g><g id=%22C33%22 data-name=%22s_bend_grating_l_40P90040799042341_o_8P697710408584552%22><use transform=%22translate(0.000000 0.000000)%22 href=%22%23C157%22 /><use transform=%22translate(-40.900000 -8.698000) rotate(180.000000)%22 href=%22%23C157%22 /><use transform=%22translate(0.000000 0.000000) rotate(180.000000)%22 href=%22%23C158%22 /></g><g id=%22C34%22 data-name=%22s_bend_grating_l_5P648910501898967_o_16P14004141063032%22><use transform=%22translate(0.000000 0.000000)%22 href=%22%23C159%22 /><use transform=%22translate(-5.649000 -16.140000) rotate(180.000000)%22 href=%22%23C159%22 /><use transform=%22translate(0.000000 0.000000) rotate(180.000000)%22 href=%22%23C160%22 /></g><g id=%22C35%22 data-name=%22s_bend_grating_l_33P97256719398432_o_20P696847110577906%22><use transform=%22translate(0.000000 0.000000)%22 href=%22%23C161%22 /><use transform=%22translate(-33.973000 -20.697000) rotate(180.000000)%22 href=%22%23C161%22 /><use transform=%22translate(0.000000 0.000000) rotate(180.000000)%22 href=%22%23C162%22 /></g><g id=%22C36%22 data-name=%22s_bend_grating_l_25P713755674002126_o_7P245988844109516%22><use transform=%22translate(0.000000 0.000000)%22 href=%22%23C163%22 /><use transform=%22translate(-25.714000 -7.246000) rotate(180.000000)%22 href=%22%23C163%22 /><use transform=%22translate(0.000000 0.000000) rotate(180.000000)%22 href=%22%23C164%22 /></g><g id=%22C37%22 data-name=%22s_bend_grating_l_20P891027534063518_o_13P986338860921457%22><use transform=%22translate(0.000000 0.000000)%22 href=%22%23C165%22 /><use transform=%22translate(-20.891000 -13.986000) rotate(180.000000)%22 href=%22%23C165%22 /><use transform=%22translate(0.000000 0.000000) rotate(180.000000)%22 href=%22%23C166%22 /></g><g id=%22C38%22 data-name=%22s_bend_grating_l_18P988478127081542_o_54P14243493491398%22><use transform=%22translate(0.000000 0.000000)%22 href=%22%23C167%22 /><use transform=%22translate(-18.988000 -54.142000) rotate(180.000000)%22 href=%22%23C167%22 /><use transform=%22translate(0.000000 0.000000) rotate(180.000000)%22 href=%22%23C168%22 /></g><g id=%22C39%22 data-name=%22s_bend_grating_l_12P087880080797822_o_21P587411689180843%22><use transform=%22translate(0.000000 0.000000)%22 href=%22%23C169%22 /><use transform=%22translate(-12.088000 -21.587000) rotate(180.000000)%22 href=%22%23C169%22 /><use transform=%22translate(0.000000 0.000000) rotate(180.000000)%22 href=%22%23C170%22 /></g><g id=%22C4%22 data-name=%22s_bend_grating_l_92P73835645783292_o_57P88687255557047%22><use transform=%22translate(0.000000 0.000000)%22 href=%22%23C171%22 /><use transform=%22translate(-92.738000 -57.887000) rotate(180.000000)%22 href=%22%23C171%22 /><use transform=%22translate(0.000000 0.000000) rotate(180.000000)%22 href=%22%23C172%22 /></g><g id=%22C40%22 data-name=%22s_bend_grating_l_16P507819110401087_o_52P26535124408226%22><use transform=%22translate(0.000000 0.000000)%22 href=%22%23C173%22 /><use transform=%22translate(-16.508000 -52.265000) rotate(180.000000)%22 href=%22%23C173%22 /><use transform=%22translate(0.000000 0.000000) rotate(180.000000)%22 href=%22%23C174%22 /></g><g id=%22C41%22 data-name=%22s_bend_grating_l_14P85450016394375_o_24P8898134466768%22><use transform=%22translate(0.000000 0.000000)%22 href=%22%23C175%22 /><use transform=%22translate(-14.855000 -24.890000) rotate(180.000000)%22 href=%22%23C175%22 /><use transform=%22translate(0.000000 0.000000) rotate(180.000000)%22 href=%22%23C176%22 /></g><g id=%22C42%22 data-name=%22s_bend_grating_l_43P34509758281596_o_68P56447883863095%22><use transform=%22translate(0.000000 0.000000)%22 href=%22%23C177%22 /><use transform=%22translate(-43.345000 -68.564000) rotate(180.000000)%22 href=%22%23C177%22 /><use transform=%22translate(0.000000 0.000000) rotate(180.000000)%22 href=%22%23C178%22 /></g><g id=%22C43%22 data-name=%22s_bend_grating_l_17P08749175597054_o_25P692049928950027%22><use transform=%22translate(0.000000 0.000000)%22 href=%22%23C179%22 /><use transform=%22translate(-17.087000 -25.692000) rotate(180.000000)%22 href=%22%23C179%22 /><use transform=%22translate(0.000000 0.000000) rotate(180.000000)%22 href=%22%23C180%22 /></g><g id=%22C44%22 data-name=%22s_bend_grating_l_9P016812268734505_o_5P02614839397448%22><use transform=%22translate(0.000000 0.000000)%22 href=%22%23C181%22 /><use transform=%22translate(-9.017000 -5.026000) rotate(180.000000)%22 href=%22%23C181%22 /><use transform=%22translate(0.000000 0.000000) rotate(180.000000)%22 href=%22%23C182%22 /></g><g id=%22C45%22 data-name=%22s_bend_grating_l_8P920962691925894_o_3P880042380634731%22><use transform=%22translate(0.000000 0.000000)%22 href=%22%23C183%22 /><use transform=%22translate(-8.921000 -3.880000) rotate(180.000000)%22 href=%22%23C183%22 /><use transform=%22translate(0.000000 0.000000) rotate(180.000000)%22 href=%22%23C184%22 /></g><g id=%22C46%22 data-name=%22s_bend_grating_l_46P314747948036015_o_40P18767179211958%22><use transform=%22translate(0.000000 0.000000)%22 href=%22%23C185%22 /><use transform=%22translate(-46.315000 -40.188000) rotate(180.000000)%22 href=%22%23C185%22 /><use transform=%22translate(0.000000 0.000000) rotate(180.000000)%22 href=%22%23C186%22 /></g><g id=%22C47%22 data-name=%22s_bend_grating_l_45P14748636711672_o_46P68732623393142%22><use transform=%22translate(0.000000 0.000000)%22 href=%22%23C187%22 /><use transform=%22translate(-45.147000 -46.687000) rotate(180.000000)%22 href=%22%23C187%22 /><use transform=%22translate(0.000000 0.000000) rotate(180.000000)%22 href=%22%23C188%22 /></g><g id=%22C48%22 data-name=%22s_bend_grating_l_44P808070354492294_o_6P962153470475144%22><use transform=%22translate(0.000000 0.000000)%22 href=%22%23C189%22 /><use transform=%22translate(-44.808000 -6.962000) rotate(180.000000)%22 href=%22%23C189%22 /><use transform=%22translate(0.000000 0.000000) rotate(180.000000)%22 href=%22%23C190%22 /></g><g id=%22C49%22 data-name=%22s_bend_grating_l_43P526454013152204_o_30P253951990362943%22><use transform=%22translate(0.000000 0.000000)%22 href=%22%23C191%22 /><use transform=%22translate(-43.526000 -30.254000) rotate(180.000000)%22 href=%22%23C191%22 /><use transform=%22translate(0.000000 0.000000) rotate(180.000000)%22 href=%22%23C192%22 /></g><g id=%22C5%22 data-name=%22s_bend_grating_l_91P3427968864984_o_11P70310508196338%22><use transform=%22translate(0.000000 0.000000)%22 href=%22%23C193%22 /><use transform=%22translate(-91.343000 -11.703000) rotate(180.000000)%22 href=%22%23C193%22 /><use transform=%22translate(0.000000 0.000000) rotate(180.000000)%22 href=%22%23C194%22 /></g><g id=%22C50%22 data-name=%22s_bend_grating_l_41P16976462671147_o_63P59349184384611%22><use transform=%22translate(0.000000 0.000000)%22 href=%22%23C195%22 /><use transform=%22translate(-41.170000 -63.593000) rotate(180.000000)%22 href=%22%23C195%22 /><use transform=%22translate(0.000000 0.000000) rotate(180.000000)%22 href=%22%23C196%22 /></g><g id=%22C51%22 data-name=%22s_bend_grating_l_7P05246090121704_o_2P652865043868781%22><use transform=%22translate(0.000000 0.000000)%22 href=%22%23C197%22 /><use transform=%22translate(-7.052000 -2.653000) rotate(180.000000)%22 href=%22%23C197%22 /><use transform=%22translate(0.000000 0.000000) rotate(180.000000)%22 href=%22%23C198%22 /></g><g id=%22C52%22 data-name=%22s_bend_grating_l_6P021150008580338_o_7P05610229789107%22><use transform=%22translate(0.000000 0.000000)%22 href=%22%23C199%22 /><use transform=%22translate(-6.021000 -7.056000) rotate(180.000000)%22 href=%22%23C199%22 /><use transform=%22translate(0.000000 0.000000) rotate(180.000000)%22 href=%22%23C200%22 /></g><g id=%22C53%22 data-name=%22s_bend_grating_l_5P39309251265782_o_32P8217591604653%22><use transform=%22translate(0.000000 0.000000)%22 href=%22%23C201%22 /><use transform=%22translate(-5.393000 -32.822000) rotate(180.000000)%22 href=%22%23C201%22 /><use transform=%22translate(0.000000 0.000000) rotate(180.000000)%22 href=%22%23C202%22 /></g><g id=%22C54%22 data-name=%22s_bend_grating_l_39P18522147149944_o_19P185136575025084%22><use transform=%22translate(0.000000 0.000000)%22 href=%22%23C203%22 /><use transform=%22translate(-39.185000 -19.185000) rotate(180.000000)%22 href=%22%23C203%22 /><use transform=%22translate(0.000000 0.000000) rotate(180.000000)%22 href=%22%23C204%22 /></g><g id=%22C55%22 data-name=%22s_bend_grating_l_38P16666470460358_o_12P24930537189671%22><use transform=%22translate(0.000000 0.000000)%22 href=%22%23C205%22 /><use transform=%22translate(-38.167000 -12.249000) rotate(180.000000)%22 href=%22%23C205%22 /><use transform=%22translate(0.000000 0.000000) rotate(180.000000)%22 href=%22%23C206%22 /></g><g id=%22C56%22 data-name=%22s_bend_grating_l_37P730852520052466_o_39P34423824015565%22><use transform=%22translate(0.000000 0.000000)%22 href=%22%23C207%22 /><use transform=%22translate(-37.731000 -39.344000) rotate(180.000000)%22 href=%22%23C207%22 /><use transform=%22translate(0.000000 0.000000) rotate(180.000000)%22 href=%22%23C208%22 /></g><g id=%22C57%22 data-name=%22s_bend_grating_l_36P88418380655921_o_30P866703852696688%22><use transform=%22translate(0.000000 0.000000)%22 href=%22%23C209%22 /><use transform=%22translate(-36.884000 -30.867000) rotate(180.000000)%22 href=%22%23C209%22 /><use transform=%22translate(0.000000 0.000000) rotate(180.000000)%22 href=%22%23C210%22 /></g><g id=%22C58%22 data-name=%22s_bend_grating_l_36P681202994887826_o_49P096240220747006%22><use transform=%22translate(0.000000 0.000000)%22 href=%22%23C211%22 /><use transform=%22translate(-36.681000 -49.096000) rotate(180.000000)%22 href=%22%23C211%22 /><use transform=%22translate(0.000000 0.000000) rotate(180.000000)%22 href=%22%23C212%22 /></g><g id=%22C59%22 data-name=%22s_bend_grating_l_35P96638889656142_o_32P24556983231602%22><use transform=%22translate(0.000000 0.000000)%22 href=%22%23C213%22 /><use transform=%22translate(-35.966000 -32.246000) rotate(180.000000)%22 href=%22%23C213%22 /><use transform=%22translate(0.000000 0.000000) rotate(180.000000)%22 href=%22%23C214%22 /></g><g id=%22C6%22 data-name=%22s_bend_grating_l_72P10131613633273_o_36P59112763558779%22><use transform=%22translate(0.000000 0.000000)%22 href=%22%23C215%22 /><use transform=%22translate(-72.101000 -36.591000) rotate(180.000000)%22 href=%22%23C215%22 /><use transform=%22translate(0.000000 0.000000) rotate(180.000000)%22 href=%22%23C216%22 /></g><g id=%22C60%22 data-name=%22s_bend_grating_l_35P42721714214523_o_17P00606725806479%22><use transform=%22translate(0.000000 0.000000)%22 href=%22%23C217%22 /><use transform=%22translate(-35.427000 -17.006000) rotate(180.000000)%22 href=%22%23C217%22 /><use transform=%22translate(0.000000 0.000000) rotate(180.000000)%22 href=%22%23C218%22 /></g><g id=%22C61%22 data-name=%22s_bend_grating_l_25P50518583318196_o_32P25072487735933%22><use transform=%22translate(0.000000 0.000000)%22 href=%22%23C219%22 /><use transform=%22translate(-25.505000 -32.251000) rotate(180.000000)%22 href=%22%23C219%22 /><use transform=%22translate(0.000000 0.000000) rotate(180.000000)%22 href=%22%23C220%22 /></g><g id=%22C62%22 data-name=%22s_bend_grating_l_34P8744668054226_o_43P97123718743289%22><use transform=%22translate(0.000000 0.000000)%22 href=%22%23C221%22 /><use transform=%22translate(-34.874000 -43.971000) rotate(180.000000)%22 href=%22%23C221%22 /><use transform=%22translate(0.000000 0.000000) rotate(180.000000)%22 href=%22%23C222%22 /></g><g id=%22C63%22 data-name=%22s_bend_grating_l_29P150282790001356_o_17P88846046080454%22><use transform=%22translate(0.000000 0.000000)%22 href=%22%23C223%22 /><use transform=%22translate(-29.150000 -17.888000) rotate(180.000000)%22 href=%22%23C223%22 /><use transform=%22translate(0.000000 0.000000) rotate(180.000000)%22 href=%22%23C224%22 /></g><g id=%22C64%22 data-name=%22s_bend_grating_l_29P142254961166614_o_46P82343135185405%22><use transform=%22translate(0.000000 0.000000)%22 href=%22%23C225%22 /><use transform=%22translate(-29.142000 -46.823000) rotate(180.000000)%22 href=%22%23C225%22 /><use transform=%22translate(0.000000 0.000000) rotate(180.000000)%22 href=%22%23C226%22 /></g><g id=%22C65%22 data-name=%22s_bend_grating_l_33P5844604504685_o_38P81628701292334%22><use transform=%22translate(0.000000 0.000000)%22 href=%22%23C227%22 /><use transform=%22translate(-33.584000 -38.816000) rotate(180.000000)%22 href=%22%23C227%22 /><use transform=%22translate(0.000000 0.000000) rotate(180.000000)%22 href=%22%23C228%22 /></g><g id=%22C66%22 data-name=%22s_bend_grating_l_33P09879262227115_o_12P506163106255746%22><use transform=%22translate(0.000000 0.000000)%22 href=%22%23C229%22 /><use transform=%22translate(-33.099000 -12.506000) rotate(180.000000)%22 href=%22%23C229%22 /><use transform=%22translate(0.000000 0.000000) rotate(180.000000)%22 href=%22%23C230%22 /></g><g id=%22C67%22 data-name=%22s_bend_grating_l_32P90441283911336_o_33P75110368234118%22><use transform=%22translate(0.000000 0.000000)%22 href=%22%23C231%22 /><use transform=%22translate(-32.904000 -33.751000) rotate(180.000000)%22 href=%22%23C231%22 /><use transform=%22translate(0.000000 0.000000) rotate(180.000000)%22 href=%22%23C232%22 /></g><g id=%22C68%22 data-name=%22s_bend_grating_l_32P78462528647653_o_29P259641082623176%22><use transform=%22translate(0.000000 0.000000)%22 href=%22%23C233%22 /><use transform=%22translate(-32.785000 -29.260000) rotate(180.000000)%22 href=%22%23C233%22 /><use transform=%22translate(0.000000 0.000000) rotate(180.000000)%22 href=%22%23C234%22 /></g><g id=%22C69%22 data-name=%22s_bend_grating_l_31P868634128588827_o_45P33123461114299%22><use transform=%22translate(0.000000 0.000000)%22 href=%22%23C235%22 /><use transform=%22translate(-31.869000 -45.331000) rotate(180.000000)%22 href=%22%23C235%22 /><use transform=%22translate(0.000000 0.000000) rotate(180.000000)%22 href=%22%23C236%22 /></g><g id=%22C7%22 data-name=%22s_bend_grating_l_70P42773593088695_o_70P38506395332873%22><use transform=%22translate(0.000000 0.000000)%22 href=%22%23C237%22 /><use transform=%22translate(-70.428000 -70.385000) rotate(180.000000)%22 href=%22%23C237%22 /><use transform=%22translate(0.000000 0.000000) rotate(180.000000)%22 href=%22%23C238%22 /></g><g id=%22C70%22 data-name=%22s_bend_grating_l_30P821708331216914_o_30P146829087938034%22><use transform=%22translate(0.000000 0.000000)%22 href=%22%23C239%22 /><use transform=%22translate(-30.822000 -30.147000) rotate(180.000000)%22 href=%22%23C239%22 /><use transform=%22translate(0.000000 0.000000) rotate(180.000000)%22 href=%22%23C240%22 /></g><g id=%22C71%22 data-name=%22s_bend_grating_l_21P291021601785104_o_12P000167223404334%22><use transform=%22translate(0.000000 0.000000)%22 href=%22%23C241%22 /><use transform=%22translate(-21.291000 -12.000000) rotate(180.000000)%22 href=%22%23C241%22 /><use transform=%22translate(0.000000 0.000000) rotate(180.000000)%22 href=%22%23C242%22 /></g><g id=%22C72%22 data-name=%22s_bend_grating_l_16P99448099815197_o_13P384255880775292%22><use transform=%22translate(0.000000 0.000000)%22 href=%22%23C243%22 /><use transform=%22translate(-16.994000 -13.384000) rotate(180.000000)%22 href=%22%23C243%22 /><use transform=%22translate(0.000000 0.000000) rotate(180.000000)%22 href=%22%23C244%22 /></g><g id=%22C73%22 data-name=%22s_bend_grating_l_16P410001543782222_o_2P494658794392924%22><use transform=%22translate(0.000000 0.000000)%22 href=%22%23C245%22 /><use transform=%22translate(-16.410000 -2.495000) rotate(180.000000)%22 href=%22%23C245%22 /><use transform=%22translate(0.000000 0.000000) rotate(180.000000)%22 href=%22%23C246%22 /></g><g id=%22C74%22 data-name=%22s_bend_grating_l_16P285474179948388_o_12P44007521980052%22><use transform=%22translate(0.000000 0.000000)%22 href=%22%23C247%22 /><use transform=%22translate(-16.285000 -12.440000) rotate(180.000000)%22 href=%22%23C247%22 /><use transform=%22translate(0.000000 0.000000) rotate(180.000000)%22 href=%22%23C248%22 /></g><g id=%22C75%22 data-name=%22s_bend_grating_l_16P185009352625887_o_20P849846438119553%22><use transform=%22translate(0.000000 0.000000)%22 href=%22%23C249%22 /><use transform=%22translate(-16.185000 -20.850000) rotate(180.000000)%22 href=%22%23C249%22 /><use transform=%22translate(0.000000 0.000000) rotate(180.000000)%22 href=%22%23C250%22 /></g><g id=%22C76%22 data-name=%22s_bend_grating_l_12P969426162294672_o_2P734463879160939%22><use transform=%22translate(0.000000 0.000000)%22 href=%22%23C251%22 /><use transform=%22translate(-12.969000 -2.734000) rotate(180.000000)%22 href=%22%23C251%22 /><use transform=%22translate(0.000000 0.000000) rotate(180.000000)%22 href=%22%23C252%22 /></g><g id=%22C77%22 data-name=%22s_bend_grating_l_12P246507603438637_o_9P729117368828026%22><use transform=%22translate(0.000000 0.000000)%22 href=%22%23C253%22 /><use transform=%22translate(-12.247000 -9.729000) rotate(180.000000)%22 href=%22%23C253%22 /><use transform=%22translate(0.000000 0.000000) rotate(180.000000)%22 href=%22%23C254%22 /></g><g id=%22C78%22 data-name=%22s_bend_grating_l_16P09663377933711_o_3P8808969416889525%22><use transform=%22translate(0.000000 0.000000)%22 href=%22%23C255%22 /><use transform=%22translate(-16.097000 -3.881000) rotate(180.000000)%22 href=%22%23C255%22 /><use transform=%22translate(0.000000 0.000000) rotate(180.000000)%22 href=%22%23C256%22 /></g><g id=%22C79%22 data-name=%22s_bend_grating_l_13P768601277051044_o_3P5074058530982017%22><use transform=%22translate(0.000000 0.000000)%22 href=%22%23C257%22 /><use transform=%22translate(-13.769000 -3.507000) rotate(180.000000)%22 href=%22%23C257%22 /><use transform=%22translate(0.000000 0.000000) rotate(180.000000)%22 href=%22%23C258%22 /></g><g id=%22C8%22 data-name=%22s_bend_grating_l_70P1020339400343_o_80P06339617799577%22><use transform=%22translate(0.000000 0.000000)%22 href=%22%23C259%22 /><use transform=%22translate(-70.102000 -80.063000) rotate(180.000000)%22 href=%22%23C259%22 /><use transform=%22translate(0.000000 0.000000) rotate(180.000000)%22 href=%22%23C260%22 /></g><g id=%22C80%22 data-name=%22s_bend_grating_l_15P605204003702553_o_4P05237305687562%22><use transform=%22translate(0.000000 0.000000)%22 href=%22%23C261%22 /><use transform=%22translate(-15.605000 -4.052000) rotate(180.000000)%22 href=%22%23C261%22 /><use transform=%22translate(0.000000 0.000000) rotate(180.000000)%22 href=%22%23C262%22 /></g><g id=%22C81%22 data-name=%22s_bend_grating_l_14P477170807809603_o_11P406011192514422%22><use transform=%22translate(0.000000 0.000000)%22 href=%22%23C263%22 /><use transform=%22translate(-14.477000 -11.406000) rotate(180.000000)%22 href=%22%23C263%22 /><use transform=%22translate(0.000000 0.000000) rotate(180.000000)%22 href=%22%23C264%22 /></g><g id=%22C82%22 data-name=%22s_bend_grating_l_13P70440949825748_o_50P67830826924883%22><use transform=%22translate(0.000000 0.000000)%22 href=%22%23C265%22 /><use transform=%22translate(-13.704000 -50.678000) rotate(180.000000)%22 href=%22%23C265%22 /><use transform=%22translate(0.000000 0.000000) rotate(180.000000)%22 href=%22%23C266%22 /></g><g id=%22C83%22 data-name=%22s_bend_grating_l_10P353379540704765_o_45P20095955167888%22><use transform=%22translate(0.000000 0.000000)%22 href=%22%23C267%22 /><use transform=%22translate(-10.353000 -45.201000) rotate(180.000000)%22 href=%22%23C267%22 /><use transform=%22translate(0.000000 0.000000) rotate(180.000000)%22 href=%22%23C268%22 /></g><g id=%22C84%22 data-name=%22s_bend_grating_l_2P645752482174227_o_41P64966253826368%22><use transform=%22translate(0.000000 0.000000)%22 href=%22%23C269%22 /><use transform=%22translate(-2.646000 -41.650000) rotate(180.000000)%22 href=%22%23C269%22 /><use transform=%22translate(0.000000 0.000000) rotate(180.000000)%22 href=%22%23C270%22 /></g><g id=%22C85%22 data-name=%22s_bend_grating_l_9P619053368217212_o_2P716809293081549%22><use transform=%22translate(0.000000 0.000000)%22 href=%22%23C271%22 /><use transform=%22translate(-9.619000 -2.717000) rotate(180.000000)%22 href=%22%23C271%22 /><use transform=%22translate(0.000000 0.000000) rotate(180.000000)%22 href=%22%23C272%22 /></g><g id=%22C86%22 data-name=%22s_bend_grating_l_11P52490244355053_o_24P122113104117044%22><use transform=%22translate(0.000000 0.000000)%22 href=%22%23C273%22 /><use transform=%22translate(-11.525000 -24.122000) rotate(180.000000)%22 href=%22%23C273%22 /><use transform=%22translate(0.000000 0.000000) rotate(180.000000)%22 href=%22%23C274%22 /></g><g id=%22C87%22 data-name=%22s_bend_grating_l_8P193723396952242_o_20P44412748524155%22><use transform=%22translate(0.000000 0.000000)%22 href=%22%23C275%22 /><use transform=%22translate(-8.194000 -20.444000) rotate(180.000000)%22 href=%22%23C275%22 /><use transform=%22translate(0.000000 0.000000) rotate(180.000000)%22 href=%22%23C276%22 /></g><g id=%22C88%22 data-name=%22s_bend_grating_l_3P291079059528407_o_7P497346034716714%22><use transform=%22translate(0.000000 0.000000)%22 href=%22%23C277%22 /><use transform=%22translate(-3.291000 -7.497000) rotate(180.000000)%22 href=%22%23C277%22 /><use transform=%22translate(0.000000 0.000000) rotate(180.000000)%22 href=%22%23C278%22 /></g><g id=%22C89%22 data-name=%22s_bend_grating_l_2P8074796720696016_o_5P081468727594478%22><use transform=%22translate(0.000000 0.000000)%22 href=%22%23C279%22 /><use transform=%22translate(-2.807000 -5.081000) rotate(180.000000)%22 href=%22%23C279%22 /><use transform=%22translate(0.000000 0.000000) rotate(180.000000)%22 href=%22%23C280%22 /></g><g id=%22C9%22 data-name=%22s_bend_grating_l_65P54890788221194_o_29P1928394068276%22><use transform=%22translate(0.000000 0.000000)%22 href=%22%23C281%22 /><use transform=%22translate(-65.549000 -29.193000) rotate(180.000000)%22 href=%22%23C281%22 /><use transform=%22translate(0.000000 0.000000) rotate(180.000000)%22 href=%22%23C282%22 /></g><g id=%22C90%22 data-name=%22s_bend_grating_l_5P084286898987836_o_6P8975679900461895%22><use transform=%22translate(0.000000 0.000000)%22 href=%22%23C283%22 /><use transform=%22translate(-5.084000 -6.898000) rotate(180.000000)%22 href=%22%23C283%22 /><use transform=%22translate(0.000000 0.000000) rotate(180.000000)%22 href=%22%23C284%22 /></g><g id=%22C91%22 data-name=%22s_bend_grating_l_5P371897949825243_o_18P01615934909531%22><use transform=%22translate(0.000000 0.000000)%22 href=%22%23C285%22 /><use transform=%22translate(-5.372000 -18.016000) rotate(180.000000)%22 href=%22%23C285%22 /><use transform=%22translate(0.000000 0.000000) rotate(180.000000)%22 href=%22%23C286%22 /></g><g id=%22C92%22 data-name=%22s_bend_grating_l_8P83180234111591_o_5P9538946990554225%22><use transform=%22translate(0.000000 0.000000)%22 href=%22%23C287%22 /><use transform=%22translate(-8.832000 -5.954000) rotate(180.000000)%22 href=%22%23C287%22 /><use transform=%22translate(0.000000 0.000000) rotate(180.000000)%22 href=%22%23C288%22 /></g><g id=%22C93%22 data-name=%22s_bend_grating_l_12P045187049616377_o_19P860861254933308%22><use transform=%22translate(0.000000 0.000000)%22 href=%22%23C289%22 /><use transform=%22translate(-12.045000 -19.861000) rotate(180.000000)%22 href=%22%23C289%22 /><use transform=%22translate(0.000000 0.000000) rotate(180.000000)%22 href=%22%23C290%22 /></g><g id=%22C94%22 data-name=%22s_bend_grating_l_5P105669163846475_o_4P645710471385195%22><use transform=%22translate(0.000000 0.000000)%22 href=%22%23C291%22 /><use transform=%22translate(-5.106000 -4.646000) rotate(180.000000)%22 href=%22%23C291%22 /><use transform=%22translate(0.000000 0.000000) rotate(180.000000)%22 href=%22%23C292%22 /></g><g id=%22C95%22 data-name=%22s_bend_grating_l_11P376743418222073_o_18P770140009611655%22><use transform=%22translate(0.000000 0.000000)%22 href=%22%23C293%22 /><use transform=%22translate(-11.377000 -18.770000) rotate(180.000000)%22 href=%22%23C293%22 /><use transform=%22translate(0.000000 0.000000) rotate(180.000000)%22 href=%22%23C294%22 /></g><g id=%22C96%22 data-name=%22s_bend_grating_l_8P856155163361986_o_18P991673657235328%22><use transform=%22translate(0.000000 0.000000)%22 href=%22%23C295%22 /><use transform=%22translate(-8.856000 -18.992000) rotate(180.000000)%22 href=%22%23C295%22 /><use transform=%22translate(0.000000 0.000000) rotate(180.000000)%22 href=%22%23C296%22 /></g><g id=%22C97%22 data-name=%22s_bend_grating_l_4P938156007855066_o_3P3902938960297786%22><use transform=%22translate(0.000000 0.000000)%22 href=%22%23C297%22 /><use transform=%22translate(-4.938000 -3.390000) rotate(180.000000)%22 href=%22%23C297%22 /><use transform=%22translate(0.000000 0.000000) rotate(180.000000)%22 href=%22%23C298%22 /></g><g id=%22C98%22 data-name=%22s_bend_grating_l_2P840735604174978_o_2P6606696420077482%22><use transform=%22translate(0.000000 0.000000)%22 href=%22%23C299%22 /><use transform=%22translate(-2.841000 -2.661000) rotate(180.000000)%22 href=%22%23C299%22 /><use transform=%22translate(0.000000 0.000000) rotate(180.000000)%22 href=%22%23C300%22 /></g><g id=%22C99%22 data-name=%22s_bend_grating_l_2P549662477878709_o_2P4353223926182768%22><use transform=%22translate(0.000000 0.000000)%22 href=%22%23C301%22 /><use transform=%22translate(-2.550000 -2.435000) rotate(180.000000)%22 href=%22%23C301%22 /><use transform=%22translate(0.000000 0.000000) rotate(180.000000)%22 href=%22%23C302%22 /></g><g id=%22C103%22 data-name=%22as_component__PNGCOJINIPILRSBFUVHAAAKRQR7F7X5DOV45DHY3HPYOUZICQITA%22><path class=%22layer_1_0%22 d=%22M 9.889000,3.500000 0.000000,1.275000 0.000000,-1.275000 9.889000,-3.500000 16.000000,-3.500000 16.000000,3.500000 z%22 /><path class=%22layer_2_0%22 d=%22M 0.000000,-0.250000 10.000000,-2.500000 10.000000,2.500000 0.000000,0.250000 z%22 /><rect class=%22layer_2_0%22 x=%2210.300000%22 y=%22-2.500000%22 width=%220.300000%22 height=%225.000000%22 /><rect class=%22layer_2_0%22 x=%2210.900000%22 y=%22-2.500000%22 width=%220.300000%22 height=%225.000000%22 /><rect class=%22layer_2_0%22 x=%2211.500000%22 y=%22-2.500000%22 width=%220.300000%22 height=%225.000000%22 /><rect class=%22layer_2_0%22 x=%2212.100000%22 y=%22-2.500000%22 width=%220.300000%22 height=%225.000000%22 /><rect class=%22layer_2_0%22 x=%2212.700000%22 y=%22-2.500000%22 width=%220.300000%22 height=%225.000000%22 /><rect class=%22layer_2_0%22 x=%2213.300000%22 y=%22-2.500000%22 width=%220.300000%22 height=%225.000000%22 /><rect class=%22layer_2_0%22 x=%2213.900000%22 y=%22-2.500000%22 width=%220.300000%22 height=%225.000000%22 /><rect class=%22layer_2_0%22 x=%2214.500000%22 y=%22-2.500000%22 width=%220.300000%22 height=%225.000000%22 /><rect class=%22layer_2_0%22 x=%2215.100000%22 y=%22-2.500000%22 width=%220.300000%22 height=%225.000000%22 /><rect class=%22layer_2_0%22 x=%2215.700000%22 y=%22-2.500000%22 width=%220.300000%22 height=%225.000000%22 /></g><g id=%22C104%22 data-name=%22s_bend_l_22P87709954684953_o_19P426045169736863_p_Strip%22><path class=%22layer_1_0%22 d=%22M 0.000000,-1.250000 0.393000,-1.244000 0.786000,-1.226000 1.178000,-1.196000 1.568000,-1.154000 1.958000,-1.100000 2.345000,-1.034000 2.730000,-0.956000 3.113000,-0.867000 3.493000,-0.766000 3.870000,-0.653000 4.243000,-0.529000 4.611000,-0.393000 4.976000,-0.247000 5.336000,-0.089000 5.691000,0.080000 6.041000,0.259000 6.385000,0.450000 6.723000,0.650000 7.054000,0.861000 7.380000,1.082000 7.698000,1.313000 8.009000,1.553000 8.312000,1.803000 8.608000,2.062000 8.895000,2.330000 9.175000,2.606000 9.445000,2.891000 9.707000,3.185000 9.960000,3.486000 10.203000,3.794000 10.437000,4.110000 10.661000,4.433000 10.875000,4.763000 11.079000,5.099000 11.273000,5.441000 11.456000,5.789000 11.628000,6.142000 11.789000,6.500000 11.940000,6.864000 12.079000,7.231000 12.207000,7.603000 12.323000,7.978000 12.428000,8.357000 12.521000,8.739000 12.602000,9.124000 12.672000,9.510000 12.728000,9.822000 12.869000,10.439000 12.953000,10.744000 13.150000,11.346000 13.262000,11.642000 13.513000,12.223000 13.651000,12.508000 13.955000,13.063000 14.291000,13.599000 14.660000,14.114000 15.060000,14.605000 15.270000,14.841000 15.713000,15.293000 16.183000,15.717000 16.427000,15.919000 16.934000,16.298000 17.463000,16.646000 18.012000,16.960000 18.580000,17.241000 19.163000,17.486000 19.761000,17.695000 20.064000,17.786000 20.678000,17.940000 21.300000,18.055000 21.614000,18.099000 22.244000,18.157000 22.877000,18.176000 22.877000,20.676000 22.484000,20.670000 22.091000,20.652000 21.699000,20.622000 21.309000,20.580000 20.919000,20.526000 20.532000,20.460000 20.147000,20.382000 19.764000,20.293000 19.384000,20.192000 19.007000,20.079000 18.634000,19.955000 18.266000,19.819000 17.901000,19.673000 17.541000,19.515000 17.186000,19.346000 16.836000,19.167000 16.492000,18.976000 16.154000,18.776000 15.823000,18.565000 15.498000,18.344000 15.179000,18.113000 14.868000,17.873000 14.565000,17.623000 14.269000,17.364000 13.982000,17.096000 13.702000,16.820000 13.432000,16.535000 13.170000,16.241000 12.917000,15.940000 12.674000,15.632000 12.440000,15.316000 12.216000,14.993000 12.002000,14.663000 11.798000,14.327000 11.604000,13.985000 11.421000,13.637000 11.249000,13.284000 11.088000,12.926000 10.937000,12.562000 10.798000,12.195000 10.670000,11.823000 10.554000,11.448000 10.449000,11.069000 10.356000,10.687000 10.275000,10.302000 10.205000,9.916000 10.149000,9.604000 10.083000,9.294000 9.924000,8.682000 9.727000,8.080000 9.494000,7.492000 9.226000,6.918000 8.922000,6.363000 8.586000,5.827000 8.217000,5.312000 8.021000,5.064000 7.607000,4.585000 7.389000,4.356000 6.932000,3.917000 6.450000,3.507000 5.943000,3.128000 5.414000,2.780000 5.142000,2.619000 4.583000,2.321000 4.007000,2.058000 3.417000,1.831000 2.813000,1.640000 2.199000,1.486000 1.889000,1.424000 1.263000,1.327000 0.633000,1.269000 0.000000,1.250000 z%22 /><path class=%22layer_2_0%22 d=%22M 0.000000,-0.250000 0.362000,-0.244000 0.724000,-0.228000 1.086000,-0.200000 1.446000,-0.161000 1.805000,-0.112000 2.163000,-0.051000 2.518000,0.021000 2.871000,0.103000 3.221000,0.196000 3.568000,0.300000 3.912000,0.415000 4.252000,0.540000 4.589000,0.675000 4.921000,0.821000 5.248000,0.976000 5.888000,1.317000 6.199000,1.502000 6.805000,1.900000 7.098000,2.113000 7.385000,2.335000 7.665000,2.565000 7.938000,2.804000 8.203000,3.051000 8.460000,3.306000 8.710000,3.569000 8.951000,3.839000 9.409000,4.401000 9.624000,4.693000 9.831000,4.991000 10.029000,5.294000 10.217000,5.604000 10.395000,5.920000 10.564000,6.241000 10.723000,6.566000 11.010000,7.232000 11.138000,7.571000 11.256000,7.914000 11.363000,8.260000 11.460000,8.609000 11.546000,8.961000 11.621000,9.316000 11.685000,9.672000 11.747000,10.014000 11.819000,10.354000 11.901000,10.691000 11.993000,11.026000 12.096000,11.357000 12.209000,11.685000 12.332000,12.010000 12.465000,12.331000 12.607000,12.647000 12.759000,12.959000 12.921000,13.267000 13.092000,13.569000 13.272000,13.866000 13.461000,14.157000 13.865000,14.721000 14.080000,14.994000 14.535000,15.518000 14.774000,15.770000 15.275000,16.251000 15.536000,16.480000 16.078000,16.913000 16.359000,17.116000 16.940000,17.498000 17.238000,17.675000 17.542000,17.843000 17.851000,18.001000 18.164000,18.150000 18.482000,18.290000 19.130000,18.539000 19.459000,18.649000 20.127000,18.838000 20.465000,18.917000 20.806000,18.985000 21.148000,19.043000 21.492000,19.091000 21.837000,19.128000 22.183000,19.155000 22.530000,19.171000 22.877000,19.176000 22.877000,19.676000 22.153000,19.654000 21.791000,19.626000 21.431000,19.587000 21.072000,19.538000 20.714000,19.477000 20.359000,19.405000 20.006000,19.323000 19.656000,19.230000 19.309000,19.126000 18.965000,19.011000 18.625000,18.886000 18.288000,18.751000 17.956000,18.605000 17.629000,18.450000 16.989000,18.109000 16.678000,17.924000 16.072000,17.526000 15.779000,17.313000 15.492000,17.091000 15.212000,16.861000 14.674000,16.375000 14.417000,16.120000 14.167000,15.857000 13.926000,15.587000 13.468000,15.025000 13.046000,14.435000 12.848000,14.132000 12.660000,13.822000 12.482000,13.506000 12.313000,13.185000 12.154000,12.860000 12.006000,12.529000 11.867000,12.194000 11.739000,11.855000 11.621000,11.512000 11.514000,11.166000 11.417000,10.817000 11.331000,10.465000 11.256000,10.110000 11.192000,9.754000 11.130000,9.412000 11.058000,9.072000 10.976000,8.735000 10.884000,8.400000 10.781000,8.069000 10.668000,7.741000 10.545000,7.416000 10.412000,7.095000 10.270000,6.779000 10.118000,6.467000 9.956000,6.159000 9.785000,5.857000 9.605000,5.560000 9.416000,5.269000 9.012000,4.705000 8.797000,4.432000 8.342000,3.908000 8.103000,3.656000 7.856000,3.412000 7.602000,3.175000 7.341000,2.946000 6.799000,2.513000 6.518000,2.310000 5.937000,1.928000 5.639000,1.751000 5.335000,1.583000 4.713000,1.276000 4.395000,1.136000 3.747000,0.887000 3.418000,0.777000 2.750000,0.588000 2.412000,0.509000 2.071000,0.441000 1.729000,0.383000 1.385000,0.335000 1.040000,0.298000 0.694000,0.271000 0.347000,0.255000 0.000000,0.250000 z%22 /></g><g id=%22C105%22 data-name=%22as_component__PNGCOJINIPILRSBFUVHAAAKRQR7F7X5DOV45DHY3HPYOUZICQITA%22><path class=%22layer_1_0%22 d=%22M 9.889000,3.500000 0.000000,1.275000 0.000000,-1.275000 9.889000,-3.500000 16.000000,-3.500000 16.000000,3.500000 z%22 /><path class=%22layer_2_0%22 d=%22M 0.000000,-0.250000 10.000000,-2.500000 10.000000,2.500000 0.000000,0.250000 z%22 /><rect class=%22layer_2_0%22 x=%2210.300000%22 y=%22-2.500000%22 width=%220.300000%22 height=%225.000000%22 /><rect class=%22layer_2_0%22 x=%2210.900000%22 y=%22-2.500000%22 width=%220.300000%22 height=%225.000000%22 /><rect class=%22layer_2_0%22 x=%2211.500000%22 y=%22-2.500000%22 width=%220.300000%22 height=%225.000000%22 /><rect class=%22layer_2_0%22 x=%2212.100000%22 y=%22-2.500000%22 width=%220.300000%22 height=%225.000000%22 /><rect class=%22layer_2_0%22 x=%2212.700000%22 y=%22-2.500000%22 width=%220.300000%22 height=%225.000000%22 /><rect class=%22layer_2_0%22 x=%2213.300000%22 y=%22-2.500000%22 width=%220.300000%22 height=%225.000000%22 /><rect class=%22layer_2_0%22 x=%2213.900000%22 y=%22-2.500000%22 width=%220.300000%22 height=%225.000000%22 /><rect class=%22layer_2_0%22 x=%2214.500000%22 y=%22-2.500000%22 width=%220.300000%22 height=%225.000000%22 /><rect class=%22layer_2_0%22 x=%2215.100000%22 y=%22-2.500000%22 width=%220.300000%22 height=%225.000000%22 /><rect class=%22layer_2_0%22 x=%2215.700000%22 y=%22-2.500000%22 width=%220.300000%22 height=%225.000000%22 /></g><g id=%22C106%22 data-name=%22s_bend_l_2P7941461764090545_o_4P3689338250504015_p_Strip%22><path class=%22layer_1_0%22 d=%22M 0.000000,-1.250000 0.254000,-1.238000 0.505000,-1.204000 0.753000,-1.147000 0.994000,-1.067000 1.227000,-0.966000 1.449000,-0.844000 1.660000,-0.702000 1.857000,-0.542000 2.039000,-0.364000 2.203000,-0.171000 2.350000,0.036000 2.476000,0.256000 2.583000,0.487000 2.668000,0.726000 2.731000,0.972000 2.771000,1.223000 2.788000,1.476000 2.782000,1.730000 2.753000,1.982000 2.702000,2.231000 2.628000,2.474000 2.532000,2.709000 2.514000,2.758000 2.506000,2.810000 2.507000,2.863000 2.518000,2.914000 2.537000,2.963000 2.566000,3.007000 2.602000,3.046000 2.644000,3.077000 2.691000,3.100000 2.742000,3.114000 2.794000,3.119000 2.794000,5.619000 2.540000,5.607000 2.289000,5.573000 2.041000,5.516000 1.800000,5.436000 1.567000,5.335000 1.345000,5.213000 1.134000,5.071000 0.937000,4.911000 0.755000,4.733000 0.591000,4.540000 0.444000,4.333000 0.318000,4.113000 0.211000,3.882000 0.126000,3.643000 0.063000,3.397000 0.023000,3.146000 0.006000,2.893000 0.012000,2.639000 0.041000,2.387000 0.092000,2.138000 0.166000,1.895000 0.262000,1.660000 0.280000,1.611000 0.288000,1.559000 0.287000,1.506000 0.276000,1.455000 0.257000,1.406000 0.228000,1.362000 0.192000,1.323000 0.150000,1.292000 0.103000,1.269000 0.052000,1.255000 0.000000,1.250000 z%22 /><path class=%22layer_2_0%22 d=%22M 0.000000,-0.250000 0.163000,-0.243000 0.324000,-0.220000 0.483000,-0.184000 0.637000,-0.133000 0.787000,-0.068000 0.930000,0.011000 1.065000,0.101000 1.191000,0.204000 1.308000,0.318000 1.413000,0.442000 1.507000,0.575000 1.589000,0.716000 1.657000,0.864000 1.711000,1.018000 1.752000,1.175000 1.777000,1.336000 1.788000,1.499000 1.785000,1.662000 1.766000,1.823000 1.733000,1.983000 1.685000,2.139000 1.624000,2.289000 1.545000,2.510000 1.521000,2.625000 1.505000,2.859000 1.513000,2.976000 1.532000,3.092000 1.561000,3.206000 1.600000,3.316000 1.649000,3.423000 1.708000,3.524000 1.852000,3.710000 1.936000,3.792000 2.027000,3.866000 2.227000,3.988000 2.446000,4.071000 2.561000,4.098000 2.677000,4.114000 2.794000,4.119000 2.794000,4.619000 2.631000,4.612000 2.470000,4.589000 2.311000,4.553000 2.157000,4.502000 2.007000,4.437000 1.864000,4.358000 1.729000,4.268000 1.603000,4.165000 1.486000,4.051000 1.381000,3.927000 1.287000,3.794000 1.205000,3.653000 1.137000,3.505000 1.083000,3.351000 1.042000,3.194000 1.017000,3.033000 1.006000,2.870000 1.009000,2.707000 1.028000,2.546000 1.061000,2.386000 1.109000,2.230000 1.170000,2.080000 1.249000,1.859000 1.273000,1.744000 1.289000,1.510000 1.281000,1.393000 1.262000,1.277000 1.233000,1.163000 1.194000,1.053000 1.145000,0.946000 1.086000,0.845000 0.942000,0.659000 0.858000,0.577000 0.767000,0.503000 0.567000,0.381000 0.348000,0.298000 0.233000,0.271000 0.117000,0.255000 0.000000,0.250000 z%22 /></g><g id=%22C107%22 data-name=%22as_component__PNGCOJINIPILRSBFUVHAAAKRQR7F7X5DOV45DHY3HPYOUZICQITA%22><path class=%22layer_1_0%22 d=%22M 9.889000,3.500000 0.000000,1.275000 0.000000,-1.275000 9.889000,-3.500000 16.000000,-3.500000 16.000000,3.500000 z%22 /><path class=%22layer_2_0%22 d=%22M 0.000000,-0.250000 10.000000,-2.500000 10.000000,2.500000 0.000000,0.250000 z%22 /><rect class=%22layer_2_0%22 x=%2210.300000%22 y=%22-2.500000%22 width=%220.300000%22 height=%225.000000%22 /><rect class=%22layer_2_0%22 x=%2210.900000%22 y=%22-2.500000%22 width=%220.300000%22 height=%225.000000%22 /><rect class=%22layer_2_0%22 x=%2211.500000%22 y=%22-2.500000%22 width=%220.300000%22 height=%225.000000%22 /><rect class=%22layer_2_0%22 x=%2212.100000%22 y=%22-2.500000%22 width=%220.300000%22 height=%225.000000%22 /><rect class=%22layer_2_0%22 x=%2212.700000%22 y=%22-2.500000%22 width=%220.300000%22 height=%225.000000%22 /><rect class=%22layer_2_0%22 x=%2213.300000%22 y=%22-2.500000%22 width=%220.300000%22 height=%225.000000%22 /><rect class=%22layer_2_0%22 x=%2213.900000%22 y=%22-2.500000%22 width=%220.300000%22 height=%225.000000%22 /><rect class=%22layer_2_0%22 x=%2214.500000%22 y=%22-2.500000%22 width=%220.300000%22 height=%225.000000%22 /><rect class=%22layer_2_0%22 x=%2215.100000%22 y=%22-2.500000%22 width=%220.300000%22 height=%225.000000%22 /><rect class=%22layer_2_0%22 x=%2215.700000%22 y=%22-2.500000%22 width=%220.300000%22 height=%225.000000%22 /></g><g id=%22C108%22 data-name=%22s_bend_l_8P567188175084212_o_4P294211239573949_p_Strip%22><path class=%22layer_1_0%22 d=%22M 0.000000,-1.250000 0.306000,-1.243000 0.612000,-1.222000 0.917000,-1.186000 1.219000,-1.136000 1.519000,-1.073000 1.815000,-0.995000 2.108000,-0.904000 2.396000,-0.800000 2.679000,-0.682000 2.956000,-0.551000 3.227000,-0.407000 3.490000,-0.251000 3.747000,-0.083000 3.995000,0.097000 4.234000,0.288000 4.465000,0.490000 4.685000,0.703000 4.896000,0.926000 5.096000,1.158000 5.285000,1.399000 5.527000,1.693000 5.794000,1.963000 6.086000,2.207000 6.399000,2.424000 6.731000,2.610000 7.079000,2.764000 7.440000,2.886000 7.810000,2.973000 8.187000,3.026000 8.567000,3.044000 8.567000,5.544000 8.261000,5.537000 7.955000,5.516000 7.651000,5.480000 7.348000,5.430000 7.048000,5.367000 6.752000,5.289000 6.459000,5.198000 6.171000,5.094000 5.888000,4.976000 5.611000,4.845000 5.340000,4.701000 5.077000,4.545000 4.820000,4.377000 4.572000,4.197000 4.333000,4.006000 4.102000,3.804000 3.882000,3.591000 3.671000,3.368000 3.471000,3.136000 3.282000,2.895000 3.040000,2.601000 2.773000,2.331000 2.481000,2.087000 2.168000,1.870000 1.836000,1.684000 1.488000,1.530000 1.127000,1.408000 0.757000,1.321000 0.380000,1.268000 0.000000,1.250000 z%22 /><path class=%22layer_2_0%22 d=%22M 0.000000,-0.250000 0.260000,-0.244000 0.519000,-0.226000 0.778000,-0.196000 1.034000,-0.154000 1.288000,-0.100000 1.540000,-0.034000 1.788000,0.043000 2.033000,0.132000 2.273000,0.232000 2.508000,0.343000 2.737000,0.465000 2.961000,0.598000 3.179000,0.740000 3.389000,0.893000 3.592000,1.055000 3.788000,1.227000 3.975000,1.407000 4.154000,1.596000 4.323000,1.793000 4.484000,1.997000 4.630000,2.184000 4.784000,2.363000 4.947000,2.535000 5.118000,2.699000 5.296000,2.856000 5.672000,3.142000 5.870000,3.272000 6.074000,3.393000 6.283000,3.504000 6.497000,3.605000 6.716000,3.696000 6.938000,3.777000 7.165000,3.847000 7.394000,3.907000 7.625000,3.956000 7.859000,3.995000 8.094000,4.022000 8.330000,4.039000 8.567000,4.044000 8.567000,4.544000 8.307000,4.538000 8.048000,4.520000 7.789000,4.490000 7.533000,4.448000 7.279000,4.394000 7.027000,4.328000 6.779000,4.251000 6.534000,4.162000 6.294000,4.062000 6.059000,3.951000 5.830000,3.829000 5.606000,3.696000 5.388000,3.554000 5.178000,3.401000 4.975000,3.239000 4.779000,3.067000 4.592000,2.887000 4.413000,2.698000 4.244000,2.501000 4.083000,2.297000 3.937000,2.110000 3.783000,1.931000 3.620000,1.759000 3.271000,1.438000 3.086000,1.291000 2.895000,1.152000 2.697000,1.022000 2.493000,0.901000 2.284000,0.790000 2.070000,0.689000 1.851000,0.598000 1.629000,0.517000 1.402000,0.447000 1.173000,0.387000 0.942000,0.338000 0.708000,0.299000 0.473000,0.272000 0.237000,0.256000 0.000000,0.250000 z%22 /></g><g id=%22C109%22 data-name=%22as_component__PNGCOJINIPILRSBFUVHAAAKRQR7F7X5DOV45DHY3HPYOUZICQITA%22><path class=%22layer_1_0%22 d=%22M 9.889000,3.500000 0.000000,1.275000 0.000000,-1.275000 9.889000,-3.500000 16.000000,-3.500000 16.000000,3.500000 z%22 /><path class=%22layer_2_0%22 d=%22M 0.000000,-0.250000 10.000000,-2.500000 10.000000,2.500000 0.000000,0.250000 z%22 /><rect class=%22layer_2_0%22 x=%2210.300000%22 y=%22-2.500000%22 width=%220.300000%22 height=%225.000000%22 /><rect class=%22layer_2_0%22 x=%2210.900000%22 y=%22-2.500000%22 width=%220.300000%22 height=%225.000000%22 /><rect class=%22layer_2_0%22 x=%2211.500000%22 y=%22-2.500000%22 width=%220.300000%22 height=%225.000000%22 /><rect class=%22layer_2_0%22 x=%2212.100000%22 y=%22-2.500000%22 width=%220.300000%22 height=%225.000000%22 /><rect class=%22layer_2_0%22 x=%2212.700000%22 y=%22-2.500000%22 width=%220.300000%22 height=%225.000000%22 /><rect class=%22layer_2_0%22 x=%2213.300000%22 y=%22-2.500000%22 width=%220.300000%22 height=%225.000000%22 /><rect class=%22layer_2_0%22 x=%2213.900000%22 y=%22-2.500000%22 width=%220.300000%22 height=%225.000000%22 /><rect class=%22layer_2_0%22 x=%2214.500000%22 y=%22-2.500000%22 width=%220.300000%22 height=%225.000000%22 /><rect class=%22layer_2_0%22 x=%2215.100000%22 y=%22-2.500000%22 width=%220.300000%22 height=%225.000000%22 /><rect class=%22layer_2_0%22 x=%2215.700000%22 y=%22-2.500000%22 width=%220.300000%22 height=%225.000000%22 /></g><g id=%22C110%22 data-name=%22s_bend_l_2P6139459021135276_o_3P857812899051991_p_Strip%22><path class=%22layer_1_0%22 d=%22M 0.000000,-1.250000 0.235000,-1.240000 0.469000,-1.208000 0.699000,-1.157000 0.923000,-1.085000 1.140000,-0.993000 1.348000,-0.883000 1.545000,-0.754000 1.731000,-0.609000 1.902000,-0.448000 2.059000,-0.272000 2.200000,-0.083000 2.323000,0.117000 2.428000,0.328000 2.514000,0.547000 2.581000,0.773000 2.627000,1.004000 2.652000,1.239000 2.656000,1.474000 2.640000,1.709000 2.603000,1.942000 2.545000,2.170000 2.468000,2.392000 2.460000,2.419000 2.457000,2.447000 2.459000,2.475000 2.465000,2.502000 2.476000,2.527000 2.492000,2.550000 2.512000,2.570000 2.534000,2.586000 2.559000,2.598000 2.586000,2.606000 2.614000,2.608000 2.614000,5.108000 2.379000,5.098000 2.145000,5.066000 1.916000,5.015000 1.691000,4.943000 1.474000,4.851000 1.266000,4.741000 1.069000,4.612000 0.883000,4.467000 0.712000,4.306000 0.555000,4.130000 0.414000,3.941000 0.291000,3.741000 0.186000,3.530000 0.100000,3.311000 0.033000,3.085000 -0.013000,2.854000 -0.038000,2.619000 -0.042000,2.384000 -0.026000,2.149000 0.011000,1.916000 0.069000,1.688000 0.146000,1.466000 0.154000,1.439000 0.157000,1.411000 0.155000,1.383000 0.149000,1.356000 0.138000,1.331000 0.122000,1.308000 0.102000,1.288000 0.080000,1.272000 0.055000,1.260000 0.028000,1.252000 0.000000,1.250000 z%22 /><path class=%22layer_2_0%22 d=%22M 0.000000,-0.250000 0.147000,-0.243000 0.292000,-0.224000 0.436000,-0.192000 0.576000,-0.147000 0.711000,-0.090000 0.841000,-0.021000 0.964000,0.059000 1.079000,0.150000 1.187000,0.250000 1.284000,0.360000 1.372000,0.478000 1.449000,0.603000 1.514000,0.734000 1.568000,0.871000 1.609000,1.012000 1.638000,1.156000 1.654000,1.302000 1.657000,1.449000 1.647000,1.595000 1.623000,1.741000 1.588000,1.883000 1.539000,2.022000 1.480000,2.218000 1.457000,2.422000 1.470000,2.626000 1.519000,2.825000 1.556000,2.921000 1.656000,3.100000 1.785000,3.259000 1.941000,3.392000 2.118000,3.496000 2.310000,3.567000 2.410000,3.590000 2.614000,3.608000 2.614000,4.108000 2.467000,4.101000 2.322000,4.082000 2.178000,4.050000 2.038000,4.005000 1.903000,3.948000 1.773000,3.879000 1.650000,3.799000 1.535000,3.708000 1.427000,3.608000 1.330000,3.498000 1.242000,3.380000 1.165000,3.255000 1.100000,3.124000 1.046000,2.987000 1.005000,2.846000 0.976000,2.702000 0.960000,2.556000 0.957000,2.409000 0.967000,2.263000 0.991000,2.117000 1.026000,1.975000 1.075000,1.836000 1.109000,1.739000 1.150000,1.539000 1.155000,1.334000 1.124000,1.131000 1.058000,0.937000 1.012000,0.846000 0.897000,0.676000 0.754000,0.529000 0.587000,0.410000 0.402000,0.322000 0.204000,0.268000 0.000000,0.250000 z%22 /></g><g id=%22C111%22 data-name=%22as_component__PNGCOJINIPILRSBFUVHAAAKRQR7F7X5DOV45DHY3HPYOUZICQITA%22><path class=%22layer_1_0%22 d=%22M 9.889000,3.500000 0.000000,1.275000 0.000000,-1.275000 9.889000,-3.500000 16.000000,-3.500000 16.000000,3.500000 z%22 /><path class=%22layer_2_0%22 d=%22M 0.000000,-0.250000 10.000000,-2.500000 10.000000,2.500000 0.000000,0.250000 z%22 /><rect class=%22layer_2_0%22 x=%2210.300000%22 y=%22-2.500000%22 width=%220.300000%22 height=%225.000000%22 /><rect class=%22layer_2_0%22 x=%2210.900000%22 y=%22-2.500000%22 width=%220.300000%22 height=%225.000000%22 /><rect class=%22layer_2_0%22 x=%2211.500000%22 y=%22-2.500000%22 width=%220.300000%22 height=%225.000000%22 /><rect class=%22layer_2_0%22 x=%2212.100000%22 y=%22-2.500000%22 width=%220.300000%22 height=%225.000000%22 /><rect class=%22layer_2_0%22 x=%2212.700000%22 y=%22-2.500000%22 width=%220.300000%22 height=%225.000000%22 /><rect class=%22layer_2_0%22 x=%2213.300000%22 y=%22-2.500000%22 width=%220.300000%22 height=%225.000000%22 /><rect class=%22layer_2_0%22 x=%2213.900000%22 y=%22-2.500000%22 width=%220.300000%22 height=%225.000000%22 /><rect class=%22layer_2_0%22 x=%2214.500000%22 y=%22-2.500000%22 width=%220.300000%22 height=%225.000000%22 /><rect class=%22layer_2_0%22 x=%2215.100000%22 y=%22-2.500000%22 width=%220.300000%22 height=%225.000000%22 /><rect class=%22layer_2_0%22 x=%2215.700000%22 y=%22-2.500000%22 width=%220.300000%22 height=%225.000000%22 /></g><g id=%22C112%22 data-name=%22s_bend_l_21P481707346218204_o_39P66841566513163_p_Strip%22><path class=%22layer_1_0%22 d=%22M 0.000000,-1.250000 0.409000,-1.244000 0.817000,-1.226000 1.225000,-1.197000 1.631000,-1.155000 2.037000,-1.102000 2.440000,-1.037000 2.842000,-0.960000 3.241000,-0.872000 3.637000,-0.772000 4.030000,-0.661000 4.420000,-0.538000 4.806000,-0.404000 5.188000,-0.259000 5.566000,-0.103000 5.939000,0.064000 6.307000,0.242000 6.670000,0.431000 7.027000,0.630000 7.378000,0.839000 7.723000,1.058000 8.061000,1.287000 8.393000,1.526000 8.718000,1.775000 9.035000,2.032000 9.344000,2.299000 9.646000,2.575000 9.940000,2.859000 10.225000,3.152000 10.501000,3.453000 10.769000,3.762000 11.028000,4.079000 11.277000,4.402000 11.517000,4.733000 11.747000,5.071000 11.967000,5.416000 12.177000,5.766000 12.377000,6.123000 12.566000,6.485000 12.745000,6.852000 12.913000,7.225000 13.070000,7.602000 13.217000,7.984000 13.352000,8.370000 13.475000,8.759000 13.588000,9.152000 13.689000,9.548000 13.778000,9.947000 13.856000,10.349000 13.922000,10.752000 13.976000,11.157000 14.019000,11.563000 14.049000,11.971000 14.068000,12.379000 14.075000,12.788000 14.070000,13.197000 14.054000,13.605000 14.025000,14.013000 13.985000,14.420000 13.933000,14.825000 13.869000,15.229000 13.793000,15.630000 13.706000,16.030000 13.607000,16.426000 13.497000,16.820000 13.375000,17.210000 13.242000,17.596000 13.098000,17.979000 12.943000,18.357000 12.777000,18.731000 12.600000,19.099000 12.412000,19.462000 12.214000,19.820000 12.006000,20.172000 11.788000,20.517000 11.608000,20.801000 11.274000,21.385000 11.120000,21.683000 10.838000,22.293000 10.710000,22.604000 10.483000,23.237000 10.292000,23.881000 10.139000,24.536000 10.024000,25.198000 9.948000,25.866000 9.924000,26.201000 9.907000,26.873000 9.912000,27.209000 9.953000,27.880000 9.988000,28.215000 10.087000,28.880000 10.151000,29.210000 10.308000,29.863000 10.400000,30.186000 10.613000,30.824000 10.862000,31.448000 11.148000,32.057000 11.303000,32.355000 11.640000,32.936000 12.011000,33.497000 12.208000,33.770000 12.626000,34.296000 13.073000,34.798000 13.549000,35.272000 14.052000,35.719000 14.580000,36.135000 15.131000,36.520000 15.703000,36.872000 16.295000,37.191000 16.905000,37.474000 17.215000,37.603000 17.847000,37.832000 18.491000,38.025000 19.145000,38.180000 19.475000,38.243000 20.140000,38.340000 20.810000,38.398000 21.482000,38.418000 21.482000,40.918000 21.073000,40.912000 20.665000,40.894000 20.257000,40.865000 19.851000,40.823000 19.445000,40.770000 19.042000,40.705000 18.640000,40.628000 18.241000,40.540000 17.845000,40.440000 17.452000,40.329000 17.062000,40.206000 16.676000,40.072000 16.294000,39.927000 15.916000,39.771000 15.543000,39.604000 15.175000,39.426000 14.812000,39.237000 14.455000,39.038000 14.104000,38.829000 13.759000,38.610000 13.421000,38.381000 13.089000,38.142000 12.764000,37.893000 12.447000,37.636000 12.138000,37.369000 11.836000,37.093000 11.542000,36.809000 11.257000,36.516000 10.981000,36.215000 10.713000,35.906000 10.454000,35.589000 10.205000,35.266000 9.965000,34.935000 9.735000,34.597000 9.515000,34.252000 9.305000,33.902000 9.105000,33.545000 8.916000,33.183000 8.737000,32.816000 8.569000,32.443000 8.412000,32.066000 8.265000,31.684000 8.130000,31.298000 8.007000,30.909000 7.894000,30.516000 7.793000,30.120000 7.704000,29.721000 7.626000,29.319000 7.560000,28.916000 7.506000,28.511000 7.463000,28.105000 7.433000,27.697000 7.414000,27.289000 7.407000,26.880000 7.412000,26.471000 7.428000,26.063000 7.457000,25.655000 7.497000,25.248000 7.549000,24.843000 7.613000,24.439000 7.689000,24.038000 7.776000,23.638000 7.875000,23.242000 7.985000,22.848000 8.107000,22.458000 8.240000,22.072000 8.384000,21.689000 8.539000,21.311000 8.705000,20.937000 8.882000,20.569000 9.070000,20.206000 9.268000,19.848000 9.476000,19.496000 9.694000,19.151000 9.874000,18.867000 10.045000,18.578000 10.362000,17.985000 10.507000,17.682000 10.772000,17.064000 10.999000,16.431000 11.190000,15.787000 11.343000,15.132000 11.458000,14.470000 11.501000,14.136000 11.558000,13.467000 11.571000,13.131000 11.570000,12.459000 11.554000,12.123000 11.494000,11.453000 11.395000,10.788000 11.331000,10.458000 11.257000,10.130000 11.082000,9.482000 10.869000,8.844000 10.620000,8.220000 10.481000,7.913000 10.179000,7.313000 9.842000,6.732000 9.660000,6.448000 9.274000,5.898000 8.856000,5.372000 8.409000,4.870000 7.933000,4.396000 7.430000,3.949000 6.902000,3.533000 6.351000,3.148000 5.779000,2.796000 5.187000,2.477000 4.884000,2.331000 4.267000,2.065000 3.635000,1.836000 2.991000,1.643000 2.337000,1.488000 2.007000,1.425000 1.342000,1.328000 0.672000,1.270000 0.000000,1.250000 z%22 /><path class=%22layer_2_0%22 d=%22M 0.000000,-0.250000 0.380000,-0.244000 0.759000,-0.228000 1.138000,-0.200000 1.515000,-0.162000 1.892000,-0.112000 2.267000,-0.052000 2.640000,0.019000 3.010000,0.101000 3.379000,0.194000 3.744000,0.297000 4.106000,0.411000 4.465000,0.536000 4.820000,0.671000 5.171000,0.816000 5.517000,0.971000 5.859000,1.136000 6.196000,1.311000 6.528000,1.496000 6.854000,1.690000 7.174000,1.894000 7.489000,2.107000 7.797000,2.329000 8.393000,2.799000 8.961000,3.303000 9.233000,3.567000 9.498000,3.839000 9.755000,4.119000 10.004000,4.406000 10.244000,4.700000 10.476000,5.001000 10.699000,5.308000 11.117000,5.942000 11.312000,6.268000 11.498000,6.599000 11.674000,6.935000 11.840000,7.277000 11.996000,7.623000 12.142000,7.973000 12.278000,8.328000 12.403000,8.686000 12.518000,9.048000 12.622000,9.413000 12.716000,9.781000 12.799000,10.152000 12.871000,10.524000 12.933000,10.899000 12.983000,11.276000 13.023000,11.653000 13.069000,12.411000 13.071000,13.170000 13.055000,13.550000 13.029000,13.928000 12.991000,14.306000 12.943000,14.683000 12.883000,15.058000 12.813000,15.431000 12.732000,15.802000 12.640000,16.170000 12.538000,16.536000 12.425000,16.898000 12.301000,17.258000 12.167000,17.613000 12.023000,17.964000 11.869000,18.311000 11.705000,18.653000 11.531000,18.991000 11.347000,19.323000 11.153000,19.650000 10.950000,19.971000 10.755000,20.279000 10.392000,20.913000 10.067000,21.567000 9.919000,21.900000 9.780000,22.238000 9.651000,22.580000 9.532000,22.925000 9.325000,23.626000 9.237000,23.980000 9.091000,24.695000 9.034000,25.056000 8.951000,25.782000 8.926000,26.146000 8.911000,26.511000 8.913000,27.241000 8.930000,27.606000 8.957000,27.970000 8.995000,28.333000 9.044000,28.695000 9.103000,29.056000 9.172000,29.414000 9.252000,29.770000 9.342000,30.124000 9.553000,30.823000 9.804000,31.509000 10.095000,32.179000 10.424000,32.831000 10.790000,33.463000 10.987000,33.770000 11.407000,34.368000 11.630000,34.657000 11.861000,34.940000 12.100000,35.216000 12.347000,35.485000 12.602000,35.747000 12.864000,36.001000 13.410000,36.485000 13.693000,36.716000 13.983000,36.938000 14.582000,37.356000 14.890000,37.552000 15.204000,37.739000 15.847000,38.085000 16.176000,38.244000 16.509000,38.393000 17.188000,38.662000 17.533000,38.782000 18.233000,38.991000 18.587000,39.080000 18.943000,39.159000 19.302000,39.228000 19.662000,39.286000 20.388000,39.370000 20.752000,39.397000 21.117000,39.413000 21.482000,39.418000 21.482000,39.918000 21.102000,39.912000 20.723000,39.896000 20.344000,39.868000 19.967000,39.830000 19.590000,39.780000 19.215000,39.720000 18.842000,39.649000 18.472000,39.567000 18.103000,39.474000 17.738000,39.371000 17.376000,39.257000 17.017000,39.132000 16.662000,38.997000 16.311000,38.852000 15.965000,38.697000 15.623000,38.532000 15.286000,38.357000 14.954000,38.172000 14.628000,37.978000 14.308000,37.774000 13.993000,37.561000 13.685000,37.339000 13.089000,36.869000 12.521000,36.365000 12.249000,36.101000 11.984000,35.829000 11.727000,35.549000 11.478000,35.262000 11.238000,34.968000 11.006000,34.667000 10.783000,34.360000 10.365000,33.726000 10.170000,33.400000 9.984000,33.069000 9.808000,32.733000 9.642000,32.391000 9.486000,32.045000 9.340000,31.695000 9.204000,31.340000 9.079000,30.982000 8.964000,30.620000 8.860000,30.255000 8.766000,29.887000 8.683000,29.516000 8.611000,29.144000 8.549000,28.769000 8.499000,28.393000 8.459000,28.015000 8.413000,27.257000 8.411000,26.498000 8.427000,26.118000 8.453000,25.740000 8.491000,25.362000 8.539000,24.985000 8.599000,24.610000 8.669000,24.237000 8.750000,23.866000 8.842000,23.498000 8.944000,23.132000 9.057000,22.770000 9.181000,22.410000 9.315000,22.055000 9.459000,21.704000 9.613000,21.357000 9.777000,21.015000 9.951000,20.677000 10.135000,20.345000 10.329000,20.018000 10.532000,19.697000 10.727000,19.389000 11.090000,18.755000 11.415000,18.101000 11.563000,17.768000 11.702000,17.430000 11.831000,17.088000 11.950000,16.743000 12.157000,16.042000 12.245000,15.688000 12.391000,14.973000 12.448000,14.612000 12.531000,13.886000 12.556000,13.522000 12.571000,13.157000 12.569000,12.427000 12.552000,12.062000 12.525000,11.698000 12.487000,11.335000 12.438000,10.973000 12.379000,10.612000 12.310000,10.254000 12.230000,9.898000 12.140000,9.544000 12.039000,9.193000 11.929000,8.845000 11.678000,8.159000 11.387000,7.489000 11.058000,6.837000 10.692000,6.205000 10.495000,5.898000 10.289000,5.596000 10.075000,5.300000 9.621000,4.728000 9.382000,4.452000 9.135000,4.183000 8.880000,3.921000 8.618000,3.667000 8.349000,3.421000 7.789000,2.952000 7.499000,2.730000 6.900000,2.312000 6.592000,2.116000 6.278000,1.929000 5.959000,1.752000 5.635000,1.583000 5.306000,1.424000 4.973000,1.275000 4.294000,1.006000 3.949000,0.886000 3.249000,0.677000 2.895000,0.588000 2.539000,0.509000 2.180000,0.440000 1.820000,0.382000 1.094000,0.298000 0.730000,0.271000 0.365000,0.255000 0.000000,0.250000 z%22 /></g><g id=%22C113%22 data-name=%22as_component__PNGCOJINIPILRSBFUVHAAAKRQR7F7X5DOV45DHY3HPYOUZICQITA%22><path class=%22layer_1_0%22 d=%22M 9.889000,3.500000 0.000000,1.275000 0.000000,-1.275000 9.889000,-3.500000 16.000000,-3.500000 16.000000,3.500000 z%22 /><path class=%22layer_2_0%22 d=%22M 0.000000,-0.250000 10.000000,-2.500000 10.000000,2.500000 0.000000,0.250000 z%22 /><rect class=%22layer_2_0%22 x=%2210.300000%22 y=%22-2.500000%22 width=%220.300000%22 height=%225.000000%22 /><rect class=%22layer_2_0%22 x=%2210.900000%22 y=%22-2.500000%22 width=%220.300000%22 height=%225.000000%22 /><rect class=%22layer_2_0%22 x=%2211.500000%22 y=%22-2.500000%22 width=%220.300000%22 height=%225.000000%22 /><rect class=%22layer_2_0%22 x=%2212.100000%22 y=%22-2.500000%22 width=%220.300000%22 height=%225.000000%22 /><rect class=%22layer_2_0%22 x=%2212.700000%22 y=%22-2.500000%22 width=%220.300000%22 height=%225.000000%22 /><rect class=%22layer_2_0%22 x=%2213.300000%22 y=%22-2.500000%22 width=%220.300000%22 height=%225.000000%22 /><rect class=%22layer_2_0%22 x=%2213.900000%22 y=%22-2.500000%22 width=%220.300000%22 height=%225.000000%22 /><rect class=%22layer_2_0%22 x=%2214.500000%22 y=%22-2.500000%22 width=%220.300000%22 height=%225.000000%22 /><rect class=%22layer_2_0%22 x=%2215.100000%22 y=%22-2.500000%22 width=%220.300000%22 height=%225.000000%22 /><rect class=%22layer_2_0%22 x=%2215.700000%22 y=%22-2.500000%22 width=%220.300000%22 height=%225.000000%22 /></g><g id=%22C114%22 data-name=%22s_bend_l_63P780358429199104_o_17P43557226765684_p_Strip%22><path class=%22layer_1_0%22 d=%22M 0.000000,-1.250000 0.853000,-1.244000 1.706000,-1.227000 2.559000,-1.199000 3.411000,-1.159000 4.262000,-1.108000 5.113000,-1.045000 5.963000,-0.971000 6.812000,-0.886000 7.659000,-0.790000 8.505000,-0.682000 9.350000,-0.563000 10.193000,-0.432000 11.034000,-0.291000 11.874000,-0.138000 12.711000,0.026000 13.546000,0.201000 14.378000,0.388000 15.208000,0.585000 16.035000,0.794000 16.860000,1.013000 17.681000,1.243000 18.499000,1.485000 19.314000,1.737000 20.126000,2.000000 20.934000,2.274000 21.738000,2.559000 22.538000,2.854000 23.334000,3.160000 24.126000,3.477000 24.914000,3.804000 25.698000,4.142000 26.476000,4.490000 27.251000,4.848000 28.020000,5.217000 28.784000,5.596000 29.543000,5.985000 30.297000,6.384000 31.046000,6.794000 31.789000,7.213000 32.526000,7.642000 33.234000,8.054000 33.948000,8.457000 35.392000,9.234000 36.121000,9.608000 36.856000,9.972000 37.595000,10.326000 38.339000,10.671000 39.087000,11.005000 39.840000,11.330000 40.597000,11.644000 41.358000,11.948000 42.123000,12.242000 42.892000,12.526000 43.665000,12.800000 44.441000,13.063000 45.221000,13.316000 46.004000,13.558000 46.790000,13.790000 47.580000,14.011000 48.372000,14.222000 49.167000,14.423000 49.964000,14.612000 50.764000,14.791000 51.566000,14.960000 52.371000,15.117000 53.177000,15.264000 53.985000,15.400000 54.795000,15.525000 55.607000,15.640000 56.420000,15.744000 57.235000,15.836000 58.050000,15.918000 58.867000,15.989000 59.684000,16.049000 60.503000,16.099000 61.322000,16.137000 62.960000,16.181000 63.780000,16.186000 63.780000,18.686000 62.927000,18.680000 62.074000,18.663000 61.221000,18.635000 60.369000,18.595000 59.518000,18.544000 58.667000,18.481000 57.817000,18.407000 56.968000,18.322000 56.121000,18.226000 55.275000,18.118000 54.430000,17.999000 53.587000,17.868000 52.746000,17.727000 51.906000,17.574000 51.069000,17.410000 50.234000,17.235000 49.402000,17.048000 48.572000,16.851000 47.745000,16.642000 46.920000,16.423000 46.099000,16.193000 45.281000,15.951000 44.466000,15.699000 43.654000,15.436000 42.846000,15.162000 42.042000,14.877000 41.242000,14.582000 40.446000,14.276000 39.654000,13.959000 38.866000,13.632000 38.082000,13.294000 37.304000,12.946000 36.529000,12.588000 35.760000,12.219000 34.996000,11.840000 34.237000,11.451000 33.483000,11.052000 32.734000,10.642000 31.991000,10.223000 31.254000,9.794000 30.546000,9.382000 29.832000,8.979000 28.388000,8.202000 27.659000,7.828000 26.924000,7.464000 26.185000,7.110000 25.441000,6.765000 24.693000,6.431000 23.940000,6.106000 23.183000,5.792000 22.422000,5.488000 21.657000,5.194000 20.888000,4.910000 20.115000,4.636000 19.339000,4.373000 18.559000,4.120000 17.776000,3.878000 16.990000,3.646000 16.200000,3.425000 15.408000,3.214000 14.613000,3.013000 13.816000,2.824000 13.016000,2.645000 12.214000,2.476000 11.409000,2.319000 10.603000,2.172000 9.795000,2.036000 8.985000,1.911000 8.173000,1.796000 7.360000,1.692000 6.545000,1.600000 5.730000,1.518000 4.913000,1.447000 4.096000,1.387000 3.277000,1.337000 2.459000,1.299000 0.820000,1.255000 0.000000,1.250000 z%22 /><path class=%22layer_2_0%22 d=%22M 0.000000,-0.250000 0.840000,-0.244000 1.679000,-0.228000 2.519000,-0.200000 4.196000,-0.110000 5.870000,0.024000 6.705000,0.108000 7.539000,0.203000 8.372000,0.309000 9.204000,0.427000 10.034000,0.555000 10.862000,0.694000 11.688000,0.845000 12.512000,1.006000 13.334000,1.179000 14.153000,1.362000 14.970000,1.556000 15.785000,1.762000 16.596000,1.978000 17.405000,2.204000 18.210000,2.442000 19.012000,2.690000 19.811000,2.949000 20.606000,3.219000 21.398000,3.499000 22.186000,3.790000 22.969000,4.091000 23.749000,4.403000 24.525000,4.725000 25.296000,5.057000 26.062000,5.400000 26.824000,5.753000 27.582000,6.116000 28.334000,6.489000 29.081000,6.872000 29.823000,7.265000 30.560000,7.668000 31.291000,8.080000 32.017000,8.503000 32.737000,8.922000 33.463000,9.331000 34.194000,9.731000 34.930000,10.121000 35.671000,10.501000 36.418000,10.871000 37.169000,11.231000 37.925000,11.581000 38.685000,11.921000 39.450000,12.251000 40.220000,12.570000 40.993000,12.879000 41.771000,13.178000 42.552000,13.467000 43.338000,13.745000 44.127000,14.012000 44.919000,14.269000 45.715000,14.515000 46.514000,14.751000 47.316000,14.976000 48.121000,15.190000 48.929000,15.394000 49.739000,15.587000 50.552000,15.769000 51.367000,15.940000 52.185000,16.100000 53.004000,16.249000 53.826000,16.387000 54.649000,16.515000 55.474000,16.631000 56.300000,16.736000 57.128000,16.831000 57.957000,16.914000 58.787000,16.986000 59.618000,17.047000 60.449000,17.097000 61.281000,17.136000 62.114000,17.164000 63.780000,17.186000 63.780000,17.686000 62.940000,17.680000 62.101000,17.664000 61.261000,17.636000 59.584000,17.546000 57.910000,17.412000 57.075000,17.328000 56.241000,17.233000 55.408000,17.127000 54.576000,17.009000 53.746000,16.881000 52.918000,16.742000 52.092000,16.591000 51.268000,16.430000 50.446000,16.257000 49.627000,16.074000 48.810000,15.880000 47.995000,15.674000 47.184000,15.458000 46.375000,15.232000 45.570000,14.994000 44.768000,14.746000 43.969000,14.487000 43.174000,14.217000 42.382000,13.937000 41.594000,13.646000 40.811000,13.345000 40.031000,13.033000 39.255000,12.711000 38.484000,12.379000 37.718000,12.036000 36.956000,11.683000 36.198000,11.320000 35.446000,10.947000 34.699000,10.564000 33.957000,10.171000 33.220000,9.768000 32.489000,9.356000 31.763000,8.933000 31.043000,8.514000 30.317000,8.105000 29.586000,7.705000 28.850000,7.315000 28.109000,6.935000 27.362000,6.565000 26.611000,6.205000 25.855000,5.855000 25.095000,5.515000 24.330000,5.186000 23.560000,4.866000 22.787000,4.557000 22.009000,4.258000 21.228000,3.969000 20.442000,3.691000 19.653000,3.424000 18.861000,3.167000 18.065000,2.921000 17.266000,2.685000 16.464000,2.460000 15.659000,2.246000 14.851000,2.042000 14.041000,1.849000 13.228000,1.667000 12.413000,1.496000 11.595000,1.336000 10.776000,1.187000 9.954000,1.049000 9.131000,0.921000 8.306000,0.805000 7.480000,0.700000 6.652000,0.605000 5.823000,0.522000 4.993000,0.450000 4.162000,0.389000 3.331000,0.339000 2.499000,0.300000 1.666000,0.272000 0.833000,0.256000 0.000000,0.250000 z%22 /></g><g id=%22C115%22 data-name=%22as_component__PNGCOJINIPILRSBFUVHAAAKRQR7F7X5DOV45DHY3HPYOUZICQITA%22><path class=%22layer_1_0%22 d=%22M 9.889000,3.500000 0.000000,1.275000 0.000000,-1.275000 9.889000,-3.500000 16.000000,-3.500000 16.000000,3.500000 z%22 /><path class=%22layer_2_0%22 d=%22M 0.000000,-0.250000 10.000000,-2.500000 10.000000,2.500000 0.000000,0.250000 z%22 /><rect class=%22layer_2_0%22 x=%2210.300000%22 y=%22-2.500000%22 width=%220.300000%22 height=%225.000000%22 /><rect class=%22layer_2_0%22 x=%2210.900000%22 y=%22-2.500000%22 width=%220.300000%22 height=%225.000000%22 /><rect class=%22layer_2_0%22 x=%2211.500000%22 y=%22-2.500000%22 width=%220.300000%22 height=%225.000000%22 /><rect class=%22layer_2_0%22 x=%2212.100000%22 y=%22-2.500000%22 width=%220.300000%22 height=%225.000000%22 /><rect class=%22layer_2_0%22 x=%2212.700000%22 y=%22-2.500000%22 width=%220.300000%22 height=%225.000000%22 /><rect class=%22layer_2_0%22 x=%2213.300000%22 y=%22-2.500000%22 width=%220.300000%22 height=%225.000000%22 /><rect class=%22layer_2_0%22 x=%2213.900000%22 y=%22-2.500000%22 width=%220.300000%22 height=%225.000000%22 /><rect class=%22layer_2_0%22 x=%2214.500000%22 y=%22-2.500000%22 width=%220.300000%22 height=%225.000000%22 /><rect class=%22layer_2_0%22 x=%2215.100000%22 y=%22-2.500000%22 width=%220.300000%22 height=%225.000000%22 /><rect class=%22layer_2_0%22 x=%2215.700000%22 y=%22-2.500000%22 width=%220.300000%22 height=%225.000000%22 /></g><g id=%22C116%22 data-name=%22s_bend_l_60P318642339837965_o_4P2810720453640965_p_Strip%22><path class=%22layer_1_0%22 d=%22M 0.000000,-1.250000 1.691000,-1.243000 3.382000,-1.223000 5.073000,-1.190000 6.763000,-1.144000 8.453000,-1.084000 10.142000,-1.010000 11.831000,-0.924000 13.519000,-0.824000 15.206000,-0.711000 16.892000,-0.585000 18.578000,-0.445000 20.262000,-0.292000 21.945000,-0.126000 23.626000,0.053000 25.306000,0.246000 26.984000,0.452000 28.661000,0.671000 30.336000,0.903000 31.992000,1.133000 33.649000,1.349000 35.308000,1.552000 36.968000,1.743000 38.630000,1.920000 40.293000,2.084000 41.958000,2.235000 43.623000,2.373000 45.290000,2.498000 46.957000,2.610000 48.626000,2.709000 50.295000,2.794000 51.965000,2.867000 53.635000,2.926000 55.306000,2.972000 56.977000,3.005000 58.648000,3.024000 60.319000,3.031000 60.319000,5.531000 58.628000,5.524000 56.937000,5.504000 55.247000,5.471000 53.556000,5.425000 51.866000,5.365000 50.177000,5.291000 48.488000,5.205000 46.800000,5.105000 45.113000,4.992000 43.427000,4.866000 41.741000,4.726000 40.057000,4.573000 38.374000,4.407000 36.693000,4.228000 35.013000,4.035000 33.335000,3.829000 31.658000,3.610000 29.983000,3.378000 28.327000,3.148000 26.670000,2.932000 25.011000,2.729000 23.351000,2.538000 21.689000,2.361000 20.026000,2.197000 18.361000,2.046000 16.696000,1.908000 15.029000,1.783000 13.362000,1.671000 11.693000,1.572000 10.024000,1.487000 8.354000,1.414000 6.684000,1.355000 5.013000,1.309000 3.342000,1.276000 1.671000,1.257000 0.000000,1.250000 z%22 /><path class=%22layer_2_0%22 d=%22M 0.000000,-0.250000 1.683000,-0.243000 3.366000,-0.223000 5.049000,-0.190000 6.731000,-0.144000 8.413000,-0.084000 10.095000,-0.012000 11.776000,0.075000 13.456000,0.174000 15.135000,0.286000 16.814000,0.412000 18.491000,0.551000 20.167000,0.703000 21.842000,0.869000 23.516000,1.047000 25.188000,1.239000 26.859000,1.444000 28.528000,1.662000 30.195000,1.893000 31.858000,2.124000 33.523000,2.341000 35.190000,2.546000 36.858000,2.737000 38.528000,2.915000 40.199000,3.080000 41.871000,3.232000 43.545000,3.370000 45.219000,3.496000 46.894000,3.608000 48.571000,3.707000 50.248000,3.793000 51.925000,3.866000 53.603000,3.925000 55.282000,3.972000 56.961000,4.005000 58.640000,4.024000 60.319000,4.031000 60.319000,4.531000 58.636000,4.524000 56.953000,4.505000 55.270000,4.471000 53.588000,4.425000 51.906000,4.365000 50.224000,4.293000 48.543000,4.206000 46.863000,4.107000 45.184000,3.995000 43.505000,3.869000 41.828000,3.730000 40.152000,3.578000 38.477000,3.412000 36.803000,3.234000 35.131000,3.042000 33.460000,2.837000 31.791000,2.619000 30.124000,2.388000 28.461000,2.157000 26.796000,1.940000 25.129000,1.735000 23.461000,1.544000 21.791000,1.366000 20.120000,1.201000 18.448000,1.049000 16.774000,0.911000 15.100000,0.785000 13.425000,0.673000 11.748000,0.574000 10.071000,0.488000 8.394000,0.415000 6.716000,0.356000 5.037000,0.309000 3.358000,0.276000 1.679000,0.257000 0.000000,0.250000 z%22 /></g><g id=%22C117%22 data-name=%22as_component__PNGCOJINIPILRSBFUVHAAAKRQR7F7X5DOV45DHY3HPYOUZICQITA%22><path class=%22layer_1_0%22 d=%22M 9.889000,3.500000 0.000000,1.275000 0.000000,-1.275000 9.889000,-3.500000 16.000000,-3.500000 16.000000,3.500000 z%22 /><path class=%22layer_2_0%22 d=%22M 0.000000,-0.250000 10.000000,-2.500000 10.000000,2.500000 0.000000,0.250000 z%22 /><rect class=%22layer_2_0%22 x=%2210.300000%22 y=%22-2.500000%22 width=%220.300000%22 height=%225.000000%22 /><rect class=%22layer_2_0%22 x=%2210.900000%22 y=%22-2.500000%22 width=%220.300000%22 height=%225.000000%22 /><rect class=%22layer_2_0%22 x=%2211.500000%22 y=%22-2.500000%22 width=%220.300000%22 height=%225.000000%22 /><rect class=%22layer_2_0%22 x=%2212.100000%22 y=%22-2.500000%22 width=%220.300000%22 height=%225.000000%22 /><rect class=%22layer_2_0%22 x=%2212.700000%22 y=%22-2.500000%22 width=%220.300000%22 height=%225.000000%22 /><rect class=%22layer_2_0%22 x=%2213.300000%22 y=%22-2.500000%22 width=%220.300000%22 height=%225.000000%22 /><rect class=%22layer_2_0%22 x=%2213.900000%22 y=%22-2.500000%22 width=%220.300000%22 height=%225.000000%22 /><rect class=%22layer_2_0%22 x=%2214.500000%22 y=%22-2.500000%22 width=%220.300000%22 height=%225.000000%22 /><rect class=%22layer_2_0%22 x=%2215.100000%22 y=%22-2.500000%22 width=%220.300000%22 height=%225.000000%22 /><rect class=%22layer_2_0%22 x=%2215.700000%22 y=%22-2.500000%22 width=%220.300000%22 height=%225.000000%22 /></g><g id=%22C118%22 data-name=%22s_bend_l_26P007750533977603_o_20P05451364216402_p_Strip%22><path class=%22layer_1_0%22 d=%22M 0.000000,-1.250000 0.420000,-1.244000 0.839000,-1.226000 1.258000,-1.196000 1.675000,-1.154000 2.091000,-1.100000 2.506000,-1.035000 2.918000,-0.957000 3.329000,-0.868000 3.736000,-0.767000 4.140000,-0.655000 4.541000,-0.531000 4.938000,-0.395000 5.332000,-0.249000 5.721000,-0.091000 6.105000,0.078000 6.484000,0.258000 6.858000,0.448000 7.226000,0.649000 7.589000,0.861000 7.945000,1.083000 8.295000,1.315000 8.638000,1.557000 8.974000,1.808000 9.303000,2.069000 9.624000,2.339000 9.937000,2.619000 10.242000,2.907000 10.539000,3.204000 10.827000,3.509000 11.106000,3.822000 11.377000,4.143000 11.638000,4.472000 11.889000,4.808000 12.131000,5.151000 12.363000,5.501000 12.585000,5.857000 12.796000,6.219000 12.997000,6.588000 13.188000,6.962000 13.368000,7.341000 13.537000,7.725000 13.694000,8.114000 13.841000,8.507000 13.976000,8.904000 14.100000,9.305000 14.213000,9.710000 14.306000,10.045000 14.409000,10.378000 14.643000,11.034000 14.914000,11.676000 15.222000,12.301000 15.564000,12.907000 15.748000,13.203000 16.141000,13.778000 16.350000,14.057000 16.791000,14.596000 17.262000,15.109000 17.508000,15.355000 18.022000,15.826000 18.288000,16.051000 18.840000,16.476000 19.124000,16.677000 19.710000,17.053000 20.011000,17.229000 20.627000,17.554000 21.261000,17.843000 21.583000,17.974000 21.910000,18.096000 22.572000,18.311000 23.246000,18.488000 23.586000,18.562000 24.272000,18.681000 24.618000,18.726000 25.312000,18.785000 26.008000,18.805000 26.008000,21.305000 25.588000,21.299000 25.169000,21.281000 24.750000,21.251000 24.333000,21.209000 23.917000,21.155000 23.502000,21.090000 23.090000,21.012000 22.679000,20.923000 22.272000,20.822000 21.868000,20.710000 21.467000,20.586000 21.070000,20.450000 20.676000,20.304000 20.287000,20.146000 19.903000,19.977000 19.524000,19.797000 19.150000,19.607000 18.782000,19.406000 18.419000,19.194000 18.063000,18.972000 17.713000,18.740000 17.370000,18.498000 17.034000,18.247000 16.705000,17.986000 16.384000,17.716000 16.071000,17.436000 15.766000,17.148000 15.469000,16.851000 15.181000,16.546000 14.902000,16.233000 14.631000,15.912000 14.370000,15.583000 14.119000,15.247000 13.877000,14.904000 13.645000,14.554000 13.423000,14.198000 13.212000,13.836000 13.011000,13.467000 12.820000,13.093000 12.640000,12.714000 12.471000,12.330000 12.314000,11.941000 12.167000,11.548000 12.032000,11.151000 11.908000,10.750000 11.795000,10.345000 11.702000,10.010000 11.599000,9.677000 11.365000,9.021000 11.094000,8.379000 10.786000,7.754000 10.444000,7.148000 10.260000,6.852000 9.867000,6.277000 9.658000,5.998000 9.217000,5.459000 8.985000,5.199000 8.500000,4.700000 8.246000,4.461000 7.720000,4.004000 7.447000,3.788000 6.884000,3.378000 6.593000,3.186000 5.997000,2.826000 5.381000,2.501000 5.066000,2.352000 4.425000,2.081000 4.098000,1.959000 3.436000,1.744000 2.762000,1.567000 2.422000,1.493000 1.736000,1.374000 1.390000,1.329000 0.696000,1.270000 0.000000,1.250000 z%22 /><path class=%22layer_2_0%22 d=%22M 0.000000,-0.250000 0.391000,-0.244000 0.782000,-0.228000 1.172000,-0.200000 1.561000,-0.161000 1.949000,-0.111000 2.335000,-0.049000 2.720000,0.023000 3.102000,0.106000 3.482000,0.200000 3.859000,0.305000 4.232000,0.420000 4.602000,0.546000 4.969000,0.683000 5.331000,0.830000 5.689000,0.988000 6.043000,1.155000 6.391000,1.333000 6.735000,1.520000 7.072000,1.717000 7.404000,1.924000 7.730000,2.140000 8.050000,2.366000 8.363000,2.600000 8.670000,2.843000 8.969000,3.095000 9.261000,3.355000 9.545000,3.624000 9.822000,3.901000 10.090000,4.185000 10.351000,4.477000 10.846000,5.082000 11.080000,5.396000 11.305000,5.715000 11.522000,6.041000 11.728000,6.373000 11.925000,6.711000 12.113000,7.054000 12.291000,7.403000 12.458000,7.756000 12.615000,8.114000 12.763000,8.477000 12.899000,8.843000 13.025000,9.213000 13.141000,9.587000 13.246000,9.964000 13.347000,10.327000 13.458000,10.687000 13.711000,11.397000 13.853000,11.746000 14.166000,12.432000 14.337000,12.767000 14.518000,13.098000 14.708000,13.424000 15.115000,14.058000 15.332000,14.366000 15.558000,14.667000 16.035000,15.251000 16.286000,15.532000 16.545000,15.806000 16.811000,16.072000 17.085000,16.331000 17.655000,16.825000 17.950000,17.059000 18.252000,17.285000 18.560000,17.502000 18.874000,17.710000 19.194000,17.909000 19.519000,18.099000 19.850000,18.280000 20.526000,18.613000 20.871000,18.764000 21.221000,18.906000 21.574000,19.038000 21.930000,19.159000 22.290000,19.270000 22.653000,19.371000 23.019000,19.462000 23.387000,19.542000 23.758000,19.612000 24.130000,19.671000 24.504000,19.719000 24.879000,19.757000 25.631000,19.800000 26.008000,19.805000 26.008000,20.305000 25.226000,20.283000 24.836000,20.255000 24.447000,20.216000 24.059000,20.166000 23.673000,20.104000 23.288000,20.032000 22.906000,19.949000 22.526000,19.855000 22.149000,19.750000 21.776000,19.635000 21.406000,19.509000 21.039000,19.372000 20.677000,19.225000 20.319000,19.067000 19.965000,18.900000 19.273000,18.535000 18.936000,18.338000 18.604000,18.131000 18.278000,17.915000 17.958000,17.689000 17.645000,17.455000 17.338000,17.212000 17.039000,16.960000 16.747000,16.700000 16.463000,16.431000 16.186000,16.154000 15.918000,15.870000 15.657000,15.578000 15.162000,14.973000 14.928000,14.659000 14.703000,14.340000 14.486000,14.014000 14.280000,13.682000 14.083000,13.344000 13.895000,13.001000 13.717000,12.652000 13.550000,12.299000 13.393000,11.941000 13.245000,11.578000 13.109000,11.212000 12.983000,10.842000 12.867000,10.468000 12.762000,10.091000 12.661000,9.728000 12.550000,9.368000 12.297000,8.658000 12.155000,8.309000 11.842000,7.623000 11.671000,7.288000 11.490000,6.957000 11.300000,6.631000 10.893000,5.997000 10.676000,5.689000 10.450000,5.388000 9.973000,4.804000 9.722000,4.523000 9.463000,4.249000 9.197000,3.983000 8.923000,3.724000 8.353000,3.230000 8.058000,2.996000 7.756000,2.770000 7.448000,2.553000 7.134000,2.345000 6.814000,2.146000 6.489000,1.956000 6.158000,1.775000 5.482000,1.442000 4.788000,1.149000 4.434000,1.017000 4.078000,0.896000 3.718000,0.785000 3.355000,0.684000 2.989000,0.593000 2.621000,0.513000 2.250000,0.443000 1.878000,0.384000 1.504000,0.336000 1.129000,0.298000 0.377000,0.255000 0.000000,0.250000 z%22 /></g><g id=%22C119%22 data-name=%22as_component__PNGCOJINIPILRSBFUVHAAAKRQR7F7X5DOV45DHY3HPYOUZICQITA%22><path class=%22layer_1_0%22 d=%22M 9.889000,3.500000 0.000000,1.275000 0.000000,-1.275000 9.889000,-3.500000 16.000000,-3.500000 16.000000,3.500000 z%22 /><path class=%22layer_2_0%22 d=%22M 0.000000,-0.250000 10.000000,-2.500000 10.000000,2.500000 0.000000,0.250000 z%22 /><rect class=%22layer_2_0%22 x=%2210.300000%22 y=%22-2.500000%22 width=%220.300000%22 height=%225.000000%22 /><rect class=%22layer_2_0%22 x=%2210.900000%22 y=%22-2.500000%22 width=%220.300000%22 height=%225.000000%22 /><rect class=%22layer_2_0%22 x=%2211.500000%22 y=%22-2.500000%22 width=%220.300000%22 height=%225.000000%22 /><rect class=%22layer_2_0%22 x=%2212.100000%22 y=%22-2.500000%22 width=%220.300000%22 height=%225.000000%22 /><rect class=%22layer_2_0%22 x=%2212.700000%22 y=%22-2.500000%22 width=%220.300000%22 height=%225.000000%22 /><rect class=%22layer_2_0%22 x=%2213.300000%22 y=%22-2.500000%22 width=%220.300000%22 height=%225.000000%22 /><rect class=%22layer_2_0%22 x=%2213.900000%22 y=%22-2.500000%22 width=%220.300000%22 height=%225.000000%22 /><rect class=%22layer_2_0%22 x=%2214.500000%22 y=%22-2.500000%22 width=%220.300000%22 height=%225.000000%22 /><rect class=%22layer_2_0%22 x=%2215.100000%22 y=%22-2.500000%22 width=%220.300000%22 height=%225.000000%22 /><rect class=%22layer_2_0%22 x=%2215.700000%22 y=%22-2.500000%22 width=%220.300000%22 height=%225.000000%22 /></g><g id=%22C120%22 data-name=%22s_bend_l_59P46769185907971_o_69P21865965332317_p_Strip%22><path class=%22layer_1_0%22 d=%22M 0.000000,-1.250000 0.586000,-1.245000 1.173000,-1.228000 1.758000,-1.201000 2.928000,-1.113000 3.511000,-1.053000 4.093000,-0.981000 4.674000,-0.899000 5.253000,-0.807000 5.830000,-0.703000 6.405000,-0.588000 6.978000,-0.463000 7.548000,-0.327000 8.116000,-0.180000 8.681000,-0.023000 9.243000,0.144000 10.356000,0.511000 10.908000,0.710000 11.456000,0.920000 11.999000,1.139000 12.539000,1.369000 13.605000,1.858000 14.651000,2.387000 15.167000,2.666000 15.677000,2.955000 16.182000,3.253000 16.682000,3.561000 17.175000,3.878000 17.662000,4.204000 18.143000,4.539000 18.618000,4.883000 19.087000,5.236000 19.548000,5.597000 20.451000,6.346000 21.325000,7.128000 22.169000,7.942000 22.579000,8.361000 22.982000,8.788000 23.376000,9.221000 24.140000,10.111000 24.510000,10.566000 24.871000,11.028000 25.223000,11.497000 25.566000,11.973000 25.900000,12.454000 26.226000,12.942000 26.542000,13.436000 26.849000,13.936000 27.146000,14.441000 27.434000,14.952000 27.712000,15.468000 27.981000,15.989000 28.240000,16.515000 28.489000,17.046000 28.728000,17.582000 29.175000,18.666000 29.384000,19.214000 29.582000,19.766000 29.770000,20.321000 29.947000,20.880000 30.114000,21.442000 30.270000,22.007000 30.416000,22.575000 30.551000,23.146000 30.675000,23.719000 30.789000,24.294000 30.892000,24.872000 30.984000,25.451000 31.065000,26.031000 31.195000,27.197000 31.243000,27.781000 31.281000,28.367000 31.307000,28.952000 31.323000,29.538000 31.327000,30.125000 31.321000,30.711000 31.304000,31.297000 31.275000,31.883000 31.236000,32.468000 31.186000,33.052000 31.125000,33.635000 31.053000,34.217000 30.970000,34.798000 30.893000,35.332000 30.771000,36.404000 30.689000,37.480000 30.662000,38.019000 30.646000,38.558000 30.645000,39.638000 30.659000,40.177000 30.718000,41.254000 30.817000,42.329000 30.882000,42.865000 31.041000,43.932000 31.136000,44.463000 31.355000,45.520000 31.479000,46.045000 31.613000,46.568000 31.757000,47.088000 32.074000,48.119000 32.429000,49.138000 32.822000,50.143000 33.253000,51.133000 33.720000,52.105000 33.967000,52.585000 34.223000,53.060000 34.488000,53.530000 35.044000,54.455000 35.634000,55.358000 35.942000,55.802000 36.582000,56.670000 36.914000,57.096000 37.254000,57.515000 37.958000,58.333000 38.320000,58.732000 38.691000,59.125000 39.453000,59.888000 40.244000,60.623000 40.649000,60.979000 41.480000,61.668000 42.336000,62.326000 43.215000,62.951000 43.664000,63.251000 44.577000,63.825000 45.042000,64.100000 45.986000,64.622000 46.465000,64.870000 47.437000,65.339000 48.426000,65.770000 49.431000,66.165000 50.449000,66.522000 50.963000,66.686000 52.000000,66.985000 52.522000,67.120000 53.047000,67.245000 53.574000,67.360000 54.635000,67.561000 55.702000,67.722000 56.774000,67.843000 57.850000,67.924000 58.928000,67.964000 59.468000,67.969000 59.468000,70.469000 58.882000,70.464000 57.710000,70.420000 56.540000,70.332000 55.957000,70.272000 55.375000,70.200000 54.794000,70.118000 54.215000,70.026000 53.638000,69.922000 53.063000,69.807000 52.490000,69.682000 51.920000,69.546000 51.352000,69.400000 50.225000,69.075000 49.667000,68.896000 49.112000,68.708000 48.560000,68.509000 48.012000,68.299000 47.469000,68.080000 46.929000,67.850000 45.863000,67.361000 44.817000,66.832000 44.301000,66.553000 43.791000,66.264000 43.286000,65.966000 42.786000,65.658000 42.293000,65.341000 41.806000,65.015000 41.325000,64.680000 40.850000,64.336000 40.381000,63.983000 39.920000,63.622000 39.465000,63.252000 39.017000,62.873000 38.143000,62.091000 37.299000,61.277000 36.889000,60.858000 36.092000,59.998000 35.328000,59.108000 34.958000,58.653000 34.597000,58.191000 34.245000,57.722000 33.902000,57.246000 33.568000,56.765000 33.242000,56.277000 32.926000,55.783000 32.619000,55.283000 32.322000,54.778000 32.034000,54.267000 31.756000,53.751000 31.487000,53.230000 31.228000,52.704000 30.979000,52.173000 30.741000,51.637000 30.512000,51.097000 30.293000,50.553000 30.084000,50.005000 29.886000,49.453000 29.698000,48.898000 29.521000,48.339000 29.354000,47.777000 29.198000,47.212000 29.052000,46.644000 28.917000,46.073000 28.793000,45.500000 28.679000,44.925000 28.576000,44.347000 28.484000,43.768000 28.403000,43.188000 28.273000,42.022000 28.225000,41.438000 28.187000,40.852000 28.161000,40.267000 28.145000,39.681000 28.141000,39.094000 28.147000,38.508000 28.164000,37.922000 28.193000,37.336000 28.232000,36.751000 28.282000,36.167000 28.343000,35.584000 28.415000,35.002000 28.498000,34.421000 28.575000,33.887000 28.641000,33.352000 28.697000,32.815000 28.743000,32.277000 28.806000,31.200000 28.822000,30.661000 28.823000,29.581000 28.809000,29.042000 28.750000,27.965000 28.651000,26.890000 28.586000,26.354000 28.427000,25.287000 28.332000,24.756000 28.113000,23.699000 27.989000,23.174000 27.855000,22.651000 27.711000,22.131000 27.394000,21.100000 27.039000,20.081000 26.646000,19.076000 26.215000,18.086000 25.986000,17.598000 25.501000,16.634000 25.245000,16.159000 24.980000,15.689000 24.424000,14.764000 23.834000,13.861000 23.526000,13.417000 23.210000,12.980000 22.554000,12.123000 22.214000,11.704000 21.511000,10.886000 20.777000,10.094000 20.015000,9.331000 19.623000,8.960000 18.819000,8.240000 17.988000,7.551000 17.133000,6.893000 16.253000,6.268000 15.804000,5.968000 15.350000,5.677000 14.426000,5.119000 13.957000,4.854000 13.003000,4.349000 12.031000,3.880000 11.538000,3.660000 10.542000,3.247000 10.037000,3.054000 9.019000,2.697000 8.505000,2.533000 7.468000,2.234000 6.946000,2.099000 6.421000,1.974000 5.894000,1.859000 4.833000,1.658000 3.766000,1.497000 2.694000,1.376000 1.618000,1.295000 0.540000,1.255000 0.000000,1.250000 z%22 /><path class=%22layer_2_0%22 d=%22M 0.000000,-0.250000 0.568000,-0.245000 1.135000,-0.229000 2.269000,-0.165000 3.399000,-0.059000 3.962000,0.010000 4.524000,0.089000 5.085000,0.179000 5.644000,0.280000 6.200000,0.391000 6.755000,0.512000 7.307000,0.643000 7.857000,0.785000 8.948000,1.100000 9.488000,1.272000 10.026000,1.455000 11.090000,1.850000 12.139000,2.285000 12.657000,2.517000 13.679000,3.010000 14.184000,3.271000 14.683000,3.541000 15.666000,4.109000 16.149000,4.407000 16.627000,4.714000 17.098000,5.030000 17.564000,5.354000 18.024000,5.687000 18.924000,6.379000 19.364000,6.737000 19.798000,7.104000 20.224000,7.478000 20.644000,7.861000 21.056000,8.251000 21.461000,8.649000 21.858000,9.054000 22.248000,9.467000 22.630000,9.887000 23.004000,10.314000 23.370000,10.748000 24.077000,11.637000 24.418000,12.090000 25.074000,13.017000 25.389000,13.489000 25.695000,13.967000 25.992000,14.451000 26.280000,14.940000 26.828000,15.934000 27.088000,16.439000 27.338000,16.948000 27.579000,17.462000 28.032000,18.503000 28.244000,19.030000 28.446000,19.561000 28.637000,20.095000 28.819000,20.633000 28.991000,21.174000 29.153000,21.718000 29.304000,22.265000 29.445000,22.815000 29.576000,23.367000 29.696000,23.922000 29.806000,24.479000 29.906000,25.038000 29.995000,25.598000 30.141000,26.724000 30.199000,27.289000 30.246000,27.855000 30.282000,28.421000 30.308000,28.988000 30.323000,29.556000 30.321000,30.691000 30.277000,31.825000 30.239000,32.392000 30.190000,32.957000 30.131000,33.522000 30.061000,34.085000 29.981000,34.647000 29.902000,35.200000 29.775000,36.309000 29.690000,37.422000 29.663000,37.980000 29.641000,39.096000 29.645000,39.655000 29.685000,40.771000 29.721000,41.328000 29.767000,41.884000 29.823000,42.440000 29.890000,42.994000 30.055000,44.098000 30.153000,44.648000 30.261000,45.196000 30.508000,46.284000 30.647000,46.825000 30.796000,47.363000 30.955000,47.898000 31.124000,48.431000 31.491000,49.485000 31.898000,50.525000 32.343000,51.549000 32.580000,52.054000 32.827000,52.555000 33.083000,53.051000 33.348000,53.543000 33.622000,54.029000 33.905000,54.510000 34.197000,54.986000 34.498000,55.456000 35.126000,56.380000 35.788000,57.278000 36.132000,57.719000 36.844000,58.579000 37.211000,58.999000 37.970000,59.818000 38.361000,60.217000 39.164000,60.992000 39.996000,61.737000 40.856000,62.450000 41.295000,62.794000 41.741000,63.130000 42.651000,63.776000 43.115000,64.087000 43.585000,64.389000 44.541000,64.965000 45.027000,65.240000 45.518000,65.506000 46.515000,66.010000 47.529000,66.476000 48.561000,66.903000 49.082000,67.103000 50.136000,67.472000 51.203000,67.801000 51.741000,67.951000 52.824000,68.220000 53.917000,68.448000 54.467000,68.547000 55.018000,68.635000 55.571000,68.713000 56.125000,68.781000 56.681000,68.838000 57.237000,68.885000 57.794000,68.922000 58.910000,68.964000 59.468000,68.969000 59.468000,69.469000 58.900000,69.464000 58.333000,69.448000 57.199000,69.384000 56.069000,69.278000 55.506000,69.209000 54.944000,69.130000 54.383000,69.040000 53.824000,68.939000 52.713000,68.707000 52.161000,68.576000 51.611000,68.434000 50.520000,68.119000 49.980000,67.947000 49.442000,67.764000 48.378000,67.369000 47.329000,66.934000 46.811000,66.702000 45.789000,66.209000 45.284000,65.948000 44.785000,65.678000 43.802000,65.110000 43.319000,64.812000 42.841000,64.505000 41.904000,63.865000 41.444000,63.532000 40.991000,63.190000 40.544000,62.840000 40.104000,62.482000 39.670000,62.115000 39.244000,61.741000 38.824000,61.358000 38.412000,60.968000 38.007000,60.570000 37.610000,60.165000 37.220000,59.752000 36.838000,59.332000 36.464000,58.905000 36.098000,58.471000 35.391000,57.583000 35.050000,57.129000 34.394000,56.202000 34.079000,55.730000 33.773000,55.252000 33.476000,54.768000 33.188000,54.279000 32.640000,53.285000 32.380000,52.780000 32.130000,52.271000 31.889000,51.757000 31.436000,50.716000 31.224000,50.189000 31.022000,49.658000 30.649000,48.586000 30.477000,48.045000 30.315000,47.501000 30.164000,46.954000 30.023000,46.404000 29.892000,45.852000 29.772000,45.297000 29.662000,44.740000 29.562000,44.181000 29.473000,43.621000 29.327000,42.495000 29.269000,41.930000 29.222000,41.364000 29.186000,40.798000 29.160000,40.231000 29.145000,39.663000 29.147000,38.528000 29.191000,37.394000 29.229000,36.827000 29.278000,36.262000 29.337000,35.697000 29.407000,35.134000 29.487000,34.572000 29.566000,34.019000 29.693000,32.910000 29.778000,31.797000 29.805000,31.239000 29.827000,30.123000 29.823000,29.564000 29.783000,28.448000 29.747000,27.891000 29.645000,26.779000 29.578000,26.225000 29.413000,25.121000 29.315000,24.571000 29.207000,24.024000 28.960000,22.935000 28.821000,22.394000 28.672000,21.856000 28.513000,21.321000 28.344000,20.788000 27.977000,19.734000 27.570000,18.694000 27.125000,17.670000 26.888000,17.165000 26.641000,16.664000 26.120000,15.676000 25.846000,15.190000 25.563000,14.709000 25.271000,14.233000 24.970000,13.763000 24.660000,13.298000 24.342000,12.840000 24.015000,12.387000 23.680000,11.941000 23.336000,11.501000 22.984000,11.067000 22.257000,10.220000 21.498000,9.401000 21.107000,9.002000 20.304000,8.227000 19.472000,7.482000 18.612000,6.769000 18.173000,6.425000 17.727000,6.089000 17.275000,5.762000 16.353000,5.132000 15.883000,4.830000 14.927000,4.254000 14.441000,3.979000 13.950000,3.713000 12.953000,3.209000 11.939000,2.743000 10.907000,2.316000 9.861000,1.927000 9.332000,1.747000 8.265000,1.418000 7.727000,1.268000 6.644000,0.999000 5.551000,0.771000 5.001000,0.672000 4.450000,0.584000 3.897000,0.506000 3.343000,0.438000 2.231000,0.334000 1.674000,0.297000 0.558000,0.255000 0.000000,0.250000 z%22 /></g><g id=%22C121%22 data-name=%22as_component__PNGCOJINIPILRSBFUVHAAAKRQR7F7X5DOV45DHY3HPYOUZICQITA%22><path class=%22layer_1_0%22 d=%22M 9.889000,3.500000 0.000000,1.275000 0.000000,-1.275000 9.889000,-3.500000 16.000000,-3.500000 16.000000,3.500000 z%22 /><path class=%22layer_2_0%22 d=%22M 0.000000,-0.250000 10.000000,-2.500000 10.000000,2.500000 0.000000,0.250000 z%22 /><rect class=%22layer_2_0%22 x=%2210.300000%22 y=%22-2.500000%22 width=%220.300000%22 height=%225.000000%22 /><rect class=%22layer_2_0%22 x=%2210.900000%22 y=%22-2.500000%22 width=%220.300000%22 height=%225.000000%22 /><rect class=%22layer_2_0%22 x=%2211.500000%22 y=%22-2.500000%22 width=%220.300000%22 height=%225.000000%22 /><rect class=%22layer_2_0%22 x=%2212.100000%22 y=%22-2.500000%22 width=%220.300000%22 height=%225.000000%22 /><rect class=%22layer_2_0%22 x=%2212.700000%22 y=%22-2.500000%22 width=%220.300000%22 height=%225.000000%22 /><rect class=%22layer_2_0%22 x=%2213.300000%22 y=%22-2.500000%22 width=%220.300000%22 height=%225.000000%22 /><rect class=%22layer_2_0%22 x=%2213.900000%22 y=%22-2.500000%22 width=%220.300000%22 height=%225.000000%22 /><rect class=%22layer_2_0%22 x=%2214.500000%22 y=%22-2.500000%22 width=%220.300000%22 height=%225.000000%22 /><rect class=%22layer_2_0%22 x=%2215.100000%22 y=%22-2.500000%22 width=%220.300000%22 height=%225.000000%22 /><rect class=%22layer_2_0%22 x=%2215.700000%22 y=%22-2.500000%22 width=%220.300000%22 height=%225.000000%22 /></g><g id=%22C122%22 data-name=%22s_bend_l_55P406362799608324_o_49P01747695263928_p_Strip%22><path class=%22layer_1_0%22 d=%22M 0.000000,-1.250000 0.571000,-1.244000 1.141000,-1.228000 1.712000,-1.200000 2.281000,-1.161000 2.850000,-1.110000 3.417000,-1.049000 3.983000,-0.977000 4.548000,-0.893000 5.111000,-0.799000 5.672000,-0.693000 6.231000,-0.577000 6.787000,-0.449000 7.341000,-0.311000 7.892000,-0.162000 8.440000,-0.002000 8.985000,0.169000 9.526000,0.350000 10.064000,0.542000 10.598000,0.744000 11.127000,0.956000 11.653000,1.179000 12.174000,1.413000 12.690000,1.656000 13.202000,1.909000 13.708000,2.173000 14.209000,2.446000 14.705000,2.729000 15.195000,3.022000 15.679000,3.324000 16.158000,3.636000 16.630000,3.957000 17.096000,4.287000 17.555000,4.626000 18.007000,4.974000 18.453000,5.331000 18.891000,5.696000 19.322000,6.070000 19.746000,6.453000 20.162000,6.843000 20.571000,7.242000 20.972000,7.649000 21.364000,8.063000 21.749000,8.485000 22.125000,8.914000 22.492000,9.351000 22.851000,9.795000 23.201000,10.246000 23.543000,10.703000 23.875000,11.167000 24.198000,11.638000 24.512000,12.115000 24.817000,12.598000 25.112000,13.086000 25.397000,13.581000 25.673000,14.081000 25.939000,14.586000 26.194000,15.096000 26.440000,15.611000 26.676000,16.131000 27.117000,17.184000 27.516000,18.254000 27.873000,19.338000 28.035000,19.885000 28.187000,20.436000 28.328000,20.989000 28.458000,21.545000 28.577000,22.103000 28.685000,22.663000 28.782000,23.226000 28.869000,23.790000 28.944000,24.356000 29.012000,24.873000 29.091000,25.389000 29.180000,25.904000 29.279000,26.416000 29.507000,27.435000 29.774000,28.444000 30.081000,29.441000 30.249000,29.935000 30.614000,30.913000 30.811000,31.397000 31.017000,31.876000 31.457000,32.822000 31.691000,33.289000 31.934000,33.751000 32.186000,34.208000 32.447000,34.660000 32.995000,35.548000 33.282000,35.984000 33.882000,36.838000 34.194000,37.257000 34.842000,38.075000 35.522000,38.867000 36.232000,39.631000 36.972000,40.367000 37.353000,40.725000 38.134000,41.416000 38.943000,42.077000 39.356000,42.395000 40.202000,43.007000 40.633000,43.300000 41.513000,43.861000 42.415000,44.388000 42.873000,44.638000 43.804000,45.110000 44.276000,45.333000 44.752000,45.546000 45.233000,45.750000 46.205000,46.129000 47.191000,46.470000 47.689000,46.626000 48.190000,46.772000 49.201000,47.035000 50.220000,47.258000 51.248000,47.441000 51.764000,47.517000 52.282000,47.583000 52.801000,47.639000 53.841000,47.721000 54.362000,47.747000 55.406000,47.767000 55.406000,50.267000 54.835000,50.261000 54.265000,50.245000 53.694000,50.217000 53.125000,50.178000 52.556000,50.127000 51.989000,50.066000 51.423000,49.994000 50.858000,49.910000 50.295000,49.816000 49.734000,49.710000 49.175000,49.594000 48.619000,49.466000 48.065000,49.328000 47.514000,49.179000 46.966000,49.019000 46.421000,48.848000 45.880000,48.667000 45.342000,48.475000 44.808000,48.273000 44.279000,48.061000 43.753000,47.838000 43.232000,47.604000 42.716000,47.361000 42.204000,47.108000 41.698000,46.844000 41.197000,46.571000 40.701000,46.288000 40.211000,45.995000 39.727000,45.693000 39.248000,45.381000 38.776000,45.060000 38.310000,44.730000 37.851000,44.391000 37.399000,44.043000 36.953000,43.686000 36.515000,43.321000 36.084000,42.947000 35.660000,42.564000 35.244000,42.174000 34.835000,41.775000 34.434000,41.368000 34.042000,40.954000 33.657000,40.532000 33.281000,40.103000 32.914000,39.666000 32.555000,39.222000 31.863000,38.314000 31.531000,37.850000 31.208000,37.379000 30.894000,36.902000 30.589000,36.419000 30.294000,35.931000 30.009000,35.436000 29.733000,34.936000 29.467000,34.431000 29.212000,33.921000 28.966000,33.406000 28.730000,32.886000 28.289000,31.833000 27.890000,30.763000 27.533000,29.679000 27.371000,29.132000 27.219000,28.581000 27.078000,28.028000 26.948000,27.472000 26.829000,26.914000 26.721000,26.354000 26.624000,25.791000 26.537000,25.227000 26.462000,24.661000 26.394000,24.144000 26.315000,23.628000 26.226000,23.113000 26.127000,22.601000 26.018000,22.091000 25.899000,21.582000 25.632000,20.573000 25.325000,19.576000 25.157000,19.082000 24.792000,18.104000 24.595000,17.620000 24.389000,17.141000 23.949000,16.195000 23.715000,15.728000 23.472000,15.266000 23.220000,14.809000 22.959000,14.357000 22.411000,13.469000 22.124000,13.033000 21.828000,12.603000 21.212000,11.760000 20.564000,10.942000 19.884000,10.150000 19.174000,9.386000 18.807000,9.014000 18.053000,8.292000 17.272000,7.601000 16.463000,6.940000 16.050000,6.622000 15.204000,6.010000 14.773000,5.717000 13.893000,5.156000 12.991000,4.629000 12.533000,4.379000 12.070000,4.139000 11.130000,3.684000 10.654000,3.471000 10.173000,3.267000 9.201000,2.888000 8.215000,2.547000 7.717000,2.391000 7.216000,2.245000 6.205000,1.982000 5.186000,1.759000 4.158000,1.576000 3.642000,1.500000 3.124000,1.434000 2.605000,1.378000 1.565000,1.296000 1.044000,1.270000 0.000000,1.250000 z%22 /><path class=%22layer_2_0%22 d=%22M 0.000000,-0.250000 0.551000,-0.245000 1.653000,-0.201000 2.203000,-0.164000 2.752000,-0.115000 3.300000,-0.056000 3.847000,0.014000 4.392000,0.095000 4.936000,0.186000 5.478000,0.288000 6.017000,0.400000 6.555000,0.523000 7.089000,0.657000 7.621000,0.801000 8.151000,0.955000 8.677000,1.120000 9.200000,1.295000 9.719000,1.480000 10.234000,1.675000 10.746000,1.881000 11.253000,2.096000 11.756000,2.321000 12.255000,2.556000 12.749000,2.801000 13.722000,3.319000 14.674000,3.875000 15.142000,4.167000 15.604000,4.468000 16.060000,4.778000 16.953000,5.424000 17.390000,5.760000 17.820000,6.105000 18.660000,6.819000 19.471000,7.566000 19.865000,7.951000 20.632000,8.744000 21.003000,9.151000 21.366000,9.566000 21.721000,9.988000 22.068000,10.416000 22.406000,10.852000 22.735000,11.293000 23.369000,12.196000 23.672000,12.656000 23.966000,13.123000 24.251000,13.595000 24.526000,14.072000 24.792000,14.555000 25.049000,15.043000 25.296000,15.535000 25.534000,16.033000 25.761000,16.535000 25.979000,17.042000 26.187000,17.552000 26.572000,18.585000 26.750000,19.107000 26.917000,19.632000 27.074000,20.161000 27.220000,20.692000 27.356000,21.226000 27.482000,21.763000 27.597000,22.302000 27.701000,22.843000 27.795000,23.387000 27.879000,23.932000 27.951000,24.478000 28.022000,25.015000 28.104000,25.550000 28.196000,26.084000 28.412000,27.145000 28.535000,27.672000 28.669000,28.197000 28.813000,28.719000 28.967000,29.238000 29.131000,29.754000 29.490000,30.776000 29.684000,31.281000 29.888000,31.783000 30.102000,32.280000 30.559000,33.262000 30.802000,33.746000 31.054000,34.225000 31.315000,34.699000 31.586000,35.168000 31.866000,35.632000 32.155000,36.090000 32.452000,36.542000 33.074000,37.429000 33.398000,37.863000 33.730000,38.290000 34.071000,38.711000 34.419000,39.125000 34.776000,39.533000 35.513000,40.326000 35.893000,40.712000 36.281000,41.090000 36.676000,41.460000 37.078000,41.823000 37.487000,42.178000 37.903000,42.525000 38.325000,42.863000 38.754000,43.193000 39.190000,43.515000 40.079000,44.133000 40.992000,44.715000 41.457000,44.993000 42.403000,45.520000 42.883000,45.770000 43.368000,46.010000 43.858000,46.241000 44.353000,46.463000 45.353000,46.876000 45.860000,47.068000 46.883000,47.421000 47.400000,47.583000 47.920000,47.735000 48.443000,47.876000 48.968000,48.007000 49.496000,48.128000 50.026000,48.239000 50.558000,48.339000 51.092000,48.429000 51.627000,48.508000 52.703000,48.635000 53.242000,48.682000 54.323000,48.746000 54.865000,48.762000 55.406000,48.767000 55.406000,49.267000 54.855000,49.262000 54.304000,49.245000 53.753000,49.218000 53.203000,49.181000 52.654000,49.132000 52.106000,49.073000 51.559000,49.003000 51.014000,48.922000 50.470000,48.831000 49.928000,48.729000 49.389000,48.617000 48.851000,48.494000 48.317000,48.360000 47.785000,48.216000 47.255000,48.062000 46.729000,47.897000 46.206000,47.722000 45.687000,47.537000 45.172000,47.342000 44.660000,47.136000 44.153000,46.921000 43.650000,46.696000 43.151000,46.461000 42.657000,46.216000 41.684000,45.698000 40.732000,45.142000 40.264000,44.850000 39.802000,44.549000 39.346000,44.239000 38.453000,43.593000 38.016000,43.257000 37.586000,42.912000 36.746000,42.198000 36.337000,41.828000 35.935000,41.451000 35.541000,41.066000 35.154000,40.673000 34.774000,40.273000 34.403000,39.866000 34.040000,39.451000 33.338000,38.601000 33.000000,38.165000 32.671000,37.724000 32.350000,37.275000 31.734000,36.361000 31.440000,35.894000 31.155000,35.422000 30.880000,34.945000 30.614000,34.462000 30.357000,33.974000 30.110000,33.482000 29.872000,32.984000 29.427000,31.976000 29.219000,31.465000 28.834000,30.432000 28.656000,29.910000 28.489000,29.385000 28.332000,28.856000 28.186000,28.325000 28.050000,27.791000 27.924000,27.254000 27.809000,26.715000 27.705000,26.174000 27.611000,25.630000 27.527000,25.085000 27.455000,24.539000 27.384000,24.002000 27.302000,23.467000 27.210000,22.933000 26.994000,21.872000 26.871000,21.345000 26.737000,20.820000 26.593000,20.298000 26.439000,19.779000 26.275000,19.263000 25.916000,18.241000 25.722000,17.736000 25.518000,17.234000 25.304000,16.737000 25.080000,16.244000 24.847000,15.755000 24.604000,15.271000 24.352000,14.792000 24.091000,14.318000 23.820000,13.849000 23.540000,13.385000 22.954000,12.475000 22.332000,11.588000 22.008000,11.154000 21.676000,10.727000 20.987000,9.892000 20.630000,9.484000 19.893000,8.691000 19.513000,8.305000 19.125000,7.927000 18.328000,7.194000 17.919000,6.839000 17.503000,6.492000 17.081000,6.154000 16.652000,5.824000 16.216000,5.502000 15.327000,4.884000 14.414000,4.302000 13.949000,4.024000 13.003000,3.497000 12.523000,3.247000 12.038000,3.007000 11.548000,2.776000 11.054000,2.555000 10.555000,2.343000 10.053000,2.141000 9.546000,1.949000 8.523000,1.596000 8.006000,1.434000 7.486000,1.282000 6.964000,1.141000 6.438000,1.010000 5.910000,0.889000 5.380000,0.778000 4.848000,0.678000 3.779000,0.509000 2.703000,0.382000 2.164000,0.335000 1.624000,0.298000 1.083000,0.271000 0.541000,0.255000 0.000000,0.250000 z%22 /></g><g id=%22C123%22 data-name=%22as_component__PNGCOJINIPILRSBFUVHAAAKRQR7F7X5DOV45DHY3HPYOUZICQITA%22><path class=%22layer_1_0%22 d=%22M 9.889000,3.500000 0.000000,1.275000 0.000000,-1.275000 9.889000,-3.500000 16.000000,-3.500000 16.000000,3.500000 z%22 /><path class=%22layer_2_0%22 d=%22M 0.000000,-0.250000 10.000000,-2.500000 10.000000,2.500000 0.000000,0.250000 z%22 /><rect class=%22layer_2_0%22 x=%2210.300000%22 y=%22-2.500000%22 width=%220.300000%22 height=%225.000000%22 /><rect class=%22layer_2_0%22 x=%2210.900000%22 y=%22-2.500000%22 width=%220.300000%22 height=%225.000000%22 /><rect class=%22layer_2_0%22 x=%2211.500000%22 y=%22-2.500000%22 width=%220.300000%22 height=%225.000000%22 /><rect class=%22layer_2_0%22 x=%2212.100000%22 y=%22-2.500000%22 width=%220.300000%22 height=%225.000000%22 /><rect class=%22layer_2_0%22 x=%2212.700000%22 y=%22-2.500000%22 width=%220.300000%22 height=%225.000000%22 /><rect class=%22layer_2_0%22 x=%2213.300000%22 y=%22-2.500000%22 width=%220.300000%22 height=%225.000000%22 /><rect class=%22layer_2_0%22 x=%2213.900000%22 y=%22-2.500000%22 width=%220.300000%22 height=%225.000000%22 /><rect class=%22layer_2_0%22 x=%2214.500000%22 y=%22-2.500000%22 width=%220.300000%22 height=%225.000000%22 /><rect class=%22layer_2_0%22 x=%2215.100000%22 y=%22-2.500000%22 width=%220.300000%22 height=%225.000000%22 /><rect class=%22layer_2_0%22 x=%2215.700000%22 y=%22-2.500000%22 width=%220.300000%22 height=%225.000000%22 /></g><g id=%22C124%22 data-name=%22s_bend_l_54P80573663526856_o_17P6441418334774_p_Strip%22><path class=%22layer_1_0%22 d=%22M 0.000000,-1.250000 0.751000,-1.244000 1.502000,-1.227000 2.252000,-1.197000 3.002000,-1.156000 3.751000,-1.104000 4.499000,-1.040000 5.246000,-0.964000 5.992000,-0.876000 6.736000,-0.777000 7.479000,-0.666000 8.220000,-0.544000 8.959000,-0.410000 9.696000,-0.265000 10.430000,-0.108000 11.162000,0.060000 11.891000,0.239000 12.617000,0.430000 13.341000,0.632000 14.061000,0.845000 14.777000,1.070000 15.490000,1.306000 16.199000,1.552000 16.905000,1.810000 17.606000,2.079000 18.303000,2.359000 18.995000,2.649000 19.683000,2.950000 20.366000,3.262000 21.044000,3.584000 21.717000,3.917000 22.385000,4.261000 23.048000,4.615000 23.704000,4.979000 24.355000,5.353000 25.001000,5.737000 25.640000,6.131000 26.273000,6.536000 26.899000,6.950000 27.519000,7.373000 28.132000,7.807000 28.714000,8.218000 29.302000,8.619000 29.896000,9.012000 30.496000,9.395000 31.102000,9.769000 31.713000,10.133000 32.331000,10.488000 32.953000,10.833000 33.581000,11.169000 34.214000,11.495000 35.496000,12.116000 36.143000,12.412000 37.452000,12.973000 38.113000,13.238000 39.447000,13.737000 40.119000,13.971000 40.795000,14.194000 41.474000,14.407000 42.157000,14.609000 42.843000,14.801000 43.531000,14.982000 44.223000,15.152000 44.917000,15.312000 45.613000,15.460000 46.312000,15.598000 47.012000,15.725000 47.715000,15.841000 48.419000,15.946000 49.125000,16.040000 49.832000,16.123000 50.540000,16.195000 51.960000,16.305000 52.671000,16.344000 53.382000,16.372000 54.806000,16.394000 54.806000,18.894000 54.055000,18.888000 53.304000,18.871000 52.554000,18.841000 51.804000,18.800000 51.055000,18.748000 50.307000,18.684000 49.560000,18.608000 48.814000,18.520000 48.070000,18.421000 47.327000,18.310000 46.586000,18.188000 45.847000,18.054000 45.110000,17.909000 44.376000,17.753000 43.644000,17.584000 42.915000,17.405000 42.189000,17.214000 41.465000,17.012000 40.745000,16.799000 40.029000,16.574000 39.316000,16.338000 38.607000,16.092000 37.901000,15.834000 37.200000,15.565000 36.503000,15.285000 35.811000,14.995000 35.123000,14.694000 34.440000,14.382000 33.762000,14.060000 33.089000,13.727000 32.421000,13.383000 31.758000,13.029000 31.102000,12.665000 30.451000,12.291000 29.805000,11.907000 29.166000,11.513000 28.533000,11.108000 27.907000,10.694000 27.287000,10.271000 26.674000,9.837000 26.092000,9.426000 24.910000,8.632000 24.310000,8.249000 23.704000,7.875000 23.093000,7.511000 22.475000,7.156000 21.853000,6.811000 21.225000,6.475000 20.592000,6.149000 19.310000,5.528000 18.663000,5.232000 17.354000,4.671000 16.693000,4.406000 15.359000,3.907000 14.687000,3.673000 14.011000,3.450000 13.332000,3.237000 12.649000,3.035000 11.963000,2.843000 11.275000,2.662000 10.583000,2.492000 9.889000,2.332000 9.193000,2.184000 8.494000,2.046000 7.794000,1.919000 7.091000,1.803000 6.387000,1.698000 5.681000,1.604000 4.974000,1.521000 4.266000,1.449000 2.846000,1.339000 2.135000,1.300000 1.424000,1.272000 0.712000,1.256000 0.000000,1.250000 z%22 /><path class=%22layer_2_0%22 d=%22M 0.000000,-0.250000 0.735000,-0.244000 1.470000,-0.227000 2.205000,-0.198000 2.940000,-0.158000 3.673000,-0.107000 4.406000,-0.044000 5.137000,0.030000 5.868000,0.116000 6.597000,0.213000 7.324000,0.321000 8.050000,0.441000 8.773000,0.572000 9.495000,0.714000 10.214000,0.868000 10.930000,1.032000 11.644000,1.208000 12.356000,1.395000 13.064000,1.593000 13.769000,1.802000 14.471000,2.022000 15.169000,2.253000 15.863000,2.494000 16.554000,2.747000 17.241000,3.010000 17.923000,3.284000 18.601000,3.568000 19.275000,3.863000 19.944000,4.168000 20.608000,4.484000 21.267000,4.810000 21.921000,5.147000 22.570000,5.493000 23.213000,5.849000 23.850000,6.216000 24.482000,6.592000 25.108000,6.978000 25.728000,7.374000 26.341000,7.780000 26.948000,8.195000 27.549000,8.619000 28.143000,9.039000 28.744000,9.449000 29.351000,9.851000 29.964000,10.242000 30.583000,10.624000 31.208000,10.997000 31.839000,11.359000 32.475000,11.712000 33.117000,12.055000 33.764000,12.387000 34.416000,12.710000 35.073000,13.022000 35.735000,13.325000 37.073000,13.898000 37.748000,14.169000 38.427000,14.429000 39.111000,14.679000 39.798000,14.918000 40.489000,15.146000 41.183000,15.364000 41.880000,15.570000 42.581000,15.766000 43.285000,15.951000 43.991000,16.125000 44.700000,16.288000 45.412000,16.440000 46.126000,16.581000 46.842000,16.710000 47.560000,16.829000 48.279000,16.936000 49.000000,17.032000 49.723000,17.117000 50.447000,17.190000 51.172000,17.252000 51.898000,17.303000 52.624000,17.343000 53.351000,17.371000 54.078000,17.388000 54.806000,17.394000 54.806000,17.894000 54.071000,17.888000 53.336000,17.871000 52.601000,17.842000 51.866000,17.802000 51.133000,17.751000 50.400000,17.688000 49.669000,17.614000 48.938000,17.528000 48.209000,17.431000 47.482000,17.323000 46.757000,17.203000 46.033000,17.072000 45.311000,16.930000 44.592000,16.776000 43.876000,16.612000 43.162000,16.436000 42.450000,16.249000 41.742000,16.051000 41.037000,15.842000 40.335000,15.622000 39.637000,15.391000 38.943000,15.150000 38.252000,14.897000 37.565000,14.634000 36.883000,14.360000 36.205000,14.076000 35.531000,13.781000 34.862000,13.476000 34.198000,13.160000 33.539000,12.834000 32.885000,12.497000 32.236000,12.151000 31.593000,11.795000 30.956000,11.428000 30.324000,11.052000 29.698000,10.666000 29.078000,10.270000 28.465000,9.864000 27.858000,9.449000 27.257000,9.025000 26.663000,8.605000 25.455000,7.793000 24.842000,7.402000 24.223000,7.020000 23.598000,6.647000 22.967000,6.285000 22.331000,5.932000 21.689000,5.589000 21.042000,5.257000 20.390000,4.934000 19.733000,4.622000 19.071000,4.319000 17.733000,3.746000 17.058000,3.475000 16.379000,3.215000 15.695000,2.965000 15.008000,2.726000 14.317000,2.498000 13.623000,2.280000 12.926000,2.074000 12.225000,1.878000 11.521000,1.693000 10.815000,1.519000 10.106000,1.356000 9.394000,1.204000 8.680000,1.063000 7.964000,0.934000 7.246000,0.815000 6.527000,0.708000 5.806000,0.612000 5.083000,0.527000 4.359000,0.454000 3.634000,0.392000 2.908000,0.341000 2.182000,0.301000 1.455000,0.273000 0.728000,0.256000 0.000000,0.250000 z%22 /></g><g id=%22C125%22 data-name=%22as_component__PNGCOJINIPILRSBFUVHAAAKRQR7F7X5DOV45DHY3HPYOUZICQITA%22><path class=%22layer_1_0%22 d=%22M 9.889000,3.500000 0.000000,1.275000 0.000000,-1.275000 9.889000,-3.500000 16.000000,-3.500000 16.000000,3.500000 z%22 /><path class=%22layer_2_0%22 d=%22M 0.000000,-0.250000 10.000000,-2.500000 10.000000,2.500000 0.000000,0.250000 z%22 /><rect class=%22layer_2_0%22 x=%2210.300000%22 y=%22-2.500000%22 width=%220.300000%22 height=%225.000000%22 /><rect class=%22layer_2_0%22 x=%2210.900000%22 y=%22-2.500000%22 width=%220.300000%22 height=%225.000000%22 /><rect class=%22layer_2_0%22 x=%2211.500000%22 y=%22-2.500000%22 width=%220.300000%22 height=%225.000000%22 /><rect class=%22layer_2_0%22 x=%2212.100000%22 y=%22-2.500000%22 width=%220.300000%22 height=%225.000000%22 /><rect class=%22layer_2_0%22 x=%2212.700000%22 y=%22-2.500000%22 width=%220.300000%22 height=%225.000000%22 /><rect class=%22layer_2_0%22 x=%2213.300000%22 y=%22-2.500000%22 width=%220.300000%22 height=%225.000000%22 /><rect class=%22layer_2_0%22 x=%2213.900000%22 y=%22-2.500000%22 width=%220.300000%22 height=%225.000000%22 /><rect class=%22layer_2_0%22 x=%2214.500000%22 y=%22-2.500000%22 width=%220.300000%22 height=%225.000000%22 /><rect class=%22layer_2_0%22 x=%2215.100000%22 y=%22-2.500000%22 width=%220.300000%22 height=%225.000000%22 /><rect class=%22layer_2_0%22 x=%2215.700000%22 y=%22-2.500000%22 width=%220.300000%22 height=%225.000000%22 /></g><g id=%22C126%22 data-name=%22s_bend_l_2P0_o_2P0_p_Strip%22><path class=%22layer_1_0%22 d=%22M 0.000000,-1.250000 0.252000,-1.236000 0.501000,-1.194000 0.743000,-1.124000 0.976000,-1.027000 1.197000,-0.905000 1.403000,-0.759000 1.591000,-0.591000 1.759000,-0.403000 1.905000,-0.197000 2.027000,0.024000 2.124000,0.257000 2.194000,0.499000 2.236000,0.748000 2.250000,1.000000 2.244000,0.944000 2.225000,0.892000 2.195000,0.844000 2.156000,0.805000 2.108000,0.775000 2.056000,0.756000 2.000000,0.750000 2.000000,3.250000 1.748000,3.236000 1.499000,3.194000 1.257000,3.124000 1.024000,3.027000 0.803000,2.905000 0.597000,2.759000 0.409000,2.591000 0.241000,2.403000 0.095000,2.197000 -0.027000,1.976000 -0.124000,1.743000 -0.194000,1.501000 -0.236000,1.252000 -0.250000,1.000000 -0.244000,1.056000 -0.225000,1.108000 -0.195000,1.156000 -0.156000,1.195000 -0.108000,1.225000 -0.056000,1.244000 0.000000,1.250000 z%22 /><path class=%22layer_2_0%22 d=%22M 0.000000,-0.250000 0.140000,-0.242000 0.278000,-0.219000 0.413000,-0.180000 0.542000,-0.126000 0.665000,-0.058000 0.779000,0.023000 0.884000,0.116000 0.977000,0.221000 1.058000,0.335000 1.126000,0.458000 1.180000,0.587000 1.219000,0.722000 1.242000,0.860000 1.250000,1.000000 1.269000,1.167000 1.324000,1.325000 1.414000,1.468000 1.532000,1.586000 1.675000,1.676000 1.833000,1.731000 2.000000,1.750000 2.000000,2.250000 1.860000,2.242000 1.722000,2.219000 1.587000,2.180000 1.458000,2.126000 1.335000,2.058000 1.221000,1.977000 1.116000,1.884000 1.023000,1.779000 0.942000,1.665000 0.874000,1.542000 0.820000,1.413000 0.781000,1.278000 0.758000,1.140000 0.750000,1.000000 0.731000,0.833000 0.676000,0.675000 0.586000,0.532000 0.468000,0.414000 0.325000,0.324000 0.167000,0.269000 0.000000,0.250000 z%22 /></g><g id=%22C127%22 data-name=%22as_component__PNGCOJINIPILRSBFUVHAAAKRQR7F7X5DOV45DHY3HPYOUZICQITA%22><path class=%22layer_1_0%22 d=%22M 9.889000,3.500000 0.000000,1.275000 0.000000,-1.275000 9.889000,-3.500000 16.000000,-3.500000 16.000000,3.500000 z%22 /><path class=%22layer_2_0%22 d=%22M 0.000000,-0.250000 10.000000,-2.500000 10.000000,2.500000 0.000000,0.250000 z%22 /><rect class=%22layer_2_0%22 x=%2210.300000%22 y=%22-2.500000%22 width=%220.300000%22 height=%225.000000%22 /><rect class=%22layer_2_0%22 x=%2210.900000%22 y=%22-2.500000%22 width=%220.300000%22 height=%225.000000%22 /><rect class=%22layer_2_0%22 x=%2211.500000%22 y=%22-2.500000%22 width=%220.300000%22 height=%225.000000%22 /><rect class=%22layer_2_0%22 x=%2212.100000%22 y=%22-2.500000%22 width=%220.300000%22 height=%225.000000%22 /><rect class=%22layer_2_0%22 x=%2212.700000%22 y=%22-2.500000%22 width=%220.300000%22 height=%225.000000%22 /><rect class=%22layer_2_0%22 x=%2213.300000%22 y=%22-2.500000%22 width=%220.300000%22 height=%225.000000%22 /><rect class=%22layer_2_0%22 x=%2213.900000%22 y=%22-2.500000%22 width=%220.300000%22 height=%225.000000%22 /><rect class=%22layer_2_0%22 x=%2214.500000%22 y=%22-2.500000%22 width=%220.300000%22 height=%225.000000%22 /><rect class=%22layer_2_0%22 x=%2215.100000%22 y=%22-2.500000%22 width=%220.300000%22 height=%225.000000%22 /><rect class=%22layer_2_0%22 x=%2215.700000%22 y=%22-2.500000%22 width=%220.300000%22 height=%225.000000%22 /></g><g id=%22C128%22 data-name=%22s_bend_l_52P450875024070655_o_80P20011691535046_p_Strip%22><path class=%22layer_1_0%22 d=%22M 0.000000,-1.250000 0.570000,-1.245000 1.708000,-1.201000 2.277000,-1.163000 3.411000,-1.055000 3.976000,-0.984000 4.540000,-0.903000 5.102000,-0.811000 5.663000,-0.708000 6.221000,-0.595000 6.777000,-0.471000 7.331000,-0.337000 7.882000,-0.192000 8.430000,-0.036000 8.975000,0.130000 9.516000,0.306000 10.055000,0.493000 10.589000,0.690000 11.120000,0.897000 11.647000,1.114000 12.169000,1.341000 12.687000,1.578000 13.201000,1.825000 13.709000,2.081000 14.213000,2.347000 14.712000,2.623000 15.692000,3.203000 16.174000,3.507000 16.650000,3.820000 17.120000,4.142000 17.584000,4.473000 18.041000,4.813000 18.492000,5.161000 18.936000,5.518000 19.373000,5.883000 19.804000,6.257000 20.227000,6.638000 20.642000,7.028000 21.451000,7.831000 22.228000,8.664000 22.605000,9.091000 23.333000,9.967000 23.685000,10.416000 24.362000,11.332000 24.687000,11.800000 25.311000,12.753000 25.609000,13.239000 26.177000,14.226000 26.447000,14.728000 26.707000,15.235000 27.198000,16.263000 27.429000,16.784000 27.650000,17.309000 27.860000,17.838000 28.061000,18.372000 28.251000,18.909000 28.431000,19.449000 28.601000,19.993000 28.761000,20.540000 28.910000,21.090000 29.048000,21.642000 29.176000,22.197000 29.293000,22.755000 29.400000,23.315000 29.496000,23.876000 29.581000,24.439000 29.655000,25.004000 29.719000,25.570000 29.772000,26.138000 29.814000,26.706000 29.866000,27.844000 29.874000,28.983000 29.861000,29.553000 29.838000,30.122000 29.804000,30.691000 29.760000,31.259000 29.704000,31.826000 29.637000,32.392000 29.560000,32.956000 29.472000,33.519000 29.374000,34.080000 29.264000,34.639000 29.144000,35.196000 29.014000,35.751000 28.873000,36.303000 28.721000,36.852000 28.559000,37.398000 28.204000,38.480000 28.011000,39.016000 27.807000,39.549000 27.594000,40.077000 27.371000,40.601000 27.166000,41.081000 26.784000,42.053000 26.607000,42.544000 26.282000,43.536000 26.133000,44.037000 25.994000,44.540000 25.745000,45.554000 25.535000,46.576000 25.364000,47.606000 25.233000,48.642000 25.141000,49.682000 25.088000,50.725000 25.076000,51.769000 25.103000,52.812000 25.170000,53.854000 25.277000,54.893000 25.345000,55.410000 25.423000,55.926000 25.511000,56.441000 25.716000,57.465000 25.960000,58.480000 26.243000,59.485000 26.564000,60.478000 26.738000,60.970000 27.115000,61.944000 27.529000,62.902000 27.979000,63.844000 28.465000,64.769000 28.985000,65.674000 29.258000,66.119000 29.830000,66.992000 30.434000,67.844000 30.748000,68.260000 31.400000,69.076000 32.083000,69.866000 32.795000,70.629000 33.536000,71.365000 34.305000,72.072000 35.099000,72.749000 35.919000,73.395000 36.763000,74.009000 37.630000,74.591000 38.072000,74.870000 38.970000,75.401000 39.427000,75.654000 40.355000,76.133000 40.825000,76.359000 41.779000,76.784000 42.261000,76.983000 42.748000,77.173000 43.731000,77.524000 44.227000,77.686000 44.727000,77.838000 45.734000,78.113000 46.751000,78.350000 47.262000,78.454000 47.776000,78.548000 48.291000,78.632000 49.326000,78.771000 49.845000,78.826000 50.886000,78.905000 51.407000,78.930000 52.451000,78.950000 52.451000,81.450000 51.881000,81.445000 50.743000,81.401000 50.174000,81.363000 49.040000,81.255000 48.475000,81.184000 47.911000,81.103000 47.349000,81.011000 46.788000,80.908000 46.230000,80.795000 45.674000,80.671000 45.120000,80.537000 44.569000,80.392000 44.021000,80.236000 43.476000,80.070000 42.935000,79.894000 42.396000,79.707000 41.862000,79.510000 41.331000,79.303000 40.804000,79.086000 40.282000,78.859000 39.764000,78.622000 39.250000,78.375000 38.742000,78.119000 38.238000,77.853000 37.739000,77.577000 36.759000,76.997000 36.277000,76.693000 35.801000,76.380000 35.331000,76.058000 34.867000,75.727000 33.959000,75.039000 33.515000,74.682000 33.078000,74.317000 32.647000,73.943000 32.224000,73.562000 31.809000,73.172000 31.000000,72.369000 30.223000,71.536000 29.846000,71.109000 29.118000,70.233000 28.766000,69.784000 28.089000,68.868000 27.764000,68.400000 27.140000,67.447000 26.842000,66.961000 26.274000,65.974000 26.004000,65.472000 25.744000,64.965000 25.494000,64.453000 25.253000,63.937000 25.022000,63.416000 24.591000,62.362000 24.390000,61.828000 24.200000,61.291000 24.020000,60.751000 23.850000,60.207000 23.690000,59.660000 23.541000,59.110000 23.403000,58.558000 23.275000,58.003000 23.158000,57.445000 23.051000,56.885000 22.955000,56.324000 22.870000,55.761000 22.796000,55.196000 22.732000,54.630000 22.679000,54.062000 22.637000,53.494000 22.585000,52.356000 22.577000,51.217000 22.590000,50.647000 22.613000,50.078000 22.647000,49.509000 22.691000,48.941000 22.747000,48.374000 22.814000,47.808000 22.891000,47.244000 22.979000,46.681000 23.077000,46.120000 23.187000,45.561000 23.307000,45.004000 23.437000,44.449000 23.578000,43.897000 23.730000,43.348000 23.892000,42.802000 24.247000,41.720000 24.440000,41.184000 24.644000,40.651000 24.857000,40.123000 25.080000,39.599000 25.285000,39.119000 25.667000,38.147000 25.844000,37.656000 26.011000,37.161000 26.318000,36.163000 26.457000,35.660000 26.706000,34.646000 26.916000,33.624000 27.087000,32.594000 27.218000,31.558000 27.310000,30.518000 27.363000,29.475000 27.375000,28.431000 27.348000,27.388000 27.281000,26.346000 27.174000,25.307000 27.106000,24.790000 27.028000,24.274000 26.940000,23.759000 26.735000,22.735000 26.491000,21.720000 26.208000,20.715000 26.052000,20.217000 25.713000,19.230000 25.336000,18.256000 24.922000,17.298000 24.472000,16.356000 23.986000,15.431000 23.466000,14.526000 23.193000,14.081000 22.621000,13.208000 22.017000,12.356000 21.703000,11.940000 21.051000,11.124000 20.368000,10.334000 19.656000,9.571000 18.915000,8.835000 18.146000,8.128000 17.352000,7.451000 16.532000,6.805000 15.688000,6.191000 14.821000,5.609000 14.379000,5.331000 13.481000,4.799000 13.024000,4.546000 12.562000,4.302000 11.626000,3.841000 11.151000,3.624000 10.190000,3.217000 9.703000,3.027000 9.213000,2.847000 8.224000,2.514000 7.724000,2.362000 6.717000,2.087000 6.210000,1.964000 5.189000,1.746000 4.675000,1.652000 4.160000,1.568000 3.125000,1.429000 2.606000,1.374000 1.565000,1.295000 1.044000,1.270000 0.000000,1.250000 z%22 /><path class=%22layer_2_0%22 d=%22M 0.000000,-0.250000 0.551000,-0.245000 1.651000,-0.203000 2.749000,-0.119000 3.297000,-0.061000 3.843000,0.007000 4.388000,0.085000 4.932000,0.174000 5.473000,0.273000 6.013000,0.383000 6.550000,0.503000 7.085000,0.633000 7.618000,0.773000 8.148000,0.923000 9.198000,1.254000 9.718000,1.434000 10.748000,1.825000 11.762000,2.254000 12.263000,2.483000 13.251000,2.970000 13.737000,3.227000 14.696000,3.769000 15.167000,4.054000 16.093000,4.650000 16.547000,4.961000 16.996000,5.281000 17.873000,5.946000 18.725000,6.644000 19.141000,7.005000 19.550000,7.374000 20.346000,8.135000 20.733000,8.527000 21.484000,9.332000 21.848000,9.745000 22.204000,10.165000 22.892000,11.025000 23.546000,11.911000 23.861000,12.363000 24.463000,13.285000 25.031000,14.229000 25.301000,14.708000 25.813000,15.683000 26.288000,16.677000 26.511000,17.180000 26.928000,18.199000 27.122000,18.715000 27.306000,19.234000 27.480000,19.756000 27.644000,20.282000 27.798000,20.810000 27.942000,21.342000 28.076000,21.876000 28.313000,22.951000 28.416000,23.492000 28.509000,24.035000 28.591000,24.580000 28.663000,25.126000 28.724000,25.673000 28.775000,26.221000 28.816000,26.770000 28.866000,27.870000 28.874000,28.971000 28.862000,29.522000 28.840000,30.072000 28.807000,30.622000 28.710000,31.719000 28.571000,32.811000 28.486000,33.355000 28.285000,34.438000 28.169000,34.976000 28.043000,35.512000 27.760000,36.576000 27.603000,37.104000 27.260000,38.151000 26.877000,39.183000 26.455000,40.200000 26.242000,40.698000 25.847000,41.705000 25.663000,42.214000 25.326000,43.243000 25.172000,43.761000 25.028000,44.283000 24.894000,44.807000 24.770000,45.334000 24.656000,45.863000 24.552000,46.394000 24.458000,46.927000 24.375000,47.461000 24.238000,48.535000 24.143000,49.613000 24.111000,50.153000 24.077000,51.235000 24.085000,52.317000 24.104000,52.857000 24.134000,53.398000 24.174000,53.937000 24.224000,54.476000 24.284000,55.014000 24.355000,55.550000 24.436000,56.085000 24.527000,56.619000 24.628000,57.150000 24.861000,58.207000 25.134000,59.254000 25.447000,60.290000 25.618000,60.804000 25.799000,61.314000 26.190000,62.323000 26.399000,62.822000 26.847000,63.807000 27.085000,64.293000 27.332000,64.774000 27.854000,65.722000 28.128000,66.189000 28.411000,66.650000 28.703000,67.105000 29.004000,67.555000 29.313000,68.000000 29.630000,68.438000 30.290000,69.296000 30.631000,69.715000 30.981000,70.128000 31.704000,70.933000 32.077000,71.325000 32.845000,72.088000 33.240000,72.458000 34.050000,73.175000 34.465000,73.522000 35.315000,74.192000 36.190000,74.829000 36.637000,75.135000 37.089000,75.432000 37.546000,75.720000 38.478000,76.271000 38.951000,76.533000 39.913000,77.030000 40.893000,77.489000 41.389000,77.705000 42.393000,78.108000 42.901000,78.295000 43.412000,78.472000 44.445000,78.797000 44.965000,78.945000 45.488000,79.083000 46.542000,79.328000 47.073000,79.436000 47.605000,79.533000 48.674000,79.698000 49.750000,79.821000 50.829000,79.904000 51.910000,79.945000 52.451000,79.950000 52.451000,80.450000 51.900000,80.445000 50.800000,80.403000 49.702000,80.319000 49.154000,80.261000 48.608000,80.193000 48.063000,80.115000 47.519000,80.026000 46.978000,79.927000 46.438000,79.817000 45.901000,79.697000 45.366000,79.567000 44.833000,79.427000 44.303000,79.277000 43.253000,78.946000 42.733000,78.766000 41.703000,78.375000 40.689000,77.946000 40.188000,77.717000 39.200000,77.230000 38.714000,76.973000 37.755000,76.431000 37.284000,76.146000 36.358000,75.550000 35.904000,75.239000 35.456000,74.919000 35.013000,74.590000 34.578000,74.254000 33.726000,73.556000 33.310000,73.195000 32.901000,72.826000 32.105000,72.065000 31.718000,71.673000 30.967000,70.868000 30.603000,70.455000 30.247000,70.035000 29.559000,69.175000 29.228000,68.735000 28.590000,67.837000 27.988000,66.915000 27.700000,66.446000 27.420000,65.972000 27.150000,65.492000 26.638000,64.517000 26.163000,63.523000 25.940000,63.020000 25.523000,62.001000 25.329000,61.485000 25.145000,60.966000 24.971000,60.444000 24.807000,59.918000 24.653000,59.390000 24.509000,58.858000 24.375000,58.324000 24.138000,57.249000 24.035000,56.708000 23.942000,56.165000 23.860000,55.620000 23.788000,55.074000 23.727000,54.527000 23.676000,53.979000 23.635000,53.430000 23.585000,52.330000 23.577000,51.229000 23.589000,50.678000 23.611000,50.128000 23.644000,49.578000 23.741000,48.481000 23.880000,47.389000 23.965000,46.845000 24.166000,45.762000 24.282000,45.224000 24.408000,44.688000 24.691000,43.624000 24.848000,43.096000 25.191000,42.049000 25.574000,41.017000 25.996000,40.000000 26.209000,39.502000 26.411000,39.000000 26.788000,37.986000 27.125000,36.957000 27.279000,36.439000 27.423000,35.917000 27.557000,35.393000 27.681000,34.866000 27.795000,34.337000 27.899000,33.806000 27.993000,33.273000 28.076000,32.739000 28.213000,31.665000 28.308000,30.587000 28.340000,30.047000 28.374000,28.965000 28.366000,27.883000 28.347000,27.343000 28.317000,26.802000 28.277000,26.263000 28.227000,25.724000 28.167000,25.186000 28.096000,24.650000 28.015000,24.115000 27.924000,23.581000 27.823000,23.050000 27.590000,21.993000 27.317000,20.946000 27.004000,19.910000 26.833000,19.396000 26.652000,18.886000 26.461000,18.380000 26.052000,17.378000 25.604000,16.393000 25.366000,15.907000 25.119000,15.426000 24.862000,14.949000 24.323000,14.011000 24.040000,13.550000 23.748000,13.095000 23.138000,12.200000 22.821000,11.762000 22.495000,11.330000 21.820000,10.485000 21.470000,10.072000 20.747000,9.267000 20.374000,8.875000 19.606000,8.112000 19.211000,7.742000 18.401000,7.025000 17.986000,6.678000 17.136000,6.008000 16.261000,5.371000 15.814000,5.065000 15.362000,4.768000 14.905000,4.480000 14.441000,4.200000 13.973000,3.929000 13.500000,3.667000 12.538000,3.170000 12.050000,2.936000 11.062000,2.495000 10.058000,2.092000 9.550000,1.905000 9.039000,1.728000 8.006000,1.403000 7.486000,1.255000 6.963000,1.117000 5.909000,0.872000 5.378000,0.764000 4.846000,0.667000 3.777000,0.502000 2.701000,0.379000 1.622000,0.296000 0.541000,0.255000 0.000000,0.250000 z%22 /></g><g id=%22C129%22 data-name=%22as_component__PNGCOJINIPILRSBFUVHAAAKRQR7F7X5DOV45DHY3HPYOUZICQITA%22><path class=%22layer_1_0%22 d=%22M 9.889000,3.500000 0.000000,1.275000 0.000000,-1.275000 9.889000,-3.500000 16.000000,-3.500000 16.000000,3.500000 z%22 /><path class=%22layer_2_0%22 d=%22M 0.000000,-0.250000 10.000000,-2.500000 10.000000,2.500000 0.000000,0.250000 z%22 /><rect class=%22layer_2_0%22 x=%2210.300000%22 y=%22-2.500000%22 width=%220.300000%22 height=%225.000000%22 /><rect class=%22layer_2_0%22 x=%2210.900000%22 y=%22-2.500000%22 width=%220.300000%22 height=%225.000000%22 /><rect class=%22layer_2_0%22 x=%2211.500000%22 y=%22-2.500000%22 width=%220.300000%22 height=%225.000000%22 /><rect class=%22layer_2_0%22 x=%2212.100000%22 y=%22-2.500000%22 width=%220.300000%22 height=%225.000000%22 /><rect class=%22layer_2_0%22 x=%2212.700000%22 y=%22-2.500000%22 width=%220.300000%22 height=%225.000000%22 /><rect class=%22layer_2_0%22 x=%2213.300000%22 y=%22-2.500000%22 width=%220.300000%22 height=%225.000000%22 /><rect class=%22layer_2_0%22 x=%2213.900000%22 y=%22-2.500000%22 width=%220.300000%22 height=%225.000000%22 /><rect class=%22layer_2_0%22 x=%2214.500000%22 y=%22-2.500000%22 width=%220.300000%22 height=%225.000000%22 /><rect class=%22layer_2_0%22 x=%2215.100000%22 y=%22-2.500000%22 width=%220.300000%22 height=%225.000000%22 /><rect class=%22layer_2_0%22 x=%2215.700000%22 y=%22-2.500000%22 width=%220.300000%22 height=%225.000000%22 /></g><g id=%22C130%22 data-name=%22s_bend_l_52P190958560507134_o_25P52456617773406_p_Strip%22><path class=%22layer_1_0%22 d=%22M 0.000000,-1.250000 0.624000,-1.244000 1.248000,-1.227000 1.872000,-1.199000 2.495000,-1.159000 3.117000,-1.108000 3.738000,-1.046000 4.358000,-0.972000 4.976000,-0.887000 5.593000,-0.791000 6.208000,-0.684000 6.821000,-0.565000 7.432000,-0.435000 8.040000,-0.295000 8.645000,-0.143000 9.248000,0.020000 9.848000,0.194000 10.444000,0.378000 11.037000,0.574000 11.626000,0.780000 12.211000,0.997000 12.793000,1.224000 13.370000,1.462000 14.511000,1.969000 15.074000,2.239000 15.632000,2.518000 16.185000,2.807000 16.733000,3.107000 17.275000,3.416000 17.811000,3.735000 18.342000,4.064000 18.867000,4.403000 19.385000,4.751000 19.897000,5.108000 20.402000,5.475000 20.900000,5.851000 21.392000,6.235000 22.354000,7.031000 22.824000,7.442000 23.286000,7.862000 23.740000,8.290000 24.187000,8.726000 24.626000,9.170000 25.056000,9.622000 25.479000,10.082000 25.893000,10.549000 26.298000,11.024000 26.694000,11.506000 27.082000,11.995000 27.809000,12.896000 28.185000,13.336000 28.960000,14.195000 29.359000,14.614000 29.766000,15.026000 30.180000,15.430000 31.030000,16.216000 31.466000,16.597000 31.909000,16.970000 32.358000,17.335000 32.814000,17.692000 33.744000,18.380000 34.699000,19.034000 35.185000,19.348000 35.677000,19.653000 36.677000,20.236000 37.698000,20.782000 38.216000,21.041000 39.264000,21.530000 40.330000,21.981000 40.869000,22.192000 41.412000,22.393000 41.958000,22.584000 43.061000,22.937000 43.617000,23.098000 44.176000,23.249000 45.301000,23.520000 45.867000,23.640000 46.435000,23.750000 47.577000,23.939000 48.725000,24.086000 49.878000,24.191000 50.456000,24.228000 51.612000,24.270000 52.191000,24.275000 52.191000,26.775000 51.567000,26.769000 50.943000,26.752000 50.319000,26.724000 49.696000,26.684000 49.074000,26.633000 48.453000,26.571000 47.833000,26.497000 47.215000,26.412000 46.598000,26.316000 45.983000,26.209000 45.370000,26.090000 44.759000,25.960000 44.151000,25.820000 43.546000,25.668000 42.943000,25.505000 42.343000,25.331000 41.747000,25.147000 41.154000,24.951000 40.565000,24.745000 39.980000,24.528000 39.398000,24.301000 38.821000,24.063000 37.680000,23.556000 37.117000,23.286000 36.559000,23.007000 36.006000,22.718000 35.458000,22.418000 34.916000,22.109000 34.380000,21.790000 33.849000,21.461000 33.324000,21.122000 32.806000,20.774000 32.294000,20.417000 31.789000,20.050000 30.799000,19.290000 29.837000,18.494000 29.367000,18.083000 28.905000,17.663000 28.451000,17.235000 28.004000,16.799000 27.565000,16.355000 27.135000,15.903000 26.712000,15.443000 26.298000,14.976000 25.893000,14.501000 25.497000,14.019000 25.109000,13.530000 24.382000,12.629000 24.006000,12.189000 23.231000,11.330000 22.832000,10.911000 22.425000,10.499000 22.011000,10.095000 21.161000,9.309000 20.725000,8.928000 19.833000,8.190000 19.377000,7.833000 18.447000,7.145000 17.492000,6.491000 17.006000,6.177000 16.514000,5.872000 15.514000,5.289000 14.493000,4.743000 13.975000,4.484000 12.927000,3.995000 11.861000,3.544000 11.322000,3.333000 10.779000,3.132000 10.233000,2.941000 9.130000,2.588000 8.574000,2.427000 8.015000,2.276000 6.890000,2.005000 6.324000,1.885000 5.756000,1.775000 4.614000,1.586000 3.466000,1.439000 2.313000,1.334000 1.735000,1.297000 0.579000,1.255000 0.000000,1.250000 z%22 /><path class=%22layer_2_0%22 d=%22M 0.000000,-0.250000 0.606000,-0.244000 1.212000,-0.228000 1.817000,-0.200000 2.422000,-0.162000 3.026000,-0.112000 3.629000,-0.052000 4.231000,0.020000 4.831000,0.102000 5.430000,0.196000 6.027000,0.300000 6.622000,0.415000 7.215000,0.541000 7.806000,0.677000 8.393000,0.825000 8.978000,0.983000 9.561000,1.152000 10.140000,1.331000 10.715000,1.520000 11.855000,1.931000 12.420000,2.152000 12.980000,2.383000 13.536000,2.624000 14.088000,2.876000 14.634000,3.137000 15.176000,3.408000 15.713000,3.689000 16.245000,3.980000 16.772000,4.280000 17.292000,4.590000 18.317000,5.238000 18.820000,5.576000 19.317000,5.923000 19.807000,6.279000 20.291000,6.644000 20.768000,7.017000 21.239000,7.399000 21.702000,7.790000 22.158000,8.189000 22.607000,8.596000 23.049000,9.012000 23.482000,9.435000 23.908000,9.866000 24.326000,10.305000 24.736000,10.751000 25.138000,11.205000 25.531000,11.666000 25.916000,12.134000 26.293000,12.609000 26.664000,13.077000 27.043000,13.538000 27.430000,13.992000 27.826000,14.439000 28.230000,14.878000 28.642000,15.311000 29.061000,15.735000 29.488000,16.152000 30.365000,16.963000 30.815000,17.356000 31.734000,18.117000 32.204000,18.485000 33.164000,19.195000 34.149000,19.869000 34.651000,20.193000 35.158000,20.507000 35.671000,20.813000 36.190000,21.109000 36.713000,21.395000 37.242000,21.672000 37.776000,21.939000 38.858000,22.444000 39.958000,22.909000 40.513000,23.127000 41.073000,23.334000 41.637000,23.531000 42.204000,23.718000 42.774000,23.895000 43.347000,24.061000 43.924000,24.216000 44.503000,24.361000 45.084000,24.496000 45.668000,24.620000 46.254000,24.733000 46.842000,24.836000 47.432000,24.928000 48.616000,25.080000 49.210000,25.139000 49.805000,25.188000 50.401000,25.226000 50.997000,25.253000 51.594000,25.270000 52.191000,25.275000 52.191000,25.775000 50.979000,25.753000 50.374000,25.725000 49.769000,25.687000 49.165000,25.637000 48.562000,25.577000 47.960000,25.505000 47.360000,25.423000 46.761000,25.329000 46.164000,25.225000 45.569000,25.110000 44.976000,24.984000 44.385000,24.848000 43.798000,24.700000 43.213000,24.542000 42.630000,24.373000 42.051000,24.194000 41.476000,24.005000 40.336000,23.594000 39.771000,23.373000 39.211000,23.142000 38.655000,22.901000 38.103000,22.649000 37.557000,22.388000 37.015000,22.117000 36.478000,21.836000 35.946000,21.545000 35.419000,21.245000 34.899000,20.935000 33.874000,20.287000 33.371000,19.949000 32.874000,19.602000 32.384000,19.246000 31.900000,18.881000 31.423000,18.508000 30.952000,18.126000 30.489000,17.735000 30.033000,17.336000 29.584000,16.929000 29.142000,16.513000 28.709000,16.090000 28.283000,15.659000 27.865000,15.220000 27.455000,14.774000 27.053000,14.320000 26.660000,13.859000 26.275000,13.391000 25.898000,12.916000 25.527000,12.448000 25.148000,11.987000 24.761000,11.533000 24.365000,11.086000 23.549000,10.214000 23.130000,9.790000 22.703000,9.373000 21.826000,8.562000 21.376000,8.169000 20.457000,7.408000 19.987000,7.040000 19.027000,6.330000 18.042000,5.656000 17.540000,5.332000 16.520000,4.712000 16.001000,4.416000 15.478000,4.130000 14.949000,3.853000 14.415000,3.586000 13.333000,3.081000 12.233000,2.616000 11.678000,2.398000 11.118000,2.191000 10.554000,1.994000 9.987000,1.807000 9.417000,1.630000 8.844000,1.464000 8.267000,1.309000 7.688000,1.164000 7.107000,1.029000 6.523000,0.905000 5.937000,0.792000 5.349000,0.689000 4.759000,0.597000 3.575000,0.445000 2.981000,0.386000 2.386000,0.337000 1.790000,0.299000 1.194000,0.272000 0.597000,0.255000 0.000000,0.250000 z%22 /></g><g id=%22C131%22 data-name=%22as_component__PNGCOJINIPILRSBFUVHAAAKRQR7F7X5DOV45DHY3HPYOUZICQITA%22><path class=%22layer_1_0%22 d=%22M 9.889000,3.500000 0.000000,1.275000 0.000000,-1.275000 9.889000,-3.500000 16.000000,-3.500000 16.000000,3.500000 z%22 /><path class=%22layer_2_0%22 d=%22M 0.000000,-0.250000 10.000000,-2.500000 10.000000,2.500000 0.000000,0.250000 z%22 /><rect class=%22layer_2_0%22 x=%2210.300000%22 y=%22-2.500000%22 width=%220.300000%22 height=%225.000000%22 /><rect class=%22layer_2_0%22 x=%2210.900000%22 y=%22-2.500000%22 width=%220.300000%22 height=%225.000000%22 /><rect class=%22layer_2_0%22 x=%2211.500000%22 y=%22-2.500000%22 width=%220.300000%22 height=%225.000000%22 /><rect class=%22layer_2_0%22 x=%2212.100000%22 y=%22-2.500000%22 width=%220.300000%22 height=%225.000000%22 /><rect class=%22layer_2_0%22 x=%2212.700000%22 y=%22-2.500000%22 width=%220.300000%22 height=%225.000000%22 /><rect class=%22layer_2_0%22 x=%2213.300000%22 y=%22-2.500000%22 width=%220.300000%22 height=%225.000000%22 /><rect class=%22layer_2_0%22 x=%2213.900000%22 y=%22-2.500000%22 width=%220.300000%22 height=%225.000000%22 /><rect class=%22layer_2_0%22 x=%2214.500000%22 y=%22-2.500000%22 width=%220.300000%22 height=%225.000000%22 /><rect class=%22layer_2_0%22 x=%2215.100000%22 y=%22-2.500000%22 width=%220.300000%22 height=%225.000000%22 /><rect class=%22layer_2_0%22 x=%2215.700000%22 y=%22-2.500000%22 width=%220.300000%22 height=%225.000000%22 /></g><g id=%22C132%22 data-name=%22s_bend_l_47P03179990737647_o_13P302659402417369_p_Strip%22><path class=%22layer_1_0%22 d=%22M 0.000000,-1.250000 0.748000,-1.244000 1.496000,-1.226000 2.244000,-1.195000 2.991000,-1.153000 3.737000,-1.098000 4.482000,-1.032000 5.226000,-0.953000 5.969000,-0.862000 6.710000,-0.760000 7.450000,-0.645000 8.187000,-0.518000 8.922000,-0.379000 9.655000,-0.229000 10.386000,-0.066000 11.113000,0.108000 11.838000,0.294000 12.560000,0.492000 13.278000,0.702000 13.993000,0.923000 14.704000,1.155000 15.411000,1.399000 16.114000,1.655000 16.813000,1.922000 17.508000,2.200000 18.198000,2.490000 18.883000,2.790000 19.563000,3.102000 20.238000,3.425000 20.908000,3.758000 21.572000,4.103000 22.231000,4.458000 22.884000,4.824000 23.530000,5.200000 24.171000,5.587000 24.777000,5.952000 25.388000,6.308000 26.006000,6.654000 26.629000,6.990000 27.257000,7.316000 27.890000,7.632000 28.529000,7.937000 29.172000,8.232000 29.820000,8.516000 30.473000,8.790000 31.130000,9.053000 31.791000,9.305000 32.456000,9.547000 33.125000,9.778000 33.797000,9.998000 34.474000,10.207000 35.153000,10.405000 35.835000,10.592000 36.521000,10.768000 37.209000,10.933000 37.900000,11.087000 38.593000,11.229000 39.289000,11.361000 39.986000,11.481000 40.685000,11.589000 41.386000,11.686000 42.089000,11.772000 42.793000,11.847000 43.497000,11.910000 44.203000,11.961000 44.910000,12.001000 45.617000,12.030000 46.324000,12.047000 47.032000,12.053000 47.032000,14.553000 46.284000,14.547000 45.536000,14.529000 44.788000,14.498000 44.041000,14.456000 43.295000,14.401000 42.550000,14.335000 41.806000,14.256000 41.063000,14.165000 40.322000,14.063000 39.582000,13.948000 38.845000,13.821000 38.110000,13.682000 37.377000,13.532000 36.646000,13.369000 35.919000,13.195000 35.194000,13.009000 34.472000,12.811000 33.754000,12.601000 33.039000,12.380000 32.328000,12.148000 31.621000,11.904000 30.918000,11.648000 30.219000,11.381000 29.524000,11.103000 28.834000,10.813000 28.149000,10.513000 27.469000,10.201000 26.794000,9.878000 26.124000,9.545000 25.460000,9.200000 24.801000,8.845000 24.149000,8.479000 23.502000,8.103000 22.861000,7.716000 22.255000,7.351000 21.644000,6.995000 21.026000,6.649000 20.403000,6.313000 19.775000,5.987000 19.142000,5.672000 18.503000,5.366000 17.860000,5.071000 17.212000,4.787000 16.559000,4.513000 15.902000,4.250000 15.241000,3.998000 14.576000,3.756000 13.907000,3.525000 13.235000,3.305000 12.558000,3.096000 11.879000,2.898000 11.197000,2.711000 10.511000,2.535000 9.823000,2.370000 9.132000,2.216000 8.439000,2.074000 7.743000,1.942000 7.046000,1.823000 6.347000,1.714000 5.646000,1.617000 4.943000,1.531000 4.239000,1.456000 3.535000,1.393000 2.829000,1.342000 2.122000,1.302000 1.415000,1.273000 0.708000,1.256000 0.000000,1.250000 z%22 /><path class=%22layer_2_0%22 d=%22M 0.000000,-0.250000 0.732000,-0.244000 1.464000,-0.226000 2.195000,-0.197000 2.926000,-0.155000 3.656000,-0.102000 4.385000,-0.037000 5.113000,0.040000 5.840000,0.129000 6.565000,0.230000 7.288000,0.342000 8.010000,0.466000 8.729000,0.602000 9.446000,0.749000 10.160000,0.908000 10.872000,1.079000 11.581000,1.261000 12.287000,1.454000 12.990000,1.659000 13.689000,1.876000 14.385000,2.103000 15.077000,2.342000 15.765000,2.592000 16.449000,2.853000 17.128000,3.125000 17.803000,3.409000 18.474000,3.703000 19.139000,4.008000 19.800000,4.323000 20.455000,4.650000 21.105000,4.987000 21.749000,5.334000 22.388000,5.692000 23.020000,6.060000 23.647000,6.439000 24.267000,6.813000 24.892000,7.177000 25.524000,7.531000 26.161000,7.874000 26.804000,8.207000 27.452000,8.530000 28.105000,8.842000 28.763000,9.144000 29.426000,9.435000 30.093000,9.715000 30.765000,9.984000 31.442000,10.242000 32.122000,10.490000 32.806000,10.726000 33.494000,10.951000 34.186000,11.165000 34.881000,11.368000 35.579000,11.559000 36.280000,11.739000 36.984000,11.908000 37.691000,12.065000 38.400000,12.211000 39.111000,12.345000 39.825000,12.467000 40.540000,12.578000 41.257000,12.678000 41.975000,12.766000 42.695000,12.842000 43.416000,12.906000 44.138000,12.959000 44.861000,13.000000 45.584000,13.030000 46.308000,13.047000 47.032000,13.053000 47.032000,13.553000 46.300000,13.547000 45.568000,13.529000 44.837000,13.500000 44.106000,13.458000 43.376000,13.405000 42.647000,13.340000 41.919000,13.263000 41.192000,13.174000 40.467000,13.073000 39.744000,12.961000 39.022000,12.837000 38.303000,12.701000 37.586000,12.554000 36.872000,12.395000 36.160000,12.224000 35.451000,12.042000 34.745000,11.849000 34.042000,11.644000 33.343000,11.427000 32.647000,11.200000 31.955000,10.961000 31.267000,10.711000 30.583000,10.450000 29.904000,10.178000 29.229000,9.894000 28.558000,9.600000 27.893000,9.295000 27.232000,8.980000 26.577000,8.653000 25.927000,8.316000 25.283000,7.969000 24.644000,7.611000 24.012000,7.243000 23.385000,6.864000 22.765000,6.490000 22.140000,6.126000 21.508000,5.772000 20.871000,5.429000 20.228000,5.096000 19.580000,4.773000 18.927000,4.461000 18.269000,4.159000 17.606000,3.868000 16.939000,3.588000 16.267000,3.319000 15.590000,3.061000 14.910000,2.813000 14.226000,2.577000 13.538000,2.352000 12.846000,2.138000 12.151000,1.935000 11.453000,1.744000 10.752000,1.564000 10.048000,1.395000 9.341000,1.238000 8.632000,1.092000 7.921000,0.958000 7.207000,0.836000 6.492000,0.725000 5.775000,0.625000 5.057000,0.537000 4.337000,0.461000 3.616000,0.397000 2.894000,0.344000 2.171000,0.303000 1.448000,0.273000 0.724000,0.256000 0.000000,0.250000 z%22 /></g><g id=%22C133%22 data-name=%22as_component__PNGCOJINIPILRSBFUVHAAAKRQR7F7X5DOV45DHY3HPYOUZICQITA%22><path class=%22layer_1_0%22 d=%22M 9.889000,3.500000 0.000000,1.275000 0.000000,-1.275000 9.889000,-3.500000 16.000000,-3.500000 16.000000,3.500000 z%22 /><path class=%22layer_2_0%22 d=%22M 0.000000,-0.250000 10.000000,-2.500000 10.000000,2.500000 0.000000,0.250000 z%22 /><rect class=%22layer_2_0%22 x=%2210.300000%22 y=%22-2.500000%22 width=%220.300000%22 height=%225.000000%22 /><rect class=%22layer_2_0%22 x=%2210.900000%22 y=%22-2.500000%22 width=%220.300000%22 height=%225.000000%22 /><rect class=%22layer_2_0%22 x=%2211.500000%22 y=%22-2.500000%22 width=%220.300000%22 height=%225.000000%22 /><rect class=%22layer_2_0%22 x=%2212.100000%22 y=%22-2.500000%22 width=%220.300000%22 height=%225.000000%22 /><rect class=%22layer_2_0%22 x=%2212.700000%22 y=%22-2.500000%22 width=%220.300000%22 height=%225.000000%22 /><rect class=%22layer_2_0%22 x=%2213.300000%22 y=%22-2.500000%22 width=%220.300000%22 height=%225.000000%22 /><rect class=%22layer_2_0%22 x=%2213.900000%22 y=%22-2.500000%22 width=%220.300000%22 height=%225.000000%22 /><rect class=%22layer_2_0%22 x=%2214.500000%22 y=%22-2.500000%22 width=%220.300000%22 height=%225.000000%22 /><rect class=%22layer_2_0%22 x=%2215.100000%22 y=%22-2.500000%22 width=%220.300000%22 height=%225.000000%22 /><rect class=%22layer_2_0%22 x=%2215.700000%22 y=%22-2.500000%22 width=%220.300000%22 height=%225.000000%22 /></g><g id=%22C134%22 data-name=%22s_bend_l_46P747308973320706_o_87P15053580434504_p_Strip%22><path class=%22layer_1_0%22 d=%22M 0.000000,-1.250000 0.564000,-1.245000 1.129000,-1.228000 1.692000,-1.201000 2.255000,-1.163000 2.818000,-1.114000 3.379000,-1.055000 3.939000,-0.984000 4.497000,-0.903000 5.054000,-0.811000 5.609000,-0.708000 6.162000,-0.595000 6.713000,-0.471000 7.261000,-0.336000 7.806000,-0.191000 8.349000,-0.036000 8.888000,0.130000 9.957000,0.493000 10.486000,0.690000 11.011000,0.897000 11.532000,1.114000 12.048000,1.341000 12.561000,1.578000 13.068000,1.825000 13.571000,2.082000 14.069000,2.348000 14.561000,2.623000 15.048000,2.908000 15.530000,3.203000 16.475000,3.819000 16.939000,4.141000 17.847000,4.811000 18.291000,5.159000 19.160000,5.880000 19.999000,6.635000 20.408000,7.024000 21.203000,7.825000 21.589000,8.237000 22.336000,9.083000 23.050000,9.957000 23.730000,10.858000 24.374000,11.785000 24.683000,12.257000 24.983000,12.736000 25.273000,13.220000 25.554000,13.709000 25.826000,14.204000 26.088000,14.704000 26.340000,15.208000 26.583000,15.718000 26.815000,16.232000 27.038000,16.751000 27.251000,17.274000 27.453000,17.800000 27.646000,18.331000 27.828000,18.865000 28.000000,19.403000 28.161000,19.944000 28.312000,20.487000 28.453000,21.034000 28.583000,21.583000 28.702000,22.135000 28.811000,22.689000 28.909000,23.244000 28.996000,23.802000 29.073000,24.361000 29.193000,25.483000 29.237000,26.046000 29.271000,26.609000 29.293000,27.173000 29.305000,27.738000 29.295000,28.866000 29.274000,29.430000 29.242000,29.994000 29.200000,30.557000 29.082000,31.679000 29.007000,32.238000 28.921000,32.796000 28.824000,33.352000 28.717000,33.906000 28.599000,34.458000 28.470000,35.008000 28.331000,35.555000 28.181000,36.099000 28.021000,36.640000 27.851000,37.178000 27.670000,37.713000 27.479000,38.244000 27.278000,38.771000 26.845000,39.814000 26.372000,40.839000 26.121000,41.344000 25.860000,41.845000 25.590000,42.340000 25.310000,42.830000 25.021000,43.315000 24.723000,43.794000 24.415000,44.267000 24.133000,44.700000 23.860000,45.138000 23.340000,46.030000 22.854000,46.941000 22.404000,47.870000 22.192000,48.340000 21.796000,49.294000 21.612000,49.776000 21.272000,50.751000 21.116000,51.243000 20.833000,52.236000 20.588000,53.239000 20.480000,53.744000 20.382000,54.251000 20.215000,55.269000 20.146000,55.781000 20.087000,56.294000 20.038000,56.808000 19.970000,57.838000 19.942000,58.870000 19.942000,59.386000 19.973000,60.418000 20.044000,61.448000 20.094000,61.962000 20.225000,62.986000 20.304000,63.496000 20.394000,64.005000 20.603000,65.016000 20.850000,66.018000 20.988000,66.515000 21.293000,67.502000 21.636000,68.476000 21.821000,68.958000 22.219000,69.910000 22.654000,70.847000 23.124000,71.766000 23.630000,72.666000 23.895000,73.108000 24.452000,73.978000 24.743000,74.405000 25.349000,75.241000 25.663000,75.650000 25.986000,76.053000 26.655000,76.839000 27.000000,77.223000 27.713000,77.970000 28.454000,78.689000 28.834000,79.038000 29.616000,79.713000 30.422000,80.357000 31.253000,80.970000 32.107000,81.550000 32.542000,81.828000 33.428000,82.358000 34.334000,82.854000 35.258000,83.314000 35.726000,83.531000 36.199000,83.739000 37.156000,84.126000 38.127000,84.477000 38.617000,84.638000 39.607000,84.933000 40.607000,85.188000 41.111000,85.302000 42.124000,85.499000 42.633000,85.583000 43.144000,85.658000 44.170000,85.777000 44.684000,85.822000 45.715000,85.881000 46.747000,85.901000 46.747000,88.401000 46.183000,88.396000 45.055000,88.352000 44.492000,88.314000 43.929000,88.265000 43.368000,88.206000 42.808000,88.135000 42.250000,88.054000 41.693000,87.962000 41.138000,87.859000 40.585000,87.746000 40.034000,87.622000 39.486000,87.487000 38.941000,87.342000 38.398000,87.187000 37.859000,87.021000 36.790000,86.658000 36.261000,86.461000 35.736000,86.254000 35.215000,86.037000 34.699000,85.810000 34.186000,85.573000 33.679000,85.326000 33.176000,85.069000 32.678000,84.803000 32.186000,84.528000 31.699000,84.243000 31.217000,83.948000 30.272000,83.332000 29.808000,83.010000 28.900000,82.340000 28.456000,81.992000 27.587000,81.271000 27.164000,80.898000 26.339000,80.127000 25.544000,79.326000 25.158000,78.914000 24.411000,78.068000 23.697000,77.194000 23.017000,76.293000 22.373000,75.366000 22.064000,74.894000 21.764000,74.415000 21.474000,73.931000 21.193000,73.442000 20.921000,72.947000 20.659000,72.447000 20.407000,71.943000 20.164000,71.433000 19.932000,70.919000 19.709000,70.400000 19.496000,69.877000 19.294000,69.351000 19.101000,68.820000 18.919000,68.286000 18.747000,67.748000 18.586000,67.207000 18.435000,66.664000 18.294000,66.117000 18.164000,65.568000 18.045000,65.016000 17.936000,64.462000 17.838000,63.907000 17.751000,63.349000 17.674000,62.790000 17.554000,61.668000 17.476000,60.542000 17.454000,59.978000 17.442000,59.413000 17.452000,58.285000 17.473000,57.721000 17.505000,57.157000 17.547000,56.594000 17.665000,55.472000 17.826000,54.355000 17.923000,53.799000 18.030000,53.245000 18.148000,52.693000 18.277000,52.143000 18.416000,51.596000 18.566000,51.052000 18.726000,50.511000 18.896000,49.973000 19.077000,49.438000 19.268000,48.907000 19.681000,47.857000 19.902000,47.337000 20.375000,46.313000 20.626000,45.807000 20.887000,45.306000 21.157000,44.811000 21.437000,44.321000 21.726000,43.836000 22.332000,42.884000 22.614000,42.451000 22.887000,42.013000 23.407000,41.121000 23.893000,40.210000 24.122000,39.748000 24.555000,38.811000 24.951000,37.857000 25.135000,37.375000 25.475000,36.400000 25.631000,35.908000 25.914000,34.915000 26.159000,33.912000 26.267000,33.407000 26.454000,32.392000 26.601000,31.370000 26.660000,30.857000 26.709000,30.343000 26.777000,29.313000 26.796000,28.797000 26.805000,27.765000 26.774000,26.733000 26.703000,25.703000 26.653000,25.189000 26.592000,24.676000 26.443000,23.655000 26.353000,23.146000 26.144000,22.135000 25.897000,21.133000 25.759000,20.636000 25.454000,19.649000 25.287000,19.161000 24.926000,18.193000 24.528000,17.241000 24.093000,16.304000 23.623000,15.385000 23.374000,14.933000 22.852000,14.043000 22.295000,13.173000 22.004000,12.746000 21.705000,12.326000 21.084000,11.501000 20.761000,11.098000 20.430000,10.702000 19.747000,9.928000 19.394000,9.551000 18.667000,8.818000 17.913000,8.113000 17.131000,7.438000 16.325000,6.794000 15.494000,6.181000 15.070000,5.887000 14.205000,5.323000 13.319000,4.793000 12.413000,4.297000 11.953000,4.063000 11.021000,3.620000 10.548000,3.412000 9.591000,3.025000 8.620000,2.674000 8.130000,2.513000 7.140000,2.218000 6.641000,2.086000 5.636000,1.849000 4.623000,1.652000 3.603000,1.493000 2.577000,1.374000 1.548000,1.295000 1.032000,1.270000 0.000000,1.250000 z%22 /><path class=%22layer_2_0%22 d=%22M 0.000000,-0.250000 0.545000,-0.245000 1.090000,-0.229000 1.634000,-0.203000 2.178000,-0.166000 2.721000,-0.119000 3.264000,-0.061000 4.344000,0.085000 4.882000,0.174000 5.418000,0.273000 5.952000,0.383000 6.484000,0.503000 7.013000,0.632000 8.064000,0.923000 8.585000,1.083000 9.617000,1.434000 10.128000,1.624000 11.138000,2.033000 12.132000,2.482000 12.622000,2.720000 13.108000,2.968000 13.589000,3.225000 14.064000,3.491000 15.000000,4.051000 15.459000,4.344000 15.913000,4.646000 16.803000,5.276000 17.667000,5.940000 18.506000,6.637000 18.915000,6.997000 19.712000,7.741000 20.479000,8.516000 20.852000,8.914000 21.217000,9.319000 21.574000,9.731000 21.923000,10.150000 22.263000,10.575000 22.596000,11.007000 22.920000,11.445000 23.236000,11.890000 23.543000,12.340000 23.841000,12.796000 24.411000,13.726000 24.945000,14.676000 25.198000,15.159000 25.675000,16.139000 25.900000,16.636000 26.115000,17.137000 26.321000,17.642000 26.516000,18.150000 26.702000,18.663000 26.878000,19.179000 27.044000,19.698000 27.200000,20.220000 27.346000,20.746000 27.482000,21.274000 27.723000,22.337000 27.828000,22.872000 28.007000,23.947000 28.144000,25.029000 28.197000,25.571000 28.240000,26.115000 28.294000,27.203000 28.305000,27.748000 28.296000,28.839000 28.245000,29.928000 28.152000,31.014000 28.017000,32.096000 27.934000,32.634000 27.737000,33.707000 27.623000,34.240000 27.499000,34.771000 27.220000,35.824000 27.065000,36.347000 26.726000,37.383000 26.347000,38.405000 26.143000,38.911000 25.929000,39.412000 25.705000,39.910000 25.230000,40.891000 24.717000,41.853000 24.447000,42.326000 23.879000,43.257000 23.582000,43.714000 23.290000,44.163000 22.732000,45.077000 22.210000,46.012000 21.963000,46.487000 21.496000,47.451000 21.276000,47.939000 21.066000,48.432000 20.866000,48.928000 20.493000,49.932000 20.160000,50.950000 20.008000,51.464000 19.866000,51.980000 19.734000,52.499000 19.612000,53.020000 19.500000,53.544000 19.398000,54.070000 19.225000,55.127000 19.154000,55.657000 19.093000,56.189000 19.042000,56.722000 19.001000,57.256000 18.951000,58.326000 18.942000,59.397000 18.953000,59.932000 19.006000,61.002000 19.048000,61.536000 19.100000,62.069000 19.235000,63.131000 19.318000,63.660000 19.411000,64.188000 19.627000,65.237000 19.884000,66.276000 20.027000,66.792000 20.180000,67.305000 20.516000,68.322000 20.699000,68.826000 20.891000,69.325000 21.093000,69.822000 21.304000,70.314000 21.755000,71.285000 22.243000,72.238000 22.767000,73.172000 23.327000,74.085000 23.620000,74.533000 23.922000,74.976000 24.550000,75.843000 25.212000,76.685000 25.554000,77.097000 26.263000,77.899000 26.629000,78.290000 27.383000,79.051000 28.166000,79.782000 28.568000,80.136000 29.392000,80.820000 29.813000,81.150000 30.675000,81.786000 31.561000,82.388000 32.012000,82.676000 32.931000,83.226000 33.871000,83.740000 34.829000,84.218000 35.806000,84.658000 36.300000,84.864000 37.300000,85.247000 37.805000,85.424000 38.826000,85.749000 39.858000,86.034000 40.378000,86.162000 41.425000,86.387000 42.480000,86.572000 43.010000,86.649000 43.541000,86.716000 44.607000,86.819000 45.141000,86.855000 46.212000,86.896000 46.747000,86.901000 46.747000,87.401000 46.202000,87.396000 45.657000,87.380000 45.113000,87.354000 44.569000,87.317000 44.026000,87.270000 43.483000,87.212000 42.403000,87.066000 41.865000,86.977000 41.329000,86.878000 40.795000,86.768000 39.734000,86.519000 38.683000,86.228000 38.162000,86.068000 37.644000,85.898000 36.619000,85.527000 35.609000,85.118000 34.615000,84.669000 34.125000,84.431000 33.639000,84.183000 33.158000,83.926000 32.683000,83.660000 31.747000,83.100000 31.288000,82.807000 30.834000,82.505000 29.944000,81.875000 29.080000,81.211000 28.241000,80.514000 27.832000,80.154000 27.035000,79.410000 26.648000,79.026000 25.895000,78.237000 25.530000,77.832000 25.173000,77.420000 24.824000,77.001000 24.151000,76.144000 23.827000,75.706000 23.511000,75.261000 23.204000,74.811000 22.906000,74.355000 22.336000,73.425000 21.802000,72.475000 21.549000,71.992000 21.072000,71.012000 20.847000,70.515000 20.632000,70.014000 20.426000,69.509000 20.231000,69.001000 20.045000,68.488000 19.869000,67.972000 19.703000,67.453000 19.547000,66.931000 19.401000,66.405000 19.265000,65.877000 19.024000,64.814000 18.919000,64.279000 18.740000,63.204000 18.603000,62.122000 18.550000,61.580000 18.507000,61.036000 18.453000,59.948000 18.442000,59.403000 18.451000,58.312000 18.503000,57.223000 18.544000,56.680000 18.596000,56.137000 18.730000,55.055000 18.813000,54.517000 19.010000,53.444000 19.124000,52.911000 19.248000,52.380000 19.527000,51.327000 19.682000,50.804000 20.021000,49.768000 20.400000,48.746000 20.604000,48.240000 20.818000,47.739000 21.042000,47.241000 21.517000,46.260000 22.030000,45.298000 22.300000,44.825000 22.868000,43.894000 23.165000,43.437000 23.457000,42.988000 24.015000,42.074000 24.537000,41.139000 24.784000,40.664000 25.022000,40.184000 25.471000,39.212000 25.681000,38.719000 25.881000,38.223000 26.254000,37.219000 26.587000,36.201000 26.739000,35.687000 26.881000,35.171000 27.013000,34.652000 27.135000,34.131000 27.247000,33.607000 27.349000,33.081000 27.522000,32.024000 27.593000,31.494000 27.654000,30.962000 27.705000,30.429000 27.746000,29.895000 27.796000,28.825000 27.805000,27.754000 27.773000,26.683000 27.699000,25.615000 27.647000,25.082000 27.512000,24.020000 27.429000,23.491000 27.336000,22.963000 27.120000,21.914000 26.863000,20.875000 26.720000,20.359000 26.567000,19.846000 26.231000,18.829000 26.048000,18.325000 25.856000,17.826000 25.443000,16.837000 24.992000,15.866000 24.752000,15.387000 24.504000,14.913000 23.980000,13.979000 23.420000,13.066000 23.127000,12.618000 22.825000,12.175000 22.197000,11.308000 21.870000,10.884000 21.193000,10.054000 20.484000,9.252000 20.118000,8.861000 19.364000,8.100000 18.581000,7.369000 18.179000,7.015000 17.770000,6.669000 16.934000,6.001000 16.072000,5.365000 15.186000,4.763000 14.735000,4.475000 13.816000,3.925000 13.349000,3.664000 12.876000,3.411000 11.918000,2.933000 10.942000,2.493000 10.447000,2.287000 9.447000,1.904000 8.942000,1.727000 7.921000,1.402000 6.889000,1.117000 6.369000,0.989000 5.322000,0.764000 4.267000,0.579000 3.737000,0.502000 3.206000,0.435000 2.140000,0.332000 1.606000,0.296000 0.535000,0.255000 0.000000,0.250000 z%22 /></g><g id=%22C135%22 data-name=%22as_component__PNGCOJINIPILRSBFUVHAAAKRQR7F7X5DOV45DHY3HPYOUZICQITA%22><path class=%22layer_1_0%22 d=%22M 9.889000,3.500000 0.000000,1.275000 0.000000,-1.275000 9.889000,-3.500000 16.000000,-3.500000 16.000000,3.500000 z%22 /><path class=%22layer_2_0%22 d=%22M 0.000000,-0.250000 10.000000,-2.500000 10.000000,2.500000 0.000000,0.250000 z%22 /><rect class=%22layer_2_0%22 x=%2210.300000%22 y=%22-2.500000%22 width=%220.300000%22 height=%225.000000%22 /><rect class=%22layer_2_0%22 x=%2210.900000%22 y=%22-2.500000%22 width=%220.300000%22 height=%225.000000%22 /><rect class=%22layer_2_0%22 x=%2211.500000%22 y=%22-2.500000%22 width=%220.300000%22 height=%225.000000%22 /><rect class=%22layer_2_0%22 x=%2212.100000%22 y=%22-2.500000%22 width=%220.300000%22 height=%225.000000%22 /><rect class=%22layer_2_0%22 x=%2212.700000%22 y=%22-2.500000%22 width=%220.300000%22 height=%225.000000%22 /><rect class=%22layer_2_0%22 x=%2213.300000%22 y=%22-2.500000%22 width=%220.300000%22 height=%225.000000%22 /><rect class=%22layer_2_0%22 x=%2213.900000%22 y=%22-2.500000%22 width=%220.300000%22 height=%225.000000%22 /><rect class=%22layer_2_0%22 x=%2214.500000%22 y=%22-2.500000%22 width=%220.300000%22 height=%225.000000%22 /><rect class=%22layer_2_0%22 x=%2215.100000%22 y=%22-2.500000%22 width=%220.300000%22 height=%225.000000%22 /><rect class=%22layer_2_0%22 x=%2215.700000%22 y=%22-2.500000%22 width=%220.300000%22 height=%225.000000%22 /></g><g id=%22C136%22 data-name=%22s_bend_l_20P679921342869044_o_9P173886706093302_p_Strip%22><path class=%22layer_1_0%22 d=%22M 0.000000,-1.250000 0.423000,-1.244000 0.846000,-1.226000 1.268000,-1.197000 1.689000,-1.156000 2.108000,-1.103000 2.526000,-1.039000 2.943000,-0.962000 3.356000,-0.875000 3.768000,-0.776000 4.176000,-0.665000 4.581000,-0.543000 4.983000,-0.410000 5.380000,-0.266000 5.774000,-0.111000 6.163000,0.056000 6.547000,0.233000 6.926000,0.420000 7.300000,0.618000 7.668000,0.826000 8.030000,1.045000 8.386000,1.273000 8.736000,1.512000 9.079000,1.760000 9.414000,2.017000 9.743000,2.284000 10.064000,2.559000 10.377000,2.844000 10.682000,3.137000 10.978000,3.438000 11.267000,3.748000 11.755000,4.259000 12.010000,4.504000 12.540000,4.972000 13.095000,5.409000 13.381000,5.617000 13.971000,6.007000 14.581000,6.363000 14.893000,6.529000 15.531000,6.833000 16.185000,7.102000 16.853000,7.333000 17.532000,7.528000 18.221000,7.684000 18.918000,7.801000 19.621000,7.880000 20.327000,7.919000 20.680000,7.924000 20.680000,10.424000 20.257000,10.418000 19.834000,10.400000 19.412000,10.371000 18.991000,10.330000 18.572000,10.277000 18.154000,10.213000 17.737000,10.136000 17.324000,10.049000 16.912000,9.950000 16.504000,9.839000 16.099000,9.717000 15.697000,9.584000 15.300000,9.440000 14.906000,9.285000 14.517000,9.118000 14.133000,8.941000 13.754000,8.754000 13.380000,8.556000 13.012000,8.348000 12.650000,8.129000 12.294000,7.901000 11.944000,7.662000 11.601000,7.414000 11.266000,7.157000 10.937000,6.890000 10.616000,6.615000 10.303000,6.330000 9.998000,6.037000 9.702000,5.736000 9.413000,5.426000 9.173000,5.167000 8.670000,4.670000 8.140000,4.202000 7.866000,3.980000 7.299000,3.557000 7.007000,3.358000 6.407000,2.985000 5.787000,2.645000 5.149000,2.341000 4.495000,2.072000 3.827000,1.841000 3.148000,1.646000 2.459000,1.490000 1.762000,1.373000 1.059000,1.294000 0.707000,1.270000 0.000000,1.250000 z%22 /><path class=%22layer_2_0%22 d=%22M 0.000000,-0.250000 0.395000,-0.244000 0.790000,-0.228000 1.184000,-0.201000 1.578000,-0.162000 1.970000,-0.113000 2.360000,-0.052000 2.749000,0.019000 3.136000,0.101000 3.520000,0.193000 3.901000,0.296000 4.280000,0.410000 5.026000,0.669000 5.394000,0.814000 6.116000,1.135000 6.470000,1.310000 6.820000,1.495000 7.164000,1.690000 7.502000,1.894000 7.835000,2.107000 8.161000,2.330000 8.481000,2.562000 8.795000,2.802000 9.102000,3.051000 9.694000,3.575000 9.979000,3.848000 10.256000,4.130000 10.525000,4.419000 10.785000,4.698000 11.053000,4.970000 11.610000,5.491000 11.899000,5.739000 12.497000,6.211000 12.806000,6.435000 13.121000,6.650000 13.442000,6.856000 13.769000,7.053000 14.437000,7.419000 14.779000,7.588000 15.125000,7.747000 15.476000,7.897000 15.831000,8.037000 16.189000,8.167000 16.551000,8.287000 16.916000,8.397000 17.655000,8.586000 18.028000,8.665000 18.780000,8.792000 19.158000,8.839000 19.537000,8.876000 19.918000,8.903000 20.299000,8.919000 20.680000,8.924000 20.680000,9.424000 20.285000,9.419000 19.890000,9.402000 19.496000,9.375000 19.102000,9.336000 18.710000,9.287000 18.320000,9.226000 17.931000,9.155000 17.544000,9.073000 17.160000,8.981000 16.779000,8.878000 16.400000,8.764000 15.654000,8.505000 15.286000,8.360000 14.564000,8.039000 14.210000,7.864000 13.860000,7.679000 13.516000,7.484000 13.178000,7.280000 12.845000,7.067000 12.519000,6.844000 11.885000,6.372000 11.578000,6.123000 11.279000,5.865000 10.986000,5.599000 10.701000,5.326000 10.424000,5.044000 10.155000,4.755000 9.895000,4.476000 9.353000,3.940000 9.070000,3.683000 8.781000,3.435000 8.485000,3.195000 8.183000,2.963000 7.874000,2.739000 7.559000,2.524000 7.238000,2.318000 6.911000,2.121000 6.243000,1.755000 5.901000,1.586000 5.555000,1.427000 5.204000,1.277000 4.849000,1.137000 4.491000,1.007000 4.129000,0.887000 3.764000,0.777000 3.025000,0.588000 2.652000,0.509000 1.900000,0.382000 1.522000,0.335000 1.143000,0.298000 0.762000,0.271000 0.381000,0.255000 0.000000,0.250000 z%22 /></g><g id=%22C137%22 data-name=%22as_component__PNGCOJINIPILRSBFUVHAAAKRQR7F7X5DOV45DHY3HPYOUZICQITA%22><path class=%22layer_1_0%22 d=%22M 9.889000,3.500000 0.000000,1.275000 0.000000,-1.275000 9.889000,-3.500000 16.000000,-3.500000 16.000000,3.500000 z%22 /><path class=%22layer_2_0%22 d=%22M 0.000000,-0.250000 10.000000,-2.500000 10.000000,2.500000 0.000000,0.250000 z%22 /><rect class=%22layer_2_0%22 x=%2210.300000%22 y=%22-2.500000%22 width=%220.300000%22 height=%225.000000%22 /><rect class=%22layer_2_0%22 x=%2210.900000%22 y=%22-2.500000%22 width=%220.300000%22 height=%225.000000%22 /><rect class=%22layer_2_0%22 x=%2211.500000%22 y=%22-2.500000%22 width=%220.300000%22 height=%225.000000%22 /><rect class=%22layer_2_0%22 x=%2212.100000%22 y=%22-2.500000%22 width=%220.300000%22 height=%225.000000%22 /><rect class=%22layer_2_0%22 x=%2212.700000%22 y=%22-2.500000%22 width=%220.300000%22 height=%225.000000%22 /><rect class=%22layer_2_0%22 x=%2213.300000%22 y=%22-2.500000%22 width=%220.300000%22 height=%225.000000%22 /><rect class=%22layer_2_0%22 x=%2213.900000%22 y=%22-2.500000%22 width=%220.300000%22 height=%225.000000%22 /><rect class=%22layer_2_0%22 x=%2214.500000%22 y=%22-2.500000%22 width=%220.300000%22 height=%225.000000%22 /><rect class=%22layer_2_0%22 x=%2215.100000%22 y=%22-2.500000%22 width=%220.300000%22 height=%225.000000%22 /><rect class=%22layer_2_0%22 x=%2215.700000%22 y=%22-2.500000%22 width=%220.300000%22 height=%225.000000%22 /></g><g id=%22C138%22 data-name=%22s_bend_l_11P350811098896934_o_15P928035871547447_p_Strip%22><path class=%22layer_1_0%22 d=%22M 0.000000,-1.250000 0.314000,-1.243000 0.627000,-1.223000 0.939000,-1.189000 1.249000,-1.142000 1.557000,-1.081000 1.862000,-1.007000 2.163000,-0.920000 2.461000,-0.820000 2.753000,-0.707000 3.041000,-0.582000 3.323000,-0.444000 3.599000,-0.294000 3.868000,-0.133000 4.129000,0.040000 4.384000,0.224000 4.629000,0.419000 4.867000,0.625000 5.095000,0.840000 5.313000,1.065000 5.522000,1.300000 5.720000,1.543000 5.908000,1.794000 6.084000,2.054000 6.249000,2.320000 6.403000,2.594000 6.544000,2.874000 6.673000,3.160000 6.790000,3.451000 6.894000,3.747000 6.985000,4.048000 7.064000,4.352000 7.128000,4.658000 7.180000,4.968000 7.218000,5.279000 7.243000,5.592000 7.254000,5.906000 7.251000,6.220000 7.235000,6.533000 7.205000,6.845000 7.162000,7.156000 7.106000,7.465000 7.036000,7.771000 6.953000,8.073000 6.857000,8.372000 6.740000,8.766000 6.657000,9.169000 6.609000,9.577000 6.597000,9.988000 6.620000,10.399000 6.679000,10.806000 6.773000,11.206000 6.901000,11.597000 7.062000,11.975000 7.255000,12.338000 7.479000,12.683000 7.732000,13.007000 8.012000,13.308000 8.317000,13.584000 8.645000,13.833000 8.993000,14.052000 9.358000,14.240000 9.738000,14.396000 10.131000,14.519000 10.532000,14.607000 10.940000,14.660000 11.145000,14.674000 11.351000,14.678000 11.351000,17.178000 11.037000,17.171000 10.724000,17.151000 10.412000,17.117000 10.102000,17.070000 9.794000,17.009000 9.489000,16.935000 9.188000,16.848000 8.890000,16.748000 8.598000,16.635000 8.310000,16.510000 8.028000,16.372000 7.752000,16.222000 7.483000,16.061000 7.222000,15.888000 6.967000,15.704000 6.722000,15.509000 6.484000,15.303000 6.256000,15.088000 6.038000,14.863000 5.829000,14.628000 5.631000,14.385000 5.443000,14.134000 5.267000,13.874000 5.102000,13.608000 4.948000,13.334000 4.807000,13.054000 4.678000,12.768000 4.561000,12.477000 4.457000,12.181000 4.366000,11.880000 4.287000,11.577000 4.223000,11.270000 4.171000,10.960000 4.133000,10.649000 4.108000,10.336000 4.097000,10.022000 4.100000,9.708000 4.116000,9.395000 4.146000,9.083000 4.189000,8.772000 4.245000,8.463000 4.315000,8.157000 4.398000,7.855000 4.494000,7.556000 4.611000,7.162000 4.694000,6.759000 4.742000,6.351000 4.752000,6.145000 4.747000,5.734000 4.706000,5.325000 4.629000,4.921000 4.518000,4.525000 4.374000,4.140000 4.196000,3.769000 3.987000,3.415000 3.749000,3.080000 3.482000,2.767000 3.189000,2.479000 2.873000,2.216000 2.535000,1.982000 2.178000,1.778000 1.804000,1.606000 1.418000,1.466000 1.020000,1.361000 0.615000,1.290000 0.206000,1.254000 0.000000,1.250000 z%22 /><path class=%22layer_2_0%22 d=%22M 0.000000,-0.250000 0.270000,-0.244000 0.540000,-0.227000 0.809000,-0.197000 1.077000,-0.157000 1.342000,-0.104000 1.605000,-0.041000 1.865000,0.035000 2.121000,0.121000 2.374000,0.218000 2.622000,0.326000 2.865000,0.445000 3.103000,0.574000 3.335000,0.713000 3.560000,0.862000 3.779000,1.021000 3.991000,1.189000 4.196000,1.366000 4.392000,1.552000 4.581000,1.746000 4.761000,1.948000 4.932000,2.158000 5.093000,2.375000 5.245000,2.598000 5.388000,2.828000 5.520000,3.064000 5.642000,3.306000 5.754000,3.552000 5.854000,3.803000 5.944000,4.058000 6.023000,4.317000 6.090000,4.579000 6.146000,4.844000 6.190000,5.111000 6.223000,5.379000 6.244000,5.649000 6.254000,5.919000 6.252000,6.190000 6.238000,6.460000 6.212000,6.729000 6.175000,6.997000 6.126000,7.263000 6.066000,7.527000 5.995000,7.788000 5.912000,8.046000 5.836000,8.283000 5.770000,8.523000 5.715000,8.765000 5.670000,9.010000 5.635000,9.257000 5.612000,9.504000 5.599000,9.753000 5.597000,10.002000 5.606000,10.251000 5.625000,10.499000 5.656000,10.746000 5.697000,10.991000 5.748000,11.235000 5.810000,11.476000 5.882000,11.714000 6.057000,12.180000 6.160000,12.407000 6.272000,12.629000 6.394000,12.846000 6.525000,13.057000 6.665000,13.263000 6.814000,13.463000 6.971000,13.656000 7.136000,13.842000 7.491000,14.191000 7.679000,14.354000 7.874000,14.509000 8.075000,14.655000 8.283000,14.792000 8.496000,14.920000 8.715000,15.039000 8.939000,15.148000 9.399000,15.337000 9.635000,15.416000 9.874000,15.485000 10.116000,15.544000 10.360000,15.592000 10.606000,15.630000 11.102000,15.673000 11.351000,15.678000 11.351000,16.178000 11.081000,16.172000 10.811000,16.155000 10.542000,16.125000 10.274000,16.085000 10.009000,16.032000 9.746000,15.969000 9.486000,15.893000 9.230000,15.807000 8.977000,15.710000 8.729000,15.602000 8.486000,15.483000 8.248000,15.354000 8.016000,15.215000 7.791000,15.066000 7.572000,14.907000 7.360000,14.739000 7.155000,14.562000 6.959000,14.376000 6.770000,14.182000 6.590000,13.980000 6.419000,13.770000 6.258000,13.553000 6.106000,13.330000 5.963000,13.100000 5.831000,12.864000 5.709000,12.622000 5.597000,12.376000 5.497000,12.125000 5.407000,11.870000 5.329000,11.611000 5.261000,11.349000 5.205000,11.084000 5.161000,10.817000 5.128000,10.549000 5.107000,10.279000 5.097000,10.009000 5.099000,9.738000 5.113000,9.468000 5.139000,9.199000 5.176000,8.931000 5.225000,8.665000 5.285000,8.401000 5.356000,8.140000 5.439000,7.882000 5.515000,7.645000 5.581000,7.405000 5.636000,7.163000 5.681000,6.918000 5.716000,6.671000 5.739000,6.424000 5.752000,6.175000 5.754000,5.926000 5.745000,5.677000 5.726000,5.429000 5.695000,5.182000 5.654000,4.937000 5.603000,4.693000 5.541000,4.452000 5.469000,4.214000 5.294000,3.748000 5.191000,3.521000 5.079000,3.299000 4.957000,3.082000 4.826000,2.871000 4.686000,2.665000 4.537000,2.465000 4.380000,2.272000 4.215000,2.086000 3.860000,1.737000 3.672000,1.574000 3.477000,1.419000 3.276000,1.273000 3.068000,1.136000 2.855000,1.008000 2.636000,0.889000 2.412000,0.780000 1.952000,0.591000 1.716000,0.512000 1.477000,0.443000 1.235000,0.384000 0.991000,0.336000 0.745000,0.298000 0.249000,0.255000 0.000000,0.250000 z%22 /></g><g id=%22C139%22 data-name=%22as_component__PNGCOJINIPILRSBFUVHAAAKRQR7F7X5DOV45DHY3HPYOUZICQITA%22><path class=%22layer_1_0%22 d=%22M 9.889000,3.500000 0.000000,1.275000 0.000000,-1.275000 9.889000,-3.500000 16.000000,-3.500000 16.000000,3.500000 z%22 /><path class=%22layer_2_0%22 d=%22M 0.000000,-0.250000 10.000000,-2.500000 10.000000,2.500000 0.000000,0.250000 z%22 /><rect class=%22layer_2_0%22 x=%2210.300000%22 y=%22-2.500000%22 width=%220.300000%22 height=%225.000000%22 /><rect class=%22layer_2_0%22 x=%2210.900000%22 y=%22-2.500000%22 width=%220.300000%22 height=%225.000000%22 /><rect class=%22layer_2_0%22 x=%2211.500000%22 y=%22-2.500000%22 width=%220.300000%22 height=%225.000000%22 /><rect class=%22layer_2_0%22 x=%2212.100000%22 y=%22-2.500000%22 width=%220.300000%22 height=%225.000000%22 /><rect class=%22layer_2_0%22 x=%2212.700000%22 y=%22-2.500000%22 width=%220.300000%22 height=%225.000000%22 /><rect class=%22layer_2_0%22 x=%2213.300000%22 y=%22-2.500000%22 width=%220.300000%22 height=%225.000000%22 /><rect class=%22layer_2_0%22 x=%2213.900000%22 y=%22-2.500000%22 width=%220.300000%22 height=%225.000000%22 /><rect class=%22layer_2_0%22 x=%2214.500000%22 y=%22-2.500000%22 width=%220.300000%22 height=%225.000000%22 /><rect class=%22layer_2_0%22 x=%2215.100000%22 y=%22-2.500000%22 width=%220.300000%22 height=%225.000000%22 /><rect class=%22layer_2_0%22 x=%2215.700000%22 y=%22-2.500000%22 width=%220.300000%22 height=%225.000000%22 /></g><g id=%22C140%22 data-name=%22s_bend_l_3P1986186946980926_o_3P0673091004114665_p_Strip%22><path class=%22layer_1_0%22 d=%22M 0.000000,-1.250000 0.242000,-1.240000 0.482000,-1.209000 0.719000,-1.158000 0.950000,-1.087000 1.175000,-0.997000 1.391000,-0.888000 1.597000,-0.761000 1.791000,-0.617000 1.973000,-0.457000 2.140000,-0.282000 2.292000,-0.094000 2.428000,0.107000 2.546000,0.318000 2.646000,0.539000 2.726000,0.767000 2.787000,1.001000 2.828000,1.240000 2.848000,1.481000 2.856000,1.540000 2.873000,1.597000 2.900000,1.650000 2.936000,1.698000 2.979000,1.739000 3.028000,1.772000 3.082000,1.797000 3.140000,1.812000 3.199000,1.817000 3.199000,4.317000 2.957000,4.307000 2.717000,4.276000 2.480000,4.225000 2.249000,4.154000 2.024000,4.064000 1.808000,3.955000 1.602000,3.828000 1.408000,3.684000 1.226000,3.524000 1.059000,3.349000 0.907000,3.161000 0.771000,2.960000 0.653000,2.749000 0.553000,2.528000 0.473000,2.300000 0.412000,2.066000 0.371000,1.827000 0.351000,1.586000 0.343000,1.527000 0.326000,1.470000 0.299000,1.417000 0.263000,1.369000 0.220000,1.328000 0.171000,1.295000 0.117000,1.270000 0.059000,1.255000 0.000000,1.250000 z%22 /><path class=%22layer_2_0%22 d=%22M 0.000000,-0.250000 0.157000,-0.243000 0.313000,-0.223000 0.466000,-0.190000 0.617000,-0.144000 0.763000,-0.086000 0.903000,-0.015000 1.037000,0.068000 1.163000,0.161000 1.281000,0.265000 1.390000,0.378000 1.488000,0.501000 1.576000,0.631000 1.653000,0.768000 1.718000,0.911000 1.770000,1.059000 1.809000,1.212000 1.836000,1.366000 1.849000,1.523000 1.878000,1.750000 1.945000,1.969000 2.049000,2.174000 2.113000,2.269000 2.264000,2.441000 2.442000,2.585000 2.642000,2.697000 2.749000,2.740000 2.971000,2.798000 3.199000,2.817000 3.199000,3.317000 3.042000,3.310000 2.886000,3.290000 2.733000,3.257000 2.582000,3.211000 2.436000,3.153000 2.296000,3.082000 2.162000,2.999000 2.036000,2.906000 1.918000,2.802000 1.809000,2.689000 1.711000,2.566000 1.623000,2.436000 1.546000,2.299000 1.481000,2.156000 1.429000,2.008000 1.390000,1.856000 1.363000,1.701000 1.350000,1.544000 1.321000,1.317000 1.254000,1.098000 1.151000,0.893000 1.086000,0.798000 0.935000,0.626000 0.757000,0.482000 0.557000,0.370000 0.450000,0.327000 0.228000,0.269000 0.000000,0.250000 z%22 /></g><g id=%22C141%22 data-name=%22as_component__PNGCOJINIPILRSBFUVHAAAKRQR7F7X5DOV45DHY3HPYOUZICQITA%22><path class=%22layer_1_0%22 d=%22M 9.889000,3.500000 0.000000,1.275000 0.000000,-1.275000 9.889000,-3.500000 16.000000,-3.500000 16.000000,3.500000 z%22 /><path class=%22layer_2_0%22 d=%22M 0.000000,-0.250000 10.000000,-2.500000 10.000000,2.500000 0.000000,0.250000 z%22 /><rect class=%22layer_2_0%22 x=%2210.300000%22 y=%22-2.500000%22 width=%220.300000%22 height=%225.000000%22 /><rect class=%22layer_2_0%22 x=%2210.900000%22 y=%22-2.500000%22 width=%220.300000%22 height=%225.000000%22 /><rect class=%22layer_2_0%22 x=%2211.500000%22 y=%22-2.500000%22 width=%220.300000%22 height=%225.000000%22 /><rect class=%22layer_2_0%22 x=%2212.100000%22 y=%22-2.500000%22 width=%220.300000%22 height=%225.000000%22 /><rect class=%22layer_2_0%22 x=%2212.700000%22 y=%22-2.500000%22 width=%220.300000%22 height=%225.000000%22 /><rect class=%22layer_2_0%22 x=%2213.300000%22 y=%22-2.500000%22 width=%220.300000%22 height=%225.000000%22 /><rect class=%22layer_2_0%22 x=%2213.900000%22 y=%22-2.500000%22 width=%220.300000%22 height=%225.000000%22 /><rect class=%22layer_2_0%22 x=%2214.500000%22 y=%22-2.500000%22 width=%220.300000%22 height=%225.000000%22 /><rect class=%22layer_2_0%22 x=%2215.100000%22 y=%22-2.500000%22 width=%220.300000%22 height=%225.000000%22 /><rect class=%22layer_2_0%22 x=%2215.700000%22 y=%22-2.500000%22 width=%220.300000%22 height=%225.000000%22 /></g><g id=%22C142%22 data-name=%22s_bend_l_6P7093456035712835_o_3P061840072266738_p_Strip%22><path class=%22layer_1_0%22 d=%22M 0.000000,-1.250000 0.304000,-1.242000 0.608000,-1.217000 0.910000,-1.177000 1.209000,-1.120000 1.505000,-1.047000 1.796000,-0.959000 2.082000,-0.855000 2.363000,-0.736000 2.636000,-0.603000 2.902000,-0.454000 3.160000,-0.292000 3.409000,-0.116000 3.647000,0.073000 3.876000,0.274000 4.093000,0.487000 4.299000,0.712000 4.536000,0.958000 4.798000,1.176000 5.082000,1.366000 5.384000,1.524000 5.702000,1.649000 6.031000,1.739000 6.368000,1.794000 6.709000,1.812000 6.709000,4.312000 6.405000,4.304000 6.101000,4.279000 5.799000,4.239000 5.500000,4.182000 5.204000,4.109000 4.913000,4.021000 4.627000,3.917000 4.346000,3.798000 4.073000,3.665000 3.807000,3.516000 3.549000,3.354000 3.300000,3.178000 3.062000,2.989000 2.833000,2.788000 2.616000,2.575000 2.410000,2.350000 2.173000,2.104000 1.911000,1.886000 1.627000,1.696000 1.325000,1.538000 1.007000,1.413000 0.678000,1.323000 0.341000,1.268000 0.000000,1.250000 z%22 /><path class=%22layer_2_0%22 d=%22M 0.000000,-0.250000 0.251000,-0.243000 0.501000,-0.223000 0.750000,-0.190000 0.996000,-0.143000 1.240000,-0.083000 1.480000,-0.010000 1.716000,0.075000 1.947000,0.173000 2.173000,0.284000 2.392000,0.406000 2.605000,0.540000 2.810000,0.685000 3.006000,0.840000 3.195000,1.006000 3.374000,1.182000 3.543000,1.367000 3.695000,1.533000 3.855000,1.690000 4.023000,1.838000 4.199000,1.977000 4.382000,2.107000 4.572000,2.226000 4.768000,2.335000 4.969000,2.434000 5.176000,2.521000 5.386000,2.598000 5.601000,2.663000 5.819000,2.716000 6.039000,2.758000 6.261000,2.788000 6.485000,2.806000 6.709000,2.812000 6.709000,3.312000 6.458000,3.305000 6.208000,3.285000 5.959000,3.252000 5.713000,3.205000 5.469000,3.145000 5.229000,3.072000 4.993000,2.987000 4.762000,2.889000 4.536000,2.778000 4.317000,2.656000 4.104000,2.522000 3.899000,2.377000 3.703000,2.222000 3.514000,2.056000 3.335000,1.880000 3.166000,1.695000 3.014000,1.529000 2.854000,1.372000 2.686000,1.224000 2.510000,1.085000 2.327000,0.955000 2.137000,0.836000 1.941000,0.727000 1.740000,0.628000 1.533000,0.541000 1.323000,0.464000 1.108000,0.399000 0.890000,0.346000 0.670000,0.304000 0.448000,0.274000 0.224000,0.256000 0.000000,0.250000 z%22 /></g><g id=%22C143%22 data-name=%22as_component__PNGCOJINIPILRSBFUVHAAAKRQR7F7X5DOV45DHY3HPYOUZICQITA%22><path class=%22layer_1_0%22 d=%22M 9.889000,3.500000 0.000000,1.275000 0.000000,-1.275000 9.889000,-3.500000 16.000000,-3.500000 16.000000,3.500000 z%22 /><path class=%22layer_2_0%22 d=%22M 0.000000,-0.250000 10.000000,-2.500000 10.000000,2.500000 0.000000,0.250000 z%22 /><rect class=%22layer_2_0%22 x=%2210.300000%22 y=%22-2.500000%22 width=%220.300000%22 height=%225.000000%22 /><rect class=%22layer_2_0%22 x=%2210.900000%22 y=%22-2.500000%22 width=%220.300000%22 height=%225.000000%22 /><rect class=%22layer_2_0%22 x=%2211.500000%22 y=%22-2.500000%22 width=%220.300000%22 height=%225.000000%22 /><rect class=%22layer_2_0%22 x=%2212.100000%22 y=%22-2.500000%22 width=%220.300000%22 height=%225.000000%22 /><rect class=%22layer_2_0%22 x=%2212.700000%22 y=%22-2.500000%22 width=%220.300000%22 height=%225.000000%22 /><rect class=%22layer_2_0%22 x=%2213.300000%22 y=%22-2.500000%22 width=%220.300000%22 height=%225.000000%22 /><rect class=%22layer_2_0%22 x=%2213.900000%22 y=%22-2.500000%22 width=%220.300000%22 height=%225.000000%22 /><rect class=%22layer_2_0%22 x=%2214.500000%22 y=%22-2.500000%22 width=%220.300000%22 height=%225.000000%22 /><rect class=%22layer_2_0%22 x=%2215.100000%22 y=%22-2.500000%22 width=%220.300000%22 height=%225.000000%22 /><rect class=%22layer_2_0%22 x=%2215.700000%22 y=%22-2.500000%22 width=%220.300000%22 height=%225.000000%22 /></g><g id=%22C144%22 data-name=%22s_bend_l_3P5259196604153296_o_9P160943707743149_p_Strip%22><path class=%22layer_1_0%22 d=%22M 0.000000,-1.250000 0.246000,-1.242000 0.490000,-1.219000 0.733000,-1.180000 0.972000,-1.126000 1.208000,-1.057000 1.439000,-0.973000 1.664000,-0.875000 1.883000,-0.763000 2.094000,-0.637000 2.296000,-0.498000 2.489000,-0.346000 2.673000,-0.182000 2.845000,-0.008000 3.007000,0.178000 3.156000,0.373000 3.292000,0.577000 3.416000,0.790000 3.525000,1.010000 3.621000,1.236000 3.702000,1.468000 3.768000,1.705000 3.819000,1.945000 3.854000,2.188000 3.875000,2.433000 3.879000,2.678000 3.868000,2.924000 3.842000,3.168000 3.800000,3.410000 3.743000,3.649000 3.671000,3.884000 3.584000,4.114000 3.483000,4.338000 3.368000,4.555000 3.240000,4.764000 3.098000,4.965000 2.944000,5.156000 2.778000,5.338000 2.601000,5.508000 2.479000,5.633000 2.374000,5.772000 2.287000,5.924000 2.221000,6.085000 2.175000,6.254000 2.150000,6.427000 2.148000,6.601000 2.168000,6.775000 2.210000,6.945000 2.272000,7.108000 2.355000,7.261000 2.457000,7.403000 2.576000,7.531000 2.710000,7.643000 2.857000,7.738000 3.014000,7.813000 3.180000,7.867000 3.352000,7.900000 3.526000,7.911000 3.526000,10.411000 3.280000,10.403000 3.036000,10.380000 2.793000,10.341000 2.554000,10.287000 2.318000,10.218000 2.087000,10.134000 1.862000,10.036000 1.643000,9.924000 1.432000,9.798000 1.230000,9.659000 1.037000,9.507000 0.853000,9.343000 0.681000,9.169000 0.519000,8.983000 0.370000,8.788000 0.234000,8.584000 0.110000,8.371000 0.001000,8.151000 -0.095000,7.925000 -0.176000,7.693000 -0.242000,7.456000 -0.293000,7.216000 -0.328000,6.973000 -0.349000,6.728000 -0.353000,6.483000 -0.342000,6.237000 -0.316000,5.993000 -0.274000,5.751000 -0.217000,5.512000 -0.145000,5.277000 -0.058000,5.047000 0.043000,4.823000 0.158000,4.606000 0.287000,4.397000 0.428000,4.196000 0.582000,4.005000 0.748000,3.823000 0.925000,3.653000 1.047000,3.528000 1.152000,3.389000 1.239000,3.237000 1.305000,3.076000 1.351000,2.907000 1.376000,2.734000 1.378000,2.560000 1.358000,2.386000 1.316000,2.216000 1.254000,2.054000 1.171000,1.900000 1.069000,1.758000 0.950000,1.630000 0.816000,1.518000 0.669000,1.423000 0.512000,1.348000 0.346000,1.294000 0.174000,1.261000 0.000000,1.250000 z%22 /><path class=%22layer_2_0%22 d=%22M 0.000000,-0.250000 0.182000,-0.244000 0.364000,-0.227000 0.544000,-0.198000 0.722000,-0.158000 0.897000,-0.107000 1.068000,-0.045000 1.235000,0.028000 1.397000,0.112000 1.554000,0.205000 1.848000,0.421000 1.984000,0.542000 2.112000,0.672000 2.232000,0.810000 2.444000,1.106000 2.535000,1.264000 2.616000,1.427000 2.687000,1.595000 2.747000,1.767000 2.796000,1.943000 2.834000,2.121000 2.861000,2.302000 2.876000,2.484000 2.879000,2.666000 2.871000,2.848000 2.852000,3.029000 2.821000,3.209000 2.778000,3.386000 2.725000,3.561000 2.660000,3.731000 2.585000,3.897000 2.500000,4.059000 2.404000,4.214000 2.299000,4.363000 2.185000,4.505000 2.062000,4.640000 1.931000,4.766000 1.720000,4.982000 1.539000,5.222000 1.390000,5.484000 1.274000,5.762000 1.195000,6.053000 1.153000,6.351000 1.150000,6.652000 1.162000,6.802000 1.215000,7.099000 1.305000,7.386000 1.431000,7.660000 1.590000,7.916000 1.781000,8.149000 1.999000,8.356000 2.242000,8.535000 2.505000,8.681000 2.785000,8.793000 3.077000,8.868000 3.225000,8.892000 3.526000,8.911000 3.526000,9.411000 3.344000,9.405000 3.162000,9.388000 2.982000,9.359000 2.804000,9.319000 2.629000,9.268000 2.458000,9.206000 2.291000,9.133000 2.129000,9.049000 1.972000,8.956000 1.822000,8.853000 1.678000,8.740000 1.542000,8.619000 1.414000,8.489000 1.294000,8.351000 1.082000,8.055000 0.991000,7.897000 0.910000,7.734000 0.839000,7.566000 0.779000,7.394000 0.730000,7.218000 0.692000,7.040000 0.665000,6.859000 0.650000,6.678000 0.647000,6.495000 0.655000,6.313000 0.674000,6.132000 0.705000,5.952000 0.748000,5.775000 0.801000,5.600000 0.866000,5.430000 0.941000,5.264000 1.026000,5.102000 1.122000,4.947000 1.227000,4.798000 1.341000,4.656000 1.464000,4.521000 1.595000,4.395000 1.704000,4.291000 1.806000,4.179000 1.987000,3.939000 2.136000,3.677000 2.252000,3.399000 2.331000,3.108000 2.373000,2.810000 2.379000,2.660000 2.364000,2.359000 2.311000,2.062000 2.221000,1.775000 2.095000,1.501000 1.936000,1.245000 1.745000,1.012000 1.527000,0.805000 1.284000,0.626000 1.021000,0.480000 0.741000,0.368000 0.596000,0.326000 0.301000,0.269000 0.000000,0.250000 z%22 /></g><g id=%22C145%22 data-name=%22as_component__PNGCOJINIPILRSBFUVHAAAKRQR7F7X5DOV45DHY3HPYOUZICQITA%22><path class=%22layer_1_0%22 d=%22M 9.889000,3.500000 0.000000,1.275000 0.000000,-1.275000 9.889000,-3.500000 16.000000,-3.500000 16.000000,3.500000 z%22 /><path class=%22layer_2_0%22 d=%22M 0.000000,-0.250000 10.000000,-2.500000 10.000000,2.500000 0.000000,0.250000 z%22 /><rect class=%22layer_2_0%22 x=%2210.300000%22 y=%22-2.500000%22 width=%220.300000%22 height=%225.000000%22 /><rect class=%22layer_2_0%22 x=%2210.900000%22 y=%22-2.500000%22 width=%220.300000%22 height=%225.000000%22 /><rect class=%22layer_2_0%22 x=%2211.500000%22 y=%22-2.500000%22 width=%220.300000%22 height=%225.000000%22 /><rect class=%22layer_2_0%22 x=%2212.100000%22 y=%22-2.500000%22 width=%220.300000%22 height=%225.000000%22 /><rect class=%22layer_2_0%22 x=%2212.700000%22 y=%22-2.500000%22 width=%220.300000%22 height=%225.000000%22 /><rect class=%22layer_2_0%22 x=%2213.300000%22 y=%22-2.500000%22 width=%220.300000%22 height=%225.000000%22 /><rect class=%22layer_2_0%22 x=%2213.900000%22 y=%22-2.500000%22 width=%220.300000%22 height=%225.000000%22 /><rect class=%22layer_2_0%22 x=%2214.500000%22 y=%22-2.500000%22 width=%220.300000%22 height=%225.000000%22 /><rect class=%22layer_2_0%22 x=%2215.100000%22 y=%22-2.500000%22 width=%220.300000%22 height=%225.000000%22 /><rect class=%22layer_2_0%22 x=%2215.700000%22 y=%22-2.500000%22 width=%220.300000%22 height=%225.000000%22 /></g><g id=%22C146%22 data-name=%22s_bend_l_5P083673371543964_o_15P314294585535968_p_Strip%22><path class=%22layer_1_0%22 d=%22M 0.000000,-1.250000 0.275000,-1.243000 0.549000,-1.223000 0.822000,-1.188000 1.093000,-1.140000 1.361000,-1.079000 1.626000,-1.004000 1.886000,-0.916000 2.142000,-0.816000 2.393000,-0.702000 2.638000,-0.576000 2.876000,-0.438000 3.106000,-0.289000 3.329000,-0.128000 3.544000,0.044000 3.750000,0.226000 3.946000,0.419000 4.133000,0.621000 4.309000,0.832000 4.475000,1.052000 4.629000,1.280000 4.772000,1.515000 4.903000,1.757000 5.021000,2.005000 5.127000,2.259000 5.220000,2.517000 5.300000,2.781000 5.367000,3.047000 5.421000,3.317000 5.461000,3.589000 5.487000,3.863000 5.499000,4.138000 5.498000,4.413000 5.483000,4.688000 5.454000,4.961000 5.412000,5.233000 5.356000,5.502000 5.287000,5.768000 5.204000,6.031000 5.109000,6.289000 5.001000,6.542000 4.880000,6.789000 4.747000,7.029000 4.602000,7.263000 4.446000,7.490000 4.278000,7.708000 4.100000,7.917000 3.912000,8.118000 3.713000,8.308000 3.506000,8.489000 3.290000,8.659000 3.058000,8.850000 2.848000,9.063000 2.659000,9.297000 2.495000,9.548000 2.356000,9.814000 2.245000,10.092000 2.162000,10.381000 2.109000,10.676000 2.085000,10.975000 2.091000,11.275000 2.127000,11.573000 2.193000,11.865000 2.287000,12.150000 2.410000,12.424000 2.559000,12.684000 2.733000,12.928000 2.931000,13.154000 3.151000,13.358000 3.390000,13.540000 3.645000,13.697000 3.915000,13.827000 4.197000,13.930000 4.488000,14.004000 4.784000,14.049000 5.084000,14.064000 5.084000,16.564000 4.809000,16.557000 4.535000,16.537000 4.262000,16.502000 3.991000,16.454000 3.723000,16.393000 3.458000,16.318000 3.198000,16.230000 2.942000,16.130000 2.691000,16.016000 2.446000,15.890000 2.208000,15.752000 1.978000,15.603000 1.755000,15.442000 1.540000,15.270000 1.334000,15.088000 1.138000,14.895000 0.951000,14.693000 0.775000,14.482000 0.609000,14.262000 0.455000,14.034000 0.312000,13.799000 0.181000,13.557000 0.063000,13.309000 -0.043000,13.055000 -0.136000,12.797000 -0.216000,12.533000 -0.283000,12.267000 -0.337000,11.997000 -0.377000,11.725000 -0.403000,11.451000 -0.415000,11.176000 -0.414000,10.901000 -0.399000,10.626000 -0.370000,10.353000 -0.328000,10.081000 -0.272000,9.812000 -0.203000,9.546000 -0.120000,9.283000 -0.025000,9.025000 0.083000,8.772000 0.204000,8.525000 0.337000,8.285000 0.482000,8.051000 0.638000,7.824000 0.806000,7.606000 0.984000,7.397000 1.172000,7.196000 1.371000,7.006000 1.578000,6.825000 1.794000,6.655000 2.026000,6.464000 2.236000,6.251000 2.425000,6.017000 2.589000,5.766000 2.728000,5.500000 2.839000,5.222000 2.922000,4.933000 2.975000,4.638000 2.999000,4.339000 2.993000,4.039000 2.957000,3.741000 2.891000,3.449000 2.797000,3.164000 2.674000,2.890000 2.525000,2.630000 2.351000,2.386000 2.153000,2.160000 1.933000,1.956000 1.694000,1.774000 1.439000,1.617000 1.169000,1.487000 0.887000,1.384000 0.596000,1.310000 0.300000,1.265000 0.000000,1.250000 z%22 /><path class=%22layer_2_0%22 d=%22M 0.000000,-0.250000 0.225000,-0.244000 0.449000,-0.228000 0.673000,-0.199000 0.894000,-0.160000 1.114000,-0.110000 1.330000,-0.049000 1.544000,0.023000 1.753000,0.105000 1.958000,0.198000 2.158000,0.301000 2.353000,0.414000 2.542000,0.536000 2.724000,0.668000 2.900000,0.809000 3.068000,0.958000 3.229000,1.116000 3.382000,1.281000 3.526000,1.454000 3.661000,1.633000 3.788000,1.820000 3.904000,2.012000 4.011000,2.210000 4.108000,2.413000 4.195000,2.621000 4.271000,2.832000 4.337000,3.048000 4.391000,3.266000 4.435000,3.487000 4.468000,3.709000 4.500000,4.158000 4.486000,4.608000 4.463000,4.832000 4.428000,5.054000 4.382000,5.275000 4.326000,5.492000 4.258000,5.707000 4.180000,5.918000 4.091000,6.125000 3.993000,6.327000 3.884000,6.524000 3.765000,6.716000 3.637000,6.901000 3.355000,7.251000 3.200000,7.415000 3.038000,7.571000 2.692000,7.857000 2.383000,8.112000 2.102000,8.397000 1.851000,8.708000 1.737000,8.872000 1.535000,9.218000 1.447000,9.397000 1.368000,9.581000 1.239000,9.960000 1.148000,10.349000 1.117000,10.547000 1.085000,10.945000 1.093000,11.345000 1.142000,11.742000 1.180000,11.939000 1.287000,12.324000 1.432000,12.697000 1.613000,13.053000 1.717000,13.224000 1.950000,13.550000 2.214000,13.850000 2.506000,14.123000 2.825000,14.365000 2.993000,14.474000 3.344000,14.666000 3.712000,14.821000 4.094000,14.940000 4.486000,15.019000 4.884000,15.059000 5.084000,15.064000 5.084000,15.564000 4.859000,15.558000 4.635000,15.542000 4.411000,15.513000 4.190000,15.474000 3.970000,15.424000 3.754000,15.363000 3.541000,15.291000 3.331000,15.209000 3.126000,15.116000 2.926000,15.013000 2.731000,14.900000 2.542000,14.778000 2.360000,14.646000 2.184000,14.505000 2.016000,14.356000 1.855000,14.199000 1.702000,14.033000 1.558000,13.860000 1.423000,13.681000 1.296000,13.494000 1.180000,13.302000 1.073000,13.104000 0.976000,12.901000 0.889000,12.693000 0.813000,12.482000 0.747000,12.266000 0.693000,12.048000 0.649000,11.827000 0.616000,11.605000 0.584000,11.156000 0.586000,10.931000 0.598000,10.706000 0.621000,10.482000 0.656000,10.260000 0.702000,10.039000 0.758000,9.822000 0.826000,9.607000 0.904000,9.396000 0.993000,9.189000 1.091000,8.987000 1.200000,8.790000 1.319000,8.599000 1.447000,8.413000 1.729000,8.063000 1.884000,7.899000 2.046000,7.743000 2.216000,7.596000 2.392000,7.457000 2.701000,7.202000 2.845000,7.063000 3.111000,6.765000 3.347000,6.442000 3.452000,6.272000 3.637000,5.917000 3.716000,5.733000 3.845000,5.354000 3.936000,4.965000 3.967000,4.767000 3.999000,4.369000 3.991000,3.969000 3.971000,3.770000 3.904000,3.375000 3.797000,2.990000 3.652000,2.617000 3.471000,2.261000 3.367000,2.090000 3.134000,1.764000 2.870000,1.464000 2.578000,1.191000 2.421000,1.066000 2.091000,0.840000 1.740000,0.648000 1.558000,0.566000 1.372000,0.493000 0.990000,0.374000 0.598000,0.295000 0.200000,0.255000 0.000000,0.250000 z%22 /></g><g id=%22C147%22 data-name=%22as_component__PNGCOJINIPILRSBFUVHAAAKRQR7F7X5DOV45DHY3HPYOUZICQITA%22><path class=%22layer_1_0%22 d=%22M 9.889000,3.500000 0.000000,1.275000 0.000000,-1.275000 9.889000,-3.500000 16.000000,-3.500000 16.000000,3.500000 z%22 /><path class=%22layer_2_0%22 d=%22M 0.000000,-0.250000 10.000000,-2.500000 10.000000,2.500000 0.000000,0.250000 z%22 /><rect class=%22layer_2_0%22 x=%2210.300000%22 y=%22-2.500000%22 width=%220.300000%22 height=%225.000000%22 /><rect class=%22layer_2_0%22 x=%2210.900000%22 y=%22-2.500000%22 width=%220.300000%22 height=%225.000000%22 /><rect class=%22layer_2_0%22 x=%2211.500000%22 y=%22-2.500000%22 width=%220.300000%22 height=%225.000000%22 /><rect class=%22layer_2_0%22 x=%2212.100000%22 y=%22-2.500000%22 width=%220.300000%22 height=%225.000000%22 /><rect class=%22layer_2_0%22 x=%2212.700000%22 y=%22-2.500000%22 width=%220.300000%22 height=%225.000000%22 /><rect class=%22layer_2_0%22 x=%2213.300000%22 y=%22-2.500000%22 width=%220.300000%22 height=%225.000000%22 /><rect class=%22layer_2_0%22 x=%2213.900000%22 y=%22-2.500000%22 width=%220.300000%22 height=%225.000000%22 /><rect class=%22layer_2_0%22 x=%2214.500000%22 y=%22-2.500000%22 width=%220.300000%22 height=%225.000000%22 /><rect class=%22layer_2_0%22 x=%2215.100000%22 y=%22-2.500000%22 width=%220.300000%22 height=%225.000000%22 /><rect class=%22layer_2_0%22 x=%2215.700000%22 y=%22-2.500000%22 width=%220.300000%22 height=%225.000000%22 /></g><g id=%22C148%22 data-name=%22s_bend_l_25P307395541161384_o_3P02203767398771_p_Strip%22><path class=%22layer_1_0%22 d=%22M 0.000000,-1.250000 0.817000,-1.244000 1.634000,-1.226000 2.450000,-1.195000 3.266000,-1.153000 4.081000,-1.098000 4.895000,-1.032000 5.708000,-0.953000 6.520000,-0.862000 7.330000,-0.759000 8.139000,-0.644000 8.946000,-0.517000 9.751000,-0.378000 10.554000,-0.228000 11.354000,-0.065000 12.153000,0.110000 12.948000,0.296000 13.707000,0.474000 14.469000,0.641000 15.233000,0.796000 15.999000,0.940000 16.768000,1.073000 17.538000,1.194000 18.310000,1.304000 19.084000,1.402000 19.858000,1.488000 20.635000,1.564000 21.412000,1.627000 22.190000,1.679000 22.968000,1.720000 23.748000,1.749000 24.527000,1.766000 25.307000,1.772000 25.307000,4.272000 24.490000,4.266000 23.673000,4.248000 22.857000,4.217000 22.041000,4.175000 21.226000,4.120000 20.412000,4.054000 19.599000,3.975000 18.787000,3.884000 17.977000,3.781000 17.168000,3.666000 16.361000,3.539000 15.556000,3.401000 14.753000,3.250000 13.953000,3.087000 13.155000,2.912000 12.359000,2.726000 11.600000,2.548000 10.838000,2.381000 10.074000,2.226000 9.308000,2.082000 8.539000,1.949000 7.769000,1.828000 6.997000,1.718000 6.223000,1.620000 5.449000,1.534000 4.672000,1.458000 3.895000,1.395000 3.117000,1.343000 2.339000,1.302000 1.559000,1.273000 0.780000,1.256000 0.000000,1.250000 z%22 /><path class=%22layer_2_0%22 d=%22M 0.000000,-0.250000 0.802000,-0.244000 1.604000,-0.226000 2.405000,-0.196000 3.206000,-0.155000 4.007000,-0.101000 4.806000,-0.036000 5.604000,0.042000 6.401000,0.131000 7.197000,0.232000 7.991000,0.345000 8.783000,0.469000 9.574000,0.606000 10.362000,0.754000 11.148000,0.914000 11.931000,1.085000 12.712000,1.268000 13.486000,1.449000 14.262000,1.619000 15.041000,1.778000 15.822000,1.924000 16.605000,2.059000 17.390000,2.183000 18.177000,2.295000 18.965000,2.395000 19.755000,2.483000 20.546000,2.560000 21.338000,2.625000 22.130000,2.678000 22.924000,2.719000 23.718000,2.748000 24.512000,2.766000 25.307000,2.772000 25.307000,3.272000 24.505000,3.266000 23.703000,3.248000 22.902000,3.218000 22.101000,3.177000 21.300000,3.123000 20.501000,3.058000 19.703000,2.980000 18.906000,2.891000 18.110000,2.790000 17.316000,2.677000 16.524000,2.553000 15.733000,2.416000 14.945000,2.268000 14.159000,2.108000 13.376000,1.937000 12.595000,1.754000 11.821000,1.573000 11.045000,1.403000 10.266000,1.244000 9.485000,1.098000 8.702000,0.963000 7.917000,0.839000 7.130000,0.727000 6.342000,0.627000 5.552000,0.539000 4.761000,0.462000 3.969000,0.398000 3.177000,0.344000 2.383000,0.303000 1.589000,0.274000 0.795000,0.256000 0.000000,0.250000 z%22 /></g><g id=%22C149%22 data-name=%22as_component__PNGCOJINIPILRSBFUVHAAAKRQR7F7X5DOV45DHY3HPYOUZICQITA%22><path class=%22layer_1_0%22 d=%22M 9.889000,3.500000 0.000000,1.275000 0.000000,-1.275000 9.889000,-3.500000 16.000000,-3.500000 16.000000,3.500000 z%22 /><path class=%22layer_2_0%22 d=%22M 0.000000,-0.250000 10.000000,-2.500000 10.000000,2.500000 0.000000,0.250000 z%22 /><rect class=%22layer_2_0%22 x=%2210.300000%22 y=%22-2.500000%22 width=%220.300000%22 height=%225.000000%22 /><rect class=%22layer_2_0%22 x=%2210.900000%22 y=%22-2.500000%22 width=%220.300000%22 height=%225.000000%22 /><rect class=%22layer_2_0%22 x=%2211.500000%22 y=%22-2.500000%22 width=%220.300000%22 height=%225.000000%22 /><rect class=%22layer_2_0%22 x=%2212.100000%22 y=%22-2.500000%22 width=%220.300000%22 height=%225.000000%22 /><rect class=%22layer_2_0%22 x=%2212.700000%22 y=%22-2.500000%22 width=%220.300000%22 height=%225.000000%22 /><rect class=%22layer_2_0%22 x=%2213.300000%22 y=%22-2.500000%22 width=%220.300000%22 height=%225.000000%22 /><rect class=%22layer_2_0%22 x=%2213.900000%22 y=%22-2.500000%22 width=%220.300000%22 height=%225.000000%22 /><rect class=%22layer_2_0%22 x=%2214.500000%22 y=%22-2.500000%22 width=%220.300000%22 height=%225.000000%22 /><rect class=%22layer_2_0%22 x=%2215.100000%22 y=%22-2.500000%22 width=%220.300000%22 height=%225.000000%22 /><rect class=%22layer_2_0%22 x=%2215.700000%22 y=%22-2.500000%22 width=%220.300000%22 height=%225.000000%22 /></g><g id=%22C150%22 data-name=%22s_bend_l_92P75474658383037_o_71P52415984115277_p_Strip%22><path class=%22layer_1_0%22 d=%22M 0.000000,-1.250000 0.735000,-1.245000 2.203000,-1.201000 3.669000,-1.113000 4.401000,-1.053000 5.132000,-0.982000 6.591000,-0.807000 7.318000,-0.703000 8.044000,-0.588000 8.768000,-0.463000 9.489000,-0.326000 10.209000,-0.179000 10.926000,-0.021000 11.641000,0.147000 12.354000,0.326000 13.063000,0.516000 13.770000,0.716000 14.474000,0.927000 15.174000,1.148000 15.871000,1.380000 16.565000,1.622000 17.940000,2.137000 18.622000,2.410000 19.300000,2.693000 19.974000,2.986000 20.643000,3.290000 21.307000,3.603000 21.967000,3.926000 22.622000,4.259000 23.271000,4.601000 23.916000,4.953000 24.555000,5.315000 25.817000,6.067000 26.440000,6.457000 27.667000,7.265000 28.869000,8.109000 29.461000,8.545000 30.046000,8.989000 30.624000,9.442000 31.195000,9.903000 31.760000,10.373000 32.317000,10.851000 32.868000,11.338000 33.411000,11.833000 34.474000,12.846000 35.507000,13.891000 36.508000,14.966000 36.996000,15.515000 37.476000,16.071000 37.948000,16.634000 38.411000,17.204000 38.866000,17.781000 39.312000,18.364000 39.749000,18.954000 40.178000,19.551000 40.597000,20.154000 41.008000,20.763000 41.409000,21.378000 41.801000,22.000000 42.184000,22.626000 42.558000,23.259000 43.276000,24.541000 43.620000,25.189000 43.955000,25.843000 44.281000,26.502000 44.596000,27.165000 44.901000,27.833000 45.197000,28.506000 45.482000,29.182000 45.757000,29.864000 46.022000,30.549000 46.277000,31.238000 46.521000,31.930000 46.755000,32.627000 46.979000,33.326000 47.192000,34.029000 47.394000,34.735000 47.586000,35.444000 47.961000,36.787000 48.163000,37.455000 48.598000,38.780000 49.071000,40.091000 49.584000,41.388000 49.855000,42.030000 50.135000,42.669000 50.724000,43.933000 51.033000,44.558000 51.678000,45.794000 52.014000,46.405000 52.714000,47.611000 53.450000,48.795000 54.220000,49.958000 54.618000,50.530000 55.440000,51.656000 56.295000,52.758000 56.735000,53.299000 57.639000,54.361000 58.102000,54.882000 59.052000,55.902000 59.539000,56.402000 60.534000,57.379000 61.557000,58.326000 62.609000,59.241000 63.145000,59.687000 63.687000,60.125000 64.791000,60.977000 65.921000,61.795000 66.494000,62.191000 67.074000,62.579000 67.659000,62.958000 68.846000,63.690000 70.054000,64.386000 70.666000,64.720000 71.904000,65.361000 72.530000,65.668000 73.796000,66.253000 75.079000,66.800000 75.726000,67.059000 77.032000,67.548000 77.690000,67.778000 78.352000,67.998000 79.017000,68.208000 79.685000,68.408000 80.355000,68.598000 81.029000,68.778000 81.705000,68.948000 82.384000,69.108000 83.065000,69.258000 84.433000,69.527000 85.120000,69.646000 85.809000,69.755000 86.499000,69.853000 87.190000,69.941000 87.883000,70.019000 88.577000,70.087000 89.272000,70.144000 89.968000,70.191000 90.664000,70.227000 91.361000,70.253000 92.058000,70.269000 92.755000,70.274000 92.755000,72.774000 92.020000,72.769000 90.552000,72.725000 89.086000,72.637000 88.354000,72.577000 87.623000,72.506000 86.893000,72.424000 86.164000,72.331000 85.437000,72.227000 84.711000,72.112000 83.987000,71.987000 83.266000,71.850000 82.546000,71.703000 81.829000,71.545000 81.114000,71.377000 80.401000,71.198000 79.692000,71.008000 78.985000,70.808000 78.281000,70.597000 77.581000,70.376000 76.884000,70.144000 76.190000,69.902000 74.815000,69.387000 74.133000,69.114000 73.455000,68.831000 72.781000,68.538000 72.112000,68.234000 71.448000,67.921000 70.788000,67.598000 70.133000,67.265000 69.484000,66.923000 68.839000,66.571000 68.200000,66.209000 67.566000,65.837000 66.938000,65.457000 66.315000,65.067000 65.088000,64.259000 63.886000,63.415000 62.709000,62.535000 62.131000,62.082000 61.560000,61.621000 60.995000,61.151000 60.438000,60.673000 59.887000,60.186000 59.344000,59.691000 58.281000,58.678000 57.248000,57.633000 56.247000,56.558000 55.759000,56.009000 55.279000,55.453000 54.807000,54.890000 54.344000,54.320000 53.889000,53.743000 53.443000,53.160000 53.006000,52.570000 52.577000,51.973000 51.747000,50.761000 51.346000,50.146000 50.571000,48.898000 50.197000,48.265000 49.834000,47.627000 49.479000,46.983000 49.135000,46.335000 48.800000,45.681000 48.474000,45.022000 48.159000,44.359000 47.854000,43.691000 47.558000,43.018000 47.273000,42.342000 46.998000,41.661000 46.733000,40.975000 46.478000,40.286000 46.234000,39.594000 46.000000,38.897000 45.776000,38.198000 45.563000,37.495000 45.361000,36.789000 45.169000,36.080000 44.794000,34.737000 44.592000,34.069000 44.157000,32.744000 43.684000,31.433000 43.171000,30.136000 42.620000,28.855000 42.031000,27.591000 41.722000,26.966000 41.077000,25.730000 40.741000,25.119000 40.041000,23.913000 39.305000,22.729000 38.535000,21.567000 38.137000,20.994000 37.315000,19.868000 36.460000,18.766000 36.020000,18.225000 35.572000,17.691000 34.653000,16.642000 33.703000,15.622000 33.216000,15.122000 32.221000,14.145000 31.198000,13.198000 30.675000,12.737000 30.146000,12.283000 29.068000,11.399000 27.964000,10.547000 26.834000,9.729000 26.261000,9.333000 25.681000,8.945000 25.096000,8.566000 23.909000,7.834000 22.701000,7.138000 22.089000,6.804000 21.472000,6.479000 20.851000,6.163000 20.225000,5.856000 18.959000,5.271000 17.676000,4.724000 17.029000,4.465000 15.723000,3.976000 15.065000,3.746000 14.403000,3.526000 13.738000,3.316000 13.070000,3.116000 12.400000,2.926000 11.726000,2.746000 11.050000,2.576000 10.371000,2.416000 9.690000,2.266000 8.322000,1.997000 7.635000,1.878000 6.946000,1.769000 6.256000,1.671000 5.565000,1.583000 4.872000,1.505000 4.178000,1.437000 3.483000,1.380000 2.787000,1.333000 2.091000,1.297000 1.394000,1.271000 0.697000,1.255000 0.000000,1.250000 z%22 /><path class=%22layer_2_0%22 d=%22M 0.000000,-0.250000 0.720000,-0.245000 1.439000,-0.229000 2.158000,-0.202000 2.877000,-0.164000 3.595000,-0.116000 4.312000,-0.057000 5.028000,0.013000 5.743000,0.093000 6.457000,0.184000 7.170000,0.286000 8.589000,0.521000 9.296000,0.655000 10.001000,0.799000 10.704000,0.954000 11.405000,1.119000 12.103000,1.294000 12.798000,1.480000 13.490000,1.676000 14.180000,1.883000 14.866000,2.100000 15.549000,2.327000 16.228000,2.564000 16.904000,2.811000 17.576000,3.068000 18.908000,3.613000 19.568000,3.900000 20.223000,4.197000 20.874000,4.504000 22.162000,5.147000 22.798000,5.482000 23.430000,5.827000 24.056000,6.182000 24.677000,6.546000 25.292000,6.919000 25.902000,7.301000 26.506000,7.692000 27.104000,8.092000 27.696000,8.501000 28.282000,8.919000 28.862000,9.346000 29.435000,9.781000 30.001000,10.224000 31.114000,11.137000 31.661000,11.606000 32.200000,12.082000 32.732000,12.567000 33.256000,13.059000 34.283000,14.068000 34.785000,14.583000 35.279000,15.106000 35.766000,15.637000 36.244000,16.174000 36.715000,16.719000 37.177000,17.270000 37.631000,17.829000 38.076000,18.394000 38.942000,19.544000 39.361000,20.128000 40.175000,21.316000 40.568000,21.919000 40.952000,22.527000 41.327000,23.141000 41.693000,23.761000 42.049000,24.386000 42.396000,25.016000 42.734000,25.652000 43.062000,26.292000 43.381000,26.938000 43.690000,27.587000 43.989000,28.242000 44.558000,29.564000 45.087000,30.902000 45.576000,32.256000 45.805000,32.938000 46.024000,33.624000 46.233000,34.312000 46.431000,35.004000 46.619000,35.698000 46.805000,36.386000 47.002000,37.070000 47.425000,38.430000 47.652000,39.105000 47.889000,39.777000 48.136000,40.445000 48.393000,41.109000 48.936000,42.426000 49.223000,43.078000 49.824000,44.369000 50.464000,45.641000 51.142000,46.894000 51.495000,47.512000 51.857000,48.125000 52.228000,48.733000 52.608000,49.335000 52.997000,49.932000 53.395000,50.522000 54.217000,51.686000 54.641000,52.258000 55.515000,53.383000 56.421000,54.481000 57.360000,55.552000 57.842000,56.077000 58.828000,57.105000 59.844000,58.103000 60.889000,59.070000 61.963000,60.005000 62.511000,60.461000 63.625000,61.347000 64.193000,61.778000 64.766000,62.200000 65.346000,62.614000 66.524000,63.414000 67.121000,63.802000 67.725000,64.180000 68.334000,64.549000 68.948000,64.909000 69.568000,65.260000 70.193000,65.601000 70.823000,65.933000 71.458000,66.256000 72.097000,66.569000 72.742000,66.873000 73.390000,67.167000 74.043000,67.451000 74.700000,67.725000 75.362000,67.990000 76.027000,68.245000 76.695000,68.489000 77.368000,68.724000 78.044000,68.949000 79.405000,69.368000 80.090000,69.562000 80.778000,69.746000 81.469000,69.920000 82.162000,70.083000 82.857000,70.236000 84.255000,70.511000 84.956000,70.632000 85.660000,70.743000 86.365000,70.844000 87.071000,70.934000 87.779000,71.014000 88.488000,71.083000 89.908000,71.189000 90.619000,71.226000 91.331000,71.253000 92.043000,71.269000 92.755000,71.274000 92.755000,71.774000 92.035000,71.769000 91.316000,71.753000 90.597000,71.726000 89.878000,71.688000 89.160000,71.640000 88.443000,71.581000 87.727000,71.511000 87.012000,71.431000 86.298000,71.340000 85.586000,71.238000 84.875000,71.126000 84.166000,71.003000 83.459000,70.869000 82.754000,70.725000 82.051000,70.570000 81.350000,70.405000 80.652000,70.230000 79.957000,70.044000 79.265000,69.848000 78.575000,69.641000 77.889000,69.424000 77.206000,69.197000 76.527000,68.960000 75.851000,68.713000 75.179000,68.456000 73.847000,67.911000 73.187000,67.624000 72.532000,67.327000 71.881000,67.020000 71.235000,66.703000 70.593000,66.377000 69.957000,66.042000 69.325000,65.697000 68.699000,65.342000 68.078000,64.978000 67.463000,64.605000 66.853000,64.223000 66.249000,63.832000 65.651000,63.432000 65.059000,63.023000 64.473000,62.605000 63.893000,62.178000 63.320000,61.743000 62.754000,61.300000 61.641000,60.387000 61.094000,59.918000 60.555000,59.442000 60.023000,58.957000 59.499000,58.465000 58.472000,57.456000 57.970000,56.941000 57.476000,56.418000 56.989000,55.887000 56.511000,55.350000 56.040000,54.805000 55.578000,54.254000 55.124000,53.695000 54.679000,53.130000 53.813000,51.980000 53.394000,51.396000 52.983000,50.805000 52.187000,49.606000 51.803000,48.997000 51.428000,48.383000 51.062000,47.763000 50.706000,47.138000 50.359000,46.508000 50.021000,45.872000 49.693000,45.232000 49.374000,44.586000 49.065000,43.937000 48.766000,43.282000 48.197000,41.960000 47.668000,40.622000 47.179000,39.268000 46.950000,38.586000 46.731000,37.901000 46.522000,37.212000 46.324000,36.520000 46.136000,35.826000 45.950000,35.138000 45.753000,34.454000 45.330000,33.094000 45.103000,32.419000 44.866000,31.747000 44.619000,31.079000 44.362000,30.415000 43.819000,29.098000 43.532000,28.446000 43.236000,27.799000 42.931000,27.156000 42.291000,25.883000 41.613000,24.630000 41.260000,24.012000 40.898000,23.399000 40.527000,22.791000 40.147000,22.189000 39.758000,21.592000 39.360000,21.002000 38.953000,20.417000 38.538000,19.839000 38.114000,19.266000 37.240000,18.141000 36.334000,17.043000 35.395000,15.972000 34.913000,15.447000 33.927000,14.419000 32.911000,13.421000 31.866000,12.454000 30.792000,11.519000 30.244000,11.063000 29.130000,10.177000 28.562000,9.746000 27.989000,9.324000 27.409000,8.910000 26.823000,8.506000 25.634000,7.722000 25.030000,7.344000 24.421000,6.975000 23.807000,6.615000 23.187000,6.264000 22.562000,5.923000 21.932000,5.591000 21.297000,5.268000 20.658000,4.955000 20.013000,4.651000 19.365000,4.357000 18.712000,4.073000 18.055000,3.799000 17.393000,3.534000 16.728000,3.279000 16.060000,3.035000 15.387000,2.800000 14.711000,2.575000 13.350000,2.156000 12.665000,1.962000 11.977000,1.778000 11.286000,1.604000 10.593000,1.441000 9.898000,1.288000 8.500000,1.013000 7.799000,0.892000 7.095000,0.781000 6.390000,0.680000 5.684000,0.590000 4.976000,0.510000 4.267000,0.441000 2.847000,0.335000 2.136000,0.298000 1.424000,0.271000 0.712000,0.255000 0.000000,0.250000 z%22 /></g><g id=%22C151%22 data-name=%22as_component__PNGCOJINIPILRSBFUVHAAAKRQR7F7X5DOV45DHY3HPYOUZICQITA%22><path class=%22layer_1_0%22 d=%22M 9.889000,3.500000 0.000000,1.275000 0.000000,-1.275000 9.889000,-3.500000 16.000000,-3.500000 16.000000,3.500000 z%22 /><path class=%22layer_2_0%22 d=%22M 0.000000,-0.250000 10.000000,-2.500000 10.000000,2.500000 0.000000,0.250000 z%22 /><rect class=%22layer_2_0%22 x=%2210.300000%22 y=%22-2.500000%22 width=%220.300000%22 height=%225.000000%22 /><rect class=%22layer_2_0%22 x=%2210.900000%22 y=%22-2.500000%22 width=%220.300000%22 height=%225.000000%22 /><rect class=%22layer_2_0%22 x=%2211.500000%22 y=%22-2.500000%22 width=%220.300000%22 height=%225.000000%22 /><rect class=%22layer_2_0%22 x=%2212.100000%22 y=%22-2.500000%22 width=%220.300000%22 height=%225.000000%22 /><rect class=%22layer_2_0%22 x=%2212.700000%22 y=%22-2.500000%22 width=%220.300000%22 height=%225.000000%22 /><rect class=%22layer_2_0%22 x=%2213.300000%22 y=%22-2.500000%22 width=%220.300000%22 height=%225.000000%22 /><rect class=%22layer_2_0%22 x=%2213.900000%22 y=%22-2.500000%22 width=%220.300000%22 height=%225.000000%22 /><rect class=%22layer_2_0%22 x=%2214.500000%22 y=%22-2.500000%22 width=%220.300000%22 height=%225.000000%22 /><rect class=%22layer_2_0%22 x=%2215.100000%22 y=%22-2.500000%22 width=%220.300000%22 height=%225.000000%22 /><rect class=%22layer_2_0%22 x=%2215.700000%22 y=%22-2.500000%22 width=%220.300000%22 height=%225.000000%22 /></g><g id=%22C152%22 data-name=%22s_bend_l_19P64001537827034_o_13P32394611371446_p_Strip%22><path class=%22layer_1_0%22 d=%22M 0.000000,-1.250000 0.391000,-1.244000 0.782000,-1.224000 1.172000,-1.192000 1.561000,-1.146000 1.948000,-1.088000 2.333000,-1.017000 2.715000,-0.934000 3.095000,-0.838000 3.471000,-0.729000 3.843000,-0.608000 4.211000,-0.474000 4.574000,-0.329000 4.932000,-0.172000 5.285000,-0.002000 5.632000,0.178000 5.973000,0.371000 6.308000,0.574000 6.635000,0.788000 6.955000,1.013000 7.268000,1.249000 7.572000,1.495000 7.869000,1.750000 8.156000,2.016000 8.435000,2.290000 8.704000,2.574000 8.964000,2.867000 9.215000,3.168000 9.454000,3.477000 9.684000,3.794000 9.903000,4.118000 10.111000,4.450000 10.308000,4.788000 10.494000,5.132000 10.668000,5.483000 10.831000,5.839000 10.981000,6.200000 11.100000,6.485000 11.228000,6.765000 11.512000,7.313000 11.832000,7.841000 12.004000,8.097000 12.185000,8.347000 12.572000,8.828000 12.989000,9.283000 13.436000,9.708000 13.669000,9.910000 13.910000,10.104000 14.409000,10.467000 14.667000,10.636000 15.199000,10.948000 15.751000,11.224000 16.320000,11.463000 16.610000,11.568000 17.200000,11.749000 17.499000,11.825000 17.801000,11.891000 18.104000,11.947000 18.716000,12.028000 19.023000,12.054000 19.331000,12.069000 19.640000,12.074000 19.640000,14.574000 19.249000,14.568000 18.858000,14.548000 18.468000,14.516000 18.079000,14.470000 17.692000,14.412000 17.307000,14.341000 16.925000,14.258000 16.545000,14.162000 16.169000,14.053000 15.797000,13.932000 15.429000,13.798000 15.066000,13.653000 14.708000,13.496000 14.355000,13.326000 14.008000,13.146000 13.667000,12.953000 13.332000,12.750000 13.005000,12.536000 12.685000,12.311000 12.372000,12.075000 12.068000,11.829000 11.771000,11.574000 11.484000,11.308000 11.205000,11.034000 10.936000,10.750000 10.676000,10.457000 10.426000,10.156000 10.186000,9.847000 9.956000,9.530000 9.737000,9.206000 9.529000,8.874000 9.332000,8.536000 9.146000,8.192000 8.972000,7.841000 8.809000,7.485000 8.659000,7.124000 8.540000,6.839000 8.412000,6.559000 8.128000,6.011000 7.972000,5.744000 7.636000,5.227000 7.455000,4.977000 7.068000,4.496000 6.651000,4.041000 6.431000,3.825000 5.971000,3.414000 5.730000,3.220000 5.232000,2.857000 4.973000,2.688000 4.441000,2.376000 3.889000,2.100000 3.320000,1.861000 3.030000,1.756000 2.440000,1.575000 2.141000,1.499000 1.839000,1.433000 1.536000,1.377000 1.231000,1.332000 0.617000,1.270000 0.309000,1.255000 0.000000,1.250000 z%22 /><path class=%22layer_2_0%22 d=%22M 0.000000,-0.250000 0.358000,-0.244000 0.716000,-0.226000 1.073000,-0.197000 1.429000,-0.155000 1.783000,-0.102000 2.135000,-0.037000 2.485000,0.039000 2.833000,0.127000 3.177000,0.227000 3.518000,0.338000 3.854000,0.460000 4.187000,0.593000 4.515000,0.737000 4.838000,0.892000 5.156000,1.058000 5.468000,1.233000 5.774000,1.420000 6.074000,1.616000 6.367000,1.822000 6.653000,2.037000 6.932000,2.262000 7.203000,2.496000 7.466000,2.739000 7.721000,2.991000 7.968000,3.251000 8.206000,3.518000 8.435000,3.794000 8.655000,4.077000 8.865000,4.367000 9.065000,4.664000 9.256000,4.967000 9.436000,5.277000 9.606000,5.592000 9.766000,5.913000 9.914000,6.239000 10.052000,6.570000 10.184000,6.885000 10.326000,7.196000 10.478000,7.502000 10.640000,7.803000 10.812000,8.098000 10.994000,8.387000 11.185000,8.670000 11.385000,8.947000 11.595000,9.217000 11.813000,9.480000 12.040000,9.735000 12.276000,9.983000 12.519000,10.223000 12.770000,10.455000 13.029000,10.678000 13.295000,10.892000 13.568000,11.098000 13.847000,11.294000 14.133000,11.482000 14.425000,11.659000 14.723000,11.827000 15.026000,11.985000 15.334000,12.132000 15.647000,12.270000 15.964000,12.397000 16.285000,12.513000 16.610000,12.619000 16.938000,12.714000 17.269000,12.798000 17.603000,12.871000 17.939000,12.933000 18.277000,12.984000 18.617000,13.023000 18.957000,13.051000 19.298000,13.068000 19.640000,13.074000 19.640000,13.574000 19.282000,13.568000 18.924000,13.550000 18.567000,13.521000 18.211000,13.479000 17.857000,13.426000 17.505000,13.361000 17.155000,13.285000 16.807000,13.197000 16.463000,13.097000 16.122000,12.986000 15.786000,12.864000 15.453000,12.731000 15.125000,12.587000 14.802000,12.432000 14.484000,12.266000 14.172000,12.091000 13.866000,11.904000 13.566000,11.708000 13.273000,11.502000 12.987000,11.287000 12.708000,11.062000 12.437000,10.828000 12.174000,10.585000 11.919000,10.333000 11.672000,10.073000 11.434000,9.806000 11.205000,9.530000 10.985000,9.247000 10.775000,8.957000 10.575000,8.660000 10.384000,8.357000 10.204000,8.047000 10.034000,7.732000 9.874000,7.411000 9.726000,7.085000 9.588000,6.754000 9.456000,6.439000 9.314000,6.128000 9.162000,5.822000 9.000000,5.522000 8.828000,5.226000 8.646000,4.937000 8.455000,4.654000 8.255000,4.377000 8.045000,4.107000 7.827000,3.844000 7.600000,3.589000 7.364000,3.341000 7.121000,3.101000 6.870000,2.869000 6.611000,2.646000 6.345000,2.432000 6.072000,2.226000 5.793000,2.030000 5.507000,1.842000 5.215000,1.665000 4.917000,1.497000 4.614000,1.339000 4.306000,1.192000 3.993000,1.054000 3.676000,0.927000 3.355000,0.811000 3.030000,0.705000 2.702000,0.610000 2.371000,0.526000 2.037000,0.453000 1.701000,0.391000 1.363000,0.340000 1.023000,0.301000 0.683000,0.273000 0.342000,0.256000 0.000000,0.250000 z%22 /></g><g id=%22C153%22 data-name=%22as_component__PNGCOJINIPILRSBFUVHAAAKRQR7F7X5DOV45DHY3HPYOUZICQITA%22><path class=%22layer_1_0%22 d=%22M 9.889000,3.500000 0.000000,1.275000 0.000000,-1.275000 9.889000,-3.500000 16.000000,-3.500000 16.000000,3.500000 z%22 /><path class=%22layer_2_0%22 d=%22M 0.000000,-0.250000 10.000000,-2.500000 10.000000,2.500000 0.000000,0.250000 z%22 /><rect class=%22layer_2_0%22 x=%2210.300000%22 y=%22-2.500000%22 width=%220.300000%22 height=%225.000000%22 /><rect class=%22layer_2_0%22 x=%2210.900000%22 y=%22-2.500000%22 width=%220.300000%22 height=%225.000000%22 /><rect class=%22layer_2_0%22 x=%2211.500000%22 y=%22-2.500000%22 width=%220.300000%22 height=%225.000000%22 /><rect class=%22layer_2_0%22 x=%2212.100000%22 y=%22-2.500000%22 width=%220.300000%22 height=%225.000000%22 /><rect class=%22layer_2_0%22 x=%2212.700000%22 y=%22-2.500000%22 width=%220.300000%22 height=%225.000000%22 /><rect class=%22layer_2_0%22 x=%2213.300000%22 y=%22-2.500000%22 width=%220.300000%22 height=%225.000000%22 /><rect class=%22layer_2_0%22 x=%2213.900000%22 y=%22-2.500000%22 width=%220.300000%22 height=%225.000000%22 /><rect class=%22layer_2_0%22 x=%2214.500000%22 y=%22-2.500000%22 width=%220.300000%22 height=%225.000000%22 /><rect class=%22layer_2_0%22 x=%2215.100000%22 y=%22-2.500000%22 width=%220.300000%22 height=%225.000000%22 /><rect class=%22layer_2_0%22 x=%2215.700000%22 y=%22-2.500000%22 width=%220.300000%22 height=%225.000000%22 /></g><g id=%22C154%22 data-name=%22s_bend_l_10P589024240315336_o_8P577175069015508_p_Strip%22><path class=%22layer_1_0%22 d=%22M 0.000000,-1.250000 0.302000,-1.243000 0.604000,-1.223000 0.904000,-1.188000 1.203000,-1.140000 1.499000,-1.079000 1.792000,-1.004000 2.081000,-0.917000 2.366000,-0.816000 2.646000,-0.702000 2.921000,-0.575000 3.190000,-0.437000 3.452000,-0.286000 3.707000,-0.124000 3.954000,0.050000 4.193000,0.235000 4.424000,0.431000 4.646000,0.637000 4.857000,0.852000 5.059000,1.078000 5.251000,1.312000 5.431000,1.554000 5.601000,1.804000 5.759000,2.062000 5.905000,2.327000 6.039000,2.598000 6.160000,2.875000 6.269000,3.157000 6.365000,3.444000 6.448000,3.735000 6.517000,4.029000 6.612000,4.394000 6.740000,4.750000 6.900000,5.092000 7.090000,5.419000 7.308000,5.727000 7.554000,6.013000 7.825000,6.277000 8.119000,6.515000 8.432000,6.725000 8.764000,6.906000 9.111000,7.056000 9.469000,7.174000 9.837000,7.259000 10.212000,7.310000 10.589000,7.327000 10.589000,9.827000 10.287000,9.820000 9.985000,9.800000 9.685000,9.765000 9.386000,9.718000 9.090000,9.656000 8.797000,9.581000 8.508000,9.494000 8.223000,9.393000 7.943000,9.279000 7.668000,9.152000 7.399000,9.014000 7.137000,8.863000 6.882000,8.701000 6.635000,8.527000 6.396000,8.342000 6.165000,8.146000 5.943000,7.940000 5.732000,7.725000 5.530000,7.499000 5.338000,7.265000 5.158000,7.023000 4.988000,6.773000 4.830000,6.515000 4.684000,6.250000 4.550000,5.979000 4.429000,5.702000 4.320000,5.420000 4.224000,5.133000 4.141000,4.842000 4.072000,4.548000 3.977000,4.183000 3.849000,3.827000 3.689000,3.485000 3.499000,3.158000 3.281000,2.850000 3.035000,2.564000 2.764000,2.300000 2.470000,2.062000 2.157000,1.852000 1.825000,1.671000 1.478000,1.521000 1.120000,1.403000 0.752000,1.318000 0.377000,1.267000 0.000000,1.250000 z%22 /><path class=%22layer_2_0%22 d=%22M 0.000000,-0.250000 0.257000,-0.244000 0.513000,-0.227000 0.769000,-0.198000 1.022000,-0.157000 1.274000,-0.105000 1.523000,-0.041000 1.769000,0.033000 2.011000,0.119000 2.249000,0.216000 2.483000,0.323000 2.711000,0.441000 2.934000,0.569000 3.151000,0.707000 3.361000,0.855000 3.564000,1.012000 3.760000,1.179000 3.948000,1.354000 4.128000,1.537000 4.300000,1.728000 4.463000,1.927000 4.616000,2.133000 4.760000,2.346000 4.895000,2.565000 5.019000,2.790000 5.132000,3.020000 5.236000,3.256000 5.328000,3.496000 5.410000,3.739000 5.480000,3.986000 5.539000,4.237000 5.593000,4.465000 5.657000,4.690000 5.731000,4.912000 5.816000,5.131000 5.910000,5.345000 6.014000,5.555000 6.127000,5.760000 6.249000,5.960000 6.380000,6.154000 6.520000,6.342000 6.669000,6.524000 6.825000,6.698000 6.989000,6.865000 7.161000,7.025000 7.525000,7.319000 7.717000,7.454000 7.914000,7.580000 8.117000,7.697000 8.538000,7.902000 8.976000,8.069000 9.200000,8.137000 9.427000,8.195000 9.657000,8.242000 9.888000,8.279000 10.121000,8.306000 10.355000,8.322000 10.589000,8.327000 10.589000,8.827000 10.332000,8.821000 10.076000,8.804000 9.820000,8.775000 9.567000,8.734000 9.315000,8.682000 9.066000,8.618000 8.820000,8.544000 8.578000,8.458000 8.340000,8.361000 8.106000,8.254000 7.878000,8.136000 7.655000,8.008000 7.438000,7.870000 7.228000,7.722000 7.025000,7.565000 6.829000,7.398000 6.641000,7.223000 6.461000,7.040000 6.289000,6.849000 6.126000,6.650000 5.973000,6.444000 5.829000,6.231000 5.695000,6.012000 5.570000,5.787000 5.457000,5.557000 5.353000,5.321000 5.261000,5.081000 5.179000,4.838000 5.109000,4.591000 5.050000,4.340000 4.996000,4.112000 4.932000,3.887000 4.858000,3.665000 4.773000,3.446000 4.576000,3.022000 4.462000,2.817000 4.340000,2.617000 4.209000,2.423000 4.069000,2.235000 3.764000,1.879000 3.600000,1.712000 3.428000,1.552000 3.064000,1.258000 2.872000,1.123000 2.675000,0.997000 2.472000,0.880000 2.051000,0.675000 1.613000,0.508000 1.389000,0.440000 1.162000,0.382000 0.932000,0.335000 0.701000,0.298000 0.468000,0.271000 0.234000,0.255000 0.000000,0.250000 z%22 /></g><g id=%22C155%22 data-name=%22as_component__PNGCOJINIPILRSBFUVHAAAKRQR7F7X5DOV45DHY3HPYOUZICQITA%22><path class=%22layer_1_0%22 d=%22M 9.889000,3.500000 0.000000,1.275000 0.000000,-1.275000 9.889000,-3.500000 16.000000,-3.500000 16.000000,3.500000 z%22 /><path class=%22layer_2_0%22 d=%22M 0.000000,-0.250000 10.000000,-2.500000 10.000000,2.500000 0.000000,0.250000 z%22 /><rect class=%22layer_2_0%22 x=%2210.300000%22 y=%22-2.500000%22 width=%220.300000%22 height=%225.000000%22 /><rect class=%22layer_2_0%22 x=%2210.900000%22 y=%22-2.500000%22 width=%220.300000%22 height=%225.000000%22 /><rect class=%22layer_2_0%22 x=%2211.500000%22 y=%22-2.500000%22 width=%220.300000%22 height=%225.000000%22 /><rect class=%22layer_2_0%22 x=%2212.100000%22 y=%22-2.500000%22 width=%220.300000%22 height=%225.000000%22 /><rect class=%22layer_2_0%22 x=%2212.700000%22 y=%22-2.500000%22 width=%220.300000%22 height=%225.000000%22 /><rect class=%22layer_2_0%22 x=%2213.300000%22 y=%22-2.500000%22 width=%220.300000%22 height=%225.000000%22 /><rect class=%22layer_2_0%22 x=%2213.900000%22 y=%22-2.500000%22 width=%220.300000%22 height=%225.000000%22 /><rect class=%22layer_2_0%22 x=%2214.500000%22 y=%22-2.500000%22 width=%220.300000%22 height=%225.000000%22 /><rect class=%22layer_2_0%22 x=%2215.100000%22 y=%22-2.500000%22 width=%220.300000%22 height=%225.000000%22 /><rect class=%22layer_2_0%22 x=%2215.700000%22 y=%22-2.500000%22 width=%220.300000%22 height=%225.000000%22 /></g><g id=%22C156%22 data-name=%22s_bend_l_40P13032507222786_o_80P07897531259376_p_Strip%22><path class=%22layer_1_0%22 d=%22M 0.000000,-1.250000 0.539000,-1.244000 1.077000,-1.228000 1.615000,-1.200000 2.153000,-1.162000 2.689000,-1.112000 3.224000,-1.052000 3.758000,-0.980000 4.291000,-0.898000 4.821000,-0.804000 5.350000,-0.700000 5.876000,-0.585000 6.400000,-0.459000 6.921000,-0.323000 7.439000,-0.176000 7.954000,-0.018000 8.466000,0.150000 8.974000,0.329000 9.479000,0.518000 9.979000,0.717000 10.476000,0.927000 10.968000,1.146000 11.455000,1.376000 12.415000,1.865000 12.887000,2.124000 13.354000,2.393000 13.815000,2.671000 14.271000,2.959000 14.720000,3.256000 15.163000,3.562000 15.600000,3.877000 16.031000,4.201000 16.871000,4.875000 17.281000,5.225000 17.683000,5.583000 18.466000,6.324000 18.845000,6.706000 19.217000,7.096000 19.581000,7.493000 19.936000,7.898000 20.283000,8.310000 20.622000,8.729000 20.952000,9.155000 21.273000,9.588000 21.889000,10.472000 22.182000,10.923000 22.467000,11.381000 22.742000,11.844000 23.008000,12.312000 23.264000,12.786000 23.747000,13.750000 23.973000,14.238000 24.190000,14.732000 24.396000,15.229000 24.592000,15.731000 24.778000,16.237000 24.953000,16.746000 25.118000,17.259000 25.272000,17.775000 25.416000,18.295000 25.549000,18.817000 25.671000,19.341000 25.782000,19.868000 25.883000,20.398000 25.973000,20.929000 26.052000,21.462000 26.120000,21.996000 26.177000,22.532000 26.223000,23.069000 26.258000,23.606000 26.282000,24.144000 26.295000,24.683000 26.297000,25.222000 26.288000,25.760000 26.268000,26.299000 26.194000,27.373000 26.141000,27.910000 26.077000,28.444000 26.002000,28.978000 25.916000,29.510000 25.819000,30.040000 25.711000,30.568000 25.593000,31.093000 25.464000,31.616000 25.324000,32.136000 25.173000,32.654000 25.012000,33.168000 24.841000,33.678000 24.659000,34.185000 24.466000,34.689000 24.264000,35.188000 24.051000,35.683000 23.828000,36.173000 23.595000,36.659000 23.352000,37.140000 23.100000,37.616000 22.837000,38.086000 22.565000,38.551000 22.284000,39.011000 21.993000,39.464000 21.693000,39.912000 21.384000,40.353000 21.066000,40.788000 20.499000,41.581000 20.227000,41.985000 19.964000,42.396000 19.464000,43.232000 19.226000,43.658000 18.778000,44.524000 18.567000,44.964000 18.173000,45.855000 17.816000,46.762000 17.651000,47.221000 17.350000,48.149000 17.087000,49.087000 16.863000,50.036000 16.765000,50.514000 16.600000,51.475000 16.532000,51.957000 16.426000,52.927000 16.360000,53.899000 16.341000,54.387000 16.335000,55.361000 16.368000,56.336000 16.442000,57.308000 16.493000,57.793000 16.626000,58.759000 16.799000,59.718000 17.010000,60.670000 17.261000,61.612000 17.400000,62.079000 17.549000,62.543000 17.876000,63.462000 18.053000,63.916000 18.240000,64.367000 18.641000,65.255000 18.855000,65.693000 19.309000,66.556000 19.799000,67.399000 20.056000,67.813000 20.322000,68.221000 20.879000,69.022000 21.468000,69.799000 22.089000,70.550000 22.411000,70.917000 23.076000,71.629000 23.770000,72.314000 24.492000,72.969000 25.240000,73.595000 25.623000,73.896000 26.408000,74.474000 27.216000,75.020000 27.628000,75.281000 28.468000,75.776000 29.328000,76.236000 29.764000,76.453000 30.205000,76.661000 31.099000,77.049000 32.009000,77.400000 32.469000,77.562000 33.398000,77.857000 34.339000,78.114000 35.289000,78.331000 35.767000,78.426000 36.729000,78.585000 37.697000,78.704000 38.182000,78.749000 38.668000,78.784000 39.155000,78.809000 40.130000,78.829000 40.130000,81.329000 39.591000,81.323000 39.053000,81.307000 38.515000,81.279000 37.978000,81.241000 37.441000,81.191000 36.906000,81.131000 36.372000,81.059000 35.839000,80.977000 35.309000,80.883000 34.780000,80.779000 34.254000,80.664000 33.730000,80.538000 33.209000,80.402000 32.691000,80.255000 32.176000,80.097000 31.664000,79.929000 31.156000,79.750000 30.651000,79.561000 30.151000,79.362000 29.654000,79.152000 29.162000,78.933000 28.675000,78.703000 27.715000,78.214000 27.243000,77.955000 26.776000,77.686000 26.315000,77.408000 25.859000,77.120000 25.410000,76.823000 24.967000,76.517000 24.530000,76.202000 24.099000,75.878000 23.259000,75.204000 22.849000,74.854000 22.447000,74.496000 21.664000,73.755000 21.285000,73.373000 20.913000,72.983000 20.549000,72.586000 20.194000,72.181000 19.847000,71.769000 19.508000,71.350000 19.178000,70.924000 18.857000,70.491000 18.241000,69.607000 17.948000,69.156000 17.663000,68.698000 17.388000,68.235000 17.122000,67.767000 16.866000,67.293000 16.383000,66.329000 16.157000,65.841000 15.940000,65.347000 15.734000,64.850000 15.538000,64.348000 15.352000,63.842000 15.177000,63.333000 15.012000,62.820000 14.858000,62.304000 14.714000,61.784000 14.581000,61.262000 14.459000,60.738000 14.348000,60.211000 14.247000,59.681000 14.157000,59.150000 14.078000,58.617000 14.010000,58.083000 13.953000,57.547000 13.907000,57.010000 13.872000,56.473000 13.848000,55.935000 13.835000,55.396000 13.833000,54.857000 13.842000,54.319000 13.862000,53.780000 13.894000,53.243000 13.936000,52.706000 13.989000,52.169000 14.053000,51.635000 14.128000,51.101000 14.214000,50.569000 14.311000,50.039000 14.419000,49.511000 14.537000,48.986000 14.666000,48.463000 14.806000,47.943000 14.957000,47.425000 15.118000,46.911000 15.289000,46.401000 15.471000,45.894000 15.664000,45.390000 15.866000,44.891000 16.079000,44.396000 16.302000,43.906000 16.535000,43.420000 16.778000,42.939000 17.030000,42.463000 17.293000,41.993000 17.565000,41.528000 17.846000,41.068000 18.137000,40.615000 18.437000,40.167000 18.746000,39.726000 19.064000,39.291000 19.351000,38.898000 19.903000,38.094000 20.166000,37.683000 20.420000,37.267000 20.904000,36.421000 21.352000,35.555000 21.563000,35.115000 21.957000,34.224000 22.140000,33.772000 22.479000,32.858000 22.780000,31.930000 23.043000,30.992000 23.160000,30.518000 23.365000,29.565000 23.452000,29.086000 23.598000,28.122000 23.704000,27.152000 23.742000,26.666000 23.789000,25.692000 23.795000,24.718000 23.762000,23.743000 23.730000,23.257000 23.637000,22.286000 23.504000,21.320000 23.331000,20.361000 23.120000,19.409000 22.999000,18.937000 22.730000,18.000000 22.581000,17.536000 22.422000,17.075000 22.077000,16.163000 21.890000,15.712000 21.489000,14.824000 21.053000,13.952000 20.821000,13.523000 20.580000,13.099000 20.074000,12.266000 19.808000,11.858000 19.251000,11.057000 18.662000,10.281000 18.355000,9.901000 17.719000,9.162000 17.054000,8.450000 16.360000,7.765000 16.002000,7.434000 15.267000,6.793000 14.507000,6.183000 13.722000,5.605000 13.321000,5.328000 12.502000,4.798000 11.662000,4.303000 11.235000,4.069000 10.366000,3.626000 9.925000,3.418000 9.031000,3.030000 8.578000,2.850000 7.661000,2.517000 6.732000,2.222000 5.791000,1.965000 5.317000,1.852000 4.363000,1.653000 3.401000,1.494000 2.918000,1.430000 1.948000,1.330000 1.462000,1.295000 0.975000,1.270000 0.000000,1.250000 z%22 /><path class=%22layer_2_0%22 d=%22M 0.000000,-0.250000 0.518000,-0.245000 1.036000,-0.229000 1.554000,-0.202000 2.071000,-0.165000 2.587000,-0.117000 3.102000,-0.059000 3.615000,0.010000 4.127000,0.089000 4.638000,0.179000 5.146000,0.279000 5.653000,0.390000 6.156000,0.511000 6.658000,0.642000 7.156000,0.783000 7.652000,0.935000 8.144000,1.097000 8.633000,1.269000 9.600000,1.642000 10.550000,2.055000 11.019000,2.276000 11.943000,2.747000 12.397000,2.996000 12.846000,3.254000 13.290000,3.522000 13.728000,3.799000 14.160000,4.085000 14.587000,4.379000 15.007000,4.682000 15.829000,5.314000 16.230000,5.642000 17.011000,6.323000 17.764000,7.036000 18.129000,7.404000 18.836000,8.161000 19.178000,8.550000 19.838000,9.350000 20.155000,9.759000 20.464000,10.175000 20.765000,10.598000 21.339000,11.460000 21.613000,11.900000 21.878000,12.346000 22.133000,12.797000 22.379000,13.253000 22.844000,14.179000 23.062000,14.649000 23.270000,15.124000 23.657000,16.086000 24.004000,17.062000 24.163000,17.555000 24.311000,18.052000 24.449000,18.551000 24.577000,19.054000 24.695000,19.558000 24.802000,20.065000 24.899000,20.574000 24.985000,21.085000 25.061000,21.598000 25.126000,22.112000 25.181000,22.627000 25.226000,23.144000 25.259000,23.661000 25.282000,24.179000 25.295000,24.697000 25.297000,25.215000 25.269000,26.251000 25.239000,26.768000 25.198000,27.285000 25.147000,27.801000 25.085000,28.315000 25.013000,28.828000 24.930000,29.340000 24.837000,29.850000 24.734000,30.358000 24.620000,30.863000 24.361000,31.867000 24.216000,32.364000 24.061000,32.859000 23.896000,33.350000 23.721000,33.838000 23.536000,34.322000 23.341000,34.802000 23.136000,35.278000 22.922000,35.750000 22.698000,36.217000 22.464000,36.680000 22.221000,37.138000 21.969000,37.590000 21.437000,38.480000 21.157000,38.916000 20.868000,39.346000 20.571000,39.771000 20.265000,40.189000 19.965000,40.599000 19.391000,41.437000 19.117000,41.865000 18.595000,42.737000 18.348000,43.180000 18.110000,43.629000 17.661000,44.541000 17.451000,45.003000 17.250000,45.470000 17.059000,45.940000 16.706000,46.893000 16.544000,47.375000 16.251000,48.347000 16.119000,48.838000 15.997000,49.331000 15.885000,49.826000 15.692000,50.824000 15.611000,51.325000 15.540000,51.828000 15.430000,52.838000 15.390000,53.345000 15.342000,54.359000 15.333000,54.867000 15.347000,55.883000 15.370000,56.391000 15.403000,56.898000 15.446000,57.404000 15.500000,57.909000 15.564000,58.413000 15.723000,59.416000 15.818000,59.915000 15.923000,60.412000 16.164000,61.399000 16.445000,62.375000 16.600000,62.859000 16.941000,63.816000 17.126000,64.290000 17.320000,64.759000 17.524000,65.224000 17.738000,65.685000 17.961000,66.141000 18.193000,66.593000 18.434000,67.040000 18.944000,67.919000 19.490000,68.776000 20.070000,69.610000 20.684000,70.419000 21.331000,71.203000 22.009000,71.959000 22.360000,72.327000 22.718000,72.687000 23.455000,73.386000 24.221000,74.053000 24.614000,74.375000 25.014000,74.689000 25.419000,74.994000 26.249000,75.580000 26.673000,75.860000 27.538000,76.394000 28.423000,76.892000 29.329000,77.353000 30.252000,77.777000 31.192000,78.162000 32.147000,78.509000 33.115000,78.816000 33.604000,78.955000 34.589000,79.202000 35.584000,79.409000 36.084000,79.497000 37.090000,79.642000 37.594000,79.699000 38.100000,79.746000 39.114000,79.808000 39.622000,79.824000 40.130000,79.829000 40.130000,80.329000 39.612000,80.324000 39.094000,80.308000 38.576000,80.281000 38.059000,80.244000 37.543000,80.196000 37.028000,80.138000 36.515000,80.069000 36.003000,79.990000 35.492000,79.900000 34.984000,79.800000 34.477000,79.689000 33.974000,79.568000 33.472000,79.437000 32.974000,79.296000 32.478000,79.144000 31.986000,78.982000 31.497000,78.810000 30.530000,78.437000 29.580000,78.024000 29.111000,77.803000 28.647000,77.572000 28.187000,77.332000 27.733000,77.083000 27.284000,76.825000 26.840000,76.557000 26.402000,76.280000 25.543000,75.700000 25.123000,75.397000 24.301000,74.765000 23.900000,74.437000 23.119000,73.756000 22.366000,73.043000 22.001000,72.675000 21.644000,72.300000 21.294000,71.918000 20.952000,71.529000 20.618000,71.132000 20.292000,70.729000 19.975000,70.320000 19.666000,69.904000 19.365000,69.481000 18.791000,68.619000 18.517000,68.179000 18.252000,67.733000 17.997000,67.282000 17.751000,66.826000 17.286000,65.900000 17.068000,65.430000 16.860000,64.955000 16.473000,63.993000 16.126000,63.017000 15.967000,62.524000 15.819000,62.027000 15.681000,61.528000 15.435000,60.521000 15.328000,60.014000 15.231000,59.505000 15.145000,58.994000 15.069000,58.481000 15.004000,57.967000 14.949000,57.452000 14.904000,56.935000 14.871000,56.418000 14.848000,55.900000 14.835000,55.382000 14.833000,54.864000 14.861000,53.828000 14.891000,53.311000 14.932000,52.794000 14.983000,52.278000 15.045000,51.764000 15.117000,51.251000 15.200000,50.739000 15.293000,50.229000 15.396000,49.721000 15.510000,49.216000 15.769000,48.212000 15.914000,47.715000 16.069000,47.220000 16.234000,46.729000 16.409000,46.241000 16.594000,45.757000 16.789000,45.277000 17.208000,44.329000 17.432000,43.862000 17.666000,43.399000 17.909000,42.941000 18.161000,42.489000 18.693000,41.599000 18.973000,41.163000 19.559000,40.308000 19.865000,39.890000 20.165000,39.480000 20.739000,38.642000 21.013000,38.214000 21.535000,37.342000 21.782000,36.899000 22.020000,36.450000 22.469000,35.538000 22.679000,35.076000 22.880000,34.609000 23.071000,34.139000 23.424000,33.186000 23.586000,32.704000 23.879000,31.732000 24.011000,31.241000 24.133000,30.748000 24.245000,30.253000 24.438000,29.255000 24.519000,28.754000 24.590000,28.251000 24.700000,27.241000 24.740000,26.734000 24.788000,25.720000 24.797000,25.212000 24.783000,24.196000 24.760000,23.688000 24.727000,23.181000 24.684000,22.675000 24.630000,22.170000 24.566000,21.666000 24.407000,20.663000 24.312000,20.164000 24.207000,19.667000 23.966000,18.680000 23.685000,17.704000 23.530000,17.220000 23.189000,16.263000 23.004000,15.789000 22.810000,15.320000 22.606000,14.855000 22.392000,14.394000 22.169000,13.938000 21.937000,13.486000 21.696000,13.039000 21.186000,12.160000 20.640000,11.303000 20.060000,10.469000 19.446000,9.660000 18.799000,8.876000 18.121000,8.120000 17.770000,7.752000 17.412000,7.392000 16.675000,6.693000 15.909000,6.026000 15.516000,5.704000 15.116000,5.390000 14.711000,5.085000 13.881000,4.499000 13.457000,4.219000 12.592000,3.685000 11.707000,3.187000 10.801000,2.726000 9.878000,2.302000 8.938000,1.917000 7.983000,1.570000 7.015000,1.263000 6.526000,1.124000 5.541000,0.877000 4.546000,0.670000 4.046000,0.582000 3.040000,0.437000 2.536000,0.380000 2.030000,0.333000 1.016000,0.271000 0.508000,0.255000 0.000000,0.250000 z%22 /></g><g id=%22C157%22 data-name=%22as_component__PNGCOJINIPILRSBFUVHAAAKRQR7F7X5DOV45DHY3HPYOUZICQITA%22><path class=%22layer_1_0%22 d=%22M 9.889000,3.500000 0.000000,1.275000 0.000000,-1.275000 9.889000,-3.500000 16.000000,-3.500000 16.000000,3.500000 z%22 /><path class=%22layer_2_0%22 d=%22M 0.000000,-0.250000 10.000000,-2.500000 10.000000,2.500000 0.000000,0.250000 z%22 /><rect class=%22layer_2_0%22 x=%2210.300000%22 y=%22-2.500000%22 width=%220.300000%22 height=%225.000000%22 /><rect class=%22layer_2_0%22 x=%2210.900000%22 y=%22-2.500000%22 width=%220.300000%22 height=%225.000000%22 /><rect class=%22layer_2_0%22 x=%2211.500000%22 y=%22-2.500000%22 width=%220.300000%22 height=%225.000000%22 /><rect class=%22layer_2_0%22 x=%2212.100000%22 y=%22-2.500000%22 width=%220.300000%22 height=%225.000000%22 /><rect class=%22layer_2_0%22 x=%2212.700000%22 y=%22-2.500000%22 width=%220.300000%22 height=%225.000000%22 /><rect class=%22layer_2_0%22 x=%2213.300000%22 y=%22-2.500000%22 width=%220.300000%22 height=%225.000000%22 /><rect class=%22layer_2_0%22 x=%2213.900000%22 y=%22-2.500000%22 width=%220.300000%22 height=%225.000000%22 /><rect class=%22layer_2_0%22 x=%2214.500000%22 y=%22-2.500000%22 width=%220.300000%22 height=%225.000000%22 /><rect class=%22layer_2_0%22 x=%2215.100000%22 y=%22-2.500000%22 width=%220.300000%22 height=%225.000000%22 /><rect class=%22layer_2_0%22 x=%2215.700000%22 y=%22-2.500000%22 width=%220.300000%22 height=%225.000000%22 /></g><g id=%22C158%22 data-name=%22s_bend_l_40P90040799042341_o_8P697710408584552_p_Strip%22><path class=%22layer_1_0%22 d=%22M 0.000000,-1.250000 0.771000,-1.244000 1.542000,-1.227000 2.312000,-1.198000 3.082000,-1.158000 3.851000,-1.106000 4.619000,-1.042000 5.386000,-0.968000 6.152000,-0.881000 6.917000,-0.783000 7.680000,-0.674000 8.442000,-0.554000 9.201000,-0.421000 9.958000,-0.278000 10.714000,-0.123000 11.466000,0.043000 12.217000,0.220000 12.964000,0.408000 13.709000,0.608000 14.450000,0.819000 15.189000,1.040000 15.923000,1.273000 16.655000,1.517000 17.382000,1.772000 18.106000,2.037000 18.826000,2.314000 19.541000,2.601000 20.252000,2.899000 20.959000,3.207000 21.631000,3.501000 22.307000,3.784000 22.988000,4.057000 23.673000,4.320000 24.361000,4.573000 25.054000,4.815000 25.749000,5.047000 26.449000,5.269000 27.151000,5.480000 27.857000,5.680000 28.565000,5.870000 29.276000,6.050000 29.990000,6.218000 30.706000,6.376000 31.425000,6.523000 32.146000,6.660000 32.868000,6.785000 33.593000,6.900000 34.319000,7.004000 35.046000,7.097000 35.775000,7.179000 36.505000,7.251000 37.236000,7.311000 38.700000,7.399000 39.433000,7.426000 40.167000,7.443000 40.900000,7.448000 40.900000,9.948000 40.129000,9.942000 39.358000,9.925000 38.588000,9.896000 37.818000,9.856000 37.049000,9.804000 36.281000,9.740000 35.514000,9.666000 34.748000,9.579000 33.983000,9.481000 33.220000,9.372000 32.458000,9.252000 31.699000,9.119000 30.942000,8.976000 30.186000,8.821000 29.434000,8.655000 28.683000,8.478000 27.936000,8.290000 27.191000,8.090000 26.450000,7.879000 25.711000,7.658000 24.977000,7.425000 24.245000,7.181000 23.518000,6.926000 22.794000,6.661000 22.074000,6.384000 21.359000,6.097000 20.648000,5.799000 19.941000,5.491000 19.269000,5.197000 18.593000,4.914000 17.912000,4.641000 17.227000,4.378000 16.539000,4.125000 15.846000,3.883000 15.151000,3.651000 14.451000,3.429000 13.749000,3.218000 13.043000,3.018000 12.335000,2.828000 11.624000,2.649000 10.910000,2.480000 10.194000,2.322000 9.475000,2.175000 8.754000,2.038000 8.032000,1.913000 7.307000,1.798000 6.581000,1.694000 5.854000,1.601000 5.125000,1.519000 4.395000,1.447000 3.664000,1.387000 2.200000,1.299000 1.467000,1.272000 0.733000,1.255000 0.000000,1.250000 z%22 /><path class=%22layer_2_0%22 d=%22M 0.000000,-0.250000 0.756000,-0.244000 1.512000,-0.227000 2.267000,-0.199000 3.022000,-0.160000 3.776000,-0.109000 5.282000,0.027000 6.033000,0.112000 6.783000,0.208000 7.531000,0.315000 8.278000,0.433000 9.022000,0.562000 9.765000,0.703000 10.506000,0.855000 11.244000,1.018000 11.980000,1.191000 12.713000,1.376000 13.443000,1.572000 14.170000,1.778000 14.894000,1.996000 15.614000,2.224000 16.331000,2.463000 17.045000,2.713000 17.755000,2.974000 18.460000,3.245000 19.162000,3.526000 19.859000,3.818000 20.552000,4.121000 21.238000,4.420000 21.928000,4.709000 22.623000,4.988000 23.321000,5.256000 24.024000,5.514000 24.730000,5.761000 25.440000,5.998000 26.154000,6.224000 26.871000,6.440000 27.590000,6.644000 28.313000,6.838000 29.039000,7.021000 29.767000,7.193000 30.498000,7.354000 31.232000,7.504000 31.967000,7.644000 32.704000,7.772000 33.444000,7.889000 34.184000,7.995000 34.927000,8.090000 35.670000,8.174000 36.415000,8.247000 37.161000,8.308000 38.655000,8.398000 39.403000,8.426000 40.900000,8.448000 40.900000,8.948000 40.144000,8.942000 39.388000,8.925000 38.633000,8.897000 37.878000,8.858000 37.124000,8.807000 35.618000,8.671000 34.867000,8.586000 34.117000,8.490000 33.369000,8.383000 32.622000,8.265000 31.878000,8.136000 31.135000,7.995000 30.394000,7.843000 29.656000,7.680000 28.920000,7.507000 28.188000,7.322000 27.457000,7.126000 26.730000,6.920000 26.006000,6.702000 25.286000,6.474000 24.569000,6.235000 23.855000,5.985000 23.145000,5.724000 22.440000,5.453000 21.738000,5.172000 21.041000,4.880000 20.348000,4.577000 19.662000,4.278000 18.972000,3.989000 18.277000,3.710000 17.579000,3.442000 16.876000,3.184000 16.170000,2.937000 15.460000,2.700000 14.746000,2.474000 14.029000,2.258000 13.310000,2.054000 12.587000,1.860000 11.861000,1.677000 11.133000,1.505000 10.402000,1.344000 9.668000,1.194000 8.933000,1.054000 8.196000,0.926000 7.457000,0.809000 6.716000,0.703000 5.973000,0.608000 5.230000,0.524000 4.485000,0.452000 3.739000,0.390000 2.245000,0.300000 1.497000,0.272000 0.748000,0.256000 0.000000,0.250000 z%22 /></g><g id=%22C159%22 data-name=%22as_component__PNGCOJINIPILRSBFUVHAAAKRQR7F7X5DOV45DHY3HPYOUZICQITA%22><path class=%22layer_1_0%22 d=%22M 9.889000,3.500000 0.000000,1.275000 0.000000,-1.275000 9.889000,-3.500000 16.000000,-3.500000 16.000000,3.500000 z%22 /><path class=%22layer_2_0%22 d=%22M 0.000000,-0.250000 10.000000,-2.500000 10.000000,2.500000 0.000000,0.250000 z%22 /><rect class=%22layer_2_0%22 x=%2210.300000%22 y=%22-2.500000%22 width=%220.300000%22 height=%225.000000%22 /><rect class=%22layer_2_0%22 x=%2210.900000%22 y=%22-2.500000%22 width=%220.300000%22 height=%225.000000%22 /><rect class=%22layer_2_0%22 x=%2211.500000%22 y=%22-2.500000%22 width=%220.300000%22 height=%225.000000%22 /><rect class=%22layer_2_0%22 x=%2212.100000%22 y=%22-2.500000%22 width=%220.300000%22 height=%225.000000%22 /><rect class=%22layer_2_0%22 x=%2212.700000%22 y=%22-2.500000%22 width=%220.300000%22 height=%225.000000%22 /><rect class=%22layer_2_0%22 x=%2213.300000%22 y=%22-2.500000%22 width=%220.300000%22 height=%225.000000%22 /><rect class=%22layer_2_0%22 x=%2213.900000%22 y=%22-2.500000%22 width=%220.300000%22 height=%225.000000%22 /><rect class=%22layer_2_0%22 x=%2214.500000%22 y=%22-2.500000%22 width=%220.300000%22 height=%225.000000%22 /><rect class=%22layer_2_0%22 x=%2215.100000%22 y=%22-2.500000%22 width=%220.300000%22 height=%225.000000%22 /><rect class=%22layer_2_0%22 x=%2215.700000%22 y=%22-2.500000%22 width=%220.300000%22 height=%225.000000%22 /></g><g id=%22C160%22 data-name=%22s_bend_l_5P648910501898967_o_16P14004141063032_p_Strip%22><path class=%22layer_1_0%22 d=%22M 0.000000,-1.250000 0.285000,-1.243000 0.570000,-1.222000 0.853000,-1.187000 1.134000,-1.138000 1.412000,-1.075000 1.687000,-0.998000 1.958000,-0.908000 2.223000,-0.805000 2.484000,-0.689000 2.738000,-0.560000 2.986000,-0.419000 3.227000,-0.265000 3.459000,-0.100000 3.684000,0.076000 3.899000,0.263000 4.105000,0.461000 4.300000,0.668000 4.486000,0.885000 4.660000,1.111000 4.823000,1.345000 4.974000,1.587000 5.113000,1.836000 5.240000,2.092000 5.354000,2.353000 5.455000,2.620000 5.542000,2.892000 5.616000,3.167000 5.677000,3.446000 5.723000,3.727000 5.756000,4.011000 5.775000,4.295000 5.779000,4.581000 5.769000,4.866000 5.746000,5.150000 5.708000,5.433000 5.657000,5.713000 5.591000,5.991000 5.512000,6.265000 5.420000,6.535000 5.314000,6.800000 5.196000,7.060000 5.065000,7.313000 4.921000,7.559000 4.766000,7.799000 4.599000,8.030000 4.420000,8.252000 4.231000,8.466000 4.032000,8.670000 3.823000,8.864000 3.604000,9.047000 3.361000,9.261000 3.141000,9.498000 2.945000,9.756000 2.775000,10.031000 2.633000,10.322000 2.521000,10.626000 2.439000,10.939000 2.389000,11.259000 2.370000,11.582000 2.383000,11.905000 2.428000,12.225000 2.504000,12.540000 2.611000,12.845000 2.748000,13.139000 2.912000,13.417000 3.104000,13.678000 3.320000,13.919000 3.559000,14.138000 3.818000,14.331000 4.095000,14.498000 4.387000,14.638000 4.692000,14.747000 5.006000,14.826000 5.326000,14.874000 5.649000,14.890000 5.649000,17.390000 5.364000,17.383000 5.079000,17.362000 4.796000,17.327000 4.515000,17.278000 4.237000,17.215000 3.962000,17.138000 3.691000,17.048000 3.426000,16.945000 3.165000,16.829000 2.911000,16.700000 2.663000,16.559000 2.422000,16.405000 2.190000,16.240000 1.965000,16.064000 1.750000,15.877000 1.544000,15.679000 1.349000,15.472000 1.163000,15.255000 0.989000,15.029000 0.826000,14.795000 0.675000,14.553000 0.536000,14.304000 0.409000,14.048000 0.295000,13.787000 0.194000,13.520000 0.107000,13.248000 0.033000,12.973000 -0.028000,12.694000 -0.074000,12.413000 -0.107000,12.129000 -0.126000,11.845000 -0.130000,11.559000 -0.120000,11.274000 -0.097000,10.990000 -0.059000,10.707000 -0.008000,10.427000 0.058000,10.149000 0.137000,9.875000 0.229000,9.605000 0.335000,9.340000 0.453000,9.080000 0.584000,8.827000 0.728000,8.581000 0.883000,8.341000 1.050000,8.110000 1.229000,7.888000 1.418000,7.674000 1.617000,7.470000 1.826000,7.276000 2.045000,7.093000 2.288000,6.879000 2.508000,6.642000 2.704000,6.384000 2.874000,6.109000 3.016000,5.818000 3.128000,5.514000 3.210000,5.201000 3.260000,4.881000 3.279000,4.558000 3.266000,4.235000 3.221000,3.915000 3.145000,3.600000 3.038000,3.295000 2.901000,3.001000 2.737000,2.723000 2.545000,2.462000 2.329000,2.221000 2.090000,2.002000 1.831000,1.809000 1.554000,1.642000 1.262000,1.502000 0.957000,1.393000 0.643000,1.314000 0.323000,1.266000 0.000000,1.250000 z%22 /><path class=%22layer_2_0%22 d=%22M 0.000000,-0.250000 0.236000,-0.244000 0.471000,-0.227000 0.705000,-0.198000 0.938000,-0.157000 1.168000,-0.105000 1.395000,-0.042000 1.619000,0.033000 1.839000,0.118000 2.054000,0.214000 2.265000,0.321000 2.470000,0.437000 2.668000,0.564000 2.861000,0.701000 3.046000,0.847000 3.224000,1.001000 3.394000,1.165000 3.556000,1.336000 3.710000,1.516000 3.854000,1.703000 3.989000,1.896000 4.114000,2.096000 4.229000,2.302000 4.333000,2.513000 4.428000,2.730000 4.511000,2.950000 4.583000,3.175000 4.645000,3.403000 4.695000,3.633000 4.733000,3.866000 4.760000,4.100000 4.775000,4.336000 4.779000,4.572000 4.771000,4.807000 4.752000,5.043000 4.721000,5.276000 4.678000,5.508000 4.624000,5.738000 4.559000,5.965000 4.482000,6.188000 4.395000,6.407000 4.297000,6.622000 4.188000,6.831000 4.070000,7.035000 3.941000,7.233000 3.803000,7.424000 3.655000,7.608000 3.499000,7.785000 3.334000,7.953000 3.161000,8.114000 2.980000,8.265000 2.664000,8.545000 2.516000,8.696000 2.376000,8.854000 2.120000,9.190000 2.005000,9.367000 1.802000,9.737000 1.714000,9.929000 1.567000,10.325000 1.460000,10.734000 1.422000,10.942000 1.394000,11.151000 1.370000,11.573000 1.373000,11.784000 1.387000,11.995000 1.411000,12.205000 1.490000,12.619000 1.545000,12.823000 1.610000,13.024000 1.769000,13.416000 1.863000,13.605000 1.966000,13.789000 2.198000,14.142000 2.465000,14.470000 2.762000,14.769000 2.921000,14.908000 3.087000,15.039000 3.260000,15.161000 3.621000,15.379000 3.810000,15.475000 4.003000,15.561000 4.400000,15.704000 4.809000,15.807000 5.227000,15.869000 5.438000,15.885000 5.649000,15.890000 5.649000,16.390000 5.413000,16.384000 5.178000,16.367000 4.944000,16.338000 4.711000,16.297000 4.481000,16.245000 4.254000,16.182000 4.030000,16.107000 3.810000,16.022000 3.595000,15.926000 3.384000,15.819000 3.179000,15.703000 2.981000,15.576000 2.788000,15.439000 2.603000,15.293000 2.425000,15.139000 2.255000,14.975000 2.093000,14.804000 1.939000,14.624000 1.795000,14.437000 1.660000,14.244000 1.535000,14.044000 1.420000,13.838000 1.316000,13.627000 1.221000,13.410000 1.138000,13.190000 1.066000,12.965000 1.004000,12.737000 0.954000,12.507000 0.916000,12.274000 0.889000,12.040000 0.874000,11.804000 0.870000,11.568000 0.878000,11.333000 0.897000,11.097000 0.928000,10.864000 0.971000,10.632000 1.025000,10.402000 1.090000,10.175000 1.167000,9.952000 1.254000,9.733000 1.352000,9.518000 1.461000,9.309000 1.579000,9.105000 1.708000,8.907000 1.846000,8.716000 1.994000,8.532000 2.150000,8.355000 2.315000,8.187000 2.488000,8.026000 2.669000,7.875000 2.830000,7.739000 3.133000,7.444000 3.273000,7.286000 3.529000,6.950000 3.644000,6.773000 3.847000,6.403000 3.935000,6.211000 4.082000,5.815000 4.189000,5.406000 4.227000,5.198000 4.255000,4.989000 4.272000,4.778000 4.276000,4.356000 4.262000,4.145000 4.238000,3.935000 4.159000,3.521000 4.104000,3.317000 4.039000,3.116000 3.880000,2.724000 3.786000,2.535000 3.683000,2.351000 3.451000,1.998000 3.184000,1.670000 2.887000,1.371000 2.728000,1.232000 2.562000,1.101000 2.389000,0.979000 2.028000,0.761000 1.839000,0.665000 1.646000,0.579000 1.249000,0.436000 0.840000,0.333000 0.422000,0.271000 0.211000,0.255000 0.000000,0.250000 z%22 /></g><g id=%22C161%22 data-name=%22as_component__PNGCOJINIPILRSBFUVHAAAKRQR7F7X5DOV45DHY3HPYOUZICQITA%22><path class=%22layer_1_0%22 d=%22M 9.889000,3.500000 0.000000,1.275000 0.000000,-1.275000 9.889000,-3.500000 16.000000,-3.500000 16.000000,3.500000 z%22 /><path class=%22layer_2_0%22 d=%22M 0.000000,-0.250000 10.000000,-2.500000 10.000000,2.500000 0.000000,0.250000 z%22 /><rect class=%22layer_2_0%22 x=%2210.300000%22 y=%22-2.500000%22 width=%220.300000%22 height=%225.000000%22 /><rect class=%22layer_2_0%22 x=%2210.900000%22 y=%22-2.500000%22 width=%220.300000%22 height=%225.000000%22 /><rect class=%22layer_2_0%22 x=%2211.500000%22 y=%22-2.500000%22 width=%220.300000%22 height=%225.000000%22 /><rect class=%22layer_2_0%22 x=%2212.100000%22 y=%22-2.500000%22 width=%220.300000%22 height=%225.000000%22 /><rect class=%22layer_2_0%22 x=%2212.700000%22 y=%22-2.500000%22 width=%220.300000%22 height=%225.000000%22 /><rect class=%22layer_2_0%22 x=%2213.300000%22 y=%22-2.500000%22 width=%220.300000%22 height=%225.000000%22 /><rect class=%22layer_2_0%22 x=%2213.900000%22 y=%22-2.500000%22 width=%220.300000%22 height=%225.000000%22 /><rect class=%22layer_2_0%22 x=%2214.500000%22 y=%22-2.500000%22 width=%220.300000%22 height=%225.000000%22 /><rect class=%22layer_2_0%22 x=%2215.100000%22 y=%22-2.500000%22 width=%220.300000%22 height=%225.000000%22 /><rect class=%22layer_2_0%22 x=%2215.700000%22 y=%22-2.500000%22 width=%220.300000%22 height=%225.000000%22 /></g><g id=%22C162%22 data-name=%22s_bend_l_33P97256719398432_o_20P696847110577906_p_Strip%22><path class=%22layer_1_0%22 d=%22M 0.000000,-1.250000 0.484000,-1.244000 0.969000,-1.227000 1.452000,-1.198000 1.935000,-1.158000 2.417000,-1.106000 2.897000,-1.043000 3.376000,-0.968000 3.853000,-0.882000 4.327000,-0.785000 4.799000,-0.676000 5.269000,-0.557000 5.735000,-0.426000 6.199000,-0.284000 6.658000,-0.131000 7.114000,0.033000 7.566000,0.208000 8.014000,0.393000 8.457000,0.589000 8.895000,0.795000 9.328000,1.012000 9.756000,1.239000 10.179000,1.476000 10.596000,1.723000 11.006000,1.980000 11.411000,2.247000 11.809000,2.523000 12.200000,2.809000 12.585000,3.104000 12.962000,3.408000 13.332000,3.720000 13.694000,4.042000 14.049000,4.372000 14.396000,4.710000 15.065000,5.411000 15.386000,5.773000 15.699000,6.143000 16.004000,6.520000 16.299000,6.905000 16.585000,7.296000 16.861000,7.694000 17.128000,8.098000 17.385000,8.508000 17.633000,8.925000 17.870000,9.347000 18.097000,9.775000 18.505000,10.521000 18.948000,11.247000 19.424000,11.950000 19.934000,12.631000 20.475000,13.286000 21.047000,13.914000 21.344000,14.218000 21.960000,14.805000 22.602000,15.361000 22.933000,15.628000 23.614000,16.137000 24.318000,16.613000 24.678000,16.839000 25.414000,17.263000 25.790000,17.463000 26.554000,17.834000 26.943000,18.006000 27.732000,18.322000 28.535000,18.599000 28.942000,18.724000 29.351000,18.839000 29.763000,18.944000 30.177000,19.039000 31.012000,19.200000 31.853000,19.321000 32.699000,19.402000 33.123000,19.427000 33.973000,19.447000 33.973000,21.947000 33.489000,21.941000 33.004000,21.924000 32.521000,21.895000 32.038000,21.855000 31.556000,21.803000 31.076000,21.740000 30.597000,21.665000 30.120000,21.579000 29.646000,21.482000 29.174000,21.373000 28.704000,21.254000 28.238000,21.123000 27.774000,20.981000 27.315000,20.828000 26.859000,20.664000 26.407000,20.489000 25.959000,20.304000 25.516000,20.108000 25.078000,19.902000 24.645000,19.685000 24.217000,19.458000 23.794000,19.221000 23.377000,18.974000 22.967000,18.717000 22.562000,18.450000 22.164000,18.174000 21.773000,17.888000 21.388000,17.593000 21.011000,17.289000 20.641000,16.977000 20.279000,16.655000 19.924000,16.325000 19.577000,15.987000 18.908000,15.286000 18.587000,14.924000 18.274000,14.554000 17.969000,14.177000 17.674000,13.792000 17.388000,13.401000 17.112000,13.003000 16.845000,12.599000 16.588000,12.189000 16.340000,11.772000 16.103000,11.350000 15.876000,10.922000 15.468000,10.176000 15.025000,9.450000 14.549000,8.747000 14.039000,8.066000 13.498000,7.411000 13.215000,7.093000 12.629000,6.479000 12.324000,6.182000 12.013000,5.892000 11.695000,5.610000 11.040000,5.069000 10.359000,4.560000 10.010000,4.318000 9.295000,3.858000 8.929000,3.642000 8.183000,3.234000 7.419000,2.863000 7.030000,2.691000 6.241000,2.375000 5.841000,2.232000 5.031000,1.973000 4.622000,1.858000 4.210000,1.753000 3.796000,1.658000 2.961000,1.497000 2.120000,1.376000 1.274000,1.295000 0.850000,1.270000 0.000000,1.250000 z%22 /><path class=%22layer_2_0%22 d=%22M 0.000000,-0.250000 0.461000,-0.245000 1.381000,-0.201000 1.840000,-0.162000 2.298000,-0.113000 2.755000,-0.053000 3.210000,0.018000 3.663000,0.100000 4.115000,0.192000 4.564000,0.295000 5.010000,0.409000 5.454000,0.534000 5.894000,0.669000 6.331000,0.814000 6.765000,0.970000 7.195000,1.136000 7.620000,1.312000 8.042000,1.499000 8.458000,1.695000 8.870000,1.901000 9.277000,2.117000 9.679000,2.342000 10.075000,2.577000 10.851000,3.075000 11.229000,3.338000 11.967000,3.890000 12.326000,4.179000 12.677000,4.476000 13.022000,4.782000 13.359000,5.096000 13.689000,5.418000 14.011000,5.747000 14.325000,6.084000 14.929000,6.780000 15.218000,7.139000 15.498000,7.504000 15.770000,7.876000 16.033000,8.254000 16.287000,8.639000 16.532000,9.029000 16.767000,9.425000 16.993000,9.827000 17.209000,10.234000 17.419000,10.630000 17.639000,11.021000 17.868000,11.407000 18.107000,11.788000 18.354000,12.162000 18.610000,12.531000 19.148000,13.249000 19.720000,13.941000 20.324000,14.605000 20.637000,14.926000 21.287000,15.545000 21.623000,15.843000 21.966000,16.133000 22.315000,16.414000 22.671000,16.687000 23.034000,16.952000 23.403000,17.208000 23.777000,17.455000 24.158000,17.693000 24.544000,17.922000 25.332000,18.352000 26.139000,18.744000 26.964000,19.097000 27.383000,19.259000 28.231000,19.552000 29.092000,19.805000 29.527000,19.916000 30.404000,20.106000 30.846000,20.186000 31.289000,20.255000 31.734000,20.314000 32.180000,20.362000 33.076000,20.426000 33.524000,20.442000 33.973000,20.447000 33.973000,20.947000 33.512000,20.942000 32.592000,20.898000 32.133000,20.859000 31.675000,20.810000 31.218000,20.750000 30.763000,20.679000 30.310000,20.597000 29.858000,20.505000 29.409000,20.402000 28.963000,20.288000 28.519000,20.163000 28.079000,20.028000 27.642000,19.883000 27.208000,19.727000 26.778000,19.561000 26.353000,19.385000 25.931000,19.198000 25.515000,19.002000 25.103000,18.796000 24.696000,18.580000 24.294000,18.355000 23.898000,18.120000 23.122000,17.622000 22.372000,17.088000 22.006000,16.807000 21.648000,16.518000 21.296000,16.221000 20.951000,15.915000 20.614000,15.601000 20.284000,15.279000 19.962000,14.950000 19.648000,14.613000 19.044000,13.917000 18.755000,13.558000 18.475000,13.193000 18.203000,12.821000 17.940000,12.443000 17.686000,12.058000 17.206000,11.272000 16.980000,10.870000 16.764000,10.463000 16.554000,10.067000 16.334000,9.676000 16.105000,9.290000 15.866000,8.909000 15.619000,8.535000 15.363000,8.166000 14.825000,7.448000 14.253000,6.756000 13.649000,6.092000 13.336000,5.771000 12.686000,5.152000 12.350000,4.854000 12.007000,4.564000 11.658000,4.283000 11.302000,4.010000 10.939000,3.745000 10.570000,3.489000 10.196000,3.242000 9.815000,3.004000 9.429000,2.775000 8.641000,2.345000 7.834000,1.953000 7.009000,1.600000 6.590000,1.438000 5.742000,1.145000 4.881000,0.892000 4.446000,0.781000 4.009000,0.681000 3.569000,0.591000 3.127000,0.511000 2.684000,0.442000 2.239000,0.383000 1.793000,0.335000 0.897000,0.271000 0.449000,0.255000 0.000000,0.250000 z%22 /></g><g id=%22C163%22 data-name=%22as_component__PNGCOJINIPILRSBFUVHAAAKRQR7F7X5DOV45DHY3HPYOUZICQITA%22><path class=%22layer_1_0%22 d=%22M 9.889000,3.500000 0.000000,1.275000 0.000000,-1.275000 9.889000,-3.500000 16.000000,-3.500000 16.000000,3.500000 z%22 /><path class=%22layer_2_0%22 d=%22M 0.000000,-0.250000 10.000000,-2.500000 10.000000,2.500000 0.000000,0.250000 z%22 /><rect class=%22layer_2_0%22 x=%2210.300000%22 y=%22-2.500000%22 width=%220.300000%22 height=%225.000000%22 /><rect class=%22layer_2_0%22 x=%2210.900000%22 y=%22-2.500000%22 width=%220.300000%22 height=%225.000000%22 /><rect class=%22layer_2_0%22 x=%2211.500000%22 y=%22-2.500000%22 width=%220.300000%22 height=%225.000000%22 /><rect class=%22layer_2_0%22 x=%2212.100000%22 y=%22-2.500000%22 width=%220.300000%22 height=%225.000000%22 /><rect class=%22layer_2_0%22 x=%2212.700000%22 y=%22-2.500000%22 width=%220.300000%22 height=%225.000000%22 /><rect class=%22layer_2_0%22 x=%2213.300000%22 y=%22-2.500000%22 width=%220.300000%22 height=%225.000000%22 /><rect class=%22layer_2_0%22 x=%2213.900000%22 y=%22-2.500000%22 width=%220.300000%22 height=%225.000000%22 /><rect class=%22layer_2_0%22 x=%2214.500000%22 y=%22-2.500000%22 width=%220.300000%22 height=%225.000000%22 /><rect class=%22layer_2_0%22 x=%2215.100000%22 y=%22-2.500000%22 width=%220.300000%22 height=%225.000000%22 /><rect class=%22layer_2_0%22 x=%2215.700000%22 y=%22-2.500000%22 width=%220.300000%22 height=%225.000000%22 /></g><g id=%22C164%22 data-name=%22s_bend_l_25P713755674002126_o_7P245988844109516_p_Strip%22><path class=%22layer_1_0%22 d=%22M 0.000000,-1.250000 0.547000,-1.244000 1.093000,-1.227000 1.639000,-1.198000 2.184000,-1.158000 2.728000,-1.106000 3.271000,-1.042000 3.813000,-0.968000 4.353000,-0.881000 4.891000,-0.784000 5.426000,-0.675000 5.960000,-0.554000 6.490000,-0.423000 7.018000,-0.280000 7.542000,-0.126000 8.064000,0.039000 8.581000,0.214000 9.095000,0.401000 9.605000,0.599000 10.110000,0.807000 10.611000,1.026000 11.107000,1.255000 11.599000,1.495000 12.085000,1.745000 12.565000,2.006000 13.040000,2.276000 13.510000,2.557000 14.363000,3.055000 14.797000,3.290000 15.236000,3.516000 15.680000,3.733000 16.128000,3.940000 16.581000,4.138000 17.037000,4.326000 17.962000,4.673000 18.429000,4.832000 18.900000,4.981000 19.374000,5.120000 19.851000,5.249000 20.330000,5.368000 21.296000,5.575000 21.782000,5.663000 22.270000,5.741000 23.249000,5.866000 23.741000,5.913000 24.233000,5.949000 25.220000,5.991000 25.714000,5.996000 25.714000,8.496000 25.167000,8.490000 24.621000,8.473000 24.075000,8.444000 23.530000,8.404000 22.986000,8.352000 22.443000,8.288000 21.901000,8.214000 21.361000,8.127000 20.823000,8.030000 20.288000,7.921000 19.754000,7.800000 19.224000,7.669000 18.696000,7.526000 18.172000,7.372000 17.650000,7.207000 17.133000,7.032000 16.619000,6.845000 16.109000,6.647000 15.604000,6.439000 15.103000,6.220000 14.607000,5.991000 14.115000,5.751000 13.629000,5.501000 13.149000,5.240000 12.674000,4.970000 12.204000,4.689000 11.351000,4.191000 10.917000,3.956000 10.478000,3.730000 10.034000,3.513000 9.586000,3.306000 9.133000,3.108000 8.677000,2.920000 7.752000,2.573000 7.285000,2.414000 6.814000,2.265000 6.340000,2.126000 5.863000,1.997000 5.384000,1.878000 4.418000,1.671000 3.932000,1.583000 3.444000,1.505000 2.465000,1.380000 1.973000,1.333000 1.481000,1.297000 0.494000,1.255000 0.000000,1.250000 z%22 /><path class=%22layer_2_0%22 d=%22M 0.000000,-0.250000 0.526000,-0.244000 1.051000,-0.228000 1.576000,-0.200000 2.100000,-0.161000 2.623000,-0.111000 3.145000,-0.050000 3.666000,0.022000 4.184000,0.104000 4.702000,0.198000 5.217000,0.303000 5.729000,0.419000 6.239000,0.545000 6.747000,0.682000 7.251000,0.830000 7.752000,0.989000 8.250000,1.158000 8.744000,1.337000 9.234000,1.527000 9.720000,1.728000 10.201000,1.938000 10.678000,2.159000 11.150000,2.389000 11.618000,2.630000 12.080000,2.880000 12.536000,3.140000 12.988000,3.410000 13.430000,3.674000 13.877000,3.929000 14.330000,4.174000 14.788000,4.410000 15.251000,4.636000 15.718000,4.852000 16.190000,5.058000 17.146000,5.441000 18.118000,5.782000 18.609000,5.937000 19.103000,6.082000 19.600000,6.217000 20.100000,6.341000 20.602000,6.454000 21.107000,6.557000 21.614000,6.649000 22.122000,6.730000 22.632000,6.800000 23.144000,6.860000 23.656000,6.909000 24.170000,6.947000 24.684000,6.974000 25.199000,6.991000 25.714000,6.996000 25.714000,7.496000 25.188000,7.490000 24.663000,7.474000 24.138000,7.446000 23.614000,7.407000 23.091000,7.357000 22.569000,7.296000 22.048000,7.224000 21.530000,7.142000 21.012000,7.048000 20.497000,6.943000 19.985000,6.827000 19.475000,6.701000 18.967000,6.564000 18.463000,6.416000 17.962000,6.257000 17.464000,6.088000 16.970000,5.909000 16.480000,5.719000 15.994000,5.518000 15.513000,5.308000 15.036000,5.087000 14.564000,4.857000 14.096000,4.616000 13.634000,4.366000 13.178000,4.106000 12.726000,3.836000 12.284000,3.572000 11.837000,3.317000 11.384000,3.072000 10.926000,2.836000 10.463000,2.610000 9.996000,2.394000 9.524000,2.188000 8.568000,1.805000 8.084000,1.630000 7.596000,1.464000 7.105000,1.309000 6.611000,1.164000 6.114000,1.029000 5.614000,0.905000 5.112000,0.792000 4.607000,0.689000 4.100000,0.597000 3.592000,0.516000 3.082000,0.446000 2.570000,0.386000 2.058000,0.337000 1.544000,0.299000 1.030000,0.272000 0.515000,0.255000 0.000000,0.250000 z%22 /></g><g id=%22C165%22 data-name=%22as_component__PNGCOJINIPILRSBFUVHAAAKRQR7F7X5DOV45DHY3HPYOUZICQITA%22><path class=%22layer_1_0%22 d=%22M 9.889000,3.500000 0.000000,1.275000 0.000000,-1.275000 9.889000,-3.500000 16.000000,-3.500000 16.000000,3.500000 z%22 /><path class=%22layer_2_0%22 d=%22M 0.000000,-0.250000 10.000000,-2.500000 10.000000,2.500000 0.000000,0.250000 z%22 /><rect class=%22layer_2_0%22 x=%2210.300000%22 y=%22-2.500000%22 width=%220.300000%22 height=%225.000000%22 /><rect class=%22layer_2_0%22 x=%2210.900000%22 y=%22-2.500000%22 width=%220.300000%22 height=%225.000000%22 /><rect class=%22layer_2_0%22 x=%2211.500000%22 y=%22-2.500000%22 width=%220.300000%22 height=%225.000000%22 /><rect class=%22layer_2_0%22 x=%2212.100000%22 y=%22-2.500000%22 width=%220.300000%22 height=%225.000000%22 /><rect class=%22layer_2_0%22 x=%2212.700000%22 y=%22-2.500000%22 width=%220.300000%22 height=%225.000000%22 /><rect class=%22layer_2_0%22 x=%2213.300000%22 y=%22-2.500000%22 width=%220.300000%22 height=%225.000000%22 /><rect class=%22layer_2_0%22 x=%2213.900000%22 y=%22-2.500000%22 width=%220.300000%22 height=%225.000000%22 /><rect class=%22layer_2_0%22 x=%2214.500000%22 y=%22-2.500000%22 width=%220.300000%22 height=%225.000000%22 /><rect class=%22layer_2_0%22 x=%2215.100000%22 y=%22-2.500000%22 width=%220.300000%22 height=%225.000000%22 /><rect class=%22layer_2_0%22 x=%2215.700000%22 y=%22-2.500000%22 width=%220.300000%22 height=%225.000000%22 /></g><g id=%22C166%22 data-name=%22s_bend_l_20P891027534063518_o_13P986338860921457_p_Strip%22><path class=%22layer_1_0%22 d=%22M 0.000000,-1.250000 0.390000,-1.244000 0.779000,-1.226000 1.167000,-1.196000 1.554000,-1.153000 1.940000,-1.099000 2.324000,-1.033000 2.706000,-0.955000 3.085000,-0.865000 3.461000,-0.763000 3.834000,-0.650000 4.203000,-0.525000 4.568000,-0.389000 4.928000,-0.242000 5.284000,-0.083000 5.635000,0.087000 5.980000,0.267000 6.320000,0.458000 6.653000,0.659000 6.981000,0.871000 7.301000,1.093000 7.614000,1.324000 7.920000,1.565000 8.218000,1.816000 8.509000,2.076000 8.791000,2.344000 9.065000,2.622000 9.330000,2.907000 9.586000,3.201000 9.832000,3.502000 10.070000,3.811000 10.297000,4.128000 10.515000,4.451000 10.722000,4.780000 10.920000,5.116000 11.106000,5.458000 11.282000,5.806000 11.447000,6.159000 11.601000,6.517000 11.857000,7.086000 12.147000,7.638000 12.471000,8.171000 12.645000,8.430000 13.018000,8.931000 13.420000,9.407000 13.632000,9.636000 14.077000,10.073000 14.549000,10.482000 15.045000,10.860000 15.301000,11.038000 15.830000,11.368000 16.379000,11.666000 16.945000,11.929000 17.233000,12.047000 17.821000,12.256000 18.421000,12.428000 18.724000,12.500000 19.337000,12.615000 19.646000,12.659000 20.267000,12.717000 20.891000,12.736000 20.891000,15.236000 20.501000,15.230000 20.112000,15.212000 19.724000,15.182000 19.337000,15.139000 18.951000,15.085000 18.567000,15.019000 18.185000,14.941000 17.806000,14.851000 17.430000,14.749000 17.057000,14.636000 16.688000,14.511000 16.323000,14.375000 15.963000,14.228000 15.607000,14.069000 15.256000,13.900000 14.911000,13.719000 14.571000,13.528000 14.238000,13.327000 13.911000,13.115000 13.590000,12.893000 13.277000,12.662000 12.971000,12.421000 12.673000,12.170000 12.382000,11.910000 12.100000,11.642000 11.826000,11.364000 11.561000,11.079000 11.305000,10.785000 11.059000,10.484000 10.821000,10.175000 10.594000,9.858000 10.376000,9.535000 10.169000,9.206000 9.971000,8.870000 9.785000,8.528000 9.609000,8.180000 9.444000,7.827000 9.290000,7.469000 9.034000,6.900000 8.744000,6.348000 8.586000,6.079000 8.246000,5.556000 8.063000,5.303000 7.676000,4.814000 7.259000,4.350000 6.814000,3.913000 6.581000,3.705000 6.097000,3.311000 5.590000,2.948000 5.061000,2.618000 4.512000,2.320000 3.947000,2.057000 3.658000,1.939000 3.070000,1.730000 2.470000,1.558000 2.167000,1.486000 1.861000,1.424000 1.245000,1.327000 0.624000,1.269000 0.000000,1.250000 z%22 /><path class=%22layer_2_0%22 d=%22M 0.000000,-0.250000 0.359000,-0.244000 0.717000,-0.228000 1.074000,-0.200000 1.431000,-0.161000 1.786000,-0.111000 2.139000,-0.050000 2.490000,0.022000 2.839000,0.104000 3.185000,0.198000 3.528000,0.302000 3.868000,0.417000 4.204000,0.542000 4.536000,0.678000 4.863000,0.824000 5.186000,0.980000 5.504000,1.146000 5.816000,1.322000 6.123000,1.507000 6.424000,1.702000 6.719000,1.906000 7.007000,2.119000 7.289000,2.341000 7.831000,2.811000 8.090000,3.058000 8.342000,3.313000 8.586000,3.576000 8.822000,3.846000 9.049000,4.124000 9.267000,4.408000 9.477000,4.699000 9.677000,4.996000 9.868000,5.300000 10.049000,5.609000 10.221000,5.924000 10.383000,6.244000 10.535000,6.568000 10.677000,6.898000 10.812000,7.213000 11.112000,7.830000 11.450000,8.427000 11.633000,8.717000 12.025000,9.280000 12.234000,9.552000 12.451000,9.817000 12.677000,10.076000 12.910000,10.327000 13.399000,10.808000 13.655000,11.037000 14.187000,11.470000 14.745000,11.869000 15.033000,12.055000 15.327000,12.232000 15.626000,12.400000 16.238000,12.709000 16.869000,12.978000 17.191000,13.098000 17.516000,13.208000 18.175000,13.397000 18.509000,13.476000 18.845000,13.545000 19.183000,13.603000 19.522000,13.651000 19.863000,13.688000 20.205000,13.715000 20.548000,13.731000 20.891000,13.736000 20.891000,14.236000 20.174000,14.214000 19.817000,14.186000 19.460000,14.147000 19.105000,14.097000 18.752000,14.036000 18.401000,13.964000 18.052000,13.882000 17.706000,13.788000 17.363000,13.684000 17.023000,13.569000 16.687000,13.444000 16.355000,13.308000 16.028000,13.162000 15.705000,13.006000 15.387000,12.840000 15.075000,12.664000 14.768000,12.479000 14.467000,12.284000 14.172000,12.080000 13.884000,11.867000 13.602000,11.645000 13.328000,11.414000 13.060000,11.175000 12.801000,10.928000 12.549000,10.673000 12.305000,10.410000 12.069000,10.140000 11.842000,9.862000 11.624000,9.578000 11.414000,9.287000 11.214000,8.990000 11.023000,8.686000 10.842000,8.377000 10.670000,8.062000 10.508000,7.742000 10.356000,7.418000 10.214000,7.088000 10.079000,6.773000 9.779000,6.156000 9.441000,5.559000 9.258000,5.269000 8.866000,4.706000 8.657000,4.434000 8.440000,4.169000 8.214000,3.910000 7.981000,3.659000 7.492000,3.178000 7.236000,2.949000 6.704000,2.517000 6.146000,2.117000 5.858000,1.931000 5.564000,1.754000 5.265000,1.586000 4.653000,1.277000 4.022000,1.008000 3.700000,0.888000 3.375000,0.778000 2.716000,0.589000 2.382000,0.510000 2.046000,0.441000 1.708000,0.383000 1.369000,0.335000 1.028000,0.298000 0.686000,0.271000 0.343000,0.255000 0.000000,0.250000 z%22 /></g><g id=%22C167%22 data-name=%22as_component__PNGCOJINIPILRSBFUVHAAAKRQR7F7X5DOV45DHY3HPYOUZICQITA%22><path class=%22layer_1_0%22 d=%22M 9.889000,3.500000 0.000000,1.275000 0.000000,-1.275000 9.889000,-3.500000 16.000000,-3.500000 16.000000,3.500000 z%22 /><path class=%22layer_2_0%22 d=%22M 0.000000,-0.250000 10.000000,-2.500000 10.000000,2.500000 0.000000,0.250000 z%22 /><rect class=%22layer_2_0%22 x=%2210.300000%22 y=%22-2.500000%22 width=%220.300000%22 height=%225.000000%22 /><rect class=%22layer_2_0%22 x=%2210.900000%22 y=%22-2.500000%22 width=%220.300000%22 height=%225.000000%22 /><rect class=%22layer_2_0%22 x=%2211.500000%22 y=%22-2.500000%22 width=%220.300000%22 height=%225.000000%22 /><rect class=%22layer_2_0%22 x=%2212.100000%22 y=%22-2.500000%22 width=%220.300000%22 height=%225.000000%22 /><rect class=%22layer_2_0%22 x=%2212.700000%22 y=%22-2.500000%22 width=%220.300000%22 height=%225.000000%22 /><rect class=%22layer_2_0%22 x=%2213.300000%22 y=%22-2.500000%22 width=%220.300000%22 height=%225.000000%22 /><rect class=%22layer_2_0%22 x=%2213.900000%22 y=%22-2.500000%22 width=%220.300000%22 height=%225.000000%22 /><rect class=%22layer_2_0%22 x=%2214.500000%22 y=%22-2.500000%22 width=%220.300000%22 height=%225.000000%22 /><rect class=%22layer_2_0%22 x=%2215.100000%22 y=%22-2.500000%22 width=%220.300000%22 height=%225.000000%22 /><rect class=%22layer_2_0%22 x=%2215.700000%22 y=%22-2.500000%22 width=%220.300000%22 height=%225.000000%22 /></g><g id=%22C168%22 data-name=%22s_bend_l_18P988478127081542_o_54P14243493491398_p_Strip%22><path class=%22layer_1_0%22 d=%22M 0.000000,-1.250000 0.432000,-1.244000 0.863000,-1.227000 1.294000,-1.199000 1.724000,-1.159000 2.152000,-1.109000 2.580000,-1.046000 3.005000,-0.973000 3.429000,-0.889000 3.850000,-0.793000 4.268000,-0.687000 4.683000,-0.569000 5.096000,-0.441000 5.504000,-0.302000 5.909000,-0.152000 6.310000,0.008000 6.706000,0.179000 7.098000,0.360000 7.485000,0.552000 7.867000,0.753000 8.244000,0.965000 8.614000,1.186000 8.979000,1.417000 9.338000,1.657000 9.690000,1.907000 10.035000,2.166000 10.374000,2.433000 10.705000,2.710000 11.029000,2.995000 11.346000,3.289000 11.655000,3.591000 11.955000,3.901000 12.248000,4.218000 12.532000,4.543000 12.807000,4.876000 13.074000,5.216000 13.331000,5.562000 13.579000,5.915000 13.818000,6.275000 14.048000,6.640000 14.268000,7.012000 14.478000,7.389000 14.678000,7.772000 15.047000,8.552000 15.216000,8.949000 15.375000,9.351000 15.523000,9.756000 15.661000,10.165000 15.788000,10.578000 15.903000,10.994000 16.008000,11.413000 16.102000,11.834000 16.185000,12.258000 16.257000,12.684000 16.317000,13.111000 16.366000,13.540000 16.404000,13.970000 16.431000,14.401000 16.446000,14.832000 16.450000,15.264000 16.443000,15.696000 16.424000,16.127000 16.394000,16.558000 16.353000,16.987000 16.300000,17.416000 16.237000,17.843000 16.162000,18.268000 16.076000,18.691000 15.979000,19.112000 15.870000,19.530000 15.751000,19.945000 15.621000,20.356000 15.481000,20.765000 15.329000,21.169000 15.167000,21.569000 14.995000,21.965000 14.812000,22.356000 14.620000,22.742000 14.417000,23.123000 14.204000,23.499000 13.981000,23.869000 13.749000,24.233000 13.507000,24.590000 13.256000,24.942000 12.996000,25.286000 12.727000,25.624000 12.449000,25.954000 12.162000,26.277000 11.867000,26.592000 11.564000,26.900000 11.253000,27.199000 10.935000,27.490000 10.608000,27.773000 10.275000,28.047000 9.715000,28.519000 9.181000,29.020000 8.674000,29.548000 8.195000,30.102000 7.747000,30.681000 7.329000,31.282000 6.943000,31.904000 6.590000,32.546000 6.272000,33.205000 5.988000,33.880000 5.741000,34.569000 5.630000,34.918000 5.529000,35.270000 5.355000,35.981000 5.282000,36.340000 5.165000,37.063000 5.120000,37.426000 5.060000,38.156000 5.038000,38.888000 5.054000,39.620000 5.109000,40.350000 5.202000,41.076000 5.333000,41.796000 5.412000,42.154000 5.501000,42.509000 5.707000,43.211000 5.949000,43.902000 6.228000,44.580000 6.541000,45.241000 6.889000,45.886000 7.075000,46.201000 7.472000,46.816000 7.901000,47.409000 8.361000,47.979000 8.850000,48.524000 9.366000,49.043000 9.910000,49.534000 10.478000,49.995000 11.069000,50.427000 11.683000,50.826000 11.997000,51.014000 12.640000,51.364000 13.301000,51.680000 13.977000,51.961000 14.667000,52.206000 15.016000,52.315000 15.723000,52.505000 16.440000,52.657000 17.163000,52.772000 17.891000,52.849000 18.256000,52.873000 18.988000,52.892000 18.988000,55.392000 18.556000,55.386000 18.125000,55.369000 17.694000,55.341000 17.264000,55.301000 16.836000,55.251000 16.408000,55.188000 15.983000,55.115000 15.559000,55.031000 15.138000,54.935000 14.720000,54.829000 14.305000,54.711000 13.892000,54.583000 13.484000,54.444000 13.079000,54.294000 12.678000,54.134000 12.282000,53.963000 11.890000,53.782000 11.503000,53.590000 11.121000,53.389000 10.744000,53.177000 10.374000,52.956000 10.009000,52.725000 9.650000,52.485000 9.298000,52.235000 8.614000,51.709000 8.283000,51.432000 7.959000,51.147000 7.642000,50.853000 7.333000,50.551000 6.740000,49.924000 6.456000,49.599000 6.181000,49.266000 5.657000,48.580000 5.409000,48.227000 5.170000,47.867000 4.940000,47.502000 4.720000,47.130000 4.510000,46.753000 4.310000,46.370000 3.941000,45.590000 3.772000,45.193000 3.613000,44.791000 3.465000,44.386000 3.327000,43.977000 3.200000,43.564000 3.085000,43.148000 2.980000,42.729000 2.886000,42.308000 2.803000,41.884000 2.731000,41.458000 2.671000,41.031000 2.622000,40.602000 2.584000,40.172000 2.557000,39.741000 2.542000,39.310000 2.538000,38.878000 2.545000,38.446000 2.564000,38.015000 2.594000,37.584000 2.635000,37.155000 2.688000,36.726000 2.751000,36.299000 2.826000,35.874000 2.912000,35.451000 3.009000,35.030000 3.118000,34.612000 3.237000,34.197000 3.367000,33.786000 3.507000,33.377000 3.659000,32.973000 3.821000,32.573000 3.993000,32.177000 4.176000,31.786000 4.368000,31.400000 4.571000,31.019000 4.784000,30.643000 5.007000,30.273000 5.239000,29.909000 5.481000,29.552000 5.732000,29.200000 5.992000,28.856000 6.261000,28.518000 6.539000,28.188000 6.826000,27.865000 7.121000,27.550000 7.424000,27.242000 7.735000,26.943000 8.053000,26.652000 8.380000,26.369000 8.713000,26.095000 9.273000,25.623000 9.807000,25.122000 10.314000,24.594000 10.793000,24.040000 11.021000,23.753000 11.454000,23.163000 11.659000,22.860000 12.045000,22.238000 12.398000,21.596000 12.716000,20.937000 13.000000,20.262000 13.128000,19.919000 13.358000,19.224000 13.459000,18.872000 13.633000,18.161000 13.706000,17.802000 13.769000,17.441000 13.868000,16.716000 13.928000,15.986000 13.950000,15.254000 13.934000,14.522000 13.879000,13.792000 13.786000,13.066000 13.725000,12.705000 13.576000,11.988000 13.487000,11.633000 13.281000,10.931000 13.039000,10.240000 12.904000,9.899000 12.608000,9.230000 12.277000,8.576000 11.913000,7.941000 11.516000,7.326000 11.087000,6.733000 10.627000,6.163000 10.138000,5.618000 9.622000,5.099000 9.078000,4.608000 8.510000,4.147000 7.919000,3.715000 7.614000,3.511000 6.991000,3.128000 6.672000,2.949000 6.020000,2.616000 5.351000,2.317000 4.668000,2.054000 3.972000,1.827000 3.265000,1.637000 2.907000,1.556000 2.188000,1.423000 1.462000,1.327000 0.732000,1.269000 0.000000,1.250000 z%22 /><path class=%22layer_2_0%22 d=%22M 0.000000,-0.250000 0.405000,-0.245000 0.811000,-0.229000 1.619000,-0.165000 2.022000,-0.117000 2.423000,-0.059000 2.822000,0.010000 3.220000,0.089000 3.616000,0.179000 4.399000,0.389000 4.786000,0.510000 5.550000,0.781000 6.299000,1.092000 6.667000,1.262000 7.389000,1.631000 8.091000,2.038000 8.433000,2.255000 8.770000,2.480000 9.101000,2.715000 9.425000,2.958000 10.055000,3.469000 10.359000,3.737000 10.946000,4.296000 11.229000,4.587000 11.770000,5.191000 12.279000,5.822000 12.521000,6.148000 12.754000,6.480000 12.978000,6.817000 13.194000,7.161000 13.400000,7.510000 13.597000,7.864000 13.785000,8.223000 13.964000,8.588000 14.132000,8.956000 14.291000,9.329000 14.580000,10.087000 14.709000,10.471000 14.828000,10.859000 14.937000,11.250000 15.035000,11.643000 15.123000,12.039000 15.201000,12.437000 15.268000,12.837000 15.325000,13.238000 15.371000,13.641000 15.407000,14.045000 15.432000,14.449000 15.450000,15.260000 15.443000,15.666000 15.426000,16.071000 15.398000,16.475000 15.359000,16.879000 15.310000,17.281000 15.250000,17.682000 15.179000,18.082000 15.098000,18.479000 15.007000,18.874000 14.906000,19.267000 14.794000,19.656000 14.672000,20.043000 14.540000,20.426000 14.245000,21.182000 14.084000,21.554000 13.731000,22.284000 13.540000,22.642000 13.131000,23.342000 12.913000,23.684000 12.686000,24.020000 12.206000,24.673000 11.953000,24.990000 11.423000,25.604000 11.146000,25.900000 10.861000,26.189000 10.569000,26.470000 10.270000,26.743000 9.963000,27.009000 9.650000,27.266000 9.050000,27.772000 8.478000,28.309000 8.203000,28.588000 7.674000,29.169000 7.177000,29.776000 6.713000,30.408000 6.493000,30.733000 6.079000,31.400000 5.886000,31.741000 5.526000,32.438000 5.360000,32.794000 5.056000,33.517000 4.791000,34.256000 4.673000,34.630000 4.466000,35.387000 4.378000,35.769000 4.300000,36.154000 4.232000,36.540000 4.174000,36.928000 4.126000,37.318000 4.061000,38.100000 4.044000,38.491000 4.041000,39.276000 4.055000,39.668000 4.114000,40.451000 4.214000,41.229000 4.279000,41.616000 4.354000,42.001000 4.439000,42.384000 4.640000,43.142000 4.755000,43.518000 4.880000,43.889000 5.159000,44.623000 5.313000,44.984000 5.476000,45.340000 5.649000,45.693000 6.021000,46.383000 6.221000,46.721000 6.647000,47.380000 6.873000,47.701000 7.349000,48.325000 7.599000,48.627000 8.123000,49.211000 8.396000,49.493000 8.964000,50.034000 9.560000,50.544000 9.868000,50.788000 10.182000,51.023000 10.828000,51.469000 11.496000,51.879000 11.838000,52.072000 12.185000,52.255000 12.537000,52.429000 13.253000,52.748000 13.618000,52.894000 14.357000,53.157000 15.109000,53.380000 15.489000,53.477000 15.872000,53.564000 16.644000,53.707000 17.421000,53.810000 17.812000,53.846000 18.596000,53.887000 18.988000,53.892000 18.988000,54.392000 18.583000,54.387000 18.177000,54.371000 17.369000,54.307000 16.966000,54.259000 16.565000,54.201000 16.166000,54.132000 15.768000,54.053000 15.372000,53.963000 14.589000,53.753000 14.202000,53.632000 13.438000,53.361000 12.689000,53.050000 12.321000,52.880000 11.599000,52.511000 10.897000,52.104000 10.218000,51.662000 9.887000,51.427000 9.245000,50.933000 8.933000,50.673000 8.629000,50.405000 8.042000,49.846000 7.759000,49.555000 7.218000,48.951000 6.709000,48.320000 6.467000,47.994000 6.234000,47.662000 6.010000,47.325000 5.794000,46.981000 5.588000,46.632000 5.391000,46.278000 5.203000,45.919000 5.024000,45.554000 4.856000,45.186000 4.697000,44.813000 4.408000,44.055000 4.279000,43.671000 4.160000,43.283000 4.051000,42.892000 3.953000,42.499000 3.865000,42.103000 3.787000,41.705000 3.720000,41.305000 3.663000,40.904000 3.617000,40.501000 3.581000,40.097000 3.556000,39.693000 3.538000,38.882000 3.545000,38.476000 3.562000,38.071000 3.590000,37.667000 3.629000,37.263000 3.678000,36.861000 3.738000,36.460000 3.809000,36.060000 3.890000,35.663000 3.981000,35.268000 4.082000,34.875000 4.194000,34.486000 4.316000,34.099000 4.448000,33.716000 4.591000,33.336000 4.904000,32.588000 5.257000,31.858000 5.448000,31.500000 5.648000,31.148000 5.857000,30.800000 6.075000,30.458000 6.302000,30.122000 6.782000,29.469000 7.035000,29.152000 7.565000,28.538000 7.842000,28.242000 8.127000,27.953000 8.419000,27.672000 8.718000,27.399000 9.025000,27.133000 9.338000,26.876000 9.938000,26.370000 10.510000,25.833000 10.785000,25.554000 11.314000,24.973000 11.566000,24.673000 11.811000,24.366000 12.047000,24.053000 12.495000,23.409000 12.909000,22.742000 13.102000,22.401000 13.462000,21.704000 13.628000,21.348000 13.932000,20.625000 14.197000,19.886000 14.315000,19.512000 14.522000,18.755000 14.610000,18.373000 14.688000,17.988000 14.756000,17.602000 14.814000,17.214000 14.862000,16.824000 14.927000,16.043000 14.944000,15.651000 14.947000,14.866000 14.933000,14.474000 14.874000,13.691000 14.774000,12.913000 14.709000,12.526000 14.634000,12.141000 14.549000,11.758000 14.348000,11.000000 14.233000,10.624000 14.108000,10.253000 13.829000,9.519000 13.675000,9.158000 13.512000,8.802000 13.339000,8.449000 12.967000,7.759000 12.767000,7.421000 12.341000,6.762000 11.881000,6.126000 11.639000,5.817000 11.389000,5.515000 11.131000,5.220000 10.592000,4.649000 10.024000,4.108000 9.729000,3.849000 9.120000,3.354000 8.486000,2.892000 7.829000,2.464000 7.150000,2.070000 6.803000,1.887000 6.451000,1.713000 5.735000,1.394000 5.370000,1.248000 4.631000,0.985000 3.879000,0.762000 3.499000,0.665000 3.116000,0.578000 2.344000,0.435000 1.567000,0.332000 1.176000,0.296000 0.392000,0.255000 0.000000,0.250000 z%22 /></g><g id=%22C169%22 data-name=%22as_component__PNGCOJINIPILRSBFUVHAAAKRQR7F7X5DOV45DHY3HPYOUZICQITA%22><path class=%22layer_1_0%22 d=%22M 9.889000,3.500000 0.000000,1.275000 0.000000,-1.275000 9.889000,-3.500000 16.000000,-3.500000 16.000000,3.500000 z%22 /><path class=%22layer_2_0%22 d=%22M 0.000000,-0.250000 10.000000,-2.500000 10.000000,2.500000 0.000000,0.250000 z%22 /><rect class=%22layer_2_0%22 x=%2210.300000%22 y=%22-2.500000%22 width=%220.300000%22 height=%225.000000%22 /><rect class=%22layer_2_0%22 x=%2210.900000%22 y=%22-2.500000%22 width=%220.300000%22 height=%225.000000%22 /><rect class=%22layer_2_0%22 x=%2211.500000%22 y=%22-2.500000%22 width=%220.300000%22 height=%225.000000%22 /><rect class=%22layer_2_0%22 x=%2212.100000%22 y=%22-2.500000%22 width=%220.300000%22 height=%225.000000%22 /><rect class=%22layer_2_0%22 x=%2212.700000%22 y=%22-2.500000%22 width=%220.300000%22 height=%225.000000%22 /><rect class=%22layer_2_0%22 x=%2213.300000%22 y=%22-2.500000%22 width=%220.300000%22 height=%225.000000%22 /><rect class=%22layer_2_0%22 x=%2213.900000%22 y=%22-2.500000%22 width=%220.300000%22 height=%225.000000%22 /><rect class=%22layer_2_0%22 x=%2214.500000%22 y=%22-2.500000%22 width=%220.300000%22 height=%225.000000%22 /><rect class=%22layer_2_0%22 x=%2215.100000%22 y=%22-2.500000%22 width=%220.300000%22 height=%225.000000%22 /><rect class=%22layer_2_0%22 x=%2215.700000%22 y=%22-2.500000%22 width=%220.300000%22 height=%225.000000%22 /></g><g id=%22C170%22 data-name=%22s_bend_l_12P087880080797822_o_21P587411689180843_p_Strip%22><path class=%22layer_1_0%22 d=%22M 0.000000,-1.250000 0.327000,-1.244000 0.654000,-1.224000 0.980000,-1.192000 1.305000,-1.147000 1.627000,-1.090000 1.947000,-1.020000 2.264000,-0.937000 2.577000,-0.842000 2.886000,-0.735000 3.191000,-0.615000 3.491000,-0.484000 3.786000,-0.341000 4.075000,-0.187000 4.357000,-0.021000 4.633000,0.155000 4.902000,0.343000 5.163000,0.540000 5.416000,0.748000 5.661000,0.966000 5.897000,1.193000 6.124000,1.429000 6.341000,1.673000 6.549000,1.927000 6.747000,2.188000 6.934000,2.456000 7.110000,2.732000 7.276000,3.015000 7.430000,3.304000 7.573000,3.598000 7.704000,3.898000 7.824000,4.203000 7.931000,4.513000 8.026000,4.826000 8.109000,5.143000 8.179000,5.463000 8.236000,5.785000 8.281000,6.109000 8.313000,6.435000 8.333000,6.762000 8.339000,7.090000 8.333000,7.417000 8.313000,7.744000 8.281000,8.070000 8.236000,8.394000 8.179000,8.716000 8.108000,9.036000 8.026000,9.353000 7.931000,9.667000 7.823000,9.976000 7.704000,10.281000 7.573000,10.581000 7.430000,10.875000 7.275000,11.164000 7.110000,11.447000 6.886000,11.847000 6.694000,12.263000 6.535000,12.693000 6.410000,13.135000 6.321000,13.584000 6.267000,14.040000 6.249000,14.498000 6.267000,14.956000 6.289000,15.184000 6.361000,15.637000 6.468000,16.083000 6.610000,16.519000 6.785000,16.942000 6.993000,17.351000 7.233000,17.742000 7.502000,18.113000 7.800000,18.461000 8.124000,18.786000 8.473000,19.083000 8.844000,19.353000 9.037000,19.477000 9.437000,19.701000 9.853000,19.893000 10.284000,20.051000 10.725000,20.176000 11.175000,20.265000 11.402000,20.297000 11.859000,20.333000 12.088000,20.337000 12.088000,22.837000 11.761000,22.831000 11.434000,22.811000 11.108000,22.779000 10.783000,22.734000 10.461000,22.677000 10.141000,22.607000 9.824000,22.524000 9.511000,22.429000 9.202000,22.322000 8.897000,22.202000 8.597000,22.071000 8.302000,21.928000 8.013000,21.774000 7.731000,21.608000 7.455000,21.432000 7.186000,21.244000 6.925000,21.047000 6.672000,20.839000 6.427000,20.621000 6.191000,20.394000 5.964000,20.158000 5.747000,19.914000 5.539000,19.660000 5.341000,19.399000 5.154000,19.131000 4.978000,18.855000 4.812000,18.572000 4.658000,18.283000 4.515000,17.989000 4.384000,17.689000 4.264000,17.384000 4.157000,17.074000 4.062000,16.761000 3.979000,16.444000 3.909000,16.124000 3.852000,15.802000 3.807000,15.478000 3.775000,15.152000 3.755000,14.825000 3.749000,14.497000 3.755000,14.170000 3.775000,13.843000 3.807000,13.517000 3.852000,13.193000 3.909000,12.871000 3.980000,12.551000 4.062000,12.234000 4.157000,11.921000 4.265000,11.611000 4.384000,11.306000 4.515000,11.006000 4.658000,10.712000 4.813000,10.423000 4.978000,10.140000 5.202000,9.740000 5.394000,9.324000 5.553000,8.894000 5.678000,8.452000 5.767000,8.003000 5.821000,7.548000 5.834000,7.319000 5.834000,6.860000 5.799000,6.403000 5.727000,5.950000 5.620000,5.504000 5.478000,5.068000 5.303000,4.645000 5.095000,4.236000 4.855000,3.845000 4.586000,3.474000 4.288000,3.126000 3.964000,2.801000 3.615000,2.504000 3.244000,2.234000 2.853000,1.995000 2.445000,1.786000 2.021000,1.611000 1.585000,1.469000 1.139000,1.362000 0.686000,1.290000 0.458000,1.268000 0.000000,1.250000 z%22 /><path class=%22layer_2_0%22 d=%22M 0.000000,-0.250000 0.288000,-0.244000 0.576000,-0.227000 0.863000,-0.199000 1.148000,-0.160000 1.432000,-0.109000 1.713000,-0.047000 1.992000,0.026000 2.268000,0.109000 2.540000,0.204000 2.809000,0.309000 3.073000,0.424000 3.332000,0.550000 3.586000,0.686000 3.835000,0.832000 4.077000,0.987000 4.314000,1.152000 4.544000,1.326000 4.982000,1.700000 5.190000,1.900000 5.389000,2.107000 5.581000,2.323000 5.764000,2.546000 5.938000,2.775000 6.258000,3.255000 6.403000,3.503000 6.539000,3.757000 6.665000,4.017000 6.780000,4.281000 6.885000,4.549000 6.980000,4.821000 7.064000,5.097000 7.136000,5.376000 7.198000,5.658000 7.249000,5.941000 7.288000,6.227000 7.316000,6.514000 7.333000,6.801000 7.339000,7.089000 7.333000,7.378000 7.316000,7.665000 7.288000,7.952000 7.249000,8.238000 7.198000,8.521000 7.136000,8.803000 7.063000,9.082000 6.980000,9.357000 6.885000,9.630000 6.780000,9.898000 6.665000,10.162000 6.539000,10.421000 6.403000,10.676000 6.257000,10.924000 6.121000,11.156000 5.877000,11.634000 5.672000,12.130000 5.584000,12.384000 5.506000,12.641000 5.438000,12.901000 5.333000,13.428000 5.296000,13.694000 5.270000,13.961000 5.254000,14.229000 5.254000,14.766000 5.270000,15.034000 5.296000,15.301000 5.333000,15.567000 5.380000,15.832000 5.438000,16.094000 5.506000,16.354000 5.584000,16.611000 5.672000,16.865000 5.769000,17.115000 5.994000,17.603000 6.257000,18.071000 6.401000,18.297000 6.555000,18.518000 6.717000,18.732000 6.887000,18.939000 7.252000,19.334000 7.646000,19.698000 7.854000,19.869000 8.068000,20.031000 8.288000,20.184000 8.515000,20.329000 8.746000,20.465000 8.983000,20.592000 9.225000,20.709000 9.471000,20.816000 9.721000,20.914000 9.975000,21.002000 10.232000,21.080000 10.491000,21.148000 10.754000,21.206000 11.018000,21.253000 11.284000,21.290000 11.551000,21.316000 11.819000,21.332000 12.088000,21.337000 12.088000,21.837000 11.800000,21.831000 11.512000,21.814000 11.225000,21.786000 10.940000,21.747000 10.656000,21.696000 10.375000,21.634000 10.096000,21.561000 9.820000,21.478000 9.548000,21.383000 9.279000,21.278000 9.015000,21.163000 8.756000,21.037000 8.502000,20.901000 8.253000,20.755000 8.011000,20.600000 7.774000,20.435000 7.544000,20.261000 7.322000,20.078000 7.106000,19.887000 6.898000,19.687000 6.699000,19.480000 6.507000,19.264000 6.324000,19.041000 6.150000,18.812000 5.830000,18.332000 5.685000,18.084000 5.549000,17.830000 5.423000,17.570000 5.308000,17.306000 5.203000,17.038000 5.108000,16.766000 5.024000,16.490000 4.952000,16.211000 4.890000,15.929000 4.839000,15.646000 4.800000,15.360000 4.772000,15.073000 4.755000,14.786000 4.749000,14.498000 4.755000,14.209000 4.772000,13.922000 4.800000,13.635000 4.839000,13.349000 4.890000,13.066000 4.952000,12.784000 5.025000,12.505000 5.108000,12.230000 5.203000,11.957000 5.308000,11.689000 5.423000,11.425000 5.549000,11.166000 5.685000,10.911000 5.831000,10.663000 5.967000,10.431000 6.211000,9.953000 6.416000,9.457000 6.504000,9.203000 6.582000,8.946000 6.650000,8.686000 6.755000,8.159000 6.792000,7.893000 6.818000,7.626000 6.834000,7.358000 6.834000,6.821000 6.818000,6.553000 6.792000,6.286000 6.755000,6.020000 6.708000,5.755000 6.650000,5.493000 6.582000,5.233000 6.504000,4.976000 6.319000,4.472000 6.094000,3.984000 5.967000,3.748000 5.687000,3.290000 5.533000,3.069000 5.371000,2.855000 5.201000,2.648000 4.836000,2.253000 4.442000,1.889000 4.234000,1.718000 4.020000,1.556000 3.800000,1.403000 3.342000,1.122000 3.105000,0.995000 2.863000,0.878000 2.367000,0.673000 2.113000,0.585000 1.856000,0.507000 1.597000,0.439000 1.334000,0.381000 1.070000,0.334000 0.804000,0.297000 0.537000,0.271000 0.269000,0.255000 0.000000,0.250000 z%22 /></g><g id=%22C171%22 data-name=%22as_component__PNGCOJINIPILRSBFUVHAAAKRQR7F7X5DOV45DHY3HPYOUZICQITA%22><path class=%22layer_1_0%22 d=%22M 9.889000,3.500000 0.000000,1.275000 0.000000,-1.275000 9.889000,-3.500000 16.000000,-3.500000 16.000000,3.500000 z%22 /><path class=%22layer_2_0%22 d=%22M 0.000000,-0.250000 10.000000,-2.500000 10.000000,2.500000 0.000000,0.250000 z%22 /><rect class=%22layer_2_0%22 x=%2210.300000%22 y=%22-2.500000%22 width=%220.300000%22 height=%225.000000%22 /><rect class=%22layer_2_0%22 x=%2210.900000%22 y=%22-2.500000%22 width=%220.300000%22 height=%225.000000%22 /><rect class=%22layer_2_0%22 x=%2211.500000%22 y=%22-2.500000%22 width=%220.300000%22 height=%225.000000%22 /><rect class=%22layer_2_0%22 x=%2212.100000%22 y=%22-2.500000%22 width=%220.300000%22 height=%225.000000%22 /><rect class=%22layer_2_0%22 x=%2212.700000%22 y=%22-2.500000%22 width=%220.300000%22 height=%225.000000%22 /><rect class=%22layer_2_0%22 x=%2213.300000%22 y=%22-2.500000%22 width=%220.300000%22 height=%225.000000%22 /><rect class=%22layer_2_0%22 x=%2213.900000%22 y=%22-2.500000%22 width=%220.300000%22 height=%225.000000%22 /><rect class=%22layer_2_0%22 x=%2214.500000%22 y=%22-2.500000%22 width=%220.300000%22 height=%225.000000%22 /><rect class=%22layer_2_0%22 x=%2215.100000%22 y=%22-2.500000%22 width=%220.300000%22 height=%225.000000%22 /><rect class=%22layer_2_0%22 x=%2215.700000%22 y=%22-2.500000%22 width=%220.300000%22 height=%225.000000%22 /></g><g id=%22C172%22 data-name=%22s_bend_l_92P73835645783292_o_57P88687255557047_p_Strip%22><path class=%22layer_1_0%22 d=%22M 0.000000,-1.250000 0.756000,-1.245000 1.513000,-1.228000 2.269000,-1.201000 3.779000,-1.115000 4.533000,-1.055000 5.286000,-0.985000 6.038000,-0.904000 6.789000,-0.812000 7.538000,-0.710000 8.286000,-0.597000 9.032000,-0.473000 9.777000,-0.338000 10.519000,-0.193000 11.259000,-0.037000 11.997000,0.129000 12.732000,0.306000 13.465000,0.494000 14.195000,0.692000 14.922000,0.900000 15.646000,1.119000 16.367000,1.348000 17.085000,1.587000 17.799000,1.836000 18.509000,2.096000 19.216000,2.366000 19.919000,2.646000 20.617000,2.936000 21.312000,3.236000 22.002000,3.546000 23.368000,4.195000 24.044000,4.534000 24.715000,4.883000 26.042000,5.609000 27.348000,6.373000 27.992000,6.769000 28.631000,7.174000 29.891000,8.012000 30.512000,8.444000 31.126000,8.885000 32.336000,9.793000 32.931000,10.260000 33.520000,10.735000 34.101000,11.219000 35.243000,12.211000 36.356000,13.236000 36.901000,13.760000 37.439000,14.292000 37.969000,14.831000 38.492000,15.378000 39.513000,16.495000 40.011000,17.064000 40.501000,17.640000 40.983000,18.223000 41.457000,18.812000 41.922000,19.409000 42.378000,20.012000 42.826000,20.622000 43.265000,21.237000 43.696000,21.860000 44.117000,22.488000 44.529000,23.122000 44.932000,23.762000 45.326000,24.408000 45.711000,25.059000 46.086000,25.716000 46.452000,26.378000 46.808000,27.045000 47.155000,27.717000 47.492000,28.394000 47.813000,29.040000 48.143000,29.680000 48.831000,30.946000 49.555000,32.193000 50.315000,33.418000 50.707000,34.022000 51.519000,35.213000 51.937000,35.800000 52.364000,36.381000 53.242000,37.523000 54.152000,38.641000 55.094000,39.732000 55.576000,40.267000 56.564000,41.316000 57.069000,41.830000 58.101000,42.836000 58.628000,43.328000 59.702000,44.289000 60.804000,45.218000 61.364000,45.671000 62.504000,46.553000 63.669000,47.401000 64.261000,47.813000 65.461000,48.611000 66.069000,48.997000 66.683000,49.374000 67.927000,50.102000 69.192000,50.794000 69.831000,51.126000 70.475000,51.449000 71.124000,51.763000 71.777000,52.068000 72.434000,52.363000 73.096000,52.649000 73.761000,52.925000 74.431000,53.192000 75.781000,53.697000 77.145000,54.162000 78.521000,54.589000 79.910000,54.976000 81.308000,55.323000 82.717000,55.630000 83.424000,55.768000 84.133000,55.896000 84.844000,56.014000 85.556000,56.122000 86.270000,56.220000 87.702000,56.385000 88.420000,56.452000 89.857000,56.555000 90.577000,56.591000 92.017000,56.632000 92.738000,56.637000 92.738000,59.137000 91.982000,59.132000 91.225000,59.115000 90.469000,59.088000 88.959000,59.002000 88.205000,58.942000 87.452000,58.872000 86.700000,58.791000 85.949000,58.699000 85.200000,58.597000 84.452000,58.484000 83.706000,58.360000 82.961000,58.225000 82.219000,58.080000 81.479000,57.924000 80.741000,57.758000 80.006000,57.581000 79.273000,57.393000 78.543000,57.195000 77.816000,56.987000 77.092000,56.768000 76.371000,56.539000 75.653000,56.300000 74.939000,56.051000 74.229000,55.791000 73.522000,55.521000 72.819000,55.241000 72.121000,54.951000 71.426000,54.651000 70.736000,54.341000 70.051000,54.021000 69.370000,53.692000 68.694000,53.353000 68.023000,53.004000 66.696000,52.278000 65.390000,51.514000 64.746000,51.118000 64.107000,50.713000 62.847000,49.875000 62.226000,49.443000 61.612000,49.002000 60.402000,48.094000 59.218000,47.152000 58.637000,46.668000 57.495000,45.676000 56.382000,44.651000 55.837000,44.127000 55.299000,43.595000 54.769000,43.056000 54.246000,42.509000 53.225000,41.392000 52.727000,40.823000 52.237000,40.247000 51.281000,39.075000 50.816000,38.478000 50.360000,37.875000 49.912000,37.265000 49.473000,36.650000 49.042000,36.027000 48.621000,35.399000 48.209000,34.765000 47.806000,34.125000 47.412000,33.479000 47.027000,32.828000 46.652000,32.171000 46.286000,31.509000 45.930000,30.842000 45.583000,30.170000 45.246000,29.493000 44.925000,28.847000 44.595000,28.207000 43.907000,26.941000 43.183000,25.694000 42.807000,25.079000 42.031000,23.865000 41.629000,23.267000 40.801000,22.087000 40.374000,21.506000 39.939000,20.932000 39.496000,20.364000 38.586000,19.246000 37.644000,18.155000 37.162000,17.620000 36.174000,16.571000 35.669000,16.057000 34.637000,15.051000 34.110000,14.559000 33.036000,13.598000 32.488000,13.130000 31.374000,12.216000 30.234000,11.334000 29.069000,10.486000 28.477000,10.074000 27.277000,9.276000 26.669000,8.890000 26.055000,8.513000 24.811000,7.785000 23.546000,7.093000 22.907000,6.761000 22.263000,6.438000 20.961000,5.819000 20.304000,5.524000 19.642000,5.238000 18.977000,4.962000 18.307000,4.695000 17.634000,4.438000 16.277000,3.953000 15.593000,3.725000 14.217000,3.298000 12.828000,2.911000 11.430000,2.564000 10.021000,2.257000 9.314000,2.119000 8.605000,1.991000 7.894000,1.873000 7.182000,1.765000 6.468000,1.667000 5.036000,1.502000 4.318000,1.435000 2.881000,1.332000 2.161000,1.296000 0.721000,1.255000 0.000000,1.250000 z%22 /><path class=%22layer_2_0%22 d=%22M 0.000000,-0.250000 0.742000,-0.245000 1.484000,-0.229000 2.226000,-0.202000 2.967000,-0.165000 4.447000,-0.059000 5.186000,0.010000 5.924000,0.089000 6.660000,0.179000 7.396000,0.280000 8.129000,0.391000 8.861000,0.513000 9.592000,0.645000 10.320000,0.787000 11.046000,0.940000 11.770000,1.103000 12.492000,1.277000 13.210000,1.461000 13.927000,1.655000 14.640000,1.859000 16.058000,2.298000 16.762000,2.533000 17.462000,2.778000 18.159000,3.033000 18.852000,3.298000 19.542000,3.572000 20.908000,4.151000 21.585000,4.455000 22.258000,4.769000 22.926000,5.092000 24.248000,5.767000 25.550000,6.480000 26.193000,6.850000 26.831000,7.229000 28.090000,8.015000 28.710000,8.421000 29.935000,9.261000 30.537000,9.693000 31.134000,10.134000 32.308000,11.042000 33.456000,11.983000 34.020000,12.466000 35.126000,13.455000 36.203000,14.476000 36.731000,14.998000 37.251000,15.527000 37.764000,16.064000 38.765000,17.159000 39.254000,17.717000 39.735000,18.282000 40.208000,18.854000 40.673000,19.433000 41.129000,20.018000 41.577000,20.610000 42.447000,21.812000 42.869000,22.422000 43.687000,23.661000 44.469000,24.922000 44.846000,25.561000 45.573000,26.855000 45.923000,27.510000 46.263000,28.169000 46.594000,28.834000 46.921000,29.492000 47.258000,30.145000 47.604000,30.793000 48.324000,32.074000 48.698000,32.707000 49.472000,33.957000 50.282000,35.183000 50.700000,35.788000 51.562000,36.978000 52.457000,38.144000 53.386000,39.283000 53.862000,39.843000 54.346000,40.396000 54.839000,40.942000 55.846000,42.012000 56.361000,42.536000 56.884000,43.053000 57.951000,44.064000 59.046000,45.044000 60.170000,45.992000 60.741000,46.454000 61.904000,47.353000 62.495000,47.790000 63.695000,48.638000 64.919000,49.452000 66.166000,50.230000 66.798000,50.606000 68.077000,51.330000 68.724000,51.678000 69.376000,52.017000 70.695000,52.667000 72.031000,53.278000 72.706000,53.570000 74.067000,54.123000 74.754000,54.386000 76.138000,54.881000 77.535000,55.336000 78.946000,55.751000 79.655000,55.943000 80.367000,56.125000 81.081000,56.297000 81.798000,56.459000 83.239000,56.751000 83.962000,56.882000 84.687000,57.002000 85.414000,57.112000 86.142000,57.212000 86.871000,57.301000 87.602000,57.380000 89.066000,57.506000 90.534000,57.590000 91.268000,57.616000 92.003000,57.632000 92.738000,57.637000 92.738000,58.137000 91.996000,58.132000 91.254000,58.116000 90.512000,58.089000 89.771000,58.052000 88.291000,57.946000 87.552000,57.877000 86.814000,57.798000 86.078000,57.708000 85.342000,57.607000 84.609000,57.496000 83.877000,57.374000 83.146000,57.242000 82.418000,57.100000 81.692000,56.947000 80.968000,56.784000 80.246000,56.610000 79.528000,56.426000 78.811000,56.232000 78.098000,56.028000 76.680000,55.589000 75.976000,55.354000 75.276000,55.109000 74.579000,54.854000 73.196000,54.315000 71.830000,53.736000 71.153000,53.432000 70.480000,53.118000 69.812000,52.795000 68.490000,52.120000 67.188000,51.407000 66.545000,51.037000 65.908000,50.658000 65.275000,50.269000 64.649000,49.872000 64.028000,49.466000 62.803000,48.626000 62.201000,48.194000 61.604000,47.753000 60.430000,46.845000 59.282000,45.904000 58.718000,45.421000 57.612000,44.432000 56.535000,43.411000 56.007000,42.889000 55.487000,42.360000 54.974000,41.823000 53.973000,40.728000 53.484000,40.170000 53.003000,39.605000 52.530000,39.033000 52.065000,38.454000 51.609000,37.869000 51.161000,37.277000 50.291000,36.075000 49.869000,35.465000 49.051000,34.226000 48.269000,32.965000 47.892000,32.326000 47.165000,31.032000 46.815000,30.377000 46.475000,29.718000 46.144000,29.053000 45.817000,28.395000 45.480000,27.742000 45.134000,27.094000 44.414000,25.813000 44.040000,25.180000 43.657000,24.552000 43.266000,23.931000 42.865000,23.314000 42.456000,22.704000 42.038000,22.099000 41.176000,20.909000 40.281000,19.743000 39.820000,19.170000 38.876000,18.044000 38.392000,17.491000 37.899000,16.945000 36.892000,15.875000 36.377000,15.351000 35.854000,14.834000 34.787000,13.823000 33.692000,12.843000 33.133000,12.365000 31.997000,11.433000 30.834000,10.534000 30.243000,10.097000 29.043000,9.249000 27.819000,8.435000 26.572000,7.657000 25.940000,7.281000 24.661000,6.557000 24.014000,6.209000 23.362000,5.870000 22.705000,5.541000 21.377000,4.910000 20.707000,4.609000 20.032000,4.317000 18.671000,3.764000 17.984000,3.501000 16.600000,3.006000 15.203000,2.551000 13.792000,2.136000 13.083000,1.944000 12.371000,1.762000 11.657000,1.590000 10.940000,1.428000 9.499000,1.136000 8.776000,1.005000 8.051000,0.885000 7.324000,0.775000 6.596000,0.675000 5.867000,0.586000 5.136000,0.507000 3.672000,0.381000 2.204000,0.297000 1.470000,0.271000 0.735000,0.255000 0.000000,0.250000 z%22 /></g><g id=%22C173%22 data-name=%22as_component__PNGCOJINIPILRSBFUVHAAAKRQR7F7X5DOV45DHY3HPYOUZICQITA%22><path class=%22layer_1_0%22 d=%22M 9.889000,3.500000 0.000000,1.275000 0.000000,-1.275000 9.889000,-3.500000 16.000000,-3.500000 16.000000,3.500000 z%22 /><path class=%22layer_2_0%22 d=%22M 0.000000,-0.250000 10.000000,-2.500000 10.000000,2.500000 0.000000,0.250000 z%22 /><rect class=%22layer_2_0%22 x=%2210.300000%22 y=%22-2.500000%22 width=%220.300000%22 height=%225.000000%22 /><rect class=%22layer_2_0%22 x=%2210.900000%22 y=%22-2.500000%22 width=%220.300000%22 height=%225.000000%22 /><rect class=%22layer_2_0%22 x=%2211.500000%22 y=%22-2.500000%22 width=%220.300000%22 height=%225.000000%22 /><rect class=%22layer_2_0%22 x=%2212.100000%22 y=%22-2.500000%22 width=%220.300000%22 height=%225.000000%22 /><rect class=%22layer_2_0%22 x=%2212.700000%22 y=%22-2.500000%22 width=%220.300000%22 height=%225.000000%22 /><rect class=%22layer_2_0%22 x=%2213.300000%22 y=%22-2.500000%22 width=%220.300000%22 height=%225.000000%22 /><rect class=%22layer_2_0%22 x=%2213.900000%22 y=%22-2.500000%22 width=%220.300000%22 height=%225.000000%22 /><rect class=%22layer_2_0%22 x=%2214.500000%22 y=%22-2.500000%22 width=%220.300000%22 height=%225.000000%22 /><rect class=%22layer_2_0%22 x=%2215.100000%22 y=%22-2.500000%22 width=%220.300000%22 height=%225.000000%22 /><rect class=%22layer_2_0%22 x=%2215.700000%22 y=%22-2.500000%22 width=%220.300000%22 height=%225.000000%22 /></g><g id=%22C174%22 data-name=%22s_bend_l_16P507819110401087_o_52P26535124408226_p_Strip%22><path class=%22layer_1_0%22 d=%22M 0.000000,-1.250000 0.420000,-1.244000 0.840000,-1.227000 1.260000,-1.199000 1.678000,-1.160000 2.095000,-1.109000 2.511000,-1.047000 2.925000,-0.974000 3.337000,-0.889000 3.746000,-0.794000 4.153000,-0.688000 4.557000,-0.571000 4.957000,-0.443000 5.354000,-0.304000 6.136000,0.005000 6.520000,0.176000 6.899000,0.356000 7.274000,0.547000 7.643000,0.748000 8.007000,0.958000 8.365000,1.179000 8.717000,1.409000 9.063000,1.648000 9.402000,1.896000 9.734000,2.154000 10.059000,2.420000 10.377000,2.695000 10.687000,2.979000 10.990000,3.270000 11.285000,3.570000 11.571000,3.878000 11.849000,4.193000 12.119000,4.515000 12.380000,4.845000 12.632000,5.182000 13.108000,5.874000 13.546000,6.592000 13.750000,6.959000 13.944000,7.332000 14.129000,7.710000 14.303000,8.092000 14.467000,8.479000 14.620000,8.871000 14.762000,9.266000 14.894000,9.665000 15.016000,10.068000 15.126000,10.473000 15.225000,10.882000 15.314000,11.293000 15.391000,11.706000 15.457000,12.121000 15.512000,12.538000 15.556000,12.956000 15.588000,13.375000 15.609000,13.795000 15.619000,14.215000 15.618000,14.635000 15.605000,15.056000 15.581000,15.475000 15.545000,15.894000 15.499000,16.312000 15.441000,16.728000 15.372000,17.143000 15.200000,17.966000 15.098000,18.373000 14.985000,18.778000 14.861000,19.180000 14.726000,19.578000 14.580000,19.972000 14.424000,20.363000 14.258000,20.749000 14.081000,21.130000 13.894000,21.506000 13.697000,21.878000 13.490000,22.244000 13.273000,22.604000 13.047000,22.958000 12.811000,23.306000 12.566000,23.647000 12.312000,23.982000 12.049000,24.310000 11.777000,24.631000 11.496000,24.944000 11.208000,25.249000 10.911000,25.547000 10.606000,25.837000 10.294000,26.118000 9.647000,26.655000 9.313000,26.910000 8.972000,27.156000 8.686000,27.362000 8.130000,27.798000 7.599000,28.264000 7.094000,28.757000 6.616000,29.277000 6.167000,29.821000 5.747000,30.389000 5.359000,30.979000 5.003000,31.589000 4.681000,32.217000 4.392000,32.861000 4.139000,33.521000 3.922000,34.192000 3.741000,34.875000 3.664000,35.219000 3.539000,35.914000 3.490000,36.264000 3.421000,36.967000 3.390000,37.672000 3.397000,38.378000 3.442000,39.083000 3.525000,39.784000 3.580000,40.133000 3.645000,40.480000 3.803000,41.168000 3.997000,41.847000 4.228000,42.514000 4.494000,43.168000 4.795000,43.807000 5.130000,44.428000 5.498000,45.031000 5.898000,45.613000 6.329000,46.172000 6.789000,46.708000 7.277000,47.218000 7.792000,47.701000 8.332000,48.156000 8.896000,48.581000 9.482000,48.975000 10.088000,49.337000 10.398000,49.506000 11.032000,49.817000 11.681000,50.095000 12.344000,50.337000 13.020000,50.543000 13.705000,50.712000 14.051000,50.783000 14.748000,50.896000 15.098000,50.939000 15.802000,50.996000 16.508000,51.015000 16.508000,53.515000 16.088000,53.509000 15.668000,53.492000 15.248000,53.464000 14.830000,53.425000 14.413000,53.374000 13.997000,53.312000 13.583000,53.239000 13.171000,53.154000 12.762000,53.059000 12.355000,52.953000 11.951000,52.836000 11.551000,52.708000 11.154000,52.569000 10.372000,52.260000 9.988000,52.089000 9.609000,51.909000 9.234000,51.718000 8.865000,51.517000 8.501000,51.307000 8.143000,51.086000 7.791000,50.856000 7.445000,50.617000 7.106000,50.369000 6.774000,50.111000 6.449000,49.845000 6.131000,49.570000 5.518000,48.995000 5.223000,48.695000 4.937000,48.387000 4.659000,48.072000 4.389000,47.750000 4.128000,47.420000 3.876000,47.083000 3.400000,46.391000 2.962000,45.673000 2.758000,45.306000 2.564000,44.933000 2.379000,44.555000 2.205000,44.173000 2.041000,43.786000 1.888000,43.394000 1.746000,42.999000 1.614000,42.600000 1.492000,42.197000 1.382000,41.792000 1.283000,41.383000 1.194000,40.972000 1.117000,40.559000 1.051000,40.144000 0.996000,39.727000 0.952000,39.309000 0.920000,38.890000 0.899000,38.470000 0.889000,38.050000 0.890000,37.630000 0.903000,37.209000 0.927000,36.790000 0.963000,36.371000 1.009000,35.953000 1.067000,35.537000 1.136000,35.122000 1.308000,34.299000 1.410000,33.892000 1.523000,33.487000 1.647000,33.085000 1.782000,32.687000 1.928000,32.293000 2.084000,31.902000 2.250000,31.516000 2.427000,31.135000 2.614000,30.759000 2.811000,30.387000 3.018000,30.021000 3.235000,29.661000 3.461000,29.307000 3.697000,28.959000 3.942000,28.618000 4.196000,28.283000 4.459000,27.955000 4.731000,27.634000 5.012000,27.321000 5.300000,27.016000 5.597000,26.718000 5.902000,26.428000 6.214000,26.147000 6.861000,25.610000 7.195000,25.355000 7.536000,25.109000 7.822000,24.903000 8.378000,24.467000 8.909000,24.001000 9.414000,23.508000 9.892000,22.988000 10.341000,22.444000 10.761000,21.876000 11.149000,21.286000 11.505000,20.676000 11.670000,20.364000 11.976000,19.728000 12.247000,19.076000 12.482000,18.410000 12.681000,17.733000 12.844000,17.046000 12.911000,16.699000 13.018000,16.001000 13.087000,15.298000 13.118000,14.593000 13.111000,13.887000 13.066000,13.182000 13.029000,12.831000 12.928000,12.132000 12.863000,11.785000 12.705000,11.097000 12.511000,10.418000 12.280000,9.751000 12.014000,9.097000 11.713000,8.458000 11.378000,7.837000 11.010000,7.234000 10.610000,6.652000 10.398000,6.370000 9.953000,5.822000 9.479000,5.299000 8.977000,4.802000 8.449000,4.333000 7.897000,3.893000 7.322000,3.483000 6.726000,3.105000 6.110000,2.759000 5.476000,2.448000 4.827000,2.170000 4.164000,1.928000 3.488000,1.722000 3.147000,1.633000 2.457000,1.482000 2.109000,1.421000 1.410000,1.326000 0.706000,1.269000 0.000000,1.250000 z%22 /><path class=%22layer_2_0%22 d=%22M 0.000000,-0.250000 0.393000,-0.245000 0.787000,-0.229000 1.571000,-0.165000 1.961000,-0.118000 2.350000,-0.060000 2.738000,0.009000 3.123000,0.088000 3.507000,0.177000 3.887000,0.276000 4.265000,0.386000 4.640000,0.506000 5.379000,0.775000 5.743000,0.925000 6.458000,1.254000 6.808000,1.432000 7.154000,1.620000 7.494000,1.817000 7.830000,2.023000 8.159000,2.238000 8.482000,2.462000 8.800000,2.695000 9.111000,2.936000 9.415000,3.185000 9.713000,3.443000 10.003000,3.708000 10.286000,3.981000 10.830000,4.549000 11.091000,4.844000 11.343000,5.146000 11.823000,5.770000 12.050000,6.091000 12.478000,6.751000 12.678000,7.090000 12.870000,7.434000 13.052000,7.783000 13.224000,8.136000 13.387000,8.494000 13.684000,9.223000 13.941000,9.967000 14.054000,10.343000 14.158000,10.723000 14.251000,11.105000 14.406000,11.877000 14.519000,12.655000 14.560000,13.046000 14.610000,13.832000 14.618000,14.618000 14.606000,15.012000 14.550000,15.796000 14.506000,16.187000 14.452000,16.577000 14.388000,16.965000 14.227000,17.736000 14.131000,18.117000 14.025000,18.496000 13.909000,18.872000 13.783000,19.245000 13.647000,19.614000 13.501000,19.979000 13.180000,20.697000 13.005000,21.050000 12.626000,21.740000 12.212000,22.408000 11.991000,22.734000 11.524000,23.367000 11.023000,23.974000 10.490000,24.553000 9.927000,25.102000 9.635000,25.366000 9.029000,25.868000 8.717000,26.107000 8.398000,26.337000 7.788000,26.790000 7.203000,27.275000 6.645000,27.791000 6.377000,28.060000 5.862000,28.620000 5.616000,28.910000 5.149000,29.509000 4.927000,29.817000 4.509000,30.452000 4.126000,31.108000 3.779000,31.784000 3.619000,32.129000 3.328000,32.831000 3.196000,33.187000 3.074000,33.547000 2.962000,33.910000 2.860000,34.276000 2.685000,35.016000 2.550000,35.763000 2.456000,36.517000 2.402000,37.275000 2.390000,37.655000 2.398000,38.415000 2.417000,38.794000 2.446000,39.173000 2.535000,39.928000 2.595000,40.303000 2.665000,40.677000 2.745000,41.048000 2.934000,41.784000 3.163000,42.509000 3.292000,42.866000 3.579000,43.570000 3.736000,43.916000 4.078000,44.594000 4.263000,44.926000 4.659000,45.575000 4.870000,45.891000 5.317000,46.505000 5.553000,46.803000 6.048000,47.380000 6.573000,47.929000 7.128000,48.449000 7.709000,48.938000 8.009000,49.171000 8.628000,49.612000 9.270000,50.019000 9.599000,50.209000 10.271000,50.563000 10.614000,50.726000 11.313000,51.025000 11.668000,51.160000 12.389000,51.401000 12.754000,51.507000 13.121000,51.603000 13.864000,51.765000 14.238000,51.831000 14.614000,51.887000 14.991000,51.933000 15.369000,51.969000 15.748000,51.995000 16.508000,52.015000 16.508000,52.515000 16.115000,52.510000 15.721000,52.494000 14.937000,52.430000 14.547000,52.383000 14.158000,52.325000 13.770000,52.256000 13.385000,52.177000 13.002000,52.088000 12.621000,51.989000 12.243000,51.879000 11.868000,51.759000 11.129000,51.490000 10.765000,51.340000 10.406000,51.181000 9.700000,50.833000 9.354000,50.645000 8.678000,50.242000 8.349000,50.027000 8.026000,49.803000 7.708000,49.570000 7.397000,49.329000 7.093000,49.080000 6.795000,48.822000 6.505000,48.557000 6.222000,48.284000 5.678000,47.716000 5.417000,47.421000 5.165000,47.119000 4.685000,46.495000 4.458000,46.174000 4.030000,45.514000 3.638000,44.831000 3.456000,44.483000 3.121000,43.771000 2.824000,43.042000 2.691000,42.672000 2.567000,42.298000 2.350000,41.542000 2.257000,41.160000 2.102000,40.388000 1.989000,39.610000 1.948000,39.219000 1.898000,38.433000 1.890000,37.647000 1.902000,37.253000 1.958000,36.469000 2.002000,36.078000 2.056000,35.688000 2.120000,35.300000 2.281000,34.529000 2.377000,34.148000 2.483000,33.769000 2.599000,33.393000 2.725000,33.020000 2.861000,32.651000 3.007000,32.286000 3.328000,31.568000 3.503000,31.215000 3.688000,30.868000 3.882000,30.525000 4.296000,29.857000 4.517000,29.531000 4.984000,28.898000 5.485000,28.291000 6.018000,27.712000 6.296000,27.434000 6.873000,26.899000 7.173000,26.644000 7.791000,26.158000 8.110000,25.928000 8.720000,25.475000 9.305000,24.990000 9.863000,24.474000 10.131000,24.205000 10.646000,23.645000 10.892000,23.355000 11.129000,23.059000 11.581000,22.448000 11.999000,21.813000 12.382000,21.157000 12.729000,20.481000 12.889000,20.136000 13.039000,19.787000 13.312000,19.078000 13.434000,18.718000 13.546000,18.355000 13.741000,17.620000 13.823000,17.250000 13.958000,16.502000 14.052000,15.748000 14.084000,15.369000 14.106000,14.990000 14.118000,14.610000 14.110000,13.850000 14.062000,13.092000 13.973000,12.337000 13.913000,11.962000 13.843000,11.588000 13.763000,11.217000 13.574000,10.481000 13.345000,9.756000 13.216000,9.399000 13.077000,9.045000 12.772000,8.349000 12.430000,7.671000 12.245000,7.339000 11.849000,6.690000 11.638000,6.374000 11.191000,5.760000 10.955000,5.462000 10.460000,4.885000 9.935000,4.336000 9.380000,3.816000 9.093000,3.568000 8.499000,3.094000 7.880000,2.653000 7.238000,2.246000 6.909000,2.056000 6.237000,1.702000 5.894000,1.539000 5.195000,1.240000 4.840000,1.105000 4.119000,0.864000 3.754000,0.758000 3.387000,0.662000 3.016000,0.576000 2.644000,0.500000 2.270000,0.434000 1.894000,0.378000 1.517000,0.332000 1.139000,0.296000 0.760000,0.270000 0.000000,0.250000 z%22 /></g><g id=%22C175%22 data-name=%22as_component__PNGCOJINIPILRSBFUVHAAAKRQR7F7X5DOV45DHY3HPYOUZICQITA%22><path class=%22layer_1_0%22 d=%22M 9.889000,3.500000 0.000000,1.275000 0.000000,-1.275000 9.889000,-3.500000 16.000000,-3.500000 16.000000,3.500000 z%22 /><path class=%22layer_2_0%22 d=%22M 0.000000,-0.250000 10.000000,-2.500000 10.000000,2.500000 0.000000,0.250000 z%22 /><rect class=%22layer_2_0%22 x=%2210.300000%22 y=%22-2.500000%22 width=%220.300000%22 height=%225.000000%22 /><rect class=%22layer_2_0%22 x=%2210.900000%22 y=%22-2.500000%22 width=%220.300000%22 height=%225.000000%22 /><rect class=%22layer_2_0%22 x=%2211.500000%22 y=%22-2.500000%22 width=%220.300000%22 height=%225.000000%22 /><rect class=%22layer_2_0%22 x=%2212.100000%22 y=%22-2.500000%22 width=%220.300000%22 height=%225.000000%22 /><rect class=%22layer_2_0%22 x=%2212.700000%22 y=%22-2.500000%22 width=%220.300000%22 height=%225.000000%22 /><rect class=%22layer_2_0%22 x=%2213.300000%22 y=%22-2.500000%22 width=%220.300000%22 height=%225.000000%22 /><rect class=%22layer_2_0%22 x=%2213.900000%22 y=%22-2.500000%22 width=%220.300000%22 height=%225.000000%22 /><rect class=%22layer_2_0%22 x=%2214.500000%22 y=%22-2.500000%22 width=%220.300000%22 height=%225.000000%22 /><rect class=%22layer_2_0%22 x=%2215.100000%22 y=%22-2.500000%22 width=%220.300000%22 height=%225.000000%22 /><rect class=%22layer_2_0%22 x=%2215.700000%22 y=%22-2.500000%22 width=%220.300000%22 height=%225.000000%22 /></g><g id=%22C176%22 data-name=%22s_bend_l_14P85450016394375_o_24P8898134466768_p_Strip%22><path class=%22layer_1_0%22 d=%22M 0.000000,-1.250000 0.345000,-1.244000 0.689000,-1.225000 1.033000,-1.195000 1.375000,-1.152000 1.716000,-1.097000 2.054000,-1.030000 2.390000,-0.951000 2.723000,-0.859000 3.052000,-0.757000 3.378000,-0.642000 3.699000,-0.516000 4.016000,-0.379000 4.327000,-0.230000 4.633000,-0.071000 4.933000,0.100000 5.227000,0.281000 5.514000,0.472000 5.794000,0.673000 6.067000,0.884000 6.332000,1.105000 6.589000,1.335000 6.838000,1.574000 7.078000,1.822000 7.309000,2.078000 7.531000,2.343000 7.743000,2.615000 7.945000,2.894000 8.138000,3.180000 8.320000,3.473000 8.491000,3.773000 8.652000,4.078000 8.802000,4.389000 8.940000,4.705000 9.068000,5.026000 9.184000,5.351000 9.288000,5.679000 9.380000,6.012000 9.461000,6.347000 9.529000,6.686000 9.585000,7.026000 9.630000,7.368000 9.662000,7.712000 9.681000,8.056000 9.689000,8.401000 9.684000,8.746000 9.667000,9.091000 9.638000,9.434000 9.596000,9.777000 9.542000,10.118000 9.477000,10.456000 9.399000,10.792000 9.309000,11.126000 9.207000,11.455000 9.094000,11.781000 8.970000,12.103000 8.833000,12.420000 8.686000,12.732000 8.528000,13.038000 8.301000,13.497000 8.107000,13.971000 7.948000,14.458000 7.881000,14.705000 7.775000,15.206000 7.704000,15.713000 7.670000,16.223000 7.672000,16.735000 7.686000,16.991000 7.743000,17.499000 7.836000,18.003000 7.895000,18.252000 8.041000,18.743000 8.221000,19.222000 8.435000,19.687000 8.682000,20.135000 8.960000,20.565000 9.267000,20.974000 9.603000,21.361000 9.966000,21.722000 10.354000,22.056000 10.764000,22.362000 11.195000,22.639000 11.645000,22.883000 11.876000,22.994000 12.349000,23.189000 12.835000,23.350000 13.331000,23.477000 13.834000,23.567000 14.343000,23.622000 14.855000,23.640000 14.855000,26.140000 14.510000,26.134000 14.166000,26.115000 13.822000,26.085000 13.480000,26.042000 13.139000,25.987000 12.801000,25.920000 12.465000,25.841000 12.132000,25.749000 11.803000,25.647000 11.477000,25.532000 11.156000,25.406000 10.839000,25.269000 10.528000,25.120000 10.222000,24.961000 9.922000,24.790000 9.628000,24.609000 9.341000,24.418000 9.061000,24.217000 8.788000,24.006000 8.523000,23.785000 8.266000,23.555000 8.017000,23.316000 7.777000,23.068000 7.546000,22.812000 7.324000,22.547000 7.112000,22.275000 6.910000,21.996000 6.717000,21.710000 6.535000,21.417000 6.364000,21.117000 6.203000,20.812000 6.053000,20.501000 5.915000,20.185000 5.787000,19.864000 5.671000,19.539000 5.567000,19.211000 5.475000,18.878000 5.394000,18.543000 5.326000,18.204000 5.270000,17.864000 5.225000,17.522000 5.193000,17.178000 5.174000,16.834000 5.166000,16.489000 5.171000,16.144000 5.188000,15.799000 5.217000,15.456000 5.259000,15.113000 5.313000,14.772000 5.378000,14.434000 5.456000,14.098000 5.546000,13.764000 5.648000,13.435000 5.761000,13.109000 5.886000,12.787000 6.022000,12.470000 6.169000,12.158000 6.327000,11.852000 6.445000,11.624000 6.655000,11.157000 6.832000,10.677000 6.974000,10.185000 7.031000,9.936000 7.120000,9.432000 7.173000,8.922000 7.189000,8.411000 7.169000,7.899000 7.145000,7.644000 7.070000,7.138000 6.960000,6.638000 6.814000,6.147000 6.634000,5.668000 6.420000,5.203000 6.173000,4.755000 5.895000,4.325000 5.588000,3.916000 5.252000,3.530000 4.889000,3.168000 4.501000,2.834000 4.091000,2.528000 3.660000,2.251000 3.437000,2.125000 2.979000,1.896000 2.506000,1.701000 2.020000,1.540000 1.524000,1.413000 1.021000,1.323000 0.512000,1.268000 0.000000,1.250000 z%22 /><path class=%22layer_2_0%22 d=%22M 0.000000,-0.250000 0.309000,-0.244000 0.618000,-0.228000 0.927000,-0.200000 1.234000,-0.162000 1.539000,-0.113000 1.842000,-0.052000 2.144000,0.019000 2.442000,0.100000 2.737000,0.192000 3.029000,0.295000 3.317000,0.408000 3.601000,0.531000 4.155000,0.808000 4.424000,0.960000 4.945000,1.294000 5.441000,1.664000 5.909000,2.068000 6.132000,2.283000 6.347000,2.505000 6.555000,2.735000 6.944000,3.216000 7.125000,3.466000 7.298000,3.723000 7.461000,3.986000 7.615000,4.254000 7.759000,4.528000 7.893000,4.807000 8.018000,5.090000 8.132000,5.378000 8.236000,5.669000 8.329000,5.964000 8.412000,6.262000 8.484000,6.563000 8.545000,6.867000 8.596000,7.172000 8.636000,7.479000 8.664000,7.787000 8.682000,8.096000 8.689000,8.405000 8.685000,8.714000 8.643000,9.332000 8.606000,9.639000 8.558000,9.944000 8.499000,10.248000 8.429000,10.550000 8.348000,10.848000 8.257000,11.144000 8.156000,11.436000 8.044000,11.725000 7.922000,12.009000 7.790000,12.289000 7.648000,12.564000 7.514000,12.823000 7.389000,13.086000 7.274000,13.354000 7.073000,13.902000 6.987000,14.180000 6.911000,14.462000 6.790000,15.032000 6.744000,15.320000 6.709000,15.610000 6.670000,16.192000 6.672000,16.775000 6.689000,17.066000 6.716000,17.356000 6.801000,17.933000 6.859000,18.219000 6.927000,18.502000 7.005000,18.783000 7.093000,19.061000 7.191000,19.336000 7.416000,19.874000 7.542000,20.137000 7.678000,20.395000 7.823000,20.648000 7.977000,20.896000 8.311000,21.374000 8.490000,21.604000 8.873000,22.043000 9.076000,22.253000 9.286000,22.455000 9.727000,22.836000 9.958000,23.015000 10.195000,23.185000 10.686000,23.499000 10.939000,23.643000 11.461000,23.904000 11.729000,24.020000 12.275000,24.223000 12.554000,24.310000 12.835000,24.387000 13.119000,24.454000 13.405000,24.511000 13.692000,24.557000 14.272000,24.619000 14.563000,24.635000 14.855000,24.640000 14.855000,25.140000 14.237000,25.118000 13.929000,25.090000 13.622000,25.052000 13.316000,25.003000 13.013000,24.942000 12.711000,24.871000 12.413000,24.790000 12.118000,24.698000 11.826000,24.595000 11.538000,24.482000 11.254000,24.359000 10.700000,24.082000 10.431000,23.930000 9.910000,23.596000 9.414000,23.226000 8.946000,22.822000 8.723000,22.607000 8.508000,22.385000 8.301000,22.155000 8.102000,21.918000 7.911000,21.674000 7.730000,21.424000 7.557000,21.167000 7.394000,20.904000 7.240000,20.636000 7.096000,20.362000 6.837000,19.800000 6.723000,19.512000 6.619000,19.221000 6.526000,18.926000 6.443000,18.628000 6.371000,18.327000 6.310000,18.023000 6.259000,17.718000 6.219000,17.411000 6.191000,17.103000 6.173000,16.794000 6.166000,16.485000 6.170000,16.176000 6.212000,15.558000 6.249000,15.251000 6.297000,14.946000 6.356000,14.642000 6.426000,14.340000 6.507000,14.042000 6.598000,13.746000 6.699000,13.454000 6.811000,13.165000 6.933000,12.881000 7.065000,12.601000 7.207000,12.326000 7.466000,11.804000 7.581000,11.536000 7.782000,10.988000 7.868000,10.710000 7.944000,10.428000 8.065000,9.858000 8.111000,9.570000 8.146000,9.280000 8.185000,8.698000 8.183000,8.115000 8.166000,7.824000 8.139000,7.534000 8.054000,6.957000 7.996000,6.671000 7.928000,6.388000 7.850000,6.107000 7.762000,5.829000 7.664000,5.554000 7.556000,5.283000 7.313000,4.753000 7.177000,4.495000 7.032000,4.242000 6.715000,3.752000 6.365000,3.286000 6.177000,3.063000 5.779000,2.637000 5.569000,2.435000 5.128000,2.054000 4.660000,1.705000 4.169000,1.391000 3.916000,1.247000 3.394000,0.986000 3.126000,0.870000 2.855000,0.764000 2.580000,0.667000 2.302000,0.580000 2.020000,0.503000 1.736000,0.436000 1.450000,0.379000 1.163000,0.333000 0.583000,0.271000 0.292000,0.255000 0.000000,0.250000 z%22 /></g><g id=%22C177%22 data-name=%22as_component__PNGCOJINIPILRSBFUVHAAAKRQR7F7X5DOV45DHY3HPYOUZICQITA%22><path class=%22layer_1_0%22 d=%22M 9.889000,3.500000 0.000000,1.275000 0.000000,-1.275000 9.889000,-3.500000 16.000000,-3.500000 16.000000,3.500000 z%22 /><path class=%22layer_2_0%22 d=%22M 0.000000,-0.250000 10.000000,-2.500000 10.000000,2.500000 0.000000,0.250000 z%22 /><rect class=%22layer_2_0%22 x=%2210.300000%22 y=%22-2.500000%22 width=%220.300000%22 height=%225.000000%22 /><rect class=%22layer_2_0%22 x=%2210.900000%22 y=%22-2.500000%22 width=%220.300000%22 height=%225.000000%22 /><rect class=%22layer_2_0%22 x=%2211.500000%22 y=%22-2.500000%22 width=%220.300000%22 height=%225.000000%22 /><rect class=%22layer_2_0%22 x=%2212.100000%22 y=%22-2.500000%22 width=%220.300000%22 height=%225.000000%22 /><rect class=%22layer_2_0%22 x=%2212.700000%22 y=%22-2.500000%22 width=%220.300000%22 height=%225.000000%22 /><rect class=%22layer_2_0%22 x=%2213.300000%22 y=%22-2.500000%22 width=%220.300000%22 height=%225.000000%22 /><rect class=%22layer_2_0%22 x=%2213.900000%22 y=%22-2.500000%22 width=%220.300000%22 height=%225.000000%22 /><rect class=%22layer_2_0%22 x=%2214.500000%22 y=%22-2.500000%22 width=%220.300000%22 height=%225.000000%22 /><rect class=%22layer_2_0%22 x=%2215.100000%22 y=%22-2.500000%22 width=%220.300000%22 height=%225.000000%22 /><rect class=%22layer_2_0%22 x=%2215.700000%22 y=%22-2.500000%22 width=%220.300000%22 height=%225.000000%22 /></g><g id=%22C178%22 data-name=%22s_bend_l_43P34509758281596_o_68P56447883863095_p_Strip%22><path class=%22layer_1_0%22 d=%22M 0.000000,-1.250000 0.530000,-1.244000 1.059000,-1.228000 1.588000,-1.200000 2.116000,-1.161000 2.643000,-1.111000 3.169000,-1.050000 3.694000,-0.978000 4.217000,-0.895000 4.738000,-0.801000 5.257000,-0.697000 5.774000,-0.581000 6.288000,-0.454000 6.799000,-0.317000 7.308000,-0.169000 7.813000,-0.010000 8.315000,0.159000 8.813000,0.339000 9.307000,0.529000 9.797000,0.729000 10.283000,0.940000 10.765000,1.160000 11.241000,1.391000 11.713000,1.632000 12.641000,2.143000 13.096000,2.413000 13.546000,2.693000 13.990000,2.982000 14.427000,3.280000 14.859000,3.587000 15.284000,3.903000 15.702000,4.228000 16.113000,4.562000 16.517000,4.904000 16.914000,5.255000 17.303000,5.614000 17.685000,5.981000 18.059000,6.356000 18.425000,6.739000 18.783000,7.129000 19.132000,7.527000 19.473000,7.932000 19.806000,8.344000 20.130000,8.763000 20.445000,9.188000 20.751000,9.620000 21.048000,10.059000 21.336000,10.504000 21.614000,10.954000 21.883000,11.410000 22.142000,11.872000 22.391000,12.339000 22.631000,12.812000 22.860000,13.289000 23.080000,13.771000 23.289000,14.257000 23.488000,14.748000 23.677000,15.243000 23.855000,15.741000 24.023000,16.244000 24.180000,16.749000 24.327000,17.258000 24.463000,17.770000 24.588000,18.285000 24.702000,18.802000 24.806000,19.321000 24.898000,19.842000 24.980000,20.366000 25.050000,20.891000 25.110000,21.417000 25.158000,21.944000 25.196000,22.472000 25.222000,23.001000 25.237000,23.531000 25.241000,24.060000 25.234000,24.590000 25.216000,25.119000 25.187000,25.648000 25.147000,26.176000 25.095000,26.703000 25.033000,27.229000 24.960000,27.753000 24.875000,28.276000 24.780000,28.797000 24.674000,29.315000 24.557000,29.832000 24.429000,30.346000 24.290000,30.857000 24.141000,31.365000 23.981000,31.870000 23.810000,32.371000 23.629000,32.869000 23.438000,33.363000 23.236000,33.852000 23.024000,34.337000 22.802000,34.818000 22.602000,35.251000 22.411000,35.688000 22.056000,36.574000 21.893000,37.023000 21.595000,37.929000 21.336000,38.848000 21.115000,39.776000 21.019000,40.243000 20.933000,40.713000 20.857000,41.184000 20.791000,41.656000 20.735000,42.130000 20.653000,43.080000 20.626000,43.557000 20.604000,44.511000 20.607000,44.988000 20.621000,45.465000 20.678000,46.417000 20.722000,46.892000 20.839000,47.839000 20.996000,48.780000 21.089000,49.248000 21.192000,49.714000 21.305000,50.178000 21.560000,51.097000 21.701000,51.553000 22.013000,52.455000 22.183000,52.901000 22.551000,53.781000 22.956000,54.645000 23.396000,55.491000 23.872000,56.319000 24.382000,57.125000 24.649000,57.520000 24.925000,57.910000 25.501000,58.671000 25.800000,59.042000 26.423000,59.765000 26.745000,60.117000 27.075000,60.462000 27.756000,61.130000 28.464000,61.769000 28.828000,62.078000 29.575000,62.671000 30.347000,63.233000 30.741000,63.502000 31.546000,64.014000 32.372000,64.492000 33.217000,64.934000 33.646000,65.142000 34.518000,65.531000 34.960000,65.712000 35.854000,66.045000 36.761000,66.340000 37.680000,66.597000 38.143000,66.711000 39.076000,66.910000 40.017000,67.069000 40.490000,67.134000 40.964000,67.189000 41.439000,67.234000 42.391000,67.294000 43.345000,67.314000 43.345000,69.814000 42.815000,69.808000 42.286000,69.792000 41.757000,69.764000 41.229000,69.725000 40.702000,69.675000 40.176000,69.614000 39.651000,69.542000 39.128000,69.459000 38.607000,69.365000 38.088000,69.261000 37.571000,69.145000 37.057000,69.018000 36.546000,68.881000 36.037000,68.733000 35.532000,68.574000 35.030000,68.405000 34.532000,68.225000 34.038000,68.035000 33.548000,67.835000 32.580000,67.404000 32.104000,67.173000 31.632000,66.932000 31.166000,66.681000 30.704000,66.421000 30.249000,66.151000 29.355000,65.583000 28.486000,64.977000 28.061000,64.661000 27.643000,64.336000 27.232000,64.002000 26.828000,63.660000 26.431000,63.309000 26.042000,62.950000 25.660000,62.583000 25.286000,62.208000 24.920000,61.825000 24.562000,61.435000 24.213000,61.037000 23.872000,60.632000 23.539000,60.220000 23.215000,59.801000 22.900000,59.376000 22.594000,58.944000 22.297000,58.505000 22.009000,58.061000 21.731000,57.610000 21.462000,57.154000 21.203000,56.692000 20.954000,56.225000 20.714000,55.752000 20.485000,55.275000 20.265000,54.793000 20.056000,54.307000 19.857000,53.816000 19.668000,53.321000 19.490000,52.823000 19.322000,52.320000 19.165000,51.815000 19.018000,51.306000 18.882000,50.794000 18.757000,50.279000 18.643000,49.762000 18.539000,49.243000 18.447000,48.722000 18.365000,48.198000 18.295000,47.674000 18.235000,47.147000 18.187000,46.620000 18.149000,46.092000 18.123000,45.563000 18.108000,45.033000 18.104000,44.504000 18.111000,43.974000 18.129000,43.445000 18.158000,42.916000 18.198000,42.388000 18.250000,41.861000 18.312000,41.335000 18.385000,40.811000 18.470000,40.288000 18.565000,39.767000 18.671000,39.249000 18.788000,38.732000 18.916000,38.218000 19.055000,37.707000 19.204000,37.199000 19.364000,36.694000 19.535000,36.193000 19.716000,35.695000 19.907000,35.201000 20.109000,34.712000 20.321000,34.227000 20.543000,33.746000 20.934000,32.876000 21.289000,31.990000 21.452000,31.541000 21.750000,30.635000 22.009000,29.716000 22.230000,28.788000 22.326000,28.321000 22.412000,27.851000 22.488000,27.380000 22.554000,26.908000 22.610000,26.434000 22.656000,25.959000 22.719000,25.007000 22.735000,24.530000 22.738000,23.576000 22.724000,23.099000 22.667000,22.147000 22.623000,21.672000 22.506000,20.725000 22.349000,19.784000 22.256000,19.316000 22.153000,18.850000 22.040000,18.386000 21.917000,17.925000 21.644000,17.011000 21.332000,16.109000 21.162000,15.663000 20.794000,14.783000 20.389000,13.919000 19.949000,13.073000 19.473000,12.245000 19.222000,11.839000 18.696000,11.044000 18.420000,10.654000 18.136000,10.271000 17.545000,9.522000 17.237000,9.157000 16.600000,8.447000 16.270000,8.102000 15.589000,7.434000 15.238000,7.111000 14.517000,6.486000 13.770000,5.893000 13.387000,5.608000 12.604000,5.062000 11.799000,4.550000 11.389000,4.307000 10.553000,3.847000 9.699000,3.422000 9.265000,3.223000 8.385000,2.852000 7.491000,2.519000 6.584000,2.224000 5.665000,1.967000 5.202000,1.853000 4.269000,1.654000 3.328000,1.495000 2.855000,1.430000 2.381000,1.375000 1.906000,1.330000 0.954000,1.270000 0.000000,1.250000 z%22 /><path class=%22layer_2_0%22 d=%22M 0.000000,-0.250000 0.509000,-0.245000 1.017000,-0.229000 1.525000,-0.202000 2.032000,-0.165000 2.538000,-0.117000 3.043000,-0.058000 3.547000,0.011000 4.050000,0.091000 4.550000,0.181000 5.049000,0.282000 5.545000,0.393000 6.039000,0.514000 6.530000,0.646000 7.018000,0.788000 7.504000,0.941000 7.985000,1.103000 8.939000,1.458000 9.876000,1.853000 10.338000,2.065000 10.796000,2.287000 11.249000,2.518000 11.697000,2.759000 12.140000,3.009000 12.577000,3.268000 13.009000,3.536000 13.436000,3.814000 13.856000,4.100000 14.270000,4.395000 15.080000,5.011000 15.862000,5.660000 16.244000,5.997000 16.984000,6.694000 17.343000,7.054000 17.695000,7.422000 18.374000,8.179000 18.702000,8.568000 19.332000,9.366000 19.635000,9.775000 19.929000,10.190000 20.214000,10.611000 20.758000,11.471000 21.016000,11.909000 21.265000,12.352000 21.504000,12.801000 21.955000,13.713000 22.366000,14.643000 22.558000,15.114000 22.739000,15.589000 22.910000,16.068000 23.071000,16.551000 23.222000,17.036000 23.363000,17.525000 23.494000,18.016000 23.724000,19.007000 23.823000,19.506000 23.912000,20.007000 23.990000,20.509000 24.058000,21.013000 24.162000,22.025000 24.198000,22.532000 24.223000,23.040000 24.241000,24.057000 24.235000,24.566000 24.189000,25.582000 24.151000,26.089000 24.101000,26.595000 24.041000,27.100000 23.971000,27.604000 23.890000,28.106000 23.798000,28.606000 23.696000,29.105000 23.584000,29.601000 23.461000,30.094000 23.328000,30.585000 23.184000,31.073000 22.867000,32.039000 22.693000,32.517000 22.509000,32.991000 22.112000,33.928000 21.898000,34.389000 21.689000,34.841000 21.300000,35.758000 21.120000,36.223000 20.950000,36.691000 20.639000,37.637000 20.368000,38.596000 20.248000,39.079000 20.138000,39.565000 20.038000,40.053000 19.948000,40.543000 19.869000,41.035000 19.800000,41.528000 19.741000,42.022000 19.693000,42.518000 19.655000,43.015000 19.627000,43.512000 19.610000,44.010000 19.607000,45.006000 19.622000,45.504000 19.647000,46.001000 19.682000,46.498000 19.727000,46.994000 19.783000,47.489000 19.926000,48.475000 20.013000,48.965000 20.218000,49.940000 20.336000,50.424000 20.464000,50.906000 20.602000,51.384000 20.750000,51.860000 20.907000,52.332000 21.075000,52.801000 21.253000,53.267000 21.440000,53.728000 21.637000,54.186000 21.843000,54.639000 22.059000,55.088000 22.519000,55.972000 22.763000,56.406000 23.016000,56.835000 23.277000,57.259000 23.827000,58.090000 24.411000,58.896000 25.029000,59.678000 25.350000,60.059000 26.015000,60.800000 26.711000,61.513000 27.436000,62.196000 28.190000,62.848000 28.576000,63.161000 29.369000,63.765000 29.775000,64.054000 30.604000,64.606000 31.027000,64.869000 31.889000,65.367000 32.328000,65.603000 32.772000,65.830000 33.220000,66.047000 34.130000,66.453000 35.056000,66.820000 35.524000,66.989000 35.996000,67.148000 36.471000,67.297000 37.431000,67.566000 37.914000,67.685000 38.889000,67.892000 39.379000,67.980000 39.871000,68.058000 40.364000,68.126000 40.859000,68.183000 41.355000,68.230000 41.852000,68.267000 42.349000,68.293000 42.847000,68.309000 43.345000,68.314000 43.345000,68.814000 42.836000,68.809000 42.328000,68.793000 41.820000,68.766000 41.313000,68.729000 40.807000,68.681000 40.302000,68.622000 39.798000,68.553000 39.295000,68.473000 38.795000,68.383000 38.296000,68.282000 37.800000,68.171000 37.306000,68.050000 36.815000,67.918000 36.327000,67.776000 35.841000,67.623000 35.360000,67.461000 34.881000,67.288000 34.406000,67.106000 33.469000,66.711000 33.007000,66.499000 32.549000,66.277000 32.096000,66.046000 31.648000,65.805000 31.205000,65.555000 30.768000,65.296000 30.336000,65.028000 29.909000,64.750000 29.489000,64.464000 29.075000,64.169000 28.265000,63.553000 27.871000,63.232000 27.483000,62.904000 27.101000,62.567000 26.361000,61.870000 26.002000,61.510000 25.650000,61.142000 24.971000,60.385000 24.643000,59.996000 24.013000,59.198000 23.710000,58.789000 23.416000,58.374000 23.131000,57.953000 22.587000,57.093000 22.329000,56.655000 22.080000,56.212000 21.841000,55.763000 21.611000,55.309000 21.391000,54.851000 21.180000,54.388000 20.787000,53.450000 20.606000,52.975000 20.435000,52.496000 20.274000,52.013000 20.123000,51.528000 19.982000,51.039000 19.851000,50.548000 19.621000,49.557000 19.522000,49.058000 19.433000,48.557000 19.355000,48.055000 19.287000,47.551000 19.183000,46.539000 19.147000,46.032000 19.122000,45.524000 19.108000,45.015000 19.110000,43.998000 19.156000,42.982000 19.194000,42.475000 19.244000,41.969000 19.304000,41.464000 19.374000,40.960000 19.455000,40.458000 19.547000,39.958000 19.649000,39.459000 19.761000,38.963000 19.884000,38.470000 20.017000,37.979000 20.161000,37.491000 20.478000,36.525000 20.652000,36.047000 20.836000,35.573000 21.233000,34.636000 21.447000,34.175000 21.656000,33.723000 22.045000,32.806000 22.225000,32.341000 22.395000,31.873000 22.706000,30.927000 22.977000,29.968000 23.097000,29.485000 23.207000,28.999000 23.307000,28.511000 23.397000,28.021000 23.476000,27.529000 23.545000,27.036000 23.604000,26.542000 23.652000,26.046000 23.718000,25.052000 23.735000,24.554000 23.738000,23.558000 23.723000,23.060000 23.698000,22.563000 23.663000,22.066000 23.618000,21.570000 23.562000,21.075000 23.419000,20.089000 23.332000,19.599000 23.127000,18.624000 23.009000,18.140000 22.881000,17.658000 22.743000,17.180000 22.438000,16.232000 22.270000,15.763000 22.092000,15.297000 21.905000,14.836000 21.708000,14.378000 21.502000,13.925000 21.286000,13.476000 20.826000,12.592000 20.582000,12.158000 20.068000,11.305000 19.518000,10.474000 18.934000,9.668000 18.316000,8.886000 17.995000,8.505000 17.330000,7.764000 16.986000,7.404000 16.634000,7.051000 15.909000,6.368000 15.155000,5.716000 14.769000,5.403000 13.976000,4.799000 13.570000,4.510000 12.741000,3.958000 12.318000,3.695000 11.456000,3.197000 11.017000,2.961000 10.573000,2.734000 10.125000,2.517000 9.215000,2.111000 8.289000,1.744000 7.821000,1.575000 7.349000,1.416000 6.874000,1.267000 5.914000,0.998000 5.431000,0.879000 4.456000,0.672000 3.966000,0.584000 3.474000,0.506000 2.981000,0.438000 2.486000,0.381000 1.990000,0.334000 1.493000,0.297000 0.996000,0.271000 0.498000,0.255000 0.000000,0.250000 z%22 /></g><g id=%22C179%22 data-name=%22as_component__PNGCOJINIPILRSBFUVHAAAKRQR7F7X5DOV45DHY3HPYOUZICQITA%22><path class=%22layer_1_0%22 d=%22M 9.889000,3.500000 0.000000,1.275000 0.000000,-1.275000 9.889000,-3.500000 16.000000,-3.500000 16.000000,3.500000 z%22 /><path class=%22layer_2_0%22 d=%22M 0.000000,-0.250000 10.000000,-2.500000 10.000000,2.500000 0.000000,0.250000 z%22 /><rect class=%22layer_2_0%22 x=%2210.300000%22 y=%22-2.500000%22 width=%220.300000%22 height=%225.000000%22 /><rect class=%22layer_2_0%22 x=%2210.900000%22 y=%22-2.500000%22 width=%220.300000%22 height=%225.000000%22 /><rect class=%22layer_2_0%22 x=%2211.500000%22 y=%22-2.500000%22 width=%220.300000%22 height=%225.000000%22 /><rect class=%22layer_2_0%22 x=%2212.100000%22 y=%22-2.500000%22 width=%220.300000%22 height=%225.000000%22 /><rect class=%22layer_2_0%22 x=%2212.700000%22 y=%22-2.500000%22 width=%220.300000%22 height=%225.000000%22 /><rect class=%22layer_2_0%22 x=%2213.300000%22 y=%22-2.500000%22 width=%220.300000%22 height=%225.000000%22 /><rect class=%22layer_2_0%22 x=%2213.900000%22 y=%22-2.500000%22 width=%220.300000%22 height=%225.000000%22 /><rect class=%22layer_2_0%22 x=%2214.500000%22 y=%22-2.500000%22 width=%220.300000%22 height=%225.000000%22 /><rect class=%22layer_2_0%22 x=%2215.100000%22 y=%22-2.500000%22 width=%220.300000%22 height=%225.000000%22 /><rect class=%22layer_2_0%22 x=%2215.700000%22 y=%22-2.500000%22 width=%220.300000%22 height=%225.000000%22 /></g><g id=%22C180%22 data-name=%22s_bend_l_17P08749175597054_o_25P692049928950027_p_Strip%22><path class=%22layer_1_0%22 d=%22M 0.000000,-1.250000 0.357000,-1.244000 0.713000,-1.226000 1.068000,-1.196000 1.422000,-1.153000 1.775000,-1.099000 2.126000,-1.033000 2.474000,-0.955000 2.819000,-0.865000 3.161000,-0.764000 3.499000,-0.651000 3.833000,-0.526000 4.163000,-0.391000 4.488000,-0.244000 4.808000,-0.086000 5.123000,0.082000 5.431000,0.261000 5.733000,0.451000 6.029000,0.650000 6.318000,0.860000 6.599000,1.079000 6.873000,1.308000 7.139000,1.545000 7.397000,1.792000 7.646000,2.047000 7.886000,2.311000 8.118000,2.582000 8.340000,2.861000 8.552000,3.148000 8.755000,3.442000 8.947000,3.742000 9.129000,4.049000 9.301000,4.361000 9.462000,4.680000 9.612000,5.003000 9.751000,5.332000 9.879000,5.665000 9.995000,6.002000 10.100000,6.343000 10.193000,6.687000 10.275000,7.034000 10.345000,7.384000 10.402000,7.736000 10.448000,8.090000 10.482000,8.445000 10.504000,8.801000 10.513000,9.158000 10.511000,9.514000 10.497000,9.871000 10.470000,10.226000 10.431000,10.581000 10.381000,10.934000 10.318000,11.285000 10.243000,11.634000 10.157000,11.980000 10.059000,12.323000 9.950000,12.663000 9.829000,12.998000 9.696000,13.329000 9.503000,13.838000 9.345000,14.358000 9.222000,14.887000 9.136000,15.424000 9.086000,15.966000 9.073000,16.509000 9.097000,17.052000 9.158000,17.593000 9.255000,18.128000 9.389000,18.655000 9.468000,18.914000 9.655000,19.425000 9.875000,19.922000 10.128000,20.403000 10.414000,20.866000 10.730000,21.308000 11.076000,21.728000 11.449000,22.123000 11.848000,22.493000 12.271000,22.834000 12.717000,23.146000 13.182000,23.426000 13.666000,23.675000 14.165000,23.890000 14.678000,24.071000 14.938000,24.149000 15.467000,24.277000 16.003000,24.368000 16.273000,24.401000 16.815000,24.437000 17.087000,24.442000 17.087000,26.942000 16.730000,26.936000 16.374000,26.918000 16.019000,26.888000 15.665000,26.845000 15.312000,26.791000 14.961000,26.725000 14.613000,26.647000 14.268000,26.557000 13.926000,26.456000 13.588000,26.343000 13.254000,26.218000 12.924000,26.083000 12.599000,25.936000 12.279000,25.778000 11.964000,25.610000 11.656000,25.431000 11.354000,25.241000 11.058000,25.042000 10.769000,24.832000 10.488000,24.613000 10.214000,24.384000 9.948000,24.147000 9.690000,23.900000 9.441000,23.645000 9.201000,23.381000 8.969000,23.110000 8.747000,22.831000 8.535000,22.544000 8.332000,22.250000 8.140000,21.950000 7.958000,21.643000 7.786000,21.331000 7.625000,21.012000 7.475000,20.689000 7.336000,20.360000 7.208000,20.027000 7.092000,19.690000 6.987000,19.349000 6.894000,19.005000 6.812000,18.658000 6.742000,18.308000 6.685000,17.956000 6.639000,17.602000 6.605000,17.247000 6.583000,16.891000 6.574000,16.534000 6.576000,16.178000 6.591000,15.821000 6.617000,15.466000 6.656000,15.111000 6.706000,14.758000 6.769000,14.407000 6.844000,14.058000 6.930000,13.712000 7.028000,13.369000 7.137000,13.029000 7.258000,12.694000 7.391000,12.363000 7.584000,11.854000 7.742000,11.334000 7.865000,10.805000 7.951000,10.268000 7.980000,9.998000 8.012000,9.455000 8.006000,8.911000 7.964000,8.369000 7.885000,7.831000 7.770000,7.300000 7.619000,6.778000 7.530000,6.521000 7.326000,6.016000 7.089000,5.527000 6.820000,5.055000 6.519000,4.602000 6.188000,4.171000 5.828000,3.763000 5.442000,3.381000 5.030000,3.025000 4.596000,2.699000 4.140000,2.402000 3.665000,2.137000 3.173000,1.905000 2.667000,1.707000 2.149000,1.543000 1.620000,1.415000 1.353000,1.365000 0.814000,1.291000 0.543000,1.268000 0.000000,1.250000 z%22 /><path class=%22layer_2_0%22 d=%22M 0.000000,-0.250000 0.323000,-0.245000 0.967000,-0.201000 1.287000,-0.163000 1.923000,-0.054000 2.238000,0.017000 2.551000,0.098000 2.860000,0.190000 3.166000,0.292000 3.469000,0.405000 4.062000,0.660000 4.351000,0.803000 4.636000,0.956000 4.915000,1.118000 5.188000,1.289000 5.456000,1.470000 5.717000,1.659000 5.972000,1.858000 6.219000,2.064000 6.460000,2.279000 6.919000,2.734000 7.136000,2.972000 7.346000,3.218000 7.547000,3.470000 7.739000,3.730000 7.922000,3.995000 8.096000,4.267000 8.261000,4.545000 8.416000,4.828000 8.562000,5.116000 8.698000,5.408000 8.824000,5.706000 8.939000,6.007000 9.044000,6.312000 9.139000,6.621000 9.224000,6.932000 9.298000,7.246000 9.361000,7.563000 9.413000,7.881000 9.455000,8.202000 9.485000,8.523000 9.505000,8.845000 9.514000,9.168000 9.498000,9.813000 9.474000,10.135000 9.439000,10.456000 9.393000,10.775000 9.337000,11.093000 9.269000,11.409000 9.191000,11.722000 9.102000,12.032000 9.003000,12.339000 8.894000,12.643000 8.774000,12.943000 8.557000,13.514000 8.463000,13.805000 8.379000,14.099000 8.305000,14.396000 8.241000,14.695000 8.187000,14.996000 8.144000,15.299000 8.111000,15.603000 8.088000,15.908000 8.073000,16.519000 8.100000,17.130000 8.129000,17.435000 8.218000,18.040000 8.278000,18.340000 8.348000,18.637000 8.428000,18.932000 8.518000,19.225000 8.727000,19.799000 8.846000,20.081000 9.113000,20.631000 9.260000,20.899000 9.416000,21.162000 9.581000,21.420000 9.937000,21.917000 10.127000,22.157000 10.532000,22.615000 10.745000,22.834000 11.194000,23.249000 11.429000,23.445000 11.918000,23.813000 12.171000,23.984000 12.695000,24.300000 13.239000,24.579000 13.800000,24.822000 14.377000,25.025000 14.670000,25.112000 14.966000,25.189000 15.565000,25.313000 15.867000,25.359000 16.171000,25.395000 16.476000,25.421000 16.781000,25.437000 17.087000,25.442000 17.087000,25.942000 16.764000,25.937000 16.120000,25.893000 15.800000,25.855000 15.164000,25.746000 14.849000,25.675000 14.536000,25.594000 14.227000,25.502000 13.921000,25.400000 13.618000,25.287000 13.026000,25.032000 12.736000,24.889000 12.172000,24.574000 11.899000,24.403000 11.631000,24.222000 11.370000,24.033000 11.115000,23.834000 10.868000,23.628000 10.627000,23.413000 10.168000,22.958000 9.951000,22.720000 9.741000,22.474000 9.540000,22.222000 9.348000,21.962000 9.165000,21.697000 8.991000,21.425000 8.826000,21.147000 8.671000,20.864000 8.525000,20.576000 8.389000,20.284000 8.263000,19.986000 8.148000,19.685000 8.043000,19.380000 7.948000,19.071000 7.863000,18.760000 7.789000,18.446000 7.726000,18.129000 7.674000,17.811000 7.633000,17.490000 7.602000,17.169000 7.582000,16.847000 7.573000,16.524000 7.589000,15.879000 7.613000,15.557000 7.648000,15.236000 7.694000,14.917000 7.750000,14.599000 7.818000,14.283000 7.896000,13.970000 7.985000,13.660000 8.084000,13.353000 8.193000,13.049000 8.313000,12.749000 8.530000,12.178000 8.624000,11.887000 8.708000,11.593000 8.782000,11.296000 8.846000,10.997000 8.900000,10.696000 8.943000,10.393000 8.976000,10.089000 8.999000,9.784000 9.014000,9.173000 8.987000,8.562000 8.958000,8.257000 8.869000,7.652000 8.809000,7.352000 8.739000,7.055000 8.659000,6.760000 8.569000,6.467000 8.360000,5.893000 8.241000,5.611000 7.974000,5.061000 7.827000,4.793000 7.671000,4.530000 7.506000,4.272000 7.332000,4.021000 6.960000,3.535000 6.761000,3.303000 6.342000,2.858000 5.893000,2.443000 5.417000,2.059000 5.169000,1.879000 4.916000,1.708000 4.392000,1.392000 3.848000,1.113000 3.287000,0.870000 2.710000,0.667000 2.417000,0.580000 2.121000,0.503000 1.522000,0.379000 1.220000,0.333000 0.916000,0.297000 0.306000,0.255000 0.000000,0.250000 z%22 /></g><g id=%22C181%22 data-name=%22as_component__PNGCOJINIPILRSBFUVHAAAKRQR7F7X5DOV45DHY3HPYOUZICQITA%22><path class=%22layer_1_0%22 d=%22M 9.889000,3.500000 0.000000,1.275000 0.000000,-1.275000 9.889000,-3.500000 16.000000,-3.500000 16.000000,3.500000 z%22 /><path class=%22layer_2_0%22 d=%22M 0.000000,-0.250000 10.000000,-2.500000 10.000000,2.500000 0.000000,0.250000 z%22 /><rect class=%22layer_2_0%22 x=%2210.300000%22 y=%22-2.500000%22 width=%220.300000%22 height=%225.000000%22 /><rect class=%22layer_2_0%22 x=%2210.900000%22 y=%22-2.500000%22 width=%220.300000%22 height=%225.000000%22 /><rect class=%22layer_2_0%22 x=%2211.500000%22 y=%22-2.500000%22 width=%220.300000%22 height=%225.000000%22 /><rect class=%22layer_2_0%22 x=%2212.100000%22 y=%22-2.500000%22 width=%220.300000%22 height=%225.000000%22 /><rect class=%22layer_2_0%22 x=%2212.700000%22 y=%22-2.500000%22 width=%220.300000%22 height=%225.000000%22 /><rect class=%22layer_2_0%22 x=%2213.300000%22 y=%22-2.500000%22 width=%220.300000%22 height=%225.000000%22 /><rect class=%22layer_2_0%22 x=%2213.900000%22 y=%22-2.500000%22 width=%220.300000%22 height=%225.000000%22 /><rect class=%22layer_2_0%22 x=%2214.500000%22 y=%22-2.500000%22 width=%220.300000%22 height=%225.000000%22 /><rect class=%22layer_2_0%22 x=%2215.100000%22 y=%22-2.500000%22 width=%220.300000%22 height=%225.000000%22 /><rect class=%22layer_2_0%22 x=%2215.700000%22 y=%22-2.500000%22 width=%220.300000%22 height=%225.000000%22 /></g><g id=%22C182%22 data-name=%22s_bend_l_9P016812268734505_o_5P02614839397448_p_Strip%22><path class=%22layer_1_0%22 d=%22M 0.000000,-1.250000 0.303000,-1.243000 0.605000,-1.222000 0.906000,-1.187000 1.204000,-1.138000 1.501000,-1.076000 1.794000,-1.000000 2.083000,-0.910000 2.368000,-0.807000 2.647000,-0.691000 2.922000,-0.562000 3.189000,-0.421000 3.450000,-0.268000 3.704000,-0.102000 3.950000,0.075000 4.187000,0.263000 4.415000,0.462000 4.634000,0.671000 4.843000,0.890000 5.042000,1.118000 5.230000,1.356000 5.407000,1.602000 5.572000,1.856000 5.783000,2.165000 6.022000,2.453000 6.287000,2.718000 6.575000,2.957000 6.883000,3.169000 7.210000,3.351000 7.553000,3.502000 7.908000,3.621000 8.272000,3.707000 8.643000,3.759000 9.017000,3.776000 9.017000,6.276000 8.714000,6.269000 8.412000,6.248000 8.111000,6.213000 7.813000,6.164000 7.516000,6.102000 7.223000,6.026000 6.934000,5.936000 6.649000,5.833000 6.370000,5.717000 6.095000,5.588000 5.828000,5.447000 5.567000,5.294000 5.313000,5.128000 5.067000,4.951000 4.830000,4.763000 4.602000,4.564000 4.383000,4.355000 4.174000,4.136000 3.975000,3.908000 3.787000,3.670000 3.610000,3.424000 3.445000,3.170000 3.234000,2.861000 2.995000,2.573000 2.730000,2.308000 2.442000,2.069000 2.134000,1.857000 1.807000,1.675000 1.464000,1.524000 1.109000,1.405000 0.745000,1.319000 0.374000,1.267000 0.000000,1.250000 z%22 /><path class=%22layer_2_0%22 d=%22M 0.000000,-0.250000 0.257000,-0.244000 0.512000,-0.226000 0.767000,-0.197000 1.021000,-0.155000 1.272000,-0.102000 1.520000,-0.038000 1.765000,0.038000 2.006000,0.125000 2.243000,0.224000 2.476000,0.333000 2.703000,0.452000 2.924000,0.582000 3.139000,0.723000 3.347000,0.872000 3.548000,1.032000 3.741000,1.200000 3.927000,1.378000 4.104000,1.563000 4.272000,1.757000 4.431000,1.958000 4.581000,2.166000 4.721000,2.382000 4.848000,2.577000 4.985000,2.767000 5.130000,2.950000 5.283000,3.126000 5.444000,3.295000 5.789000,3.610000 5.972000,3.755000 6.161000,3.891000 6.357000,4.019000 6.558000,4.137000 6.764000,4.246000 7.191000,4.435000 7.411000,4.514000 7.634000,4.583000 7.860000,4.642000 8.088000,4.690000 8.319000,4.728000 8.784000,4.771000 9.017000,4.776000 9.017000,5.276000 8.760000,5.270000 8.505000,5.252000 8.250000,5.223000 7.996000,5.181000 7.745000,5.128000 7.497000,5.064000 7.252000,4.988000 7.011000,4.901000 6.774000,4.802000 6.541000,4.693000 6.315000,4.574000 6.093000,4.444000 5.878000,4.303000 5.670000,4.154000 5.469000,3.994000 5.276000,3.826000 5.090000,3.648000 4.913000,3.463000 4.745000,3.269000 4.586000,3.068000 4.436000,2.860000 4.296000,2.644000 4.169000,2.449000 4.032000,2.259000 3.887000,2.076000 3.734000,1.900000 3.573000,1.731000 3.228000,1.416000 3.045000,1.271000 2.856000,1.135000 2.660000,1.007000 2.459000,0.889000 2.253000,0.780000 1.826000,0.591000 1.606000,0.512000 1.383000,0.443000 1.157000,0.384000 0.929000,0.336000 0.698000,0.298000 0.233000,0.255000 0.000000,0.250000 z%22 /></g><g id=%22C183%22 data-name=%22as_component__PNGCOJINIPILRSBFUVHAAAKRQR7F7X5DOV45DHY3HPYOUZICQITA%22><path class=%22layer_1_0%22 d=%22M 9.889000,3.500000 0.000000,1.275000 0.000000,-1.275000 9.889000,-3.500000 16.000000,-3.500000 16.000000,3.500000 z%22 /><path class=%22layer_2_0%22 d=%22M 0.000000,-0.250000 10.000000,-2.500000 10.000000,2.500000 0.000000,0.250000 z%22 /><rect class=%22layer_2_0%22 x=%2210.300000%22 y=%22-2.500000%22 width=%220.300000%22 height=%225.000000%22 /><rect class=%22layer_2_0%22 x=%2210.900000%22 y=%22-2.500000%22 width=%220.300000%22 height=%225.000000%22 /><rect class=%22layer_2_0%22 x=%2211.500000%22 y=%22-2.500000%22 width=%220.300000%22 height=%225.000000%22 /><rect class=%22layer_2_0%22 x=%2212.100000%22 y=%22-2.500000%22 width=%220.300000%22 height=%225.000000%22 /><rect class=%22layer_2_0%22 x=%2212.700000%22 y=%22-2.500000%22 width=%220.300000%22 height=%225.000000%22 /><rect class=%22layer_2_0%22 x=%2213.300000%22 y=%22-2.500000%22 width=%220.300000%22 height=%225.000000%22 /><rect class=%22layer_2_0%22 x=%2213.900000%22 y=%22-2.500000%22 width=%220.300000%22 height=%225.000000%22 /><rect class=%22layer_2_0%22 x=%2214.500000%22 y=%22-2.500000%22 width=%220.300000%22 height=%225.000000%22 /><rect class=%22layer_2_0%22 x=%2215.100000%22 y=%22-2.500000%22 width=%220.300000%22 height=%225.000000%22 /><rect class=%22layer_2_0%22 x=%2215.700000%22 y=%22-2.500000%22 width=%220.300000%22 height=%225.000000%22 /></g><g id=%22C184%22 data-name=%22s_bend_l_8P920962691925894_o_3P880042380634731_p_Strip%22><path class=%22layer_1_0%22 d=%22M 0.000000,-1.250000 0.335000,-1.242000 0.669000,-1.219000 1.002000,-1.181000 1.332000,-1.128000 1.660000,-1.060000 1.985000,-0.977000 2.305000,-0.879000 2.621000,-0.767000 2.931000,-0.640000 3.235000,-0.500000 3.532000,-0.345000 3.822000,-0.178000 4.104000,0.003000 4.377000,0.196000 4.642000,0.402000 4.896000,0.619000 5.141000,0.848000 5.375000,1.088000 5.529000,1.246000 5.859000,1.540000 6.033000,1.676000 6.400000,1.923000 6.787000,2.135000 6.987000,2.228000 7.400000,2.385000 7.612000,2.450000 7.826000,2.505000 8.042000,2.550000 8.260000,2.585000 8.700000,2.625000 8.921000,2.630000 8.921000,5.130000 8.586000,5.122000 8.252000,5.099000 7.919000,5.061000 7.589000,5.008000 7.261000,4.940000 6.936000,4.857000 6.616000,4.759000 6.300000,4.647000 5.990000,4.520000 5.686000,4.380000 5.389000,4.226000 5.099000,4.058000 4.817000,3.877000 4.544000,3.684000 4.279000,3.478000 4.025000,3.261000 3.780000,3.032000 3.546000,2.792000 3.392000,2.634000 3.230000,2.483000 2.888000,2.204000 2.522000,1.957000 2.330000,1.847000 1.934000,1.652000 1.729000,1.569000 1.309000,1.430000 1.095000,1.375000 0.879000,1.330000 0.661000,1.295000 0.221000,1.255000 0.000000,1.250000 z%22 /><path class=%22layer_2_0%22 d=%22M 0.000000,-0.250000 0.289000,-0.243000 0.578000,-0.224000 0.865000,-0.191000 1.151000,-0.145000 1.434000,-0.086000 1.715000,-0.014000 1.991000,0.070000 2.264000,0.167000 2.532000,0.277000 2.794000,0.398000 3.051000,0.531000 3.302000,0.676000 3.545000,0.832000 3.782000,0.999000 4.010000,1.177000 4.230000,1.365000 4.441000,1.562000 4.643000,1.770000 4.830000,1.960000 5.024000,2.142000 5.227000,2.315000 5.437000,2.479000 5.655000,2.633000 5.879000,2.777000 6.110000,2.910000 6.347000,3.033000 6.589000,3.145000 6.835000,3.245000 7.087000,3.335000 7.341000,3.413000 7.600000,3.479000 7.861000,3.533000 8.124000,3.575000 8.389000,3.606000 8.655000,3.624000 8.921000,3.630000 8.921000,4.130000 8.632000,4.123000 8.343000,4.104000 8.056000,4.071000 7.770000,4.025000 7.487000,3.966000 7.206000,3.894000 6.930000,3.810000 6.657000,3.713000 6.389000,3.603000 6.127000,3.482000 5.870000,3.349000 5.619000,3.204000 5.376000,3.048000 5.139000,2.881000 4.911000,2.703000 4.691000,2.515000 4.480000,2.318000 4.278000,2.110000 4.091000,1.920000 3.897000,1.738000 3.694000,1.565000 3.484000,1.401000 3.266000,1.247000 3.042000,1.103000 2.811000,0.970000 2.574000,0.847000 2.332000,0.735000 2.086000,0.635000 1.834000,0.545000 1.580000,0.467000 1.321000,0.401000 1.060000,0.347000 0.797000,0.305000 0.532000,0.274000 0.266000,0.256000 0.000000,0.250000 z%22 /></g><g id=%22C185%22 data-name=%22as_component__PNGCOJINIPILRSBFUVHAAAKRQR7F7X5DOV45DHY3HPYOUZICQITA%22><path class=%22layer_1_0%22 d=%22M 9.889000,3.500000 0.000000,1.275000 0.000000,-1.275000 9.889000,-3.500000 16.000000,-3.500000 16.000000,3.500000 z%22 /><path class=%22layer_2_0%22 d=%22M 0.000000,-0.250000 10.000000,-2.500000 10.000000,2.500000 0.000000,0.250000 z%22 /><rect class=%22layer_2_0%22 x=%2210.300000%22 y=%22-2.500000%22 width=%220.300000%22 height=%225.000000%22 /><rect class=%22layer_2_0%22 x=%2210.900000%22 y=%22-2.500000%22 width=%220.300000%22 height=%225.000000%22 /><rect class=%22layer_2_0%22 x=%2211.500000%22 y=%22-2.500000%22 width=%220.300000%22 height=%225.000000%22 /><rect class=%22layer_2_0%22 x=%2212.100000%22 y=%22-2.500000%22 width=%220.300000%22 height=%225.000000%22 /><rect class=%22layer_2_0%22 x=%2212.700000%22 y=%22-2.500000%22 width=%220.300000%22 height=%225.000000%22 /><rect class=%22layer_2_0%22 x=%2213.300000%22 y=%22-2.500000%22 width=%220.300000%22 height=%225.000000%22 /><rect class=%22layer_2_0%22 x=%2213.900000%22 y=%22-2.500000%22 width=%220.300000%22 height=%225.000000%22 /><rect class=%22layer_2_0%22 x=%2214.500000%22 y=%22-2.500000%22 width=%220.300000%22 height=%225.000000%22 /><rect class=%22layer_2_0%22 x=%2215.100000%22 y=%22-2.500000%22 width=%220.300000%22 height=%225.000000%22 /><rect class=%22layer_2_0%22 x=%2215.700000%22 y=%22-2.500000%22 width=%220.300000%22 height=%225.000000%22 /></g><g id=%22C186%22 data-name=%22s_bend_l_46P314747948036015_o_40P18767179211958_p_Strip%22><path class=%22layer_1_0%22 d=%22M 0.000000,-1.250000 0.518000,-1.245000 1.036000,-1.228000 1.553000,-1.201000 2.069000,-1.163000 2.585000,-1.114000 3.100000,-1.054000 3.613000,-0.984000 4.124000,-0.902000 4.634000,-0.810000 5.142000,-0.708000 5.647000,-0.594000 6.150000,-0.470000 6.650000,-0.336000 7.147000,-0.191000 7.641000,-0.035000 8.132000,0.131000 8.619000,0.307000 9.102000,0.493000 9.582000,0.689000 10.057000,0.896000 10.527000,1.112000 10.993000,1.338000 11.454000,1.574000 11.910000,1.820000 12.361000,2.075000 12.806000,2.339000 13.246000,2.613000 13.680000,2.896000 14.108000,3.188000 14.529000,3.489000 15.353000,4.117000 15.755000,4.444000 16.537000,5.123000 17.290000,5.834000 18.013000,6.577000 18.362000,6.959000 18.703000,7.348000 19.036000,7.745000 19.361000,8.149000 19.677000,8.559000 19.985000,8.976000 20.283000,9.399000 20.573000,9.829000 21.125000,10.705000 21.387000,11.152000 21.639000,11.604000 21.882000,12.062000 22.115000,12.524000 22.339000,12.991000 22.553000,13.463000 22.756000,13.939000 22.950000,14.420000 23.307000,15.392000 23.470000,15.884000 23.622000,16.379000 23.764000,16.877000 23.896000,17.378000 24.017000,17.881000 24.128000,18.387000 24.317000,19.406000 24.395000,19.918000 24.465000,20.378000 24.635000,21.293000 24.843000,22.200000 25.089000,23.098000 25.373000,23.984000 25.694000,24.858000 26.051000,25.718000 26.443000,26.561000 26.871000,27.388000 27.334000,28.196000 27.577000,28.592000 27.829000,28.983000 28.358000,29.750000 28.918000,30.493000 29.509000,31.212000 30.130000,31.905000 30.779000,32.572000 31.456000,33.211000 31.804000,33.520000 32.520000,34.115000 33.260000,34.680000 34.023000,35.213000 34.808000,35.713000 35.208000,35.951000 35.613000,36.180000 36.437000,36.612000 36.856000,36.816000 37.705000,37.196000 38.570000,37.539000 39.008000,37.698000 39.449000,37.847000 40.340000,38.116000 41.241000,38.349000 41.695000,38.451000 42.609000,38.626000 43.069000,38.699000 43.992000,38.816000 44.920000,38.894000 45.850000,38.933000 46.315000,38.938000 46.315000,41.438000 45.797000,41.433000 45.279000,41.416000 44.762000,41.389000 44.246000,41.351000 43.730000,41.302000 43.215000,41.242000 42.702000,41.172000 42.191000,41.090000 41.681000,40.998000 41.173000,40.896000 40.668000,40.782000 40.165000,40.658000 39.665000,40.524000 39.168000,40.379000 38.674000,40.223000 38.183000,40.057000 37.696000,39.881000 37.213000,39.695000 36.733000,39.499000 36.258000,39.292000 35.788000,39.076000 35.322000,38.850000 34.861000,38.614000 34.405000,38.368000 33.954000,38.113000 33.509000,37.849000 33.069000,37.575000 32.635000,37.292000 32.207000,37.000000 31.786000,36.699000 30.962000,36.071000 30.561000,35.744000 29.778000,35.065000 29.025000,34.354000 28.302000,33.611000 27.953000,33.229000 27.612000,32.840000 27.279000,32.443000 26.954000,32.039000 26.638000,31.629000 26.330000,31.212000 26.032000,30.789000 25.742000,30.359000 25.190000,29.483000 24.928000,29.036000 24.676000,28.584000 24.433000,28.126000 24.200000,27.664000 23.976000,27.197000 23.762000,26.725000 23.559000,26.249000 23.365000,25.768000 23.008000,24.796000 22.845000,24.304000 22.693000,23.809000 22.551000,23.311000 22.419000,22.810000 22.298000,22.307000 22.187000,21.801000 21.998000,20.782000 21.920000,20.270000 21.850000,19.810000 21.680000,18.895000 21.472000,17.988000 21.226000,17.090000 20.942000,16.204000 20.621000,15.330000 20.264000,14.470000 19.872000,13.627000 19.444000,12.800000 19.217000,12.394000 18.738000,11.596000 18.486000,11.205000 17.957000,10.438000 17.397000,9.695000 16.806000,8.976000 16.499000,8.626000 15.864000,7.946000 15.201000,7.293000 14.511000,6.668000 13.795000,6.073000 13.055000,5.508000 12.292000,4.975000 11.902000,4.721000 11.107000,4.237000 10.702000,4.008000 10.292000,3.788000 9.459000,3.372000 8.610000,2.992000 8.179000,2.816000 7.307000,2.490000 6.422000,2.202000 5.975000,2.072000 5.074000,1.839000 4.620000,1.737000 3.706000,1.562000 3.246000,1.489000 2.323000,1.372000 1.859000,1.328000 0.931000,1.270000 0.000000,1.250000 z%22 /><path class=%22layer_2_0%22 d=%22M 0.000000,-0.250000 0.497000,-0.245000 0.994000,-0.229000 1.490000,-0.203000 2.480000,-0.120000 3.466000,0.005000 3.957000,0.083000 4.933000,0.270000 5.418000,0.379000 5.900000,0.498000 6.380000,0.627000 6.857000,0.766000 7.331000,0.915000 8.269000,1.243000 8.733000,1.422000 9.649000,1.809000 10.100000,2.016000 10.547000,2.233000 11.427000,2.695000 11.860000,2.940000 12.709000,3.456000 13.535000,4.008000 13.940000,4.297000 14.338000,4.594000 15.115000,5.213000 15.494000,5.535000 16.231000,6.202000 16.939000,6.899000 17.282000,7.259000 17.617000,7.626000 18.264000,8.380000 18.879000,9.161000 19.174000,9.561000 19.738000,10.379000 20.007000,10.797000 20.267000,11.220000 20.519000,11.649000 20.994000,12.521000 21.218000,12.965000 21.432000,13.413000 21.833000,14.323000 22.195000,15.248000 22.361000,15.717000 22.664000,16.663000 22.800000,17.141000 22.926000,17.622000 23.042000,18.105000 23.148000,18.590000 23.244000,19.078000 23.330000,19.568000 23.405000,20.059000 23.562000,21.019000 23.656000,21.496000 23.760000,21.971000 23.997000,22.915000 24.274000,23.847000 24.427000,24.309000 24.762000,25.222000 25.135000,26.121000 25.336000,26.564000 25.765000,27.437000 26.230000,28.291000 26.476000,28.711000 26.731000,29.125000 27.267000,29.937000 27.547000,30.335000 28.133000,31.111000 28.437000,31.490000 28.750000,31.863000 29.399000,32.588000 30.078000,33.285000 30.428000,33.623000 30.785000,33.953000 31.520000,34.590000 31.897000,34.897000 32.280000,35.196000 33.066000,35.770000 33.875000,36.310000 34.706000,36.816000 35.558000,37.286000 36.429000,37.720000 36.870000,37.923000 37.317000,38.117000 38.221000,38.476000 38.678000,38.642000 39.603000,38.943000 40.540000,39.206000 41.486000,39.429000 42.442000,39.612000 42.922000,39.688000 43.404000,39.754000 43.887000,39.810000 44.857000,39.892000 45.342000,39.918000 46.315000,39.938000 46.315000,40.438000 45.818000,40.433000 45.321000,40.417000 44.825000,40.391000 43.835000,40.308000 42.849000,40.183000 42.358000,40.105000 41.382000,39.918000 40.897000,39.809000 40.415000,39.690000 39.935000,39.561000 39.458000,39.422000 38.984000,39.273000 38.513000,39.114000 38.046000,38.945000 37.582000,38.766000 37.122000,38.577000 36.666000,38.379000 36.215000,38.172000 35.325000,37.729000 34.455000,37.248000 33.606000,36.732000 32.780000,36.180000 32.375000,35.891000 31.977000,35.594000 31.200000,34.975000 30.821000,34.653000 30.084000,33.986000 29.376000,33.289000 29.033000,32.929000 28.698000,32.562000 28.051000,31.808000 27.436000,31.027000 27.141000,30.627000 26.577000,29.809000 26.308000,29.391000 25.796000,28.539000 25.321000,27.667000 25.097000,27.223000 24.883000,26.775000 24.482000,25.865000 24.120000,24.940000 23.954000,24.471000 23.651000,23.525000 23.515000,23.047000 23.389000,22.566000 23.273000,22.083000 23.167000,21.598000 23.071000,21.110000 22.985000,20.620000 22.910000,20.129000 22.753000,19.169000 22.659000,18.692000 22.555000,18.217000 22.318000,17.273000 22.041000,16.341000 21.888000,15.879000 21.553000,14.966000 21.180000,14.067000 20.979000,13.624000 20.550000,12.751000 20.085000,11.897000 19.839000,11.477000 19.584000,11.063000 19.320000,10.654000 18.768000,9.853000 18.479000,9.462000 17.878000,8.698000 17.565000,8.325000 16.916000,7.600000 16.238000,6.903000 15.530000,6.235000 14.795000,5.598000 14.035000,4.992000 13.249000,4.418000 12.440000,3.878000 11.609000,3.372000 10.757000,2.902000 9.886000,2.468000 9.445000,2.265000 8.998000,2.071000 8.548000,1.887000 7.637000,1.546000 6.712000,1.245000 5.775000,0.982000 4.829000,0.759000 3.873000,0.576000 3.393000,0.500000 2.911000,0.434000 2.428000,0.378000 1.943000,0.332000 0.973000,0.270000 0.000000,0.250000 z%22 /></g><g id=%22C187%22 data-name=%22as_component__PNGCOJINIPILRSBFUVHAAAKRQR7F7X5DOV45DHY3HPYOUZICQITA%22><path class=%22layer_1_0%22 d=%22M 9.889000,3.500000 0.000000,1.275000 0.000000,-1.275000 9.889000,-3.500000 16.000000,-3.500000 16.000000,3.500000 z%22 /><path class=%22layer_2_0%22 d=%22M 0.000000,-0.250000 10.000000,-2.500000 10.000000,2.500000 0.000000,0.250000 z%22 /><rect class=%22layer_2_0%22 x=%2210.300000%22 y=%22-2.500000%22 width=%220.300000%22 height=%225.000000%22 /><rect class=%22layer_2_0%22 x=%2210.900000%22 y=%22-2.500000%22 width=%220.300000%22 height=%225.000000%22 /><rect class=%22layer_2_0%22 x=%2211.500000%22 y=%22-2.500000%22 width=%220.300000%22 height=%225.000000%22 /><rect class=%22layer_2_0%22 x=%2212.100000%22 y=%22-2.500000%22 width=%220.300000%22 height=%225.000000%22 /><rect class=%22layer_2_0%22 x=%2212.700000%22 y=%22-2.500000%22 width=%220.300000%22 height=%225.000000%22 /><rect class=%22layer_2_0%22 x=%2213.300000%22 y=%22-2.500000%22 width=%220.300000%22 height=%225.000000%22 /><rect class=%22layer_2_0%22 x=%2213.900000%22 y=%22-2.500000%22 width=%220.300000%22 height=%225.000000%22 /><rect class=%22layer_2_0%22 x=%2214.500000%22 y=%22-2.500000%22 width=%220.300000%22 height=%225.000000%22 /><rect class=%22layer_2_0%22 x=%2215.100000%22 y=%22-2.500000%22 width=%220.300000%22 height=%225.000000%22 /><rect class=%22layer_2_0%22 x=%2215.700000%22 y=%22-2.500000%22 width=%220.300000%22 height=%225.000000%22 /></g><g id=%22C188%22 data-name=%22s_bend_l_45P14748636711672_o_46P68732623393142_p_Strip%22><path class=%22layer_1_0%22 d=%22M 0.000000,-1.250000 0.517000,-1.244000 1.033000,-1.228000 1.549000,-1.200000 2.065000,-1.160000 2.579000,-1.110000 3.092000,-1.049000 3.604000,-0.976000 4.622000,-0.798000 5.127000,-0.692000 5.631000,-0.575000 6.132000,-0.448000 6.629000,-0.310000 7.616000,-0.001000 8.104000,0.170000 8.588000,0.351000 9.068000,0.542000 9.543000,0.744000 10.015000,0.956000 10.481000,1.178000 10.943000,1.410000 11.399000,1.652000 11.850000,1.905000 12.296000,2.166000 13.170000,2.718000 14.018000,3.308000 14.433000,3.616000 14.841000,3.934000 15.242000,4.260000 16.022000,4.938000 16.401000,5.289000 16.772000,5.649000 17.135000,6.016000 17.490000,6.392000 17.837000,6.775000 18.176000,7.165000 18.506000,7.563000 19.140000,8.379000 19.443000,8.797000 19.737000,9.222000 20.022000,9.653000 20.298000,10.090000 20.564000,10.533000 20.821000,10.982000 21.067000,11.436000 21.304000,11.895000 21.531000,12.360000 21.748000,12.829000 21.954000,13.302000 22.150000,13.781000 22.336000,14.263000 22.511000,14.749000 22.676000,15.239000 22.830000,15.732000 22.973000,16.229000 23.105000,16.728000 23.227000,17.230000 23.337000,17.735000 23.437000,18.242000 23.526000,18.751000 23.603000,19.262000 23.670000,19.775000 23.725000,20.289000 23.769000,20.803000 23.803000,21.319000 23.824000,21.835000 23.835000,22.352000 23.835000,22.869000 23.823000,23.385000 23.812000,23.848000 23.821000,24.773000 23.871000,25.697000 23.910000,26.158000 24.019000,27.076000 24.168000,27.989000 24.257000,28.443000 24.356000,28.895000 24.584000,29.792000 24.712000,30.236000 24.997000,31.116000 25.320000,31.983000 25.680000,32.835000 26.077000,33.671000 26.289000,34.082000 26.740000,34.890000 26.978000,35.286000 27.225000,35.677000 27.743000,36.443000 28.015000,36.818000 28.582000,37.549000 29.181000,38.254000 29.491000,38.597000 30.134000,39.262000 30.806000,39.898000 31.151000,40.205000 31.863000,40.797000 32.599000,41.357000 33.359000,41.885000 34.141000,42.379000 34.943000,42.839000 35.765000,43.264000 36.183000,43.463000 37.030000,43.833000 37.893000,44.166000 38.330000,44.319000 38.770000,44.462000 39.659000,44.719000 40.557000,44.938000 41.465000,45.117000 41.921000,45.192000 42.379000,45.257000 43.299000,45.357000 43.760000,45.392000 44.684000,45.432000 45.147000,45.437000 45.147000,47.937000 44.630000,47.931000 44.114000,47.915000 43.598000,47.887000 43.083000,47.847000 42.568000,47.797000 42.055000,47.736000 41.543000,47.663000 41.034000,47.579000 40.526000,47.485000 40.020000,47.379000 39.516000,47.262000 39.015000,47.135000 38.518000,46.997000 37.531000,46.688000 37.043000,46.517000 36.559000,46.336000 36.079000,46.145000 35.604000,45.943000 35.132000,45.731000 34.666000,45.509000 34.204000,45.277000 33.748000,45.035000 32.851000,44.521000 31.977000,43.969000 31.550000,43.678000 31.129000,43.379000 30.714000,43.071000 30.306000,42.753000 29.905000,42.427000 29.125000,41.749000 28.746000,41.398000 28.375000,41.038000 28.012000,40.671000 27.657000,40.295000 27.310000,39.912000 26.971000,39.522000 26.641000,39.124000 26.320000,38.720000 26.007000,38.308000 25.704000,37.890000 25.410000,37.465000 25.125000,37.034000 24.849000,36.597000 24.583000,36.154000 24.326000,35.705000 24.080000,35.251000 23.843000,34.792000 23.616000,34.327000 23.399000,33.858000 23.193000,33.385000 22.997000,32.906000 22.811000,32.424000 22.636000,31.938000 22.471000,31.448000 22.174000,30.458000 22.042000,29.959000 21.920000,29.457000 21.810000,28.952000 21.710000,28.445000 21.621000,27.936000 21.544000,27.425000 21.477000,26.912000 21.422000,26.399000 21.378000,25.884000 21.345000,25.368000 21.323000,24.852000 21.312000,24.335000 21.312000,23.818000 21.324000,23.302000 21.335000,22.839000 21.326000,21.914000 21.306000,21.452000 21.237000,20.529000 21.128000,19.611000 20.979000,18.698000 20.890000,18.244000 20.791000,17.792000 20.682000,17.343000 20.435000,16.451000 20.150000,15.571000 19.827000,14.704000 19.467000,13.852000 19.273000,13.432000 18.858000,12.605000 18.637000,12.199000 18.169000,11.401000 17.922000,11.010000 17.404000,10.244000 17.132000,9.869000 16.565000,9.138000 16.269000,8.783000 15.656000,8.090000 15.013000,7.425000 14.680000,7.103000 13.996000,6.482000 13.284000,5.890000 12.548000,5.330000 11.788000,4.802000 11.006000,4.308000 10.204000,3.848000 9.382000,3.423000 8.964000,3.225000 8.117000,2.854000 7.687000,2.683000 6.817000,2.368000 6.377000,2.225000 5.488000,1.968000 4.590000,1.749000 3.682000,1.570000 3.226000,1.495000 2.768000,1.430000 1.848000,1.330000 1.387000,1.295000 0.463000,1.255000 0.000000,1.250000 z%22 /><path class=%22layer_2_0%22 d=%22M 0.000000,-0.250000 0.495000,-0.245000 0.990000,-0.229000 1.484000,-0.202000 1.978000,-0.164000 2.471000,-0.116000 2.962000,-0.057000 3.452000,0.012000 4.428000,0.183000 5.395000,0.396000 5.874000,0.518000 6.351000,0.651000 6.825000,0.794000 7.296000,0.947000 7.764000,1.110000 8.687000,1.467000 9.143000,1.660000 9.594000,1.863000 10.041000,2.076000 10.484000,2.299000 10.921000,2.531000 11.353000,2.772000 11.780000,3.023000 12.201000,3.283000 12.617000,3.552000 13.027000,3.830000 13.828000,4.412000 14.218000,4.716000 14.979000,5.349000 15.350000,5.678000 15.713000,6.015000 16.068000,6.359000 16.756000,7.071000 17.089000,7.438000 17.413000,7.812000 17.729000,8.193000 18.037000,8.581000 18.337000,8.975000 18.909000,9.783000 19.447000,10.614000 19.702000,11.039000 20.184000,11.904000 20.628000,12.789000 20.835000,13.238000 21.033000,13.692000 21.221000,14.150000 21.399000,14.612000 21.567000,15.078000 21.872000,16.020000 22.009000,16.495000 22.136000,16.974000 22.252000,17.455000 22.454000,18.424000 22.539000,18.912000 22.613000,19.402000 22.677000,19.893000 22.730000,20.385000 22.772000,20.878000 22.804000,21.372000 22.825000,21.867000 22.835000,22.857000 22.823000,23.352000 22.812000,23.836000 22.822000,24.804000 22.842000,25.288000 22.873000,25.771000 22.915000,26.254000 22.967000,26.735000 23.029000,27.216000 23.102000,27.694000 23.185000,28.171000 23.278000,28.647000 23.382000,29.120000 23.496000,29.590000 23.620000,30.058000 23.754000,30.524000 23.898000,30.986000 24.217000,31.900000 24.391000,32.352000 24.768000,33.244000 24.971000,33.684000 25.405000,34.549000 25.637000,34.975000 25.877000,35.395000 26.126000,35.810000 26.385000,36.220000 26.652000,36.624000 27.212000,37.414000 27.505000,37.800000 27.806000,38.179000 28.432000,38.917000 28.757000,39.276000 29.090000,39.628000 29.778000,40.309000 30.133000,40.639000 30.864000,41.274000 31.622000,41.877000 32.011000,42.166000 32.405000,42.446000 32.806000,42.718000 33.625000,43.236000 34.042000,43.481000 34.465000,43.717000 35.325000,44.162000 36.204000,44.569000 36.650000,44.758000 37.553000,45.107000 38.471000,45.416000 38.935000,45.556000 39.871000,45.805000 40.342000,45.914000 40.816000,46.013000 41.292000,46.102000 41.770000,46.180000 42.730000,46.306000 43.212000,46.353000 43.695000,46.390000 44.663000,46.432000 45.147000,46.437000 45.147000,46.937000 44.652000,46.932000 44.157000,46.916000 43.663000,46.889000 43.169000,46.851000 42.676000,46.803000 42.185000,46.744000 41.695000,46.675000 40.719000,46.504000 39.752000,46.291000 39.273000,46.169000 38.796000,46.036000 38.322000,45.893000 37.851000,45.740000 37.383000,45.577000 36.460000,45.220000 36.004000,45.027000 35.553000,44.824000 35.106000,44.611000 34.663000,44.388000 34.226000,44.156000 33.794000,43.915000 33.367000,43.664000 32.946000,43.404000 32.530000,43.135000 32.120000,42.857000 31.319000,42.275000 30.929000,41.971000 30.168000,41.338000 29.797000,41.009000 29.434000,40.672000 29.079000,40.328000 28.391000,39.616000 28.058000,39.249000 27.734000,38.875000 27.418000,38.494000 26.810000,37.712000 26.238000,36.904000 25.700000,36.073000 25.445000,35.648000 24.963000,34.783000 24.519000,33.898000 24.312000,33.449000 24.114000,32.995000 23.926000,32.537000 23.748000,32.075000 23.580000,31.609000 23.423000,31.140000 23.275000,30.667000 23.138000,30.192000 23.011000,29.713000 22.895000,29.232000 22.693000,28.263000 22.608000,27.775000 22.534000,27.285000 22.470000,26.794000 22.417000,26.302000 22.375000,25.809000 22.343000,25.315000 22.322000,24.820000 22.312000,23.830000 22.324000,23.335000 22.335000,22.851000 22.335000,22.367000 22.305000,21.399000 22.274000,20.916000 22.232000,20.433000 22.180000,19.952000 22.118000,19.471000 22.045000,18.993000 21.962000,18.516000 21.869000,18.040000 21.765000,17.567000 21.651000,17.097000 21.527000,16.629000 21.393000,16.163000 21.249000,15.701000 20.930000,14.787000 20.756000,14.335000 20.379000,13.443000 20.176000,13.003000 19.742000,12.138000 19.270000,11.292000 19.021000,10.877000 18.495000,10.063000 17.935000,9.273000 17.642000,8.887000 17.341000,8.508000 16.715000,7.770000 16.390000,7.411000 16.057000,7.059000 15.369000,6.378000 15.014000,6.048000 14.283000,5.413000 13.525000,4.810000 13.136000,4.521000 12.742000,4.241000 12.341000,3.969000 11.522000,3.451000 11.105000,3.206000 10.682000,2.970000 9.822000,2.525000 8.943000,2.118000 8.497000,1.929000 7.594000,1.580000 6.676000,1.271000 6.212000,1.131000 5.276000,0.882000 4.805000,0.773000 4.331000,0.674000 3.855000,0.585000 3.377000,0.507000 2.417000,0.381000 1.935000,0.334000 1.452000,0.297000 0.484000,0.255000 0.000000,0.250000 z%22 /></g><g id=%22C189%22 data-name=%22as_component__PNGCOJINIPILRSBFUVHAAAKRQR7F7X5DOV45DHY3HPYOUZICQITA%22><path class=%22layer_1_0%22 d=%22M 9.889000,3.500000 0.000000,1.275000 0.000000,-1.275000 9.889000,-3.500000 16.000000,-3.500000 16.000000,3.500000 z%22 /><path class=%22layer_2_0%22 d=%22M 0.000000,-0.250000 10.000000,-2.500000 10.000000,2.500000 0.000000,0.250000 z%22 /><rect class=%22layer_2_0%22 x=%2210.300000%22 y=%22-2.500000%22 width=%220.300000%22 height=%225.000000%22 /><rect class=%22layer_2_0%22 x=%2210.900000%22 y=%22-2.500000%22 width=%220.300000%22 height=%225.000000%22 /><rect class=%22layer_2_0%22 x=%2211.500000%22 y=%22-2.500000%22 width=%220.300000%22 height=%225.000000%22 /><rect class=%22layer_2_0%22 x=%2212.100000%22 y=%22-2.500000%22 width=%220.300000%22 height=%225.000000%22 /><rect class=%22layer_2_0%22 x=%2212.700000%22 y=%22-2.500000%22 width=%220.300000%22 height=%225.000000%22 /><rect class=%22layer_2_0%22 x=%2213.300000%22 y=%22-2.500000%22 width=%220.300000%22 height=%225.000000%22 /><rect class=%22layer_2_0%22 x=%2213.900000%22 y=%22-2.500000%22 width=%220.300000%22 height=%225.000000%22 /><rect class=%22layer_2_0%22 x=%2214.500000%22 y=%22-2.500000%22 width=%220.300000%22 height=%225.000000%22 /><rect class=%22layer_2_0%22 x=%2215.100000%22 y=%22-2.500000%22 width=%220.300000%22 height=%225.000000%22 /><rect class=%22layer_2_0%22 x=%2215.700000%22 y=%22-2.500000%22 width=%220.300000%22 height=%225.000000%22 /></g><g id=%22C190%22 data-name=%22s_bend_l_44P808070354492294_o_6P962153470475144_p_Strip%22><path class=%22layer_1_0%22 d=%22M 0.000000,-1.250000 0.964000,-1.244000 1.929000,-1.225000 2.893000,-1.194000 3.856000,-1.151000 4.819000,-1.095000 5.781000,-1.027000 6.742000,-0.947000 7.702000,-0.854000 8.661000,-0.749000 9.619000,-0.631000 10.574000,-0.502000 11.528000,-0.360000 12.480000,-0.206000 13.430000,-0.039000 14.378000,0.139000 15.324000,0.330000 16.267000,0.533000 17.207000,0.748000 18.144000,0.975000 19.079000,1.214000 20.010000,1.465000 20.938000,1.728000 21.862000,2.003000 22.783000,2.290000 23.674000,2.567000 24.567000,2.833000 25.464000,3.087000 26.365000,3.330000 27.268000,3.561000 28.174000,3.780000 29.083000,3.988000 29.994000,4.184000 30.908000,4.369000 31.825000,4.541000 32.743000,4.702000 33.664000,4.851000 34.586000,4.989000 35.510000,5.114000 36.435000,5.227000 37.362000,5.329000 38.290000,5.419000 39.219000,5.497000 40.149000,5.562000 41.080000,5.616000 42.012000,5.658000 42.943000,5.688000 43.876000,5.706000 44.808000,5.712000 44.808000,8.212000 43.844000,8.206000 42.879000,8.187000 41.915000,8.156000 40.952000,8.113000 39.989000,8.057000 39.027000,7.989000 38.066000,7.909000 37.106000,7.816000 36.147000,7.711000 35.189000,7.593000 34.234000,7.464000 33.280000,7.322000 32.328000,7.168000 31.378000,7.001000 30.430000,6.823000 29.484000,6.632000 28.541000,6.429000 27.601000,6.214000 26.664000,5.987000 25.729000,5.748000 24.798000,5.497000 23.870000,5.234000 22.946000,4.959000 22.025000,4.672000 21.134000,4.395000 20.241000,4.129000 19.344000,3.875000 18.443000,3.632000 17.540000,3.401000 16.634000,3.182000 15.725000,2.974000 14.814000,2.778000 13.900000,2.593000 12.983000,2.421000 12.065000,2.260000 11.144000,2.111000 10.222000,1.973000 9.298000,1.848000 8.373000,1.735000 7.446000,1.633000 6.518000,1.543000 5.589000,1.465000 4.659000,1.400000 3.728000,1.346000 2.796000,1.304000 1.865000,1.274000 0.932000,1.256000 0.000000,1.250000 z%22 /><path class=%22layer_2_0%22 d=%22M 0.000000,-0.250000 0.952000,-0.244000 1.903000,-0.226000 2.854000,-0.195000 3.805000,-0.152000 4.755000,-0.097000 5.704000,-0.030000 6.653000,0.049000 7.600000,0.141000 8.546000,0.245000 9.490000,0.360000 10.434000,0.488000 11.375000,0.628000 12.314000,0.781000 13.252000,0.945000 14.187000,1.121000 15.120000,1.309000 16.050000,1.509000 16.978000,1.722000 17.903000,1.946000 18.825000,2.181000 19.743000,2.429000 20.659000,2.689000 21.571000,2.960000 22.480000,3.243000 23.382000,3.524000 24.288000,3.793000 25.198000,4.051000 26.110000,4.297000 27.026000,4.531000 27.945000,4.754000 28.866000,4.964000 29.790000,5.163000 30.717000,5.350000 31.646000,5.525000 32.577000,5.688000 33.510000,5.840000 34.445000,5.979000 35.382000,6.106000 36.320000,6.221000 37.259000,6.324000 38.200000,6.415000 39.142000,6.494000 40.085000,6.560000 41.029000,6.615000 41.973000,6.657000 42.918000,6.688000 43.863000,6.706000 44.808000,6.712000 44.808000,7.212000 43.856000,7.206000 42.905000,7.188000 41.954000,7.157000 41.003000,7.114000 40.053000,7.059000 39.104000,6.992000 38.155000,6.913000 37.208000,6.821000 36.262000,6.717000 35.318000,6.602000 34.375000,6.474000 33.433000,6.334000 32.494000,6.181000 31.556000,6.017000 30.621000,5.841000 29.688000,5.653000 28.758000,5.453000 27.830000,5.240000 26.905000,5.016000 25.983000,4.781000 25.065000,4.533000 24.149000,4.273000 23.237000,4.002000 22.328000,3.719000 21.426000,3.438000 20.520000,3.169000 19.610000,2.911000 18.698000,2.665000 17.782000,2.431000 16.863000,2.208000 15.942000,1.998000 15.018000,1.799000 14.091000,1.612000 13.162000,1.437000 12.231000,1.274000 11.298000,1.122000 10.363000,0.983000 9.426000,0.856000 8.488000,0.741000 7.549000,0.638000 6.608000,0.547000 5.666000,0.468000 4.723000,0.402000 3.779000,0.347000 2.835000,0.305000 1.890000,0.274000 0.945000,0.256000 0.000000,0.250000 z%22 /></g><g id=%22C191%22 data-name=%22as_component__PNGCOJINIPILRSBFUVHAAAKRQR7F7X5DOV45DHY3HPYOUZICQITA%22><path class=%22layer_1_0%22 d=%22M 9.889000,3.500000 0.000000,1.275000 0.000000,-1.275000 9.889000,-3.500000 16.000000,-3.500000 16.000000,3.500000 z%22 /><path class=%22layer_2_0%22 d=%22M 0.000000,-0.250000 10.000000,-2.500000 10.000000,2.500000 0.000000,0.250000 z%22 /><rect class=%22layer_2_0%22 x=%2210.300000%22 y=%22-2.500000%22 width=%220.300000%22 height=%225.000000%22 /><rect class=%22layer_2_0%22 x=%2210.900000%22 y=%22-2.500000%22 width=%220.300000%22 height=%225.000000%22 /><rect class=%22layer_2_0%22 x=%2211.500000%22 y=%22-2.500000%22 width=%220.300000%22 height=%225.000000%22 /><rect class=%22layer_2_0%22 x=%2212.100000%22 y=%22-2.500000%22 width=%220.300000%22 height=%225.000000%22 /><rect class=%22layer_2_0%22 x=%2212.700000%22 y=%22-2.500000%22 width=%220.300000%22 height=%225.000000%22 /><rect class=%22layer_2_0%22 x=%2213.300000%22 y=%22-2.500000%22 width=%220.300000%22 height=%225.000000%22 /><rect class=%22layer_2_0%22 x=%2213.900000%22 y=%22-2.500000%22 width=%220.300000%22 height=%225.000000%22 /><rect class=%22layer_2_0%22 x=%2214.500000%22 y=%22-2.500000%22 width=%220.300000%22 height=%225.000000%22 /><rect class=%22layer_2_0%22 x=%2215.100000%22 y=%22-2.500000%22 width=%220.300000%22 height=%225.000000%22 /><rect class=%22layer_2_0%22 x=%2215.700000%22 y=%22-2.500000%22 width=%220.300000%22 height=%225.000000%22 /></g><g id=%22C192%22 data-name=%22s_bend_l_43P526454013152204_o_30P253951990362943_p_Strip%22><path class=%22layer_1_0%22 d=%22M 0.000000,-1.250000 0.531000,-1.244000 1.061000,-1.227000 1.591000,-1.198000 2.121000,-1.158000 2.649000,-1.106000 3.176000,-1.043000 3.701000,-0.968000 4.225000,-0.882000 4.747000,-0.785000 5.267000,-0.676000 5.784000,-0.557000 6.298000,-0.426000 6.809000,-0.283000 7.318000,-0.130000 7.822000,0.034000 8.323000,0.209000 8.821000,0.395000 9.314000,0.592000 9.802000,0.799000 10.286000,1.017000 10.765000,1.245000 11.239000,1.484000 11.708000,1.733000 12.172000,1.992000 12.629000,2.261000 13.081000,2.540000 13.526000,2.829000 13.965000,3.127000 14.398000,3.434000 14.824000,3.751000 15.654000,4.413000 16.058000,4.757000 16.455000,5.109000 16.844000,5.471000 17.225000,5.840000 17.598000,6.218000 17.963000,6.604000 18.319000,6.997000 18.666000,7.398000 19.005000,7.807000 19.335000,8.223000 19.656000,8.646000 19.967000,9.076000 20.269000,9.512000 20.562000,9.955000 20.845000,10.404000 21.118000,10.859000 21.381000,11.320000 21.634000,11.787000 21.877000,12.259000 22.109000,12.736000 22.332000,13.218000 22.543000,13.705000 22.744000,14.196000 22.935000,14.691000 23.286000,15.577000 23.476000,16.014000 23.884000,16.876000 24.330000,17.718000 24.566000,18.132000 24.811000,18.541000 25.065000,18.944000 25.328000,19.342000 25.599000,19.733000 25.879000,20.119000 26.167000,20.499000 26.463000,20.872000 27.079000,21.600000 27.726000,22.299000 28.403000,22.970000 29.108000,23.611000 29.471000,23.920000 30.217000,24.514000 30.599000,24.798000 31.382000,25.342000 32.187000,25.852000 33.014000,26.326000 33.861000,26.764000 34.291000,26.969000 34.725000,27.164000 35.607000,27.527000 36.053000,27.694000 36.956000,27.999000 37.872000,28.264000 38.798000,28.489000 39.264000,28.587000 39.733000,28.674000 40.203000,28.751000 40.675000,28.818000 41.148000,28.875000 41.622000,28.921000 42.097000,28.957000 42.573000,28.983000 43.049000,28.999000 43.526000,29.004000 43.526000,31.504000 42.995000,31.498000 42.465000,31.481000 41.935000,31.452000 41.405000,31.412000 40.877000,31.360000 40.350000,31.297000 39.825000,31.222000 39.301000,31.136000 38.779000,31.039000 38.259000,30.931000 37.742000,30.811000 37.228000,30.680000 36.717000,30.537000 36.208000,30.384000 35.704000,30.220000 35.203000,30.045000 34.705000,29.859000 34.212000,29.662000 33.724000,29.455000 33.240000,29.237000 32.761000,29.009000 32.287000,28.770000 31.818000,28.521000 31.354000,28.262000 30.897000,27.993000 30.445000,27.714000 30.000000,27.425000 29.561000,27.127000 29.128000,26.820000 28.702000,26.503000 28.284000,26.176000 27.872000,25.841000 27.468000,25.497000 27.071000,25.145000 26.682000,24.783000 26.301000,24.414000 25.928000,24.036000 25.563000,23.650000 25.207000,23.257000 24.860000,22.856000 24.521000,22.447000 24.191000,22.031000 23.870000,21.608000 23.559000,21.178000 23.257000,20.742000 22.964000,20.299000 22.681000,19.850000 22.408000,19.395000 22.145000,18.934000 21.892000,18.467000 21.649000,17.995000 21.417000,17.518000 21.194000,17.036000 20.983000,16.549000 20.782000,16.058000 20.591000,15.563000 20.240000,14.677000 20.050000,14.240000 19.642000,13.379000 19.196000,12.536000 18.960000,12.122000 18.715000,11.713000 18.461000,11.310000 18.198000,10.912000 17.927000,10.521000 17.359000,9.755000 17.063000,9.382000 16.447000,8.654000 15.800000,7.955000 15.123000,7.284000 14.418000,6.643000 14.055000,6.334000 13.309000,5.740000 12.927000,5.456000 12.538000,5.180000 12.144000,4.912000 11.339000,4.402000 10.512000,3.928000 9.665000,3.490000 9.235000,3.285000 8.801000,3.090000 7.919000,2.727000 7.473000,2.560000 6.570000,2.255000 5.655000,1.990000 5.193000,1.873000 4.262000,1.667000 3.793000,1.580000 3.323000,1.503000 2.851000,1.436000 2.378000,1.379000 1.904000,1.333000 1.429000,1.297000 0.477000,1.255000 0.000000,1.250000 z%22 /><path class=%22layer_2_0%22 d=%22M 0.000000,-0.250000 0.509000,-0.244000 1.018000,-0.228000 1.526000,-0.200000 2.034000,-0.162000 2.541000,-0.112000 3.046000,-0.051000 3.550000,0.020000 4.052000,0.103000 4.553000,0.196000 5.051000,0.300000 5.547000,0.415000 6.041000,0.541000 6.531000,0.677000 7.019000,0.824000 7.503000,0.982000 7.983000,1.150000 8.460000,1.328000 9.402000,1.715000 9.866000,1.924000 10.325000,2.143000 10.780000,2.372000 11.230000,2.611000 11.674000,2.860000 12.113000,3.118000 12.546000,3.385000 12.973000,3.662000 13.395000,3.948000 13.809000,4.243000 14.218000,4.547000 14.620000,4.860000 15.014000,5.181000 15.402000,5.511000 15.783000,5.849000 16.156000,6.196000 16.521000,6.550000 16.879000,6.913000 17.228000,7.283000 17.570000,7.660000 17.903000,8.045000 18.228000,8.437000 18.545000,8.836000 18.852000,9.241000 19.151000,9.654000 19.441000,10.072000 19.993000,10.928000 20.255000,11.364000 20.507000,11.806000 20.750000,12.254000 20.983000,12.707000 21.206000,13.164000 21.419000,13.627000 21.622000,14.093000 21.815000,14.565000 21.997000,15.040000 22.176000,15.505000 22.563000,16.423000 22.772000,16.876000 22.990000,17.323000 23.218000,17.766000 23.456000,18.204000 23.703000,18.637000 23.959000,19.064000 24.499000,19.902000 25.075000,20.715000 25.376000,21.112000 26.004000,21.886000 26.330000,22.262000 26.665000,22.632000 27.007000,22.994000 27.357000,23.349000 28.080000,24.034000 28.452000,24.366000 29.218000,25.003000 29.611000,25.309000 30.011000,25.607000 30.417000,25.896000 31.247000,26.446000 31.671000,26.708000 32.101000,26.961000 32.535000,27.204000 33.421000,27.662000 33.870000,27.876000 34.783000,28.275000 35.246000,28.460000 36.183000,28.799000 36.657000,28.953000 37.134000,29.097000 37.614000,29.230000 38.097000,29.353000 38.582000,29.466000 39.070000,29.568000 39.560000,29.659000 40.052000,29.740000 40.545000,29.810000 41.535000,29.918000 42.032000,29.955000 42.530000,29.982000 43.028000,29.999000 43.526000,30.004000 43.526000,30.504000 42.508000,30.482000 42.000000,30.454000 41.492000,30.416000 40.985000,30.366000 40.480000,30.305000 39.976000,30.234000 39.474000,30.151000 38.973000,30.058000 38.475000,29.954000 37.979000,29.839000 37.485000,29.713000 36.995000,29.577000 36.507000,29.430000 36.023000,29.272000 35.543000,29.104000 35.066000,28.926000 34.124000,28.539000 33.660000,28.330000 33.201000,28.111000 32.746000,27.882000 32.296000,27.643000 31.852000,27.394000 31.413000,27.136000 30.980000,26.869000 30.553000,26.592000 30.131000,26.306000 29.717000,26.011000 29.308000,25.707000 28.906000,25.394000 28.512000,25.073000 28.124000,24.743000 27.743000,24.405000 27.370000,24.058000 27.005000,23.704000 26.647000,23.341000 25.956000,22.594000 25.623000,22.209000 25.298000,21.817000 24.981000,21.418000 24.674000,21.013000 24.375000,20.600000 24.085000,20.182000 23.533000,19.326000 23.271000,18.890000 23.019000,18.448000 22.776000,18.000000 22.543000,17.547000 22.320000,17.090000 22.107000,16.627000 21.904000,16.161000 21.711000,15.689000 21.529000,15.214000 21.350000,14.749000 20.963000,13.831000 20.754000,13.378000 20.536000,12.931000 20.308000,12.488000 20.070000,12.050000 19.823000,11.617000 19.567000,11.190000 19.027000,10.352000 18.451000,9.539000 18.150000,9.142000 17.522000,8.368000 17.196000,7.992000 16.861000,7.622000 16.519000,7.260000 16.169000,6.905000 15.811000,6.559000 15.074000,5.888000 14.308000,5.251000 13.915000,4.945000 13.515000,4.647000 13.109000,4.358000 12.279000,3.808000 11.855000,3.546000 11.425000,3.293000 10.991000,3.050000 10.105000,2.592000 9.656000,2.378000 8.743000,1.979000 8.280000,1.794000 7.343000,1.455000 6.869000,1.301000 6.392000,1.157000 5.912000,1.024000 5.429000,0.901000 4.944000,0.788000 4.456000,0.686000 3.966000,0.595000 3.474000,0.514000 2.981000,0.444000 1.991000,0.336000 1.494000,0.299000 0.498000,0.255000 0.000000,0.250000 z%22 /></g><g id=%22C193%22 data-name=%22as_component__PNGCOJINIPILRSBFUVHAAAKRQR7F7X5DOV45DHY3HPYOUZICQITA%22><path class=%22layer_1_0%22 d=%22M 9.889000,3.500000 0.000000,1.275000 0.000000,-1.275000 9.889000,-3.500000 16.000000,-3.500000 16.000000,3.500000 z%22 /><path class=%22layer_2_0%22 d=%22M 0.000000,-0.250000 10.000000,-2.500000 10.000000,2.500000 0.000000,0.250000 z%22 /><rect class=%22layer_2_0%22 x=%2210.300000%22 y=%22-2.500000%22 width=%220.300000%22 height=%225.000000%22 /><rect class=%22layer_2_0%22 x=%2210.900000%22 y=%22-2.500000%22 width=%220.300000%22 height=%225.000000%22 /><rect class=%22layer_2_0%22 x=%2211.500000%22 y=%22-2.500000%22 width=%220.300000%22 height=%225.000000%22 /><rect class=%22layer_2_0%22 x=%2212.100000%22 y=%22-2.500000%22 width=%220.300000%22 height=%225.000000%22 /><rect class=%22layer_2_0%22 x=%2212.700000%22 y=%22-2.500000%22 width=%220.300000%22 height=%225.000000%22 /><rect class=%22layer_2_0%22 x=%2213.300000%22 y=%22-2.500000%22 width=%220.300000%22 height=%225.000000%22 /><rect class=%22layer_2_0%22 x=%2213.900000%22 y=%22-2.500000%22 width=%220.300000%22 height=%225.000000%22 /><rect class=%22layer_2_0%22 x=%2214.500000%22 y=%22-2.500000%22 width=%220.300000%22 height=%225.000000%22 /><rect class=%22layer_2_0%22 x=%2215.100000%22 y=%22-2.500000%22 width=%220.300000%22 height=%225.000000%22 /><rect class=%22layer_2_0%22 x=%2215.700000%22 y=%22-2.500000%22 width=%220.300000%22 height=%225.000000%22 /></g><g id=%22C194%22 data-name=%22s_bend_l_91P3427968864984_o_11P70310508196338_p_Strip%22><path class=%22layer_1_0%22 d=%22M 0.000000,-1.250000 1.453000,-1.244000 2.905000,-1.227000 4.358000,-1.198000 5.810000,-1.157000 7.262000,-1.105000 8.713000,-1.042000 10.164000,-0.967000 11.614000,-0.880000 13.064000,-0.782000 14.512000,-0.672000 15.960000,-0.550000 17.407000,-0.418000 18.852000,-0.273000 20.296000,-0.117000 21.740000,0.050000 23.181000,0.229000 24.621000,0.419000 26.060000,0.621000 27.497000,0.834000 28.932000,1.059000 30.366000,1.295000 31.797000,1.543000 33.227000,1.802000 34.654000,2.072000 36.079000,2.354000 37.502000,2.647000 38.923000,2.951000 40.341000,3.267000 41.756000,3.594000 43.169000,3.932000 44.579000,4.281000 45.987000,4.642000 47.375000,4.998000 48.765000,5.342000 50.159000,5.676000 51.555000,5.998000 52.954000,6.310000 54.355000,6.610000 55.758000,6.899000 57.164000,7.176000 58.572000,7.443000 59.981000,7.698000 61.393000,7.943000 62.807000,8.176000 64.223000,8.397000 65.640000,8.608000 67.059000,8.807000 68.479000,8.994000 69.901000,9.171000 71.325000,9.336000 72.749000,9.490000 74.175000,9.632000 75.602000,9.763000 77.030000,9.883000 78.458000,9.991000 79.888000,10.088000 81.318000,10.173000 82.749000,10.248000 84.181000,10.310000 85.613000,10.362000 87.045000,10.402000 88.477000,10.430000 89.910000,10.447000 91.343000,10.453000 91.343000,12.953000 89.890000,12.947000 88.438000,12.930000 86.985000,12.901000 85.533000,12.860000 84.081000,12.808000 82.630000,12.745000 81.179000,12.670000 79.729000,12.583000 78.279000,12.485000 76.831000,12.375000 75.383000,12.253000 73.936000,12.121000 72.491000,11.976000 71.047000,11.820000 69.603000,11.653000 68.162000,11.474000 66.722000,11.284000 65.283000,11.082000 63.846000,10.869000 62.411000,10.644000 60.977000,10.408000 59.546000,10.160000 58.116000,9.901000 56.689000,9.631000 55.264000,9.349000 53.841000,9.056000 52.420000,8.752000 51.002000,8.436000 49.587000,8.109000 48.174000,7.771000 46.764000,7.422000 45.356000,7.061000 43.968000,6.705000 42.578000,6.361000 41.184000,6.027000 39.788000,5.705000 38.389000,5.393000 36.988000,5.093000 35.585000,4.804000 34.179000,4.527000 32.771000,4.260000 31.362000,4.005000 29.950000,3.760000 28.536000,3.527000 27.120000,3.306000 25.703000,3.096000 24.284000,2.896000 22.864000,2.709000 21.442000,2.532000 20.018000,2.367000 18.594000,2.213000 17.168000,2.071000 15.741000,1.940000 14.313000,1.820000 12.885000,1.712000 11.455000,1.615000 10.025000,1.530000 8.594000,1.455000 7.162000,1.393000 5.730000,1.341000 4.298000,1.301000 2.866000,1.273000 1.433000,1.256000 0.000000,1.250000 z%22 /><path class=%22layer_2_0%22 d=%22M 0.000000,-0.250000 1.445000,-0.244000 2.889000,-0.227000 4.334000,-0.198000 5.778000,-0.158000 7.222000,-0.106000 8.665000,-0.043000 10.108000,0.032000 11.551000,0.118000 12.992000,0.216000 14.433000,0.325000 15.872000,0.446000 17.311000,0.578000 18.749000,0.721000 20.185000,0.876000 21.620000,1.043000 23.054000,1.221000 24.487000,1.410000 25.917000,1.611000 27.346000,1.823000 28.774000,2.046000 30.199000,2.281000 31.623000,2.527000 33.045000,2.785000 34.464000,3.054000 35.882000,3.334000 37.297000,3.625000 38.709000,3.928000 40.120000,4.242000 41.527000,4.567000 42.933000,4.903000 44.335000,5.251000 45.735000,5.610000 47.130000,5.967000 48.529000,6.314000 49.930000,6.649000 51.334000,6.973000 52.740000,7.286000 54.149000,7.588000 55.560000,7.879000 56.974000,8.158000 58.389000,8.426000 59.807000,8.683000 61.227000,8.929000 62.648000,9.163000 64.072000,9.386000 65.497000,9.597000 66.924000,9.797000 68.352000,9.986000 69.782000,10.164000 71.213000,10.330000 72.646000,10.484000 74.080000,10.627000 75.514000,10.759000 76.950000,10.880000 79.824000,11.086000 81.263000,11.172000 82.701000,11.246000 84.141000,11.310000 85.581000,11.361000 87.021000,11.401000 88.462000,11.430000 89.902000,11.447000 91.343000,11.453000 91.343000,11.953000 89.898000,11.947000 88.454000,11.930000 87.009000,11.901000 85.565000,11.861000 84.121000,11.809000 82.678000,11.746000 81.235000,11.671000 79.792000,11.585000 78.351000,11.487000 76.910000,11.378000 75.471000,11.257000 74.032000,11.125000 72.594000,10.982000 71.158000,10.827000 69.723000,10.660000 68.289000,10.482000 66.856000,10.293000 65.426000,10.092000 63.997000,9.880000 62.569000,9.657000 61.144000,9.422000 59.720000,9.176000 58.298000,8.918000 56.879000,8.649000 55.461000,8.369000 54.046000,8.078000 52.634000,7.775000 51.223000,7.461000 49.816000,7.136000 48.410000,6.800000 47.008000,6.452000 45.608000,6.093000 44.213000,5.736000 42.814000,5.389000 41.413000,5.054000 40.009000,4.730000 38.603000,4.417000 37.194000,4.115000 35.783000,3.824000 34.369000,3.545000 32.954000,3.277000 31.536000,3.020000 30.116000,2.774000 28.695000,2.540000 27.271000,2.317000 25.846000,2.106000 24.419000,1.906000 22.991000,1.717000 21.561000,1.539000 20.130000,1.373000 18.697000,1.219000 17.263000,1.076000 15.829000,0.944000 14.393000,0.823000 11.519000,0.617000 10.080000,0.531000 8.642000,0.457000 7.202000,0.393000 5.762000,0.342000 4.322000,0.302000 2.882000,0.273000 1.441000,0.256000 0.000000,0.250000 z%22 /></g><g id=%22C195%22 data-name=%22as_component__PNGCOJINIPILRSBFUVHAAAKRQR7F7X5DOV45DHY3HPYOUZICQITA%22><path class=%22layer_1_0%22 d=%22M 9.889000,3.500000 0.000000,1.275000 0.000000,-1.275000 9.889000,-3.500000 16.000000,-3.500000 16.000000,3.500000 z%22 /><path class=%22layer_2_0%22 d=%22M 0.000000,-0.250000 10.000000,-2.500000 10.000000,2.500000 0.000000,0.250000 z%22 /><rect class=%22layer_2_0%22 x=%2210.300000%22 y=%22-2.500000%22 width=%220.300000%22 height=%225.000000%22 /><rect class=%22layer_2_0%22 x=%2210.900000%22 y=%22-2.500000%22 width=%220.300000%22 height=%225.000000%22 /><rect class=%22layer_2_0%22 x=%2211.500000%22 y=%22-2.500000%22 width=%220.300000%22 height=%225.000000%22 /><rect class=%22layer_2_0%22 x=%2212.100000%22 y=%22-2.500000%22 width=%220.300000%22 height=%225.000000%22 /><rect class=%22layer_2_0%22 x=%2212.700000%22 y=%22-2.500000%22 width=%220.300000%22 height=%225.000000%22 /><rect class=%22layer_2_0%22 x=%2213.300000%22 y=%22-2.500000%22 width=%220.300000%22 height=%225.000000%22 /><rect class=%22layer_2_0%22 x=%2213.900000%22 y=%22-2.500000%22 width=%220.300000%22 height=%225.000000%22 /><rect class=%22layer_2_0%22 x=%2214.500000%22 y=%22-2.500000%22 width=%220.300000%22 height=%225.000000%22 /><rect class=%22layer_2_0%22 x=%2215.100000%22 y=%22-2.500000%22 width=%220.300000%22 height=%225.000000%22 /><rect class=%22layer_2_0%22 x=%2215.700000%22 y=%22-2.500000%22 width=%220.300000%22 height=%225.000000%22 /></g><g id=%22C196%22 data-name=%22s_bend_l_41P16976462671147_o_63P59349184384611_p_Strip%22><path class=%22layer_1_0%22 d=%22M 0.000000,-1.250000 0.516000,-1.244000 1.031000,-1.228000 1.546000,-1.200000 2.060000,-1.161000 2.573000,-1.111000 3.086000,-1.049000 3.596000,-0.977000 4.105000,-0.893000 4.612000,-0.799000 5.117000,-0.694000 5.619000,-0.577000 6.119000,-0.450000 6.616000,-0.312000 7.110000,-0.164000 7.600000,-0.005000 8.087000,0.165000 8.570000,0.346000 9.049000,0.537000 9.524000,0.738000 9.995000,0.949000 10.921000,1.402000 11.377000,1.644000 11.827000,1.895000 12.272000,2.156000 12.711000,2.426000 13.144000,2.706000 13.571000,2.996000 13.991000,3.294000 14.813000,3.918000 15.213000,4.243000 15.606000,4.577000 15.992000,4.919000 16.741000,5.628000 17.104000,5.995000 17.458000,6.369000 17.805000,6.751000 18.143000,7.140000 18.473000,7.537000 18.794000,7.940000 19.106000,8.351000 19.409000,8.768000 19.703000,9.191000 19.988000,9.621000 20.264000,10.057000 20.530000,10.499000 20.786000,10.946000 21.033000,11.399000 21.270000,11.857000 21.497000,12.320000 21.713000,12.788000 21.920000,13.261000 22.116000,13.738000 22.302000,14.219000 22.478000,14.704000 22.643000,15.192000 22.797000,15.684000 22.940000,16.180000 23.073000,16.678000 23.195000,17.179000 23.306000,17.683000 23.407000,18.188000 23.496000,18.696000 23.574000,19.206000 23.641000,19.717000 23.697000,20.230000 23.742000,20.744000 23.776000,21.258000 23.799000,21.774000 23.810000,22.289000 23.810000,22.805000 23.800000,23.320000 23.777000,23.836000 23.744000,24.350000 23.700000,24.864000 23.645000,25.377000 23.578000,25.888000 23.501000,26.398000 23.412000,26.906000 23.312000,27.412000 23.202000,27.916000 23.080000,28.417000 22.948000,28.915000 22.805000,29.411000 22.652000,29.903000 22.487000,30.392000 22.312000,30.877000 22.127000,31.358000 21.931000,31.835000 21.725000,32.308000 21.366000,33.158000 21.200000,33.589000 20.897000,34.461000 20.759000,34.901000 20.631000,35.345000 20.404000,36.239000 20.305000,36.690000 20.216000,37.143000 20.067000,38.054000 19.958000,38.971000 19.889000,39.891000 19.869000,40.352000 19.860000,41.275000 19.870000,41.737000 19.890000,42.198000 19.961000,43.118000 20.011000,43.577000 20.071000,44.035000 20.141000,44.491000 20.221000,44.945000 20.410000,45.849000 20.519000,46.297000 20.638000,46.743000 20.905000,47.627000 21.052000,48.064000 21.209000,48.498000 21.551000,49.356000 21.736000,49.779000 22.133000,50.612000 22.345000,51.022000 22.795000,51.828000 23.280000,52.613000 23.798000,53.377000 24.349000,54.118000 24.932000,54.834000 25.545000,55.524000 25.862000,55.859000 26.519000,56.508000 26.857000,56.822000 27.554000,57.427000 28.277000,58.001000 29.024000,58.543000 29.794000,59.053000 30.187000,59.295000 30.988000,59.753000 31.808000,60.177000 32.646000,60.564000 33.500000,60.915000 34.368000,61.228000 34.807000,61.371000 35.249000,61.504000 36.141000,61.741000 36.590000,61.845000 37.496000,62.024000 37.951000,62.099000 38.867000,62.218000 39.326000,62.263000 39.786000,62.298000 40.708000,62.338000 41.170000,62.343000 41.170000,64.843000 40.654000,64.837000 40.139000,64.821000 39.624000,64.793000 39.110000,64.754000 38.597000,64.704000 38.084000,64.642000 37.574000,64.570000 37.065000,64.486000 36.558000,64.392000 36.053000,64.287000 35.551000,64.170000 35.051000,64.043000 34.554000,63.905000 34.060000,63.757000 33.570000,63.598000 33.083000,63.428000 32.600000,63.247000 32.121000,63.056000 31.646000,62.855000 31.175000,62.644000 30.249000,62.191000 29.793000,61.949000 29.343000,61.698000 28.898000,61.437000 28.459000,61.167000 28.026000,60.887000 27.599000,60.597000 27.179000,60.299000 26.357000,59.675000 25.957000,59.350000 25.564000,59.016000 25.178000,58.674000 24.429000,57.965000 23.712000,57.224000 23.365000,56.842000 23.027000,56.453000 22.697000,56.056000 22.376000,55.653000 22.064000,55.242000 21.761000,54.825000 21.467000,54.402000 21.182000,53.972000 20.906000,53.536000 20.640000,53.094000 20.384000,52.647000 20.137000,52.194000 19.900000,51.736000 19.673000,51.273000 19.457000,50.805000 19.250000,50.332000 19.054000,49.855000 18.868000,49.374000 18.692000,48.889000 18.527000,48.401000 18.373000,47.909000 18.230000,47.413000 18.097000,46.915000 17.975000,46.414000 17.763000,45.405000 17.674000,44.897000 17.596000,44.387000 17.529000,43.876000 17.473000,43.363000 17.428000,42.849000 17.394000,42.335000 17.371000,41.819000 17.360000,41.304000 17.360000,40.788000 17.370000,40.273000 17.393000,39.757000 17.426000,39.243000 17.470000,38.729000 17.525000,38.216000 17.592000,37.705000 17.669000,37.195000 17.758000,36.687000 17.858000,36.181000 17.968000,35.677000 18.090000,35.176000 18.222000,34.678000 18.365000,34.182000 18.518000,33.690000 18.683000,33.201000 18.858000,32.716000 19.043000,32.235000 19.239000,31.758000 19.445000,31.285000 19.629000,30.862000 19.970000,30.004000 20.126000,29.570000 20.411000,28.692000 20.539000,28.248000 20.766000,27.354000 20.865000,26.903000 20.954000,26.450000 21.103000,25.539000 21.212000,24.622000 21.281000,23.702000 21.301000,23.241000 21.310000,22.779000 21.300000,21.856000 21.280000,21.395000 21.209000,20.475000 21.159000,20.016000 21.099000,19.558000 21.029000,19.102000 20.949000,18.648000 20.760000,17.744000 20.651000,17.296000 20.532000,16.850000 20.403000,16.406000 20.118000,15.529000 19.961000,15.095000 19.619000,14.237000 19.434000,13.814000 19.037000,12.981000 18.825000,12.571000 18.375000,11.765000 17.890000,10.980000 17.372000,10.216000 16.821000,9.475000 16.238000,8.759000 15.935000,8.411000 15.308000,7.734000 14.983000,7.406000 14.313000,6.771000 13.967000,6.465000 13.257000,5.875000 12.893000,5.592000 12.146000,5.050000 11.376000,4.540000 10.983000,4.298000 10.182000,3.840000 9.362000,3.416000 8.524000,3.029000 7.670000,2.678000 7.238000,2.517000 6.363000,2.222000 5.921000,2.089000 5.477000,1.966000 4.580000,1.748000 3.674000,1.569000 3.219000,1.494000 2.762000,1.430000 1.844000,1.330000 1.384000,1.295000 0.462000,1.255000 0.000000,1.250000 z%22 /><path class=%22layer_2_0%22 d=%22M 0.000000,-0.250000 0.494000,-0.245000 0.988000,-0.229000 1.481000,-0.202000 1.974000,-0.164000 2.465000,-0.116000 2.956000,-0.058000 3.445000,0.012000 3.933000,0.092000 4.418000,0.182000 4.902000,0.283000 5.383000,0.394000 5.862000,0.516000 6.338000,0.648000 7.281000,0.943000 7.747000,1.106000 8.210000,1.279000 9.124000,1.654000 9.575000,1.857000 10.021000,2.069000 10.899000,2.522000 11.330000,2.763000 11.756000,3.013000 12.177000,3.272000 12.592000,3.540000 13.001000,3.817000 13.404000,4.103000 14.190000,4.701000 14.951000,5.332000 15.683000,5.996000 16.038000,6.339000 16.385000,6.690000 16.725000,7.049000 17.057000,7.415000 17.381000,7.788000 17.697000,8.168000 18.005000,8.554000 18.304000,8.947000 18.876000,9.753000 19.149000,10.165000 19.413000,10.582000 19.668000,11.005000 20.150000,11.868000 20.377000,12.307000 20.594000,12.750000 20.802000,13.199000 20.999000,13.651000 21.366000,14.569000 21.534000,15.034000 21.692000,15.502000 21.977000,16.448000 22.104000,16.925000 22.221000,17.405000 22.328000,17.887000 22.424000,18.372000 22.509000,18.859000 22.584000,19.347000 22.648000,19.837000 22.702000,20.328000 22.745000,20.820000 22.777000,21.313000 22.799000,21.807000 22.810000,22.301000 22.810000,22.795000 22.800000,23.288000 22.779000,23.782000 22.747000,24.275000 22.705000,24.767000 22.652000,25.258000 22.588000,25.748000 22.514000,26.237000 22.429000,26.723000 22.333000,27.208000 22.227000,27.691000 22.111000,28.171000 21.985000,28.648000 21.848000,29.123000 21.543000,30.063000 21.198000,30.989000 20.813000,31.899000 20.620000,32.342000 20.263000,33.240000 20.099000,33.694000 19.945000,34.152000 19.801000,34.614000 19.667000,35.078000 19.543000,35.545000 19.326000,36.487000 19.233000,36.961000 19.150000,37.437000 19.077000,37.914000 18.963000,38.874000 18.921000,39.355000 18.890000,39.838000 18.870000,40.320000 18.860000,41.287000 18.892000,42.253000 18.924000,42.735000 18.966000,43.216000 19.018000,43.696000 19.081000,44.176000 19.154000,44.653000 19.238000,45.129000 19.332000,45.603000 19.436000,46.075000 19.550000,46.544000 19.809000,47.475000 19.954000,47.937000 20.108000,48.394000 20.273000,48.849000 20.447000,49.299000 20.631000,49.746000 20.824000,50.189000 21.027000,50.628000 21.462000,51.491000 21.693000,51.915000 21.933000,52.334000 22.183000,52.748000 22.441000,53.157000 22.983000,53.956000 23.560000,54.732000 23.861000,55.110000 24.487000,55.846000 24.812000,56.204000 25.144000,56.555000 25.831000,57.234000 26.547000,57.883000 26.916000,58.196000 27.672000,58.797000 28.454000,59.365000 28.854000,59.636000 29.671000,60.152000 30.510000,60.632000 30.937000,60.858000 31.369000,61.075000 32.246000,61.481000 33.140000,61.848000 33.592000,62.017000 34.049000,62.176000 34.971000,62.465000 35.436000,62.594000 35.905000,62.713000 36.376000,62.822000 37.324000,63.009000 37.800000,63.087000 38.279000,63.155000 38.759000,63.212000 39.240000,63.259000 39.721000,63.296000 40.687000,63.338000 41.170000,63.343000 41.170000,63.843000 40.676000,63.838000 40.182000,63.822000 39.689000,63.795000 39.196000,63.757000 38.214000,63.651000 37.725000,63.581000 37.237000,63.501000 36.752000,63.411000 36.268000,63.310000 35.787000,63.199000 35.308000,63.077000 34.832000,62.945000 33.889000,62.650000 33.423000,62.487000 32.960000,62.314000 32.046000,61.939000 31.595000,61.736000 31.149000,61.524000 30.271000,61.071000 29.840000,60.830000 29.414000,60.580000 28.993000,60.321000 28.578000,60.053000 28.169000,59.776000 27.766000,59.490000 26.980000,58.892000 26.219000,58.261000 25.487000,57.597000 25.132000,57.254000 24.785000,56.903000 24.445000,56.544000 24.113000,56.178000 23.789000,55.805000 23.165000,55.039000 22.866000,54.646000 22.294000,53.840000 22.021000,53.428000 21.757000,53.011000 21.502000,52.588000 21.020000,51.725000 20.793000,51.286000 20.576000,50.843000 20.368000,50.394000 20.171000,49.942000 19.804000,49.024000 19.636000,48.559000 19.478000,48.091000 19.193000,47.145000 19.066000,46.668000 18.949000,46.188000 18.842000,45.706000 18.746000,45.221000 18.661000,44.734000 18.586000,44.246000 18.522000,43.756000 18.468000,43.265000 18.425000,42.773000 18.393000,42.280000 18.371000,41.786000 18.360000,41.292000 18.360000,40.798000 18.370000,40.305000 18.391000,39.811000 18.423000,39.318000 18.465000,38.826000 18.518000,38.335000 18.582000,37.845000 18.656000,37.356000 18.741000,36.870000 18.837000,36.385000 18.943000,35.902000 19.059000,35.422000 19.185000,34.945000 19.322000,34.470000 19.627000,33.530000 19.972000,32.604000 20.357000,31.694000 20.550000,31.251000 20.907000,30.353000 21.071000,29.899000 21.225000,29.441000 21.369000,28.979000 21.503000,28.515000 21.627000,28.048000 21.844000,27.106000 21.937000,26.632000 22.020000,26.156000 22.093000,25.679000 22.207000,24.719000 22.249000,24.238000 22.280000,23.755000 22.300000,23.273000 22.310000,22.789000 22.310000,22.306000 22.278000,21.340000 22.246000,20.858000 22.204000,20.377000 22.152000,19.897000 22.089000,19.417000 22.016000,18.940000 21.932000,18.464000 21.838000,17.990000 21.734000,17.518000 21.620000,17.049000 21.361000,16.118000 21.216000,15.656000 21.062000,15.199000 20.897000,14.744000 20.723000,14.294000 20.346000,13.404000 20.143000,12.965000 19.708000,12.102000 19.477000,11.678000 19.237000,11.259000 18.729000,10.436000 18.187000,9.637000 17.610000,8.861000 17.309000,8.483000 16.683000,7.747000 16.358000,7.389000 16.026000,7.038000 15.339000,6.359000 14.623000,5.710000 14.254000,5.397000 13.498000,4.796000 12.716000,4.228000 12.316000,3.957000 11.499000,3.441000 10.660000,2.961000 10.233000,2.735000 9.801000,2.518000 9.365000,2.311000 8.924000,2.112000 8.030000,1.745000 7.578000,1.576000 7.121000,1.417000 6.662000,1.268000 5.734000,0.999000 5.265000,0.880000 4.794000,0.771000 3.846000,0.584000 3.370000,0.506000 2.891000,0.438000 2.411000,0.381000 1.930000,0.334000 1.449000,0.297000 0.483000,0.255000 0.000000,0.250000 z%22 /></g><g id=%22C197%22 data-name=%22as_component__PNGCOJINIPILRSBFUVHAAAKRQR7F7X5DOV45DHY3HPYOUZICQITA%22><path class=%22layer_1_0%22 d=%22M 9.889000,3.500000 0.000000,1.275000 0.000000,-1.275000 9.889000,-3.500000 16.000000,-3.500000 16.000000,3.500000 z%22 /><path class=%22layer_2_0%22 d=%22M 0.000000,-0.250000 10.000000,-2.500000 10.000000,2.500000 0.000000,0.250000 z%22 /><rect class=%22layer_2_0%22 x=%2210.300000%22 y=%22-2.500000%22 width=%220.300000%22 height=%225.000000%22 /><rect class=%22layer_2_0%22 x=%2210.900000%22 y=%22-2.500000%22 width=%220.300000%22 height=%225.000000%22 /><rect class=%22layer_2_0%22 x=%2211.500000%22 y=%22-2.500000%22 width=%220.300000%22 height=%225.000000%22 /><rect class=%22layer_2_0%22 x=%2212.100000%22 y=%22-2.500000%22 width=%220.300000%22 height=%225.000000%22 /><rect class=%22layer_2_0%22 x=%2212.700000%22 y=%22-2.500000%22 width=%220.300000%22 height=%225.000000%22 /><rect class=%22layer_2_0%22 x=%2213.300000%22 y=%22-2.500000%22 width=%220.300000%22 height=%225.000000%22 /><rect class=%22layer_2_0%22 x=%2213.900000%22 y=%22-2.500000%22 width=%220.300000%22 height=%225.000000%22 /><rect class=%22layer_2_0%22 x=%2214.500000%22 y=%22-2.500000%22 width=%220.300000%22 height=%225.000000%22 /><rect class=%22layer_2_0%22 x=%2215.100000%22 y=%22-2.500000%22 width=%220.300000%22 height=%225.000000%22 /><rect class=%22layer_2_0%22 x=%2215.700000%22 y=%22-2.500000%22 width=%220.300000%22 height=%225.000000%22 /></g><g id=%22C198%22 data-name=%22s_bend_l_7P05246090121704_o_2P652865043868781_p_Strip%22><path class=%22layer_1_0%22 d=%22M 0.000000,-1.250000 0.339000,-1.241000 0.677000,-1.215000 1.014000,-1.172000 1.347000,-1.111000 1.678000,-1.033000 2.003000,-0.939000 2.324000,-0.827000 2.638000,-0.700000 2.945000,-0.556000 3.245000,-0.397000 3.536000,-0.223000 3.818000,-0.034000 4.089000,0.170000 4.350000,0.386000 4.512000,0.521000 4.856000,0.765000 5.036000,0.873000 5.222000,0.972000 5.413000,1.061000 5.808000,1.210000 6.215000,1.317000 6.422000,1.354000 6.631000,1.381000 6.841000,1.398000 7.052000,1.403000 7.052000,3.903000 6.713000,3.894000 6.375000,3.868000 6.038000,3.825000 5.705000,3.764000 5.374000,3.686000 5.049000,3.592000 4.728000,3.480000 4.414000,3.353000 4.107000,3.209000 3.807000,3.050000 3.516000,2.876000 3.234000,2.687000 2.963000,2.483000 2.702000,2.267000 2.540000,2.132000 2.371000,2.006000 2.196000,1.888000 2.016000,1.780000 1.830000,1.681000 1.639000,1.592000 1.443000,1.513000 1.244000,1.443000 0.837000,1.336000 0.630000,1.299000 0.421000,1.272000 0.211000,1.255000 0.000000,1.250000 z%22 /><path class=%22layer_2_0%22 d=%22M 0.000000,-0.250000 0.288000,-0.243000 0.575000,-0.220000 0.860000,-0.184000 1.143000,-0.132000 1.423000,-0.066000 1.700000,0.014000 1.972000,0.109000 2.238000,0.217000 2.499000,0.339000 2.753000,0.474000 3.000000,0.622000 3.239000,0.782000 3.470000,0.954000 3.691000,1.138000 3.892000,1.306000 4.102000,1.463000 4.320000,1.609000 4.545000,1.744000 4.776000,1.867000 5.014000,1.978000 5.256000,2.076000 5.504000,2.162000 5.756000,2.235000 6.011000,2.296000 6.269000,2.342000 6.529000,2.376000 6.790000,2.396000 7.052000,2.403000 7.052000,2.903000 6.764000,2.896000 6.477000,2.873000 6.192000,2.837000 5.909000,2.785000 5.629000,2.719000 5.352000,2.639000 5.080000,2.544000 4.814000,2.436000 4.553000,2.314000 4.299000,2.179000 4.052000,2.031000 3.813000,1.871000 3.582000,1.699000 3.361000,1.515000 3.160000,1.347000 2.950000,1.190000 2.732000,1.044000 2.507000,0.909000 2.276000,0.786000 2.038000,0.675000 1.796000,0.577000 1.548000,0.491000 1.296000,0.418000 1.041000,0.357000 0.783000,0.311000 0.523000,0.277000 0.262000,0.257000 0.000000,0.250000 z%22 /></g><g id=%22C199%22 data-name=%22as_component__PNGCOJINIPILRSBFUVHAAAKRQR7F7X5DOV45DHY3HPYOUZICQITA%22><path class=%22layer_1_0%22 d=%22M 9.889000,3.500000 0.000000,1.275000 0.000000,-1.275000 9.889000,-3.500000 16.000000,-3.500000 16.000000,3.500000 z%22 /><path class=%22layer_2_0%22 d=%22M 0.000000,-0.250000 10.000000,-2.500000 10.000000,2.500000 0.000000,0.250000 z%22 /><rect class=%22layer_2_0%22 x=%2210.300000%22 y=%22-2.500000%22 width=%220.300000%22 height=%225.000000%22 /><rect class=%22layer_2_0%22 x=%2210.900000%22 y=%22-2.500000%22 width=%220.300000%22 height=%225.000000%22 /><rect class=%22layer_2_0%22 x=%2211.500000%22 y=%22-2.500000%22 width=%220.300000%22 height=%225.000000%22 /><rect class=%22layer_2_0%22 x=%2212.100000%22 y=%22-2.500000%22 width=%220.300000%22 height=%225.000000%22 /><rect class=%22layer_2_0%22 x=%2212.700000%22 y=%22-2.500000%22 width=%220.300000%22 height=%225.000000%22 /><rect class=%22layer_2_0%22 x=%2213.300000%22 y=%22-2.500000%22 width=%220.300000%22 height=%225.000000%22 /><rect class=%22layer_2_0%22 x=%2213.900000%22 y=%22-2.500000%22 width=%220.300000%22 height=%225.000000%22 /><rect class=%22layer_2_0%22 x=%2214.500000%22 y=%22-2.500000%22 width=%220.300000%22 height=%225.000000%22 /><rect class=%22layer_2_0%22 x=%2215.100000%22 y=%22-2.500000%22 width=%220.300000%22 height=%225.000000%22 /><rect class=%22layer_2_0%22 x=%2215.700000%22 y=%22-2.500000%22 width=%220.300000%22 height=%225.000000%22 /></g><g id=%22C200%22 data-name=%22s_bend_l_6P021150008580338_o_7P05610229789107_p_Strip%22><path class=%22layer_1_0%22 d=%22M 0.000000,-1.250000 0.265000,-1.242000 0.529000,-1.217000 0.792000,-1.176000 1.051000,-1.120000 1.306000,-1.047000 1.556000,-0.958000 1.800000,-0.855000 2.038000,-0.736000 2.268000,-0.603000 2.489000,-0.456000 2.700000,-0.296000 2.901000,-0.123000 3.091000,0.062000 3.270000,0.258000 3.436000,0.465000 3.589000,0.682000 3.728000,0.908000 3.853000,1.142000 3.963000,1.384000 4.058000,1.631000 4.138000,1.884000 4.202000,2.142000 4.250000,2.403000 4.281000,2.666000 4.297000,2.931000 4.296000,3.197000 4.279000,3.461000 4.245000,3.725000 4.224000,3.946000 4.230000,4.167000 4.263000,4.387000 4.323000,4.600000 4.409000,4.805000 4.520000,4.998000 4.653000,5.175000 4.807000,5.335000 4.980000,5.474000 5.168000,5.591000 5.370000,5.684000 5.581000,5.751000 5.799000,5.792000 6.021000,5.806000 6.021000,8.306000 5.756000,8.298000 5.492000,8.273000 5.229000,8.232000 4.970000,8.176000 4.715000,8.103000 4.465000,8.014000 4.221000,7.911000 3.983000,7.792000 3.754000,7.659000 3.533000,7.512000 3.321000,7.352000 3.120000,7.179000 2.930000,6.994000 2.751000,6.798000 2.585000,6.591000 2.432000,6.374000 2.293000,6.148000 2.168000,5.914000 2.058000,5.672000 1.963000,5.425000 1.883000,5.172000 1.819000,4.914000 1.771000,4.653000 1.740000,4.390000 1.724000,4.125000 1.725000,3.859000 1.742000,3.595000 1.776000,3.331000 1.797000,3.110000 1.791000,2.889000 1.758000,2.669000 1.698000,2.456000 1.612000,2.251000 1.501000,2.058000 1.368000,1.881000 1.214000,1.721000 1.041000,1.582000 0.853000,1.465000 0.651000,1.372000 0.440000,1.305000 0.222000,1.264000 0.000000,1.250000 z%22 /><path class=%22layer_2_0%22 d=%22M 0.000000,-0.250000 0.204000,-0.244000 0.406000,-0.225000 0.607000,-0.194000 0.806000,-0.150000 1.002000,-0.094000 1.194000,-0.026000 1.382000,0.053000 1.564000,0.144000 1.740000,0.246000 1.910000,0.359000 2.072000,0.482000 2.226000,0.615000 2.372000,0.757000 2.509000,0.907000 2.636000,1.066000 2.754000,1.233000 2.861000,1.406000 2.956000,1.586000 3.041000,1.771000 3.114000,1.961000 3.175000,2.155000 3.224000,2.353000 3.261000,2.553000 3.285000,2.755000 3.297000,2.959000 3.296000,3.162000 3.283000,3.365000 3.257000,3.567000 3.235000,3.739000 3.224000,3.911000 3.224000,4.084000 3.234000,4.256000 3.254000,4.428000 3.285000,4.598000 3.327000,4.765000 3.379000,4.930000 3.441000,5.091000 3.513000,5.249000 3.594000,5.401000 3.784000,5.689000 3.892000,5.824000 4.008000,5.952000 4.263000,6.185000 4.401000,6.289000 4.545000,6.385000 4.694000,6.472000 4.849000,6.549000 5.171000,6.674000 5.337000,6.721000 5.506000,6.758000 5.676000,6.785000 5.848000,6.801000 6.021000,6.806000 6.021000,7.306000 5.817000,7.300000 5.615000,7.281000 5.414000,7.250000 5.215000,7.206000 5.019000,7.150000 4.827000,7.082000 4.639000,7.003000 4.457000,6.912000 4.281000,6.810000 4.111000,6.697000 3.949000,6.574000 3.795000,6.441000 3.649000,6.299000 3.512000,6.149000 3.385000,5.990000 3.267000,5.823000 3.160000,5.650000 3.065000,5.470000 2.980000,5.285000 2.907000,5.095000 2.846000,4.901000 2.797000,4.703000 2.760000,4.503000 2.736000,4.301000 2.724000,4.097000 2.725000,3.894000 2.738000,3.691000 2.764000,3.489000 2.786000,3.317000 2.797000,3.145000 2.797000,2.972000 2.787000,2.800000 2.767000,2.628000 2.736000,2.458000 2.694000,2.291000 2.642000,2.126000 2.580000,1.965000 2.508000,1.807000 2.427000,1.655000 2.237000,1.367000 2.129000,1.232000 2.013000,1.104000 1.758000,0.871000 1.476000,0.671000 1.327000,0.584000 1.172000,0.507000 0.850000,0.382000 0.684000,0.335000 0.515000,0.298000 0.345000,0.271000 0.173000,0.255000 0.000000,0.250000 z%22 /></g><g id=%22C201%22 data-name=%22as_component__PNGCOJINIPILRSBFUVHAAAKRQR7F7X5DOV45DHY3HPYOUZICQITA%22><path class=%22layer_1_0%22 d=%22M 9.889000,3.500000 0.000000,1.275000 0.000000,-1.275000 9.889000,-3.500000 16.000000,-3.500000 16.000000,3.500000 z%22 /><path class=%22layer_2_0%22 d=%22M 0.000000,-0.250000 10.000000,-2.500000 10.000000,2.500000 0.000000,0.250000 z%22 /><rect class=%22layer_2_0%22 x=%2210.300000%22 y=%22-2.500000%22 width=%220.300000%22 height=%225.000000%22 /><rect class=%22layer_2_0%22 x=%2210.900000%22 y=%22-2.500000%22 width=%220.300000%22 height=%225.000000%22 /><rect class=%22layer_2_0%22 x=%2211.500000%22 y=%22-2.500000%22 width=%220.300000%22 height=%225.000000%22 /><rect class=%22layer_2_0%22 x=%2212.100000%22 y=%22-2.500000%22 width=%220.300000%22 height=%225.000000%22 /><rect class=%22layer_2_0%22 x=%2212.700000%22 y=%22-2.500000%22 width=%220.300000%22 height=%225.000000%22 /><rect class=%22layer_2_0%22 x=%2213.300000%22 y=%22-2.500000%22 width=%220.300000%22 height=%225.000000%22 /><rect class=%22layer_2_0%22 x=%2213.900000%22 y=%22-2.500000%22 width=%220.300000%22 height=%225.000000%22 /><rect class=%22layer_2_0%22 x=%2214.500000%22 y=%22-2.500000%22 width=%220.300000%22 height=%225.000000%22 /><rect class=%22layer_2_0%22 x=%2215.100000%22 y=%22-2.500000%22 width=%220.300000%22 height=%225.000000%22 /><rect class=%22layer_2_0%22 x=%2215.700000%22 y=%22-2.500000%22 width=%220.300000%22 height=%225.000000%22 /></g><g id=%22C202%22 data-name=%22s_bend_l_5P39309251265782_o_32P8217591604653_p_Strip%22><path class=%22layer_1_0%22 d=%22M 0.000000,-1.250000 0.341000,-1.244000 0.681000,-1.226000 1.020000,-1.196000 1.358000,-1.154000 1.694000,-1.101000 2.029000,-1.035000 2.360000,-0.958000 2.689000,-0.869000 3.015000,-0.768000 3.336000,-0.657000 3.654000,-0.534000 3.967000,-0.400000 4.275000,-0.254000 4.578000,-0.099000 4.875000,0.068000 5.166000,0.244000 5.451000,0.431000 5.729000,0.628000 6.000000,0.835000 6.263000,1.050000 6.519000,1.275000 6.767000,1.509000 7.006000,1.752000 7.237000,2.002000 7.458000,2.261000 7.671000,2.527000 8.067000,3.081000 8.250000,3.369000 8.423000,3.662000 8.585000,3.961000 8.737000,4.266000 8.878000,4.576000 9.008000,4.891000 9.127000,5.210000 9.234000,5.534000 9.330000,5.860000 9.415000,6.190000 9.488000,6.523000 9.549000,6.858000 9.598000,7.195000 9.636000,7.534000 9.661000,7.873000 9.675000,8.214000 9.676000,8.554000 9.666000,8.895000 9.643000,9.234000 9.609000,9.573000 9.563000,9.911000 9.504000,10.246000 9.435000,10.580000 9.353000,10.910000 9.260000,11.238000 9.155000,11.562000 9.039000,11.882000 8.912000,12.198000 8.774000,12.510000 8.625000,12.816000 8.465000,13.117000 8.295000,13.412000 8.114000,13.700000 7.923000,13.983000 7.723000,14.258000 7.513000,14.526000 7.294000,14.787000 7.065000,15.040000 6.828000,15.284000 6.583000,15.520000 6.329000,15.747000 6.068000,15.966000 5.522000,16.374000 5.239000,16.563000 4.950000,16.742000 4.654000,16.912000 4.352000,17.070000 4.046000,17.218000 3.734000,17.355000 3.417000,17.481000 3.096000,17.595000 2.624000,17.774000 2.165000,17.985000 1.941000,18.102000 1.507000,18.361000 1.093000,18.649000 0.699000,18.966000 0.329000,19.309000 -0.016000,19.678000 -0.335000,20.070000 -0.625000,20.484000 -0.885000,20.917000 -1.114000,21.367000 -1.311000,21.832000 -1.475000,22.310000 -1.604000,22.798000 -1.699000,23.295000 -1.759000,23.796000 -1.776000,24.048000 -1.782000,24.553000 -1.753000,25.058000 -1.726000,25.309000 -1.644000,25.807000 -1.527000,26.299000 -1.376000,26.781000 -1.191000,27.251000 -0.974000,27.707000 -0.725000,28.147000 -0.590000,28.360000 -0.296000,28.771000 0.026000,29.160000 0.374000,29.526000 0.748000,29.866000 1.144000,30.179000 1.561000,30.464000 1.998000,30.718000 2.222000,30.834000 2.683000,31.041000 3.157000,31.215000 3.642000,31.355000 4.136000,31.461000 4.637000,31.532000 5.140000,31.568000 5.393000,31.572000 5.393000,34.072000 5.052000,34.066000 4.712000,34.048000 4.373000,34.018000 4.035000,33.976000 3.699000,33.923000 3.364000,33.857000 3.033000,33.780000 2.704000,33.691000 2.378000,33.590000 2.057000,33.479000 1.739000,33.356000 1.426000,33.222000 1.118000,33.076000 0.815000,32.921000 0.518000,32.754000 0.227000,32.578000 -0.058000,32.391000 -0.336000,32.194000 -0.607000,31.987000 -0.870000,31.772000 -1.126000,31.547000 -1.374000,31.313000 -1.613000,31.070000 -1.844000,30.820000 -2.065000,30.561000 -2.278000,30.295000 -2.674000,29.741000 -2.857000,29.453000 -3.030000,29.160000 -3.192000,28.861000 -3.344000,28.556000 -3.485000,28.246000 -3.615000,27.931000 -3.734000,27.612000 -3.841000,27.288000 -3.937000,26.962000 -4.022000,26.632000 -4.095000,26.299000 -4.156000,25.964000 -4.205000,25.627000 -4.243000,25.288000 -4.268000,24.949000 -4.282000,24.608000 -4.283000,24.268000 -4.273000,23.927000 -4.250000,23.588000 -4.216000,23.249000 -4.170000,22.911000 -4.111000,22.576000 -4.042000,22.242000 -3.960000,21.912000 -3.867000,21.584000 -3.762000,21.260000 -3.646000,20.940000 -3.519000,20.624000 -3.381000,20.312000 -3.232000,20.006000 -3.072000,19.705000 -2.902000,19.410000 -2.721000,19.122000 -2.530000,18.839000 -2.330000,18.564000 -2.120000,18.296000 -1.901000,18.035000 -1.672000,17.782000 -1.435000,17.538000 -1.190000,17.302000 -0.936000,17.075000 -0.674000,16.856000 -0.405000,16.648000 -0.129000,16.448000 0.154000,16.259000 0.443000,16.080000 0.739000,15.910000 1.041000,15.752000 1.347000,15.604000 1.659000,15.467000 1.976000,15.341000 2.297000,15.227000 2.534000,15.142000 3.000000,14.947000 3.452000,14.720000 3.671000,14.594000 4.096000,14.321000 4.500000,14.018000 4.882000,13.688000 5.240000,13.331000 5.572000,12.951000 5.876000,12.547000 6.152000,12.124000 6.396000,11.682000 6.610000,11.224000 6.790000,10.752000 6.937000,10.269000 7.049000,9.776000 7.127000,9.277000 7.169000,8.774000 7.176000,8.521000 7.165000,8.016000 7.119000,7.513000 7.082000,7.263000 6.983000,6.768000 6.849000,6.281000 6.681000,5.805000 6.480000,5.341000 6.247000,4.893000 5.983000,4.462000 5.839000,4.254000 5.531000,3.854000 5.196000,3.476000 4.835000,3.123000 4.450000,2.796000 4.043000,2.497000 3.616000,2.227000 3.171000,1.988000 2.710000,1.781000 2.236000,1.607000 1.751000,1.467000 1.257000,1.361000 0.756000,1.290000 0.253000,1.254000 0.000000,1.250000 z%22 /><path class=%22layer_2_0%22 d=%22M 0.000000,-0.250000 0.305000,-0.245000 0.610000,-0.229000 0.915000,-0.202000 1.218000,-0.164000 1.519000,-0.116000 1.819000,-0.057000 2.116000,0.012000 2.411000,0.092000 2.703000,0.182000 2.992000,0.282000 3.276000,0.392000 3.557000,0.513000 3.833000,0.643000 4.105000,0.782000 4.632000,1.090000 4.888000,1.258000 5.137000,1.434000 5.380000,1.619000 5.845000,2.014000 6.068000,2.224000 6.489000,2.666000 6.688000,2.898000 7.060000,3.382000 7.233000,3.634000 7.397000,3.891000 7.552000,4.155000 7.698000,4.423000 7.834000,4.696000 7.960000,4.974000 8.077000,5.257000 8.184000,5.543000 8.280000,5.833000 8.366000,6.126000 8.442000,6.421000 8.507000,6.720000 8.562000,7.020000 8.606000,7.322000 8.640000,7.626000 8.663000,7.930000 8.675000,8.236000 8.667000,8.846000 8.647000,9.151000 8.616000,9.455000 8.574000,9.757000 8.522000,10.058000 8.460000,10.357000 8.303000,10.948000 8.209000,11.238000 8.105000,11.525000 7.991000,11.809000 7.867000,12.088000 7.590000,12.632000 7.437000,12.897000 7.105000,13.409000 6.925000,13.656000 6.737000,13.896000 6.540000,14.130000 6.123000,14.576000 5.675000,14.991000 5.441000,15.187000 4.952000,15.553000 4.438000,15.883000 4.173000,16.035000 3.903000,16.177000 3.628000,16.309000 3.348000,16.432000 3.064000,16.545000 2.777000,16.648000 2.505000,16.745000 2.238000,16.851000 1.715000,17.092000 1.211000,17.368000 0.727000,17.680000 0.493000,17.848000 0.045000,18.209000 -0.377000,18.601000 -0.577000,18.807000 -0.955000,19.241000 -1.133000,19.468000 -1.302000,19.700000 -1.616000,20.183000 -1.760000,20.432000 -1.895000,20.686000 -2.138000,21.208000 -2.343000,21.746000 -2.510000,22.297000 -2.579000,22.576000 -2.638000,22.858000 -2.687000,23.141000 -2.726000,23.426000 -2.756000,23.713000 -2.783000,24.288000 -2.771000,24.863000 -2.749000,25.150000 -2.676000,25.721000 -2.563000,26.285000 -2.410000,26.840000 -2.219000,27.383000 -1.990000,27.911000 -1.724000,28.421000 -1.578000,28.669000 -1.260000,29.149000 -1.089000,29.380000 -0.722000,29.824000 -0.527000,30.036000 -0.116000,30.438000 0.323000,30.811000 0.787000,31.151000 1.027000,31.309000 1.274000,31.459000 1.781000,31.731000 2.306000,31.967000 2.574000,32.071000 3.121000,32.250000 3.399000,32.325000 3.961000,32.446000 4.531000,32.526000 4.818000,32.552000 5.105000,32.567000 5.393000,32.572000 5.393000,33.072000 5.088000,33.067000 4.783000,33.051000 4.478000,33.024000 4.175000,32.986000 3.874000,32.938000 3.574000,32.879000 3.277000,32.810000 2.982000,32.730000 2.690000,32.640000 2.401000,32.540000 2.117000,32.430000 1.836000,32.309000 1.288000,32.040000 1.022000,31.890000 0.761000,31.732000 0.505000,31.564000 0.256000,31.388000 0.013000,31.203000 -0.452000,30.808000 -0.675000,30.598000 -1.096000,30.156000 -1.295000,29.924000 -1.667000,29.440000 -1.840000,29.188000 -2.004000,28.931000 -2.159000,28.668000 -2.305000,28.399000 -2.441000,28.126000 -2.567000,27.848000 -2.684000,27.565000 -2.791000,27.279000 -2.887000,26.989000 -2.973000,26.696000 -3.049000,26.401000 -3.114000,26.102000 -3.169000,25.802000 -3.213000,25.500000 -3.247000,25.196000 -3.270000,24.892000 -3.282000,24.586000 -3.274000,23.976000 -3.254000,23.671000 -3.223000,23.367000 -3.181000,23.065000 -3.129000,22.764000 -3.067000,22.465000 -2.910000,21.874000 -2.816000,21.584000 -2.712000,21.297000 -2.598000,21.013000 -2.474000,20.734000 -2.340000,20.460000 -2.197000,20.190000 -2.044000,19.926000 -1.712000,19.413000 -1.344000,18.926000 -1.147000,18.692000 -0.730000,18.246000 -0.282000,17.831000 -0.047000,17.635000 0.441000,17.269000 0.955000,16.939000 1.220000,16.787000 1.490000,16.645000 2.045000,16.390000 2.329000,16.277000 2.617000,16.174000 3.155000,15.971000 3.678000,15.730000 4.182000,15.454000 4.427000,15.302000 4.900000,14.974000 5.348000,14.613000 5.562000,14.421000 5.970000,14.015000 6.163000,13.801000 6.526000,13.354000 6.695000,13.122000 7.009000,12.639000 7.153000,12.390000 7.288000,12.136000 7.531000,11.614000 7.736000,11.076000 7.903000,10.525000 7.972000,10.246000 8.031000,9.964000 8.080000,9.681000 8.149000,9.109000 8.167000,8.822000 8.176000,8.534000 8.164000,7.959000 8.142000,7.672000 8.069000,7.101000 7.956000,6.537000 7.803000,5.982000 7.612000,5.439000 7.383000,4.911000 7.117000,4.401000 6.971000,4.153000 6.816000,3.910000 6.482000,3.442000 6.115000,2.998000 5.920000,2.786000 5.509000,2.384000 5.070000,2.011000 4.841000,1.837000 4.366000,1.513000 4.119000,1.363000 3.612000,1.091000 3.088000,0.855000 2.819000,0.751000 2.272000,0.572000 1.994000,0.497000 1.432000,0.376000 1.147000,0.331000 0.575000,0.270000 0.288000,0.255000 0.000000,0.250000 z%22 /></g><g id=%22C203%22 data-name=%22as_component__PNGCOJINIPILRSBFUVHAAAKRQR7F7X5DOV45DHY3HPYOUZICQITA%22><path class=%22layer_1_0%22 d=%22M 9.889000,3.500000 0.000000,1.275000 0.000000,-1.275000 9.889000,-3.500000 16.000000,-3.500000 16.000000,3.500000 z%22 /><path class=%22layer_2_0%22 d=%22M 0.000000,-0.250000 10.000000,-2.500000 10.000000,2.500000 0.000000,0.250000 z%22 /><rect class=%22layer_2_0%22 x=%2210.300000%22 y=%22-2.500000%22 width=%220.300000%22 height=%225.000000%22 /><rect class=%22layer_2_0%22 x=%2210.900000%22 y=%22-2.500000%22 width=%220.300000%22 height=%225.000000%22 /><rect class=%22layer_2_0%22 x=%2211.500000%22 y=%22-2.500000%22 width=%220.300000%22 height=%225.000000%22 /><rect class=%22layer_2_0%22 x=%2212.100000%22 y=%22-2.500000%22 width=%220.300000%22 height=%225.000000%22 /><rect class=%22layer_2_0%22 x=%2212.700000%22 y=%22-2.500000%22 width=%220.300000%22 height=%225.000000%22 /><rect class=%22layer_2_0%22 x=%2213.300000%22 y=%22-2.500000%22 width=%220.300000%22 height=%225.000000%22 /><rect class=%22layer_2_0%22 x=%2213.900000%22 y=%22-2.500000%22 width=%220.300000%22 height=%225.000000%22 /><rect class=%22layer_2_0%22 x=%2214.500000%22 y=%22-2.500000%22 width=%220.300000%22 height=%225.000000%22 /><rect class=%22layer_2_0%22 x=%2215.100000%22 y=%22-2.500000%22 width=%220.300000%22 height=%225.000000%22 /><rect class=%22layer_2_0%22 x=%2215.700000%22 y=%22-2.500000%22 width=%220.300000%22 height=%225.000000%22 /></g><g id=%22C204%22 data-name=%22s_bend_l_39P18522147149944_o_19P185136575025084_p_Strip%22><path class=%22layer_1_0%22 d=%22M 0.000000,-1.250000 0.539000,-1.244000 1.078000,-1.228000 1.617000,-1.200000 2.154000,-1.161000 2.691000,-1.111000 3.227000,-1.049000 3.761000,-0.977000 4.294000,-0.894000 4.825000,-0.799000 5.354000,-0.694000 5.880000,-0.578000 6.404000,-0.451000 6.925000,-0.313000 7.444000,-0.164000 7.959000,-0.005000 8.471000,0.165000 8.979000,0.346000 9.483000,0.537000 9.983000,0.738000 10.479000,0.950000 10.970000,1.172000 11.457000,1.404000 11.939000,1.646000 12.415000,1.898000 12.887000,2.160000 13.353000,2.432000 13.813000,2.713000 14.267000,3.003000 14.715000,3.303000 15.157000,3.612000 15.592000,3.931000 16.021000,4.258000 16.443000,4.594000 16.857000,4.938000 17.265000,5.291000 18.058000,6.022000 18.442000,6.400000 18.819000,6.786000 19.188000,7.179000 19.549000,7.580000 19.901000,7.988000 20.245000,8.403000 20.580000,8.826000 20.883000,9.208000 21.512000,9.952000 21.838000,10.315000 22.512000,11.019000 23.215000,11.695000 23.945000,12.341000 24.701000,12.956000 25.089000,13.252000 25.882000,13.819000 26.287000,14.090000 27.114000,14.607000 27.961000,15.089000 28.827000,15.536000 29.712000,15.946000 30.612000,16.320000 31.527000,16.655000 31.990000,16.809000 32.924000,17.088000 33.869000,17.327000 34.823000,17.528000 35.303000,17.613000 36.268000,17.754000 36.752000,17.809000 37.724000,17.890000 38.210000,17.915000 39.185000,17.935000 39.185000,20.435000 38.107000,20.413000 37.568000,20.385000 37.031000,20.346000 36.494000,20.296000 35.958000,20.234000 35.424000,20.162000 34.891000,20.079000 34.360000,19.984000 33.831000,19.879000 33.305000,19.763000 32.781000,19.636000 32.260000,19.498000 31.741000,19.349000 31.226000,19.190000 30.714000,19.020000 30.206000,18.839000 29.702000,18.648000 29.202000,18.447000 28.706000,18.235000 28.215000,18.013000 27.728000,17.781000 27.246000,17.539000 26.770000,17.287000 26.298000,17.025000 25.832000,16.753000 25.372000,16.472000 24.918000,16.182000 24.470000,15.882000 24.028000,15.573000 23.164000,14.927000 22.742000,14.591000 22.328000,14.247000 21.920000,13.894000 21.127000,13.163000 20.743000,12.785000 20.366000,12.399000 19.997000,12.006000 19.636000,11.605000 19.284000,11.197000 18.940000,10.782000 18.605000,10.359000 18.302000,9.977000 17.991000,9.602000 17.347000,8.870000 16.673000,8.166000 15.970000,7.490000 15.240000,6.844000 14.484000,6.229000 14.096000,5.933000 13.303000,5.366000 12.898000,5.095000 12.071000,4.578000 11.224000,4.096000 10.358000,3.649000 9.473000,3.239000 9.025000,3.048000 8.117000,2.693000 7.195000,2.376000 6.261000,2.097000 5.316000,1.858000 4.362000,1.657000 3.882000,1.572000 2.917000,1.431000 2.433000,1.376000 1.461000,1.295000 0.975000,1.270000 0.000000,1.250000 z%22 /><path class=%22layer_2_0%22 d=%22M 0.000000,-0.250000 0.518000,-0.245000 1.037000,-0.229000 1.555000,-0.202000 2.072000,-0.164000 2.588000,-0.116000 3.103000,-0.057000 3.617000,0.012000 4.640000,0.183000 5.655000,0.396000 6.660000,0.651000 7.158000,0.794000 7.653000,0.948000 8.145000,1.111000 9.119000,1.468000 9.600000,1.662000 10.077000,1.866000 10.549000,2.079000 11.017000,2.302000 11.481000,2.535000 11.939000,2.777000 12.392000,3.029000 12.840000,3.290000 13.283000,3.561000 13.719000,3.840000 14.150000,4.128000 14.994000,4.732000 15.406000,5.046000 15.812000,5.369000 16.602000,6.040000 16.987000,6.388000 17.735000,7.106000 18.452000,7.855000 19.137000,8.633000 19.468000,9.033000 19.790000,9.439000 20.430000,10.229000 20.762000,10.614000 21.449000,11.362000 21.804000,11.725000 22.537000,12.430000 23.298000,13.103000 23.689000,13.428000 24.490000,14.053000 24.901000,14.353000 25.739000,14.927000 26.601000,15.465000 27.040000,15.721000 27.484000,15.968000 28.388000,16.434000 29.309000,16.862000 30.248000,17.251000 30.723000,17.431000 31.202000,17.601000 32.170000,17.912000 32.658000,18.052000 33.149000,18.182000 34.140000,18.411000 34.638000,18.510000 35.138000,18.599000 35.640000,18.678000 36.144000,18.746000 36.649000,18.804000 37.661000,18.888000 38.677000,18.930000 39.185000,18.935000 39.185000,19.435000 38.667000,19.430000 38.148000,19.414000 37.630000,19.387000 37.113000,19.349000 36.597000,19.301000 36.082000,19.242000 35.568000,19.173000 34.545000,19.002000 33.530000,18.789000 32.525000,18.534000 32.027000,18.391000 31.040000,18.074000 30.066000,17.717000 29.585000,17.523000 29.108000,17.319000 28.636000,17.106000 28.168000,16.883000 27.704000,16.650000 27.246000,16.408000 26.793000,16.156000 26.345000,15.895000 25.902000,15.624000 25.466000,15.345000 25.035000,15.057000 24.191000,14.453000 23.779000,14.139000 23.373000,13.816000 22.583000,13.145000 22.198000,12.797000 21.450000,12.079000 20.733000,11.330000 20.048000,10.552000 19.717000,10.152000 19.395000,9.746000 18.755000,8.956000 18.423000,8.571000 17.736000,7.823000 17.381000,7.460000 16.648000,6.755000 15.887000,6.082000 15.496000,5.757000 14.695000,5.132000 14.284000,4.832000 13.446000,4.258000 13.018000,3.985000 12.584000,3.720000 12.145000,3.464000 11.701000,3.217000 11.251000,2.980000 10.797000,2.751000 9.876000,2.323000 8.937000,1.934000 8.462000,1.754000 7.983000,1.584000 7.015000,1.273000 6.527000,1.133000 6.036000,1.003000 5.045000,0.774000 4.547000,0.675000 4.047000,0.586000 3.545000,0.507000 3.041000,0.439000 2.536000,0.381000 1.524000,0.297000 0.508000,0.255000 0.000000,0.250000 z%22 /></g><g id=%22C205%22 data-name=%22as_component__PNGCOJINIPILRSBFUVHAAAKRQR7F7X5DOV45DHY3HPYOUZICQITA%22><path class=%22layer_1_0%22 d=%22M 9.889000,3.500000 0.000000,1.275000 0.000000,-1.275000 9.889000,-3.500000 16.000000,-3.500000 16.000000,3.500000 z%22 /><path class=%22layer_2_0%22 d=%22M 0.000000,-0.250000 10.000000,-2.500000 10.000000,2.500000 0.000000,0.250000 z%22 /><rect class=%22layer_2_0%22 x=%2210.300000%22 y=%22-2.500000%22 width=%220.300000%22 height=%225.000000%22 /><rect class=%22layer_2_0%22 x=%2210.900000%22 y=%22-2.500000%22 width=%220.300000%22 height=%225.000000%22 /><rect class=%22layer_2_0%22 x=%2211.500000%22 y=%22-2.500000%22 width=%220.300000%22 height=%225.000000%22 /><rect class=%22layer_2_0%22 x=%2212.100000%22 y=%22-2.500000%22 width=%220.300000%22 height=%225.000000%22 /><rect class=%22layer_2_0%22 x=%2212.700000%22 y=%22-2.500000%22 width=%220.300000%22 height=%225.000000%22 /><rect class=%22layer_2_0%22 x=%2213.300000%22 y=%22-2.500000%22 width=%220.300000%22 height=%225.000000%22 /><rect class=%22layer_2_0%22 x=%2213.900000%22 y=%22-2.500000%22 width=%220.300000%22 height=%225.000000%22 /><rect class=%22layer_2_0%22 x=%2214.500000%22 y=%22-2.500000%22 width=%220.300000%22 height=%225.000000%22 /><rect class=%22layer_2_0%22 x=%2215.100000%22 y=%22-2.500000%22 width=%220.300000%22 height=%225.000000%22 /><rect class=%22layer_2_0%22 x=%2215.700000%22 y=%22-2.500000%22 width=%220.300000%22 height=%225.000000%22 /></g><g id=%22C206%22 data-name=%22s_bend_l_38P16666470460358_o_12P24930537189671_p_Strip%22><path class=%22layer_1_0%22 d=%22M 0.000000,-1.250000 0.622000,-1.244000 1.244000,-1.227000 1.865000,-1.199000 2.485000,-1.159000 3.105000,-1.108000 3.724000,-1.046000 4.341000,-0.972000 4.957000,-0.887000 5.572000,-0.791000 6.184000,-0.684000 6.795000,-0.565000 7.403000,-0.435000 8.009000,-0.295000 8.612000,-0.143000 9.212000,0.020000 9.809000,0.194000 10.403000,0.378000 10.993000,0.574000 11.580000,0.780000 12.163000,0.997000 12.742000,1.224000 13.316000,1.462000 13.886000,1.711000 14.452000,1.970000 15.013000,2.239000 15.568000,2.518000 16.119000,2.808000 16.664000,3.107000 17.203000,3.416000 18.265000,4.064000 18.786000,4.403000 19.302000,4.751000 19.811000,5.108000 20.283000,5.439000 20.760000,5.761000 21.244000,6.075000 21.733000,6.380000 22.727000,6.962000 23.742000,7.508000 24.776000,8.016000 25.300000,8.256000 25.829000,8.486000 26.897000,8.917000 27.437000,9.118000 27.981000,9.309000 28.528000,9.490000 29.078000,9.661000 29.631000,9.822000 30.746000,10.114000 31.871000,10.364000 32.437000,10.474000 33.004000,10.574000 33.574000,10.663000 34.717000,10.810000 35.290000,10.868000 35.864000,10.915000 36.439000,10.952000 37.591000,10.994000 38.167000,10.999000 38.167000,13.499000 37.545000,13.493000 36.923000,13.476000 36.302000,13.448000 35.682000,13.408000 35.062000,13.357000 34.443000,13.295000 33.826000,13.221000 33.210000,13.136000 32.595000,13.040000 31.983000,12.933000 31.372000,12.814000 30.764000,12.684000 30.158000,12.544000 29.555000,12.392000 28.955000,12.229000 28.358000,12.055000 27.764000,11.871000 27.174000,11.675000 26.587000,11.469000 26.004000,11.252000 25.425000,11.025000 24.851000,10.787000 24.281000,10.538000 23.715000,10.279000 23.155000,10.010000 22.599000,9.731000 22.048000,9.441000 21.503000,9.142000 20.964000,8.833000 19.902000,8.185000 19.381000,7.846000 18.865000,7.498000 18.356000,7.141000 17.884000,6.810000 17.407000,6.488000 16.923000,6.174000 16.434000,5.869000 15.440000,5.287000 14.425000,4.741000 13.391000,4.233000 12.867000,3.993000 12.338000,3.763000 11.806000,3.543000 11.270000,3.332000 10.730000,3.131000 10.186000,2.940000 9.639000,2.759000 9.089000,2.588000 8.536000,2.427000 7.421000,2.135000 6.296000,1.885000 5.730000,1.775000 5.163000,1.675000 4.593000,1.586000 3.450000,1.439000 2.877000,1.381000 2.303000,1.334000 1.728000,1.297000 0.576000,1.255000 0.000000,1.250000 z%22 /><path class=%22layer_2_0%22 d=%22M 0.000000,-0.250000 0.604000,-0.244000 1.207000,-0.228000 1.810000,-0.200000 2.412000,-0.162000 3.014000,-0.112000 3.615000,-0.052000 4.214000,0.020000 4.812000,0.102000 5.408000,0.196000 6.003000,0.300000 6.595000,0.415000 7.186000,0.541000 7.774000,0.677000 8.359000,0.825000 8.942000,0.983000 9.521000,1.151000 10.671000,1.520000 11.240000,1.720000 11.806000,1.931000 12.368000,2.152000 12.925000,2.383000 13.479000,2.624000 14.027000,2.875000 14.572000,3.136000 15.645000,3.688000 16.174000,3.979000 16.698000,4.279000 17.216000,4.589000 17.728000,4.908000 18.235000,5.237000 18.735000,5.574000 19.229000,5.921000 19.716000,6.263000 20.208000,6.595000 20.707000,6.919000 21.212000,7.233000 21.722000,7.538000 22.238000,7.834000 22.759000,8.120000 23.285000,8.397000 23.816000,8.664000 24.892000,9.169000 25.437000,9.406000 25.987000,9.634000 26.540000,9.851000 27.097000,10.058000 27.658000,10.255000 28.222000,10.442000 28.790000,10.619000 29.361000,10.785000 29.935000,10.941000 30.511000,11.086000 31.090000,11.220000 32.255000,11.458000 32.841000,11.560000 33.428000,11.652000 34.017000,11.733000 34.607000,11.804000 35.199000,11.863000 35.791000,11.912000 36.384000,11.950000 36.978000,11.977000 37.573000,11.994000 38.167000,11.999000 38.167000,12.499000 37.563000,12.493000 36.960000,12.477000 36.357000,12.449000 35.755000,12.411000 35.153000,12.361000 34.552000,12.301000 33.953000,12.229000 33.355000,12.147000 32.759000,12.053000 32.164000,11.949000 31.572000,11.834000 30.981000,11.708000 30.393000,11.572000 29.808000,11.424000 29.226000,11.266000 28.646000,11.098000 27.496000,10.729000 26.927000,10.529000 26.361000,10.318000 25.799000,10.097000 25.242000,9.866000 24.688000,9.625000 24.140000,9.374000 23.595000,9.113000 23.056000,8.842000 22.522000,8.561000 21.993000,8.270000 21.469000,7.970000 20.951000,7.660000 20.439000,7.341000 19.932000,7.012000 19.432000,6.675000 18.938000,6.328000 18.451000,5.986000 17.959000,5.654000 17.460000,5.330000 16.955000,5.016000 16.445000,4.711000 15.929000,4.415000 15.408000,4.129000 14.882000,3.852000 14.351000,3.585000 13.275000,3.080000 12.730000,2.843000 12.180000,2.615000 11.627000,2.398000 11.070000,2.191000 10.509000,1.994000 9.945000,1.807000 9.377000,1.630000 8.806000,1.464000 8.232000,1.308000 7.656000,1.163000 7.077000,1.029000 5.912000,0.791000 5.326000,0.689000 4.739000,0.597000 4.150000,0.516000 3.560000,0.445000 2.968000,0.386000 2.376000,0.337000 1.783000,0.299000 1.189000,0.272000 0.594000,0.255000 0.000000,0.250000 z%22 /></g><g id=%22C207%22 data-name=%22as_component__PNGCOJINIPILRSBFUVHAAAKRQR7F7X5DOV45DHY3HPYOUZICQITA%22><path class=%22layer_1_0%22 d=%22M 9.889000,3.500000 0.000000,1.275000 0.000000,-1.275000 9.889000,-3.500000 16.000000,-3.500000 16.000000,3.500000 z%22 /><path class=%22layer_2_0%22 d=%22M 0.000000,-0.250000 10.000000,-2.500000 10.000000,2.500000 0.000000,0.250000 z%22 /><rect class=%22layer_2_0%22 x=%2210.300000%22 y=%22-2.500000%22 width=%220.300000%22 height=%225.000000%22 /><rect class=%22layer_2_0%22 x=%2210.900000%22 y=%22-2.500000%22 width=%220.300000%22 height=%225.000000%22 /><rect class=%22layer_2_0%22 x=%2211.500000%22 y=%22-2.500000%22 width=%220.300000%22 height=%225.000000%22 /><rect class=%22layer_2_0%22 x=%2212.100000%22 y=%22-2.500000%22 width=%220.300000%22 height=%225.000000%22 /><rect class=%22layer_2_0%22 x=%2212.700000%22 y=%22-2.500000%22 width=%220.300000%22 height=%225.000000%22 /><rect class=%22layer_2_0%22 x=%2213.300000%22 y=%22-2.500000%22 width=%220.300000%22 height=%225.000000%22 /><rect class=%22layer_2_0%22 x=%2213.900000%22 y=%22-2.500000%22 width=%220.300000%22 height=%225.000000%22 /><rect class=%22layer_2_0%22 x=%2214.500000%22 y=%22-2.500000%22 width=%220.300000%22 height=%225.000000%22 /><rect class=%22layer_2_0%22 x=%2215.100000%22 y=%22-2.500000%22 width=%220.300000%22 height=%225.000000%22 /><rect class=%22layer_2_0%22 x=%2215.700000%22 y=%22-2.500000%22 width=%220.300000%22 height=%225.000000%22 /></g><g id=%22C208%22 data-name=%22s_bend_l_37P730852520052466_o_39P34423824015565_p_Strip%22><path class=%22layer_1_0%22 d=%22M 0.000000,-1.250000 0.477000,-1.244000 0.955000,-1.227000 1.431000,-1.199000 1.907000,-1.159000 2.382000,-1.109000 2.855000,-1.047000 3.327000,-0.973000 3.797000,-0.889000 4.730000,-0.687000 5.192000,-0.569000 5.652000,-0.440000 6.109000,-0.301000 6.562000,-0.151000 7.011000,0.010000 7.457000,0.182000 7.898000,0.364000 8.335000,0.557000 8.767000,0.759000 9.195000,0.972000 9.617000,1.195000 10.034000,1.428000 10.445000,1.671000 10.850000,1.924000 11.249000,2.186000 11.642000,2.457000 12.028000,2.738000 12.407000,3.028000 12.780000,3.326000 13.145000,3.634000 13.503000,3.950000 13.853000,4.274000 14.196000,4.607000 14.530000,4.948000 14.857000,5.296000 15.175000,5.652000 15.785000,6.386000 16.077000,6.764000 16.633000,7.540000 16.897000,7.938000 17.152000,8.342000 17.397000,8.751000 17.633000,9.167000 17.858000,9.587000 18.073000,10.014000 18.279000,10.445000 18.474000,10.880000 18.658000,11.321000 18.832000,11.765000 18.996000,12.214000 19.148000,12.666000 19.290000,13.122000 19.422000,13.581000 19.542000,14.043000 19.651000,14.508000 19.749000,14.975000 19.836000,15.445000 19.912000,15.916000 19.977000,16.389000 20.031000,16.863000 20.073000,17.339000 20.104000,17.815000 20.123000,18.292000 20.132000,18.770000 20.129000,19.247000 20.114000,19.724000 20.099000,20.560000 20.124000,21.396000 20.151000,21.814000 20.235000,22.646000 20.291000,23.060000 20.434000,23.884000 20.520000,24.293000 20.721000,25.105000 20.960000,25.906000 21.237000,26.695000 21.551000,27.470000 21.722000,27.852000 22.091000,28.602000 22.288000,28.971000 22.494000,29.335000 22.932000,30.047000 23.163000,30.395000 23.651000,31.075000 23.906000,31.406000 24.441000,32.049000 24.719000,32.361000 25.298000,32.964000 25.598000,33.256000 26.218000,33.817000 26.864000,34.347000 27.197000,34.601000 27.879000,35.085000 28.583000,35.535000 28.943000,35.748000 29.678000,36.148000 30.431000,36.512000 31.200000,36.840000 31.984000,37.131000 32.381000,37.263000 32.781000,37.385000 33.589000,37.600000 33.996000,37.694000 34.406000,37.778000 34.817000,37.852000 35.645000,37.970000 36.061000,38.015000 36.895000,38.074000 37.731000,38.094000 37.731000,40.594000 37.254000,40.588000 36.776000,40.571000 36.300000,40.543000 35.824000,40.503000 35.349000,40.453000 34.876000,40.391000 34.404000,40.317000 33.934000,40.233000 33.001000,40.031000 32.539000,39.913000 32.079000,39.784000 31.622000,39.645000 31.169000,39.495000 30.720000,39.334000 30.274000,39.162000 29.833000,38.980000 29.396000,38.787000 28.964000,38.585000 28.536000,38.372000 28.114000,38.149000 27.697000,37.916000 27.286000,37.673000 26.881000,37.420000 26.482000,37.158000 26.089000,36.887000 25.703000,36.606000 24.951000,36.018000 24.586000,35.710000 24.228000,35.394000 23.878000,35.070000 23.535000,34.737000 23.201000,34.397000 22.874000,34.048000 22.556000,33.692000 21.946000,32.958000 21.654000,32.580000 21.098000,31.804000 20.834000,31.406000 20.579000,31.002000 20.334000,30.593000 20.098000,30.177000 19.873000,29.757000 19.452000,28.899000 19.257000,28.464000 19.073000,28.023000 18.899000,27.579000 18.735000,27.130000 18.583000,26.678000 18.441000,26.222000 18.309000,25.763000 18.189000,25.301000 18.080000,24.836000 17.982000,24.369000 17.895000,23.899000 17.819000,23.428000 17.754000,22.955000 17.700000,22.481000 17.658000,22.005000 17.627000,21.529000 17.608000,21.052000 17.599000,20.574000 17.602000,20.097000 17.617000,19.620000 17.632000,18.784000 17.624000,18.366000 17.580000,17.530000 17.543000,17.114000 17.440000,16.284000 17.297000,15.460000 17.211000,15.051000 17.010000,14.239000 16.771000,13.438000 16.494000,12.649000 16.180000,11.874000 16.009000,11.492000 15.829000,11.115000 15.443000,10.373000 15.237000,10.009000 15.022000,9.650000 14.568000,8.949000 14.328000,8.606000 13.825000,7.938000 13.561000,7.613000 13.012000,6.983000 12.726000,6.678000 12.133000,6.088000 11.513000,5.527000 11.193000,5.258000 10.534000,4.743000 9.852000,4.259000 9.502000,4.030000 8.788000,3.596000 8.053000,3.196000 7.300000,2.832000 6.531000,2.504000 6.141000,2.354000 5.350000,2.081000 4.950000,1.959000 4.548000,1.847000 3.735000,1.650000 3.325000,1.566000 2.914000,1.492000 2.500000,1.428000 1.670000,1.329000 0.836000,1.270000 0.000000,1.250000 z%22 /><path class=%22layer_2_0%22 d=%22M 0.000000,-0.250000 0.454000,-0.245000 1.360000,-0.202000 1.812000,-0.164000 2.263000,-0.116000 2.713000,-0.057000 3.162000,0.013000 3.608000,0.093000 4.053000,0.184000 4.495000,0.285000 4.935000,0.397000 5.805000,0.652000 6.236000,0.795000 6.663000,0.948000 7.087000,1.111000 7.506000,1.284000 7.921000,1.467000 8.332000,1.660000 8.738000,1.862000 9.139000,2.074000 9.535000,2.295000 9.926000,2.526000 10.311000,2.766000 10.690000,3.015000 11.063000,3.273000 11.791000,3.815000 12.145000,4.099000 12.492000,4.391000 13.165000,5.000000 13.491000,5.316000 14.119000,5.971000 14.421000,6.309000 15.001000,7.007000 15.278000,7.366000 15.547000,7.732000 15.807000,8.104000 16.058000,8.481000 16.300000,8.865000 16.533000,9.254000 16.757000,9.649000 16.971000,10.049000 17.176000,10.454000 17.371000,10.864000 17.556000,11.278000 17.731000,11.696000 17.897000,12.119000 18.052000,12.545000 18.197000,12.975000 18.332000,13.408000 18.457000,13.844000 18.571000,14.283000 18.675000,14.725000 18.768000,15.169000 18.851000,15.615000 18.923000,16.063000 18.985000,16.513000 19.036000,16.964000 19.076000,17.416000 19.105000,17.868000 19.124000,18.322000 19.132000,18.775000 19.129000,19.229000 19.115000,19.682000 19.099000,20.566000 19.107000,21.008000 19.125000,21.449000 19.154000,21.890000 19.193000,22.330000 19.242000,22.769000 19.302000,23.207000 19.453000,24.078000 19.544000,24.510000 19.645000,24.940000 19.756000,25.368000 20.009000,26.215000 20.302000,27.048000 20.463000,27.460000 20.814000,28.271000 21.004000,28.670000 21.412000,29.454000 21.630000,29.838000 21.857000,30.217000 22.337000,30.959000 22.590000,31.321000 23.122000,32.027000 23.687000,32.706000 23.981000,33.036000 24.593000,33.674000 25.234000,34.282000 25.903000,34.859000 26.599000,35.403000 26.957000,35.663000 27.320000,35.914000 27.690000,36.157000 28.445000,36.615000 28.831000,36.831000 29.221000,37.037000 29.617000,37.234000 30.017000,37.422000 30.421000,37.600000 30.830000,37.769000 31.242000,37.927000 32.077000,38.216000 32.500000,38.345000 32.925000,38.464000 33.354000,38.573000 34.217000,38.760000 34.652000,38.838000 35.089000,38.906000 35.527000,38.963000 35.966000,39.010000 36.407000,39.047000 37.289000,39.089000 37.731000,39.094000 37.731000,39.594000 37.277000,39.589000 36.371000,39.546000 35.919000,39.508000 35.468000,39.460000 35.018000,39.401000 34.570000,39.331000 34.123000,39.251000 33.678000,39.160000 33.236000,39.059000 32.796000,38.947000 31.926000,38.692000 31.495000,38.549000 31.068000,38.396000 30.644000,38.233000 30.225000,38.060000 29.810000,37.877000 29.399000,37.684000 28.993000,37.482000 28.592000,37.270000 28.196000,37.049000 27.805000,36.818000 27.420000,36.578000 27.041000,36.329000 26.668000,36.071000 25.940000,35.529000 25.586000,35.245000 25.239000,34.953000 24.899000,34.652000 24.566000,34.344000 24.240000,34.028000 23.612000,33.373000 23.310000,33.035000 22.730000,32.337000 22.453000,31.978000 22.184000,31.612000 21.924000,31.240000 21.673000,30.863000 21.431000,30.479000 21.198000,30.090000 20.974000,29.695000 20.760000,29.295000 20.555000,28.890000 20.360000,28.480000 20.175000,28.066000 20.000000,27.648000 19.834000,27.225000 19.679000,26.799000 19.534000,26.369000 19.399000,25.936000 19.274000,25.500000 19.160000,25.061000 19.056000,24.619000 18.963000,24.175000 18.880000,23.729000 18.808000,23.281000 18.746000,22.831000 18.695000,22.380000 18.655000,21.928000 18.626000,21.476000 18.607000,21.022000 18.599000,20.569000 18.602000,20.115000 18.616000,19.662000 18.632000,18.778000 18.624000,18.336000 18.606000,17.895000 18.577000,17.454000 18.538000,17.014000 18.489000,16.575000 18.429000,16.137000 18.278000,15.266000 18.187000,14.834000 18.086000,14.404000 17.975000,13.976000 17.722000,13.129000 17.429000,12.296000 17.268000,11.884000 16.917000,11.073000 16.727000,10.674000 16.319000,9.890000 16.101000,9.506000 15.874000,9.127000 15.394000,8.385000 15.141000,8.023000 14.609000,7.317000 14.330000,6.974000 13.750000,6.308000 13.138000,5.670000 12.497000,5.062000 11.828000,4.485000 11.132000,3.941000 10.774000,3.681000 10.411000,3.430000 10.041000,3.187000 9.286000,2.729000 8.900000,2.513000 8.510000,2.307000 7.714000,1.922000 7.310000,1.744000 6.901000,1.575000 6.489000,1.417000 5.654000,1.128000 5.231000,0.999000 4.806000,0.880000 4.377000,0.772000 3.947000,0.673000 3.514000,0.584000 3.079000,0.506000 2.642000,0.438000 2.204000,0.381000 1.765000,0.334000 1.324000,0.297000 0.442000,0.255000 0.000000,0.250000 z%22 /></g><g id=%22C209%22 data-name=%22as_component__PNGCOJINIPILRSBFUVHAAAKRQR7F7X5DOV45DHY3HPYOUZICQITA%22><path class=%22layer_1_0%22 d=%22M 9.889000,3.500000 0.000000,1.275000 0.000000,-1.275000 9.889000,-3.500000 16.000000,-3.500000 16.000000,3.500000 z%22 /><path class=%22layer_2_0%22 d=%22M 0.000000,-0.250000 10.000000,-2.500000 10.000000,2.500000 0.000000,0.250000 z%22 /><rect class=%22layer_2_0%22 x=%2210.300000%22 y=%22-2.500000%22 width=%220.300000%22 height=%225.000000%22 /><rect class=%22layer_2_0%22 x=%2210.900000%22 y=%22-2.500000%22 width=%220.300000%22 height=%225.000000%22 /><rect class=%22layer_2_0%22 x=%2211.500000%22 y=%22-2.500000%22 width=%220.300000%22 height=%225.000000%22 /><rect class=%22layer_2_0%22 x=%2212.100000%22 y=%22-2.500000%22 width=%220.300000%22 height=%225.000000%22 /><rect class=%22layer_2_0%22 x=%2212.700000%22 y=%22-2.500000%22 width=%220.300000%22 height=%225.000000%22 /><rect class=%22layer_2_0%22 x=%2213.300000%22 y=%22-2.500000%22 width=%220.300000%22 height=%225.000000%22 /><rect class=%22layer_2_0%22 x=%2213.900000%22 y=%22-2.500000%22 width=%220.300000%22 height=%225.000000%22 /><rect class=%22layer_2_0%22 x=%2214.500000%22 y=%22-2.500000%22 width=%220.300000%22 height=%225.000000%22 /><rect class=%22layer_2_0%22 x=%2215.100000%22 y=%22-2.500000%22 width=%220.300000%22 height=%225.000000%22 /><rect class=%22layer_2_0%22 x=%2215.700000%22 y=%22-2.500000%22 width=%220.300000%22 height=%225.000000%22 /></g><g id=%22C210%22 data-name=%22s_bend_l_36P88418380655921_o_30P866703852696688_p_Strip%22><path class=%22layer_1_0%22 d=%22M 0.000000,-1.250000 0.480000,-1.244000 0.960000,-1.227000 1.439000,-1.198000 1.918000,-1.158000 2.395000,-1.106000 2.871000,-1.043000 3.346000,-0.968000 3.818000,-0.882000 4.288000,-0.784000 4.756000,-0.676000 5.221000,-0.556000 5.683000,-0.425000 6.142000,-0.283000 6.597000,-0.130000 7.048000,0.034000 7.495000,0.209000 7.938000,0.394000 8.377000,0.590000 8.810000,0.797000 9.239000,1.014000 9.662000,1.241000 10.079000,1.478000 10.491000,1.725000 10.897000,1.982000 11.296000,2.249000 11.689000,2.525000 12.075000,2.810000 12.454000,3.105000 12.826000,3.409000 13.191000,3.721000 13.548000,4.043000 13.897000,4.372000 14.238000,4.710000 14.571000,5.057000 14.895000,5.411000 15.211000,5.772000 15.518000,6.141000 15.816000,6.518000 16.105000,6.901000 16.385000,7.292000 16.655000,7.689000 16.915000,8.092000 17.166000,8.502000 17.407000,8.917000 17.638000,9.338000 17.859000,9.765000 18.069000,10.196000 18.269000,10.633000 18.459000,11.074000 18.637000,11.520000 18.805000,11.970000 18.962000,12.423000 19.109000,12.881000 19.244000,13.342000 19.368000,13.806000 19.481000,14.272000 19.582000,14.742000 19.672000,15.213000 19.751000,15.626000 19.939000,16.445000 20.166000,17.254000 20.431000,18.051000 20.578000,18.445000 20.900000,19.221000 21.075000,19.603000 21.452000,20.353000 21.654000,20.722000 22.085000,21.444000 22.549000,22.144000 23.046000,22.821000 23.576000,23.473000 23.852000,23.790000 24.427000,24.402000 25.031000,24.986000 25.662000,25.541000 26.319000,26.065000 27.001000,26.556000 27.705000,27.014000 28.431000,27.438000 28.801000,27.637000 29.555000,28.007000 30.326000,28.341000 30.717000,28.494000 31.511000,28.771000 32.316000,29.010000 32.723000,29.115000 33.132000,29.210000 33.544000,29.295000 34.372000,29.436000 34.788000,29.491000 35.625000,29.572000 36.044000,29.597000 36.884000,29.617000 36.884000,32.117000 36.404000,32.111000 35.924000,32.094000 35.445000,32.065000 34.966000,32.025000 34.489000,31.973000 34.013000,31.910000 33.538000,31.835000 33.066000,31.749000 32.596000,31.652000 32.128000,31.543000 31.663000,31.423000 31.201000,31.292000 30.742000,31.150000 30.287000,30.997000 29.836000,30.833000 29.389000,30.658000 28.946000,30.473000 28.507000,30.277000 28.074000,30.070000 27.645000,29.853000 27.222000,29.626000 26.805000,29.389000 26.393000,29.142000 25.987000,28.885000 25.588000,28.618000 25.195000,28.342000 24.809000,28.057000 24.430000,27.762000 24.058000,27.458000 23.693000,27.146000 23.336000,26.824000 22.987000,26.495000 22.646000,26.157000 22.313000,25.810000 21.989000,25.456000 21.673000,25.095000 21.366000,24.726000 21.068000,24.349000 20.779000,23.966000 20.499000,23.575000 20.229000,23.178000 19.969000,22.775000 19.718000,22.365000 19.477000,21.950000 19.246000,21.529000 19.025000,21.102000 18.815000,20.671000 18.615000,20.234000 18.426000,19.793000 18.247000,19.347000 18.079000,18.897000 17.922000,18.444000 17.775000,17.986000 17.640000,17.525000 17.516000,17.062000 17.403000,16.595000 17.302000,16.125000 17.212000,15.654000 17.133000,15.241000 16.945000,14.422000 16.718000,13.613000 16.453000,12.816000 16.306000,12.422000 15.984000,11.646000 15.809000,11.264000 15.625000,10.887000 15.230000,10.145000 15.019000,9.782000 14.571000,9.071000 14.335000,8.723000 13.838000,8.046000 13.577000,7.717000 13.032000,7.077000 12.457000,6.465000 11.853000,5.881000 11.222000,5.326000 10.565000,4.802000 9.883000,4.311000 9.179000,3.853000 8.819000,3.637000 8.083000,3.230000 7.329000,2.860000 6.558000,2.526000 6.167000,2.373000 5.373000,2.096000 4.568000,1.857000 4.161000,1.752000 3.752000,1.657000 3.340000,1.572000 2.512000,1.431000 2.096000,1.376000 1.259000,1.295000 0.840000,1.270000 0.000000,1.250000 z%22 /><path class=%22layer_2_0%22 d=%22M 0.000000,-0.250000 0.456000,-0.245000 0.912000,-0.228000 1.367000,-0.201000 1.822000,-0.162000 2.275000,-0.113000 2.728000,-0.053000 3.178000,0.018000 3.627000,0.100000 4.074000,0.192000 4.518000,0.295000 4.960000,0.409000 5.399000,0.534000 5.834000,0.669000 6.267000,0.814000 6.696000,0.970000 7.120000,1.136000 7.541000,1.312000 7.958000,1.498000 8.370000,1.694000 8.777000,1.900000 9.575000,2.341000 9.966000,2.576000 10.352000,2.820000 11.104000,3.336000 11.471000,3.607000 11.831000,3.887000 12.531000,4.473000 12.870000,4.778000 13.201000,5.091000 13.525000,5.412000 13.842000,5.741000 14.150000,6.077000 14.450000,6.421000 15.025000,7.129000 15.565000,7.864000 15.822000,8.242000 16.069000,8.625000 16.307000,9.014000 16.536000,9.408000 16.756000,9.808000 16.965000,10.213000 17.165000,10.623000 17.355000,11.038000 17.535000,11.457000 17.705000,11.881000 18.014000,12.739000 18.281000,13.611000 18.399000,14.052000 18.506000,14.496000 18.602000,14.941000 18.688000,15.389000 18.772000,15.826000 18.866000,16.260000 18.970000,16.692000 19.085000,17.121000 19.210000,17.547000 19.345000,17.970000 19.490000,18.390000 19.811000,19.218000 19.986000,19.626000 20.171000,20.030000 20.570000,20.824000 20.783000,21.213000 21.006000,21.597000 21.238000,21.976000 21.479000,22.349000 21.729000,22.716000 22.255000,23.432000 22.815000,24.122000 23.407000,24.784000 24.030000,25.417000 24.353000,25.722000 24.683000,26.019000 25.365000,26.589000 25.715000,26.861000 26.072000,27.125000 26.436000,27.381000 26.805000,27.628000 27.561000,28.094000 27.947000,28.313000 28.735000,28.724000 29.136000,28.915000 29.541000,29.096000 29.951000,29.268000 30.365000,29.429000 30.782000,29.581000 31.628000,29.854000 32.055000,29.975000 32.485000,30.086000 33.353000,30.277000 33.789000,30.356000 34.228000,30.425000 34.669000,30.484000 35.110000,30.532000 35.996000,30.596000 36.440000,30.612000 36.884000,30.617000 36.884000,31.117000 36.428000,31.112000 35.972000,31.095000 35.517000,31.068000 35.062000,31.029000 34.609000,30.980000 34.156000,30.920000 33.706000,30.849000 33.257000,30.767000 32.810000,30.675000 32.366000,30.572000 31.924000,30.458000 31.485000,30.333000 31.050000,30.198000 30.617000,30.053000 30.188000,29.897000 29.764000,29.731000 29.343000,29.555000 28.926000,29.369000 28.515000,29.173000 28.107000,28.967000 27.309000,28.526000 26.918000,28.291000 26.532000,28.047000 25.780000,27.531000 25.413000,27.260000 25.053000,26.980000 24.353000,26.394000 24.014000,26.089000 23.683000,25.776000 23.359000,25.455000 23.042000,25.126000 22.734000,24.790000 22.434000,24.446000 21.859000,23.738000 21.319000,23.003000 21.062000,22.625000 20.815000,22.242000 20.577000,21.853000 20.348000,21.459000 20.128000,21.059000 19.919000,20.654000 19.719000,20.244000 19.529000,19.829000 19.349000,19.410000 19.179000,18.986000 18.870000,18.128000 18.603000,17.256000 18.485000,16.815000 18.378000,16.371000 18.282000,15.926000 18.196000,15.478000 18.112000,15.041000 18.018000,14.607000 17.914000,14.176000 17.799000,13.746000 17.674000,13.320000 17.539000,12.897000 17.394000,12.477000 17.073000,11.649000 16.898000,11.241000 16.713000,10.837000 16.314000,10.043000 16.101000,9.654000 15.878000,9.270000 15.646000,8.891000 15.405000,8.518000 15.155000,8.151000 14.629000,7.435000 14.069000,6.745000 13.477000,6.083000 12.854000,5.450000 12.531000,5.145000 12.201000,4.848000 11.519000,4.278000 11.169000,4.006000 10.812000,3.742000 10.448000,3.486000 10.079000,3.239000 9.323000,2.773000 8.937000,2.554000 8.149000,2.143000 7.748000,1.952000 7.343000,1.771000 6.933000,1.599000 6.102000,1.286000 5.256000,1.013000 4.829000,0.892000 4.399000,0.781000 3.532000,0.590000 3.095000,0.511000 2.656000,0.442000 2.216000,0.383000 1.774000,0.335000 0.888000,0.271000 0.444000,0.255000 0.000000,0.250000 z%22 /></g><g id=%22C211%22 data-name=%22as_component__PNGCOJINIPILRSBFUVHAAAKRQR7F7X5DOV45DHY3HPYOUZICQITA%22><path class=%22layer_1_0%22 d=%22M 9.889000,3.500000 0.000000,1.275000 0.000000,-1.275000 9.889000,-3.500000 16.000000,-3.500000 16.000000,3.500000 z%22 /><path class=%22layer_2_0%22 d=%22M 0.000000,-0.250000 10.000000,-2.500000 10.000000,2.500000 0.000000,0.250000 z%22 /><rect class=%22layer_2_0%22 x=%2210.300000%22 y=%22-2.500000%22 width=%220.300000%22 height=%225.000000%22 /><rect class=%22layer_2_0%22 x=%2210.900000%22 y=%22-2.500000%22 width=%220.300000%22 height=%225.000000%22 /><rect class=%22layer_2_0%22 x=%2211.500000%22 y=%22-2.500000%22 width=%220.300000%22 height=%225.000000%22 /><rect class=%22layer_2_0%22 x=%2212.100000%22 y=%22-2.500000%22 width=%220.300000%22 height=%225.000000%22 /><rect class=%22layer_2_0%22 x=%2212.700000%22 y=%22-2.500000%22 width=%220.300000%22 height=%225.000000%22 /><rect class=%22layer_2_0%22 x=%2213.300000%22 y=%22-2.500000%22 width=%220.300000%22 height=%225.000000%22 /><rect class=%22layer_2_0%22 x=%2213.900000%22 y=%22-2.500000%22 width=%220.300000%22 height=%225.000000%22 /><rect class=%22layer_2_0%22 x=%2214.500000%22 y=%22-2.500000%22 width=%220.300000%22 height=%225.000000%22 /><rect class=%22layer_2_0%22 x=%2215.100000%22 y=%22-2.500000%22 width=%220.300000%22 height=%225.000000%22 /><rect class=%22layer_2_0%22 x=%2215.700000%22 y=%22-2.500000%22 width=%220.300000%22 height=%225.000000%22 /></g><g id=%22C212%22 data-name=%22s_bend_l_36P681202994887826_o_49P096240220747006_p_Strip%22><path class=%22layer_1_0%22 d=%22M 0.000000,-1.250000 0.473000,-1.244000 0.946000,-1.228000 1.419000,-1.201000 2.361000,-1.113000 2.831000,-1.052000 3.298000,-0.981000 3.765000,-0.899000 4.229000,-0.806000 4.690000,-0.703000 5.606000,-0.464000 6.060000,-0.328000 6.510000,-0.182000 6.957000,-0.026000 7.399000,0.141000 7.838000,0.318000 8.273000,0.505000 8.703000,0.702000 9.129000,0.909000 9.550000,1.126000 9.965000,1.353000 10.375000,1.589000 10.780000,1.835000 11.178000,2.090000 11.571000,2.354000 11.957000,2.628000 12.337000,2.910000 12.711000,3.201000 13.077000,3.500000 13.789000,4.124000 14.470000,4.781000 14.800000,5.121000 15.121000,5.468000 15.434000,5.823000 15.739000,6.185000 16.035000,6.554000 16.323000,6.930000 16.602000,7.313000 16.871000,7.701000 17.132000,8.096000 17.384000,8.497000 17.626000,8.904000 17.859000,9.316000 18.082000,9.733000 18.295000,10.156000 18.498000,10.583000 18.692000,11.015000 18.875000,11.452000 19.048000,11.892000 19.211000,12.336000 19.364000,12.784000 19.506000,13.236000 19.637000,13.690000 19.758000,14.148000 19.868000,14.608000 19.968000,15.071000 20.057000,15.536000 20.135000,16.003000 20.202000,16.471000 20.258000,16.941000 20.303000,17.412000 20.338000,17.884000 20.361000,18.357000 20.375000,19.303000 20.365000,19.777000 20.313000,20.722000 20.270000,21.193000 20.217000,21.663000 20.152000,22.132000 20.077000,22.599000 19.991000,23.065000 19.894000,23.528000 19.786000,23.989000 19.668000,24.447000 19.539000,24.902000 19.322000,25.704000 19.143000,26.515000 19.067000,26.923000 19.001000,27.333000 18.898000,28.157000 18.833000,28.985000 18.806000,29.815000 18.818000,30.645000 18.869000,31.474000 18.958000,32.299000 19.085000,33.120000 19.250000,33.933000 19.453000,34.739000 19.693000,35.534000 19.970000,36.316000 20.283000,37.086000 20.452000,37.465000 20.818000,38.210000 21.218000,38.938000 21.430000,39.295000 21.880000,39.993000 22.116000,40.334000 22.613000,40.999000 23.141000,41.641000 23.697000,42.257000 24.282000,42.847000 24.893000,43.408000 25.208000,43.679000 25.857000,44.197000 26.530000,44.684000 27.224000,45.140000 27.939000,45.562000 28.303000,45.761000 29.046000,46.133000 29.804000,46.470000 30.189000,46.626000 30.970000,46.909000 31.763000,47.156000 32.163000,47.266000 32.971000,47.457000 33.787000,47.610000 34.198000,47.673000 34.610000,47.726000 35.436000,47.803000 36.266000,47.841000 36.681000,47.846000 36.681000,50.346000 36.208000,50.341000 35.262000,50.297000 34.320000,50.209000 33.850000,50.148000 33.383000,50.077000 32.916000,49.995000 32.452000,49.902000 31.991000,49.799000 31.075000,49.560000 30.621000,49.424000 30.171000,49.278000 29.724000,49.122000 29.282000,48.955000 28.843000,48.778000 28.408000,48.591000 27.978000,48.394000 27.552000,48.187000 27.131000,47.970000 26.716000,47.743000 26.306000,47.507000 25.901000,47.261000 25.503000,47.006000 25.110000,46.742000 24.344000,46.186000 23.970000,45.895000 23.604000,45.596000 22.892000,44.972000 22.211000,44.315000 21.881000,43.975000 21.560000,43.628000 21.247000,43.273000 20.942000,42.911000 20.646000,42.542000 20.358000,42.166000 20.079000,41.783000 19.810000,41.395000 19.549000,41.000000 19.297000,40.599000 19.055000,40.192000 18.822000,39.780000 18.599000,39.363000 18.386000,38.940000 18.183000,38.513000 17.989000,38.081000 17.806000,37.644000 17.633000,37.204000 17.470000,36.760000 17.317000,36.312000 17.175000,35.860000 17.044000,35.406000 16.923000,34.948000 16.813000,34.488000 16.713000,34.025000 16.624000,33.560000 16.546000,33.093000 16.479000,32.625000 16.423000,32.155000 16.378000,31.684000 16.343000,31.212000 16.320000,30.739000 16.306000,29.793000 16.316000,29.320000 16.368000,28.374000 16.411000,27.903000 16.464000,27.433000 16.529000,26.964000 16.604000,26.497000 16.690000,26.031000 16.787000,25.568000 16.895000,25.107000 17.013000,24.649000 17.142000,24.194000 17.359000,23.392000 17.453000,22.988000 17.614000,22.173000 17.680000,21.763000 17.783000,20.939000 17.848000,20.111000 17.875000,19.281000 17.863000,18.451000 17.812000,17.622000 17.723000,16.797000 17.596000,15.976000 17.431000,15.163000 17.228000,14.357000 16.988000,13.562000 16.854000,13.169000 16.559000,12.393000 16.229000,11.631000 16.050000,11.256000 15.667000,10.520000 15.251000,9.801000 15.030000,9.450000 14.565000,8.762000 14.320000,8.426000 13.808000,7.773000 13.266000,7.144000 12.695000,6.541000 12.097000,5.965000 11.473000,5.417000 10.824000,4.899000 10.490000,4.652000 9.807000,4.180000 9.102000,3.741000 8.378000,3.335000 8.009000,3.145000 7.258000,2.790000 6.492000,2.470000 6.103000,2.324000 5.316000,2.059000 4.518000,1.830000 3.710000,1.639000 3.303000,1.558000 2.483000,1.423000 2.071000,1.370000 1.245000,1.293000 0.830000,1.269000 0.000000,1.250000 z%22 /><path class=%22layer_2_0%22 d=%22M 0.000000,-0.250000 0.450000,-0.245000 0.900000,-0.229000 1.349000,-0.203000 1.798000,-0.166000 2.692000,-0.062000 3.137000,0.006000 3.580000,0.084000 4.021000,0.172000 4.460000,0.270000 4.897000,0.379000 5.331000,0.498000 5.762000,0.627000 6.615000,0.914000 7.454000,1.241000 7.867000,1.419000 8.681000,1.803000 9.476000,2.225000 9.866000,2.450000 10.630000,2.926000 11.003000,3.177000 11.370000,3.437000 12.087000,3.982000 12.777000,4.560000 13.440000,5.169000 14.073000,5.808000 14.677000,6.476000 15.248000,7.171000 15.522000,7.529000 15.787000,7.892000 16.291000,8.638000 16.531000,9.019000 16.761000,9.405000 16.982000,9.797000 17.194000,10.194000 17.397000,10.596000 17.590000,11.002000 17.949000,11.828000 18.268000,12.670000 18.413000,13.096000 18.548000,13.525000 18.673000,13.957000 18.788000,14.392000 18.893000,14.830000 18.988000,15.270000 19.072000,15.712000 19.146000,16.156000 19.210000,16.601000 19.264000,17.048000 19.307000,17.496000 19.362000,18.395000 19.375000,19.295000 19.346000,20.194000 19.316000,20.643000 19.224000,21.539000 19.092000,22.429000 19.010000,22.871000 18.918000,23.312000 18.703000,24.186000 18.580000,24.619000 18.351000,25.465000 18.162000,26.321000 18.082000,26.752000 18.012000,27.185000 17.903000,28.055000 17.834000,28.929000 17.815000,29.367000 17.806000,29.806000 17.819000,30.683000 17.872000,31.558000 17.914000,31.994000 17.966000,32.429000 18.101000,33.296000 18.183000,33.727000 18.377000,34.582000 18.611000,35.427000 18.884000,36.260000 19.035000,36.672000 19.365000,37.484000 19.733000,38.280000 19.930000,38.671000 20.137000,39.058000 20.577000,39.816000 20.810000,40.188000 21.302000,40.914000 21.826000,41.616000 22.383000,42.293000 22.673000,42.622000 23.276000,43.259000 23.588000,43.567000 24.234000,44.160000 24.567000,44.446000 25.252000,44.993000 25.962000,45.507000 26.326000,45.752000 27.070000,46.216000 27.834000,46.645000 28.224000,46.846000 29.017000,47.220000 29.826000,47.557000 30.237000,47.712000 30.650000,47.857000 31.067000,47.992000 31.910000,48.233000 32.336000,48.339000 32.764000,48.435000 33.194000,48.521000 33.625000,48.597000 34.059000,48.663000 34.494000,48.719000 34.930000,48.765000 35.804000,48.826000 36.681000,48.846000 36.681000,49.346000 36.231000,49.341000 35.781000,49.325000 35.332000,49.299000 34.883000,49.262000 34.436000,49.215000 33.989000,49.158000 33.544000,49.090000 33.101000,49.012000 32.660000,48.924000 32.221000,48.826000 31.784000,48.717000 31.350000,48.598000 30.919000,48.469000 30.066000,48.182000 29.227000,47.855000 28.814000,47.677000 28.000000,47.293000 27.205000,46.871000 26.815000,46.646000 26.430000,46.412000 26.051000,46.170000 25.678000,45.919000 25.311000,45.659000 24.594000,45.114000 23.904000,44.536000 23.241000,43.927000 22.608000,43.288000 22.004000,42.620000 21.433000,41.925000 21.159000,41.567000 20.894000,41.204000 20.638000,40.834000 20.150000,40.077000 19.920000,39.691000 19.699000,39.299000 19.487000,38.902000 19.284000,38.500000 19.091000,38.094000 18.732000,37.268000 18.413000,36.426000 18.268000,36.000000 18.133000,35.571000 18.008000,35.139000 17.893000,34.704000 17.788000,34.266000 17.693000,33.826000 17.609000,33.384000 17.535000,32.940000 17.471000,32.495000 17.417000,32.048000 17.374000,31.600000 17.319000,30.701000 17.306000,29.801000 17.335000,28.902000 17.365000,28.453000 17.406000,28.005000 17.457000,27.557000 17.518000,27.112000 17.589000,26.667000 17.671000,26.225000 17.763000,25.784000 17.978000,24.910000 18.101000,24.477000 18.330000,23.631000 18.519000,22.775000 18.599000,22.344000 18.669000,21.911000 18.778000,21.041000 18.847000,20.167000 18.866000,19.729000 18.875000,19.290000 18.862000,18.414000 18.809000,17.538000 18.767000,17.102000 18.715000,16.667000 18.580000,15.800000 18.498000,15.369000 18.304000,14.514000 18.070000,13.669000 17.797000,12.836000 17.646000,12.425000 17.316000,11.612000 16.948000,10.816000 16.751000,10.425000 16.544000,10.038000 16.328000,9.656000 15.871000,8.908000 15.379000,8.182000 14.855000,7.480000 14.580000,7.138000 14.008000,6.474000 13.710000,6.152000 13.093000,5.529000 12.773000,5.229000 12.114000,4.650000 11.775000,4.373000 11.077000,3.842000 10.355000,3.344000 9.611000,2.880000 8.847000,2.451000 8.063000,2.059000 7.664000,1.876000 6.855000,1.539000 6.444000,1.384000 6.031000,1.239000 5.614000,1.104000 4.771000,0.863000 4.345000,0.757000 3.917000,0.661000 3.487000,0.575000 3.056000,0.499000 2.622000,0.433000 2.187000,0.377000 1.751000,0.331000 0.877000,0.270000 0.000000,0.250000 z%22 /></g><g id=%22C213%22 data-name=%22as_component__PNGCOJINIPILRSBFUVHAAAKRQR7F7X5DOV45DHY3HPYOUZICQITA%22><path class=%22layer_1_0%22 d=%22M 9.889000,3.500000 0.000000,1.275000 0.000000,-1.275000 9.889000,-3.500000 16.000000,-3.500000 16.000000,3.500000 z%22 /><path class=%22layer_2_0%22 d=%22M 0.000000,-0.250000 10.000000,-2.500000 10.000000,2.500000 0.000000,0.250000 z%22 /><rect class=%22layer_2_0%22 x=%2210.300000%22 y=%22-2.500000%22 width=%220.300000%22 height=%225.000000%22 /><rect class=%22layer_2_0%22 x=%2210.900000%22 y=%22-2.500000%22 width=%220.300000%22 height=%225.000000%22 /><rect class=%22layer_2_0%22 x=%2211.500000%22 y=%22-2.500000%22 width=%220.300000%22 height=%225.000000%22 /><rect class=%22layer_2_0%22 x=%2212.100000%22 y=%22-2.500000%22 width=%220.300000%22 height=%225.000000%22 /><rect class=%22layer_2_0%22 x=%2212.700000%22 y=%22-2.500000%22 width=%220.300000%22 height=%225.000000%22 /><rect class=%22layer_2_0%22 x=%2213.300000%22 y=%22-2.500000%22 width=%220.300000%22 height=%225.000000%22 /><rect class=%22layer_2_0%22 x=%2213.900000%22 y=%22-2.500000%22 width=%220.300000%22 height=%225.000000%22 /><rect class=%22layer_2_0%22 x=%2214.500000%22 y=%22-2.500000%22 width=%220.300000%22 height=%225.000000%22 /><rect class=%22layer_2_0%22 x=%2215.100000%22 y=%22-2.500000%22 width=%220.300000%22 height=%225.000000%22 /><rect class=%22layer_2_0%22 x=%2215.700000%22 y=%22-2.500000%22 width=%220.300000%22 height=%225.000000%22 /></g><g id=%22C214%22 data-name=%22s_bend_l_35P96638889656142_o_32P24556983231602_p_Strip%22><path class=%22layer_1_0%22 d=%22M 0.000000,-1.250000 0.471000,-1.244000 0.942000,-1.227000 1.412000,-1.198000 1.882000,-1.158000 2.350000,-1.107000 2.817000,-1.044000 3.282000,-0.969000 3.746000,-0.884000 4.207000,-0.787000 4.666000,-0.679000 5.121000,-0.560000 5.574000,-0.429000 6.024000,-0.288000 6.470000,-0.136000 6.912000,0.027000 7.350000,0.201000 7.783000,0.385000 8.212000,0.580000 8.637000,0.785000 9.056000,1.001000 9.469000,1.227000 9.877000,1.462000 10.279000,1.708000 10.675000,1.963000 11.065000,2.228000 11.448000,2.502000 11.825000,2.786000 12.194000,3.078000 12.556000,3.380000 12.911000,3.690000 13.258000,4.009000 13.597000,4.336000 13.928000,4.671000 14.251000,5.015000 14.565000,5.366000 14.871000,5.724000 15.167000,6.090000 15.455000,6.463000 15.734000,6.843000 16.003000,7.230000 16.263000,7.623000 16.513000,8.022000 16.754000,8.428000 16.984000,8.839000 17.204000,9.255000 17.414000,9.677000 17.614000,10.104000 17.804000,10.535000 17.982000,10.971000 18.150000,11.411000 18.308000,11.855000 18.454000,12.303000 18.590000,12.755000 18.714000,13.209000 18.828000,13.666000 18.930000,14.126000 19.021000,14.589000 19.100000,15.053000 19.169000,15.519000 19.226000,15.987000 19.275000,16.394000 19.404000,17.205000 19.572000,18.008000 19.779000,18.802000 19.897000,19.195000 20.162000,19.971000 20.308000,20.355000 20.629000,21.110000 20.803000,21.482000 21.177000,22.211000 21.587000,22.922000 22.031000,23.612000 22.509000,24.280000 22.759000,24.604000 23.284000,25.235000 23.558000,25.541000 24.127000,26.132000 24.422000,26.417000 25.033000,26.965000 25.670000,27.482000 26.331000,27.968000 27.015000,28.420000 27.721000,28.839000 28.081000,29.036000 28.446000,29.224000 29.189000,29.572000 29.566000,29.733000 30.333000,30.026000 31.112000,30.281000 31.507000,30.395000 31.904000,30.499000 32.303000,30.593000 33.108000,30.752000 33.920000,30.871000 34.327000,30.916000 34.736000,30.951000 35.556000,30.991000 35.966000,30.996000 35.966000,33.496000 35.495000,33.490000 35.024000,33.473000 34.554000,33.444000 34.084000,33.404000 33.616000,33.353000 33.149000,33.290000 32.684000,33.215000 32.220000,33.130000 31.759000,33.033000 31.300000,32.925000 30.845000,32.806000 30.392000,32.675000 29.942000,32.534000 29.496000,32.382000 29.054000,32.219000 28.616000,32.045000 28.183000,31.861000 27.754000,31.666000 27.329000,31.461000 26.910000,31.245000 26.497000,31.019000 26.089000,30.784000 25.687000,30.538000 25.291000,30.283000 24.901000,30.018000 24.518000,29.744000 24.141000,29.460000 23.772000,29.168000 23.410000,28.866000 23.055000,28.556000 22.708000,28.237000 22.369000,27.910000 22.038000,27.575000 21.715000,27.231000 21.401000,26.880000 21.095000,26.522000 20.799000,26.156000 20.511000,25.783000 20.232000,25.403000 19.963000,25.016000 19.703000,24.623000 19.453000,24.224000 19.212000,23.818000 18.982000,23.407000 18.762000,22.991000 18.552000,22.569000 18.352000,22.142000 18.162000,21.711000 17.984000,21.275000 17.816000,20.835000 17.658000,20.391000 17.512000,19.943000 17.376000,19.491000 17.252000,19.037000 17.138000,18.580000 17.036000,18.120000 16.945000,17.657000 16.866000,17.193000 16.797000,16.727000 16.740000,16.259000 16.691000,15.852000 16.562000,15.041000 16.394000,14.238000 16.187000,13.444000 16.069000,13.051000 15.941000,12.661000 15.658000,11.891000 15.502000,11.512000 15.163000,10.764000 14.789000,10.035000 14.379000,9.324000 13.935000,8.634000 13.700000,8.297000 13.207000,7.642000 12.682000,7.011000 12.127000,6.406000 11.544000,5.829000 10.933000,5.281000 10.296000,4.764000 9.635000,4.278000 8.951000,3.826000 8.600000,3.612000 7.885000,3.210000 7.520000,3.022000 7.151000,2.844000 6.400000,2.513000 5.633000,2.220000 5.245000,2.088000 4.459000,1.851000 4.062000,1.747000 3.663000,1.653000 2.858000,1.494000 2.453000,1.430000 1.639000,1.330000 1.230000,1.295000 0.820000,1.270000 0.000000,1.250000 z%22 /><path class=%22layer_2_0%22 d=%22M 0.000000,-0.250000 0.447000,-0.245000 1.339000,-0.201000 1.785000,-0.163000 2.229000,-0.114000 2.672000,-0.054000 3.113000,0.016000 3.552000,0.097000 3.989000,0.189000 4.424000,0.292000 4.857000,0.405000 5.286000,0.528000 5.712000,0.662000 6.135000,0.807000 6.554000,0.961000 6.970000,1.126000 7.381000,1.301000 7.788000,1.486000 8.190000,1.680000 8.980000,2.099000 9.366000,2.322000 9.748000,2.555000 10.123000,2.797000 10.493000,3.048000 10.856000,3.308000 11.213000,3.577000 11.907000,4.141000 12.243000,4.435000 12.572000,4.737000 12.894000,5.047000 13.208000,5.365000 13.514000,5.691000 13.812000,6.024000 14.102000,6.364000 14.383000,6.711000 14.656000,7.065000 14.920000,7.425000 15.176000,7.792000 15.422000,8.164000 15.659000,8.543000 15.887000,8.927000 16.106000,9.317000 16.315000,9.712000 16.514000,10.112000 16.883000,10.926000 17.053000,11.339000 17.212000,11.757000 17.361000,12.178000 17.500000,12.603000 17.629000,13.030000 17.747000,13.461000 17.854000,13.895000 17.951000,14.331000 18.037000,14.770000 18.113000,15.210000 18.178000,15.652000 18.232000,16.096000 18.284000,16.527000 18.347000,16.957000 18.504000,17.812000 18.703000,18.658000 18.818000,19.078000 18.943000,19.494000 19.078000,19.907000 19.223000,20.317000 19.378000,20.723000 19.543000,21.125000 19.902000,21.917000 20.096000,22.306000 20.299000,22.690000 20.512000,23.069000 20.964000,23.811000 21.204000,24.174000 21.452000,24.530000 21.975000,25.225000 22.249000,25.563000 22.821000,26.217000 23.118000,26.534000 23.737000,27.145000 24.057000,27.439000 24.384000,27.725000 24.718000,28.003000 25.406000,28.535000 25.759000,28.788000 26.119000,29.032000 26.484000,29.267000 26.855000,29.494000 27.613000,29.920000 28.391000,30.308000 28.786000,30.488000 29.186000,30.658000 29.590000,30.818000 30.409000,31.109000 30.824000,31.239000 31.242000,31.359000 31.662000,31.469000 32.085000,31.569000 32.511000,31.658000 32.938000,31.737000 33.367000,31.806000 33.798000,31.864000 34.230000,31.911000 34.663000,31.948000 35.097000,31.975000 35.531000,31.991000 35.966000,31.996000 35.966000,32.496000 35.519000,32.491000 34.627000,32.447000 34.181000,32.409000 33.737000,32.360000 32.853000,32.230000 32.414000,32.149000 31.977000,32.057000 31.542000,31.954000 31.109000,31.841000 30.680000,31.718000 30.254000,31.584000 29.412000,31.285000 28.996000,31.120000 28.585000,30.945000 28.178000,30.760000 27.776000,30.566000 26.986000,30.147000 26.600000,29.924000 26.218000,29.691000 25.843000,29.449000 25.473000,29.198000 25.110000,28.938000 24.753000,28.669000 24.403000,28.391000 24.059000,28.105000 23.723000,27.811000 23.394000,27.509000 23.072000,27.199000 22.758000,26.881000 22.452000,26.555000 22.154000,26.222000 21.864000,25.882000 21.583000,25.535000 21.310000,25.181000 21.046000,24.821000 20.790000,24.454000 20.544000,24.082000 20.307000,23.703000 20.079000,23.319000 19.860000,22.929000 19.651000,22.534000 19.452000,22.134000 19.083000,21.320000 18.913000,20.907000 18.754000,20.489000 18.605000,20.068000 18.466000,19.643000 18.337000,19.216000 18.219000,18.785000 18.112000,18.351000 18.015000,17.915000 17.929000,17.476000 17.853000,17.036000 17.788000,16.594000 17.734000,16.150000 17.682000,15.719000 17.619000,15.289000 17.462000,14.434000 17.263000,13.588000 17.148000,13.168000 17.023000,12.752000 16.888000,12.339000 16.743000,11.929000 16.588000,11.523000 16.423000,11.121000 16.064000,10.329000 15.870000,9.940000 15.667000,9.556000 15.454000,9.177000 15.002000,8.435000 14.762000,8.072000 14.514000,7.716000 14.257000,7.365000 13.717000,6.683000 13.435000,6.353000 12.848000,5.712000 12.542000,5.403000 12.229000,5.101000 11.909000,4.807000 11.582000,4.521000 10.908000,3.973000 10.560000,3.711000 10.207000,3.458000 9.847000,3.214000 9.111000,2.752000 8.353000,2.326000 7.967000,2.128000 7.575000,1.938000 6.780000,1.588000 6.376000,1.428000 5.557000,1.137000 5.142000,1.007000 4.724000,0.887000 4.304000,0.777000 3.881000,0.677000 3.455000,0.588000 3.028000,0.509000 2.599000,0.440000 2.168000,0.382000 1.736000,0.335000 1.303000,0.298000 0.869000,0.271000 0.435000,0.255000 0.000000,0.250000 z%22 /></g><g id=%22C215%22 data-name=%22as_component__PNGCOJINIPILRSBFUVHAAAKRQR7F7X5DOV45DHY3HPYOUZICQITA%22><path class=%22layer_1_0%22 d=%22M 9.889000,3.500000 0.000000,1.275000 0.000000,-1.275000 9.889000,-3.500000 16.000000,-3.500000 16.000000,3.500000 z%22 /><path class=%22layer_2_0%22 d=%22M 0.000000,-0.250000 10.000000,-2.500000 10.000000,2.500000 0.000000,0.250000 z%22 /><rect class=%22layer_2_0%22 x=%2210.300000%22 y=%22-2.500000%22 width=%220.300000%22 height=%225.000000%22 /><rect class=%22layer_2_0%22 x=%2210.900000%22 y=%22-2.500000%22 width=%220.300000%22 height=%225.000000%22 /><rect class=%22layer_2_0%22 x=%2211.500000%22 y=%22-2.500000%22 width=%220.300000%22 height=%225.000000%22 /><rect class=%22layer_2_0%22 x=%2212.100000%22 y=%22-2.500000%22 width=%220.300000%22 height=%225.000000%22 /><rect class=%22layer_2_0%22 x=%2212.700000%22 y=%22-2.500000%22 width=%220.300000%22 height=%225.000000%22 /><rect class=%22layer_2_0%22 x=%2213.300000%22 y=%22-2.500000%22 width=%220.300000%22 height=%225.000000%22 /><rect class=%22layer_2_0%22 x=%2213.900000%22 y=%22-2.500000%22 width=%220.300000%22 height=%225.000000%22 /><rect class=%22layer_2_0%22 x=%2214.500000%22 y=%22-2.500000%22 width=%220.300000%22 height=%225.000000%22 /><rect class=%22layer_2_0%22 x=%2215.100000%22 y=%22-2.500000%22 width=%220.300000%22 height=%225.000000%22 /><rect class=%22layer_2_0%22 x=%2215.700000%22 y=%22-2.500000%22 width=%220.300000%22 height=%225.000000%22 /></g><g id=%22C216%22 data-name=%22s_bend_l_72P10131613633273_o_36P59112763558779_p_Strip%22><path class=%22layer_1_0%22 d=%22M 0.000000,-1.250000 0.719000,-1.244000 1.437000,-1.227000 2.156000,-1.199000 2.873000,-1.160000 3.590000,-1.109000 4.306000,-1.048000 5.021000,-0.975000 5.735000,-0.890000 6.448000,-0.795000 7.158000,-0.689000 7.868000,-0.571000 8.575000,-0.442000 9.280000,-0.302000 9.982000,-0.152000 10.683000,0.010000 11.381000,0.183000 12.075000,0.366000 12.767000,0.561000 13.456000,0.766000 14.142000,0.982000 14.824000,1.209000 15.502000,1.446000 16.177000,1.694000 16.848000,1.953000 17.514000,2.222000 18.176000,2.501000 18.834000,2.791000 19.487000,3.091000 20.136000,3.401000 20.779000,3.721000 21.418000,4.051000 22.051000,4.391000 23.301000,5.101000 23.917000,5.471000 24.528000,5.850000 25.132000,6.239000 25.731000,6.637000 26.909000,7.461000 27.488000,7.887000 28.626000,8.765000 29.184000,9.218000 29.735000,9.679000 30.279000,10.149000 30.816000,10.627000 31.345000,11.114000 31.866000,11.608000 32.380000,12.111000 32.886000,12.622000 33.873000,13.667000 34.354000,14.201000 34.826000,14.743000 35.290000,15.292000 35.746000,15.848000 36.193000,16.411000 36.631000,16.981000 37.059000,17.558000 37.879000,18.642000 38.301000,19.174000 38.732000,19.700000 39.171000,20.219000 39.618000,20.731000 40.535000,21.734000 41.484000,22.707000 41.970000,23.183000 42.463000,23.651000 42.963000,24.111000 43.470000,24.563000 44.506000,25.443000 45.034000,25.871000 46.110000,26.702000 46.657000,27.104000 47.211000,27.498000 48.337000,28.260000 49.486000,28.986000 50.657000,29.676000 51.251000,30.007000 52.453000,30.641000 53.062000,30.944000 53.675000,31.237000 54.292000,31.520000 54.914000,31.794000 55.540000,32.058000 56.171000,32.313000 57.443000,32.792000 58.084000,33.016000 59.377000,33.435000 60.029000,33.629000 60.683000,33.813000 62.000000,34.150000 62.662000,34.303000 63.993000,34.577000 64.662000,34.699000 65.332000,34.810000 66.004000,34.911000 66.678000,35.001000 67.353000,35.081000 68.029000,35.150000 68.706000,35.208000 69.384000,35.256000 70.742000,35.320000 71.421000,35.336000 72.101000,35.341000 72.101000,37.841000 71.382000,37.835000 70.664000,37.819000 69.945000,37.790000 69.228000,37.751000 68.511000,37.700000 67.795000,37.639000 67.080000,37.566000 66.366000,37.481000 65.653000,37.386000 64.943000,37.280000 64.233000,37.162000 63.526000,37.033000 62.821000,36.893000 62.119000,36.743000 61.418000,36.581000 60.720000,36.408000 60.026000,36.225000 59.334000,36.030000 58.645000,35.825000 57.959000,35.609000 57.277000,35.382000 56.599000,35.145000 55.924000,34.897000 55.253000,34.638000 54.587000,34.369000 53.925000,34.090000 53.267000,33.800000 52.614000,33.500000 51.965000,33.190000 51.322000,32.870000 50.683000,32.540000 50.050000,32.200000 49.422000,31.849000 48.800000,31.490000 48.184000,31.120000 47.573000,30.741000 46.969000,30.352000 46.370000,29.954000 45.778000,29.546000 45.192000,29.130000 44.613000,28.704000 43.475000,27.826000 42.917000,27.373000 42.366000,26.912000 41.822000,26.442000 41.285000,25.964000 40.756000,25.477000 40.235000,24.983000 39.721000,24.480000 39.215000,23.969000 38.228000,22.924000 37.747000,22.390000 37.275000,21.848000 36.811000,21.299000 36.355000,20.743000 35.908000,20.180000 35.470000,19.610000 35.042000,19.033000 34.222000,17.949000 33.800000,17.417000 33.369000,16.891000 32.930000,16.372000 32.483000,15.860000 31.566000,14.857000 30.617000,13.884000 30.131000,13.408000 29.638000,12.940000 29.138000,12.480000 28.631000,12.028000 27.595000,11.148000 27.067000,10.720000 25.991000,9.889000 25.444000,9.487000 24.890000,9.093000 23.764000,8.331000 22.615000,7.605000 21.444000,6.915000 20.850000,6.584000 19.648000,5.950000 19.040000,5.647000 18.426000,5.354000 17.809000,5.071000 17.187000,4.797000 16.561000,4.533000 15.930000,4.278000 14.658000,3.799000 14.017000,3.575000 12.724000,3.156000 12.072000,2.962000 11.418000,2.778000 10.101000,2.441000 9.439000,2.288000 8.108000,2.014000 7.439000,1.892000 6.769000,1.781000 6.097000,1.680000 5.423000,1.590000 4.748000,1.510000 4.072000,1.441000 3.395000,1.383000 2.717000,1.335000 1.359000,1.271000 0.680000,1.255000 0.000000,1.250000 z%22 /><path class=%22layer_2_0%22 d=%22M 0.000000,-0.250000 0.703000,-0.244000 1.406000,-0.228000 2.109000,-0.200000 2.811000,-0.162000 4.213000,-0.052000 4.912000,0.019000 5.610000,0.102000 6.307000,0.195000 7.003000,0.299000 7.696000,0.414000 8.388000,0.540000 9.078000,0.677000 9.765000,0.824000 10.450000,0.983000 11.133000,1.152000 11.812000,1.331000 12.489000,1.521000 13.163000,1.722000 13.834000,1.933000 14.501000,2.155000 15.165000,2.387000 15.825000,2.630000 16.481000,2.883000 17.133000,3.146000 17.781000,3.419000 19.063000,3.996000 19.697000,4.299000 20.327000,4.613000 20.951000,4.936000 21.571000,5.269000 22.185000,5.611000 22.793000,5.963000 23.396000,6.325000 23.994000,6.696000 24.585000,7.076000 25.170000,7.465000 25.750000,7.864000 26.323000,8.271000 27.449000,9.113000 28.002000,9.547000 29.088000,10.441000 30.145000,11.368000 30.662000,11.844000 31.172000,12.328000 31.675000,12.820000 32.656000,13.827000 33.135000,14.342000 34.068000,15.394000 34.522000,15.931000 34.967000,16.475000 35.404000,17.026000 35.833000,17.584000 36.252000,18.148000 36.667000,18.706000 37.523000,19.802000 37.963000,20.340000 38.412000,20.871000 39.335000,21.911000 39.808000,22.420000 40.290000,22.922000 40.779000,23.416000 41.276000,23.903000 41.780000,24.381000 42.292000,24.852000 42.811000,25.315000 43.337000,25.769000 43.870000,26.215000 44.411000,26.653000 44.958000,27.082000 45.511000,27.503000 46.071000,27.914000 47.211000,28.712000 47.790000,29.097000 48.374000,29.473000 49.561000,30.197000 50.163000,30.545000 50.771000,30.884000 51.383000,31.213000 52.623000,31.842000 53.250000,32.142000 54.518000,32.713000 55.159000,32.983000 55.804000,33.243000 56.453000,33.493000 57.105000,33.733000 57.761000,33.963000 58.421000,34.182000 59.084000,34.391000 59.751000,34.589000 60.420000,34.777000 61.092000,34.955000 61.767000,35.122000 62.445000,35.279000 63.806000,35.560000 65.176000,35.798000 65.864000,35.901000 66.553000,35.993000 67.244000,36.075000 67.935000,36.145000 68.628000,36.205000 69.322000,36.254000 70.016000,36.292000 71.406000,36.336000 72.101000,36.341000 72.101000,36.841000 71.398000,36.836000 70.695000,36.819000 69.992000,36.791000 69.290000,36.753000 68.589000,36.703000 67.888000,36.643000 67.189000,36.572000 66.491000,36.489000 65.794000,36.396000 65.098000,36.292000 64.405000,36.177000 63.713000,36.051000 63.023000,35.914000 62.336000,35.767000 61.651000,35.608000 60.968000,35.439000 60.289000,35.260000 59.612000,35.070000 58.938000,34.869000 58.267000,34.658000 57.600000,34.436000 56.936000,34.204000 56.276000,33.961000 55.620000,33.708000 54.968000,33.445000 54.320000,33.172000 53.677000,32.888000 53.038000,32.595000 52.404000,32.292000 51.774000,31.978000 51.150000,31.655000 50.530000,31.322000 49.916000,30.980000 49.308000,30.628000 48.705000,30.266000 48.107000,29.895000 47.516000,29.515000 46.931000,29.126000 46.351000,28.727000 45.778000,28.320000 44.652000,27.478000 44.099000,27.044000 43.013000,26.150000 41.956000,25.223000 41.439000,24.747000 40.929000,24.263000 40.426000,23.771000 39.932000,23.271000 39.445000,22.764000 38.966000,22.249000 38.033000,21.197000 37.579000,20.660000 37.134000,20.116000 36.697000,19.565000 36.268000,19.007000 35.849000,18.443000 35.434000,17.885000 34.578000,16.789000 34.138000,16.251000 33.689000,15.720000 32.766000,14.680000 32.293000,14.171000 31.811000,13.669000 31.322000,13.175000 30.825000,12.688000 30.321000,12.210000 29.809000,11.739000 29.290000,11.276000 28.764000,10.822000 28.231000,10.376000 27.690000,9.938000 26.590000,9.088000 26.030000,8.677000 24.890000,7.879000 24.311000,7.494000 23.727000,7.118000 22.540000,6.394000 21.938000,6.046000 21.330000,5.707000 20.718000,5.378000 20.100000,5.059000 19.478000,4.749000 18.851000,4.449000 17.583000,3.878000 16.942000,3.608000 16.297000,3.348000 15.648000,3.098000 14.996000,2.858000 14.340000,2.628000 13.680000,2.409000 13.017000,2.200000 12.350000,2.002000 11.681000,1.814000 11.009000,1.636000 10.334000,1.469000 9.656000,1.312000 8.295000,1.031000 6.925000,0.793000 6.237000,0.690000 5.548000,0.598000 4.857000,0.516000 4.166000,0.446000 3.473000,0.386000 2.779000,0.337000 2.085000,0.299000 0.695000,0.255000 0.000000,0.250000 z%22 /></g><g id=%22C217%22 data-name=%22as_component__PNGCOJINIPILRSBFUVHAAAKRQR7F7X5DOV45DHY3HPYOUZICQITA%22><path class=%22layer_1_0%22 d=%22M 9.889000,3.500000 0.000000,1.275000 0.000000,-1.275000 9.889000,-3.500000 16.000000,-3.500000 16.000000,3.500000 z%22 /><path class=%22layer_2_0%22 d=%22M 0.000000,-0.250000 10.000000,-2.500000 10.000000,2.500000 0.000000,0.250000 z%22 /><rect class=%22layer_2_0%22 x=%2210.300000%22 y=%22-2.500000%22 width=%220.300000%22 height=%225.000000%22 /><rect class=%22layer_2_0%22 x=%2210.900000%22 y=%22-2.500000%22 width=%220.300000%22 height=%225.000000%22 /><rect class=%22layer_2_0%22 x=%2211.500000%22 y=%22-2.500000%22 width=%220.300000%22 height=%225.000000%22 /><rect class=%22layer_2_0%22 x=%2212.100000%22 y=%22-2.500000%22 width=%220.300000%22 height=%225.000000%22 /><rect class=%22layer_2_0%22 x=%2212.700000%22 y=%22-2.500000%22 width=%220.300000%22 height=%225.000000%22 /><rect class=%22layer_2_0%22 x=%2213.300000%22 y=%22-2.500000%22 width=%220.300000%22 height=%225.000000%22 /><rect class=%22layer_2_0%22 x=%2213.900000%22 y=%22-2.500000%22 width=%220.300000%22 height=%225.000000%22 /><rect class=%22layer_2_0%22 x=%2214.500000%22 y=%22-2.500000%22 width=%220.300000%22 height=%225.000000%22 /><rect class=%22layer_2_0%22 x=%2215.100000%22 y=%22-2.500000%22 width=%220.300000%22 height=%225.000000%22 /><rect class=%22layer_2_0%22 x=%2215.700000%22 y=%22-2.500000%22 width=%220.300000%22 height=%225.000000%22 /></g><g id=%22C218%22 data-name=%22s_bend_l_35P42721714214523_o_17P00606725806479_p_Strip%22><path class=%22layer_1_0%22 d=%22M 0.000000,-1.250000 0.536000,-1.244000 1.072000,-1.226000 1.607000,-1.196000 2.141000,-1.154000 2.674000,-1.100000 3.206000,-1.034000 3.737000,-0.957000 4.265000,-0.867000 4.791000,-0.766000 5.315000,-0.653000 5.836000,-0.528000 6.355000,-0.392000 6.870000,-0.244000 7.382000,-0.084000 7.890000,0.087000 8.394000,0.269000 8.893000,0.462000 9.389000,0.667000 9.880000,0.882000 10.365000,1.109000 10.846000,1.346000 11.321000,1.594000 11.790000,1.853000 12.254000,2.122000 12.711000,2.401000 13.162000,2.691000 13.607000,2.990000 14.045000,3.300000 14.475000,3.619000 14.899000,3.947000 15.723000,4.633000 16.123000,4.989000 16.515000,5.354000 16.899000,5.728000 17.275000,6.111000 17.642000,6.501000 18.000000,6.900000 18.349000,7.307000 18.689000,7.721000 18.993000,8.092000 19.306000,8.457000 19.955000,9.164000 20.635000,9.841000 21.345000,10.487000 21.711000,10.798000 22.084000,11.101000 22.848000,11.681000 23.638000,12.227000 24.042000,12.486000 24.452000,12.736000 24.867000,12.977000 25.288000,13.209000 25.713000,13.431000 26.579000,13.846000 27.018000,14.039000 27.910000,14.396000 28.361000,14.559000 28.816000,14.712000 29.274000,14.855000 29.736000,14.987000 30.200000,15.109000 30.667000,15.221000 31.136000,15.322000 31.607000,15.413000 32.080000,15.493000 32.555000,15.563000 33.032000,15.622000 33.509000,15.670000 33.988000,15.708000 34.467000,15.735000 34.947000,15.751000 35.427000,15.756000 35.427000,18.256000 34.891000,18.250000 34.355000,18.232000 33.820000,18.202000 33.286000,18.160000 32.753000,18.106000 32.221000,18.040000 31.690000,17.963000 31.162000,17.873000 30.636000,17.772000 30.112000,17.659000 29.591000,17.534000 29.072000,17.398000 28.557000,17.250000 28.045000,17.090000 27.537000,16.919000 27.033000,16.737000 26.534000,16.544000 26.038000,16.339000 25.547000,16.124000 25.062000,15.897000 24.581000,15.660000 24.106000,15.412000 23.637000,15.153000 23.173000,14.884000 22.716000,14.605000 22.265000,14.315000 21.820000,14.016000 21.382000,13.706000 20.952000,13.387000 20.529000,13.059000 20.113000,12.720000 19.704000,12.373000 19.304000,12.017000 18.912000,11.652000 18.528000,11.278000 18.152000,10.895000 17.785000,10.505000 17.427000,10.106000 17.078000,9.699000 16.738000,9.285000 16.434000,8.914000 16.121000,8.549000 15.472000,7.842000 14.792000,7.165000 14.082000,6.519000 13.716000,6.208000 13.343000,5.905000 12.579000,5.325000 11.789000,4.779000 11.385000,4.520000 10.975000,4.270000 10.560000,4.029000 10.139000,3.797000 9.714000,3.575000 8.848000,3.160000 8.409000,2.967000 7.518000,2.610000 7.066000,2.447000 6.611000,2.294000 6.153000,2.151000 5.691000,2.019000 5.227000,1.897000 4.760000,1.785000 4.291000,1.684000 3.820000,1.593000 3.347000,1.513000 2.872000,1.443000 2.395000,1.384000 1.918000,1.336000 1.439000,1.298000 0.960000,1.271000 0.480000,1.255000 0.000000,1.250000 z%22 /><path class=%22layer_2_0%22 d=%22M 0.000000,-0.250000 0.514000,-0.244000 1.027000,-0.227000 1.540000,-0.198000 2.052000,-0.158000 2.563000,-0.106000 3.072000,-0.043000 3.581000,0.031000 4.087000,0.117000 4.591000,0.214000 5.093000,0.322000 5.593000,0.442000 6.089000,0.573000 6.583000,0.714000 7.073000,0.867000 7.560000,1.031000 8.043000,1.205000 8.522000,1.391000 8.997000,1.587000 9.467000,1.793000 9.933000,2.010000 10.393000,2.238000 10.848000,2.476000 11.298000,2.723000 11.742000,2.981000 12.181000,3.249000 12.613000,3.526000 13.039000,3.813000 13.458000,4.110000 13.871000,4.416000 14.276000,4.730000 14.675000,5.054000 15.066000,5.387000 15.450000,5.729000 15.826000,6.079000 16.194000,6.437000 16.554000,6.803000 16.905000,7.178000 17.248000,7.560000 17.583000,7.950000 17.909000,8.347000 18.227000,8.735000 18.554000,9.116000 18.890000,9.490000 19.234000,9.856000 19.586000,10.215000 19.946000,10.565000 20.314000,10.908000 20.689000,11.242000 21.072000,11.567000 21.462000,11.884000 21.858000,12.192000 22.262000,12.491000 22.672000,12.781000 23.089000,13.062000 23.512000,13.333000 23.940000,13.595000 24.375000,13.847000 24.815000,14.090000 25.260000,14.322000 25.711000,14.545000 26.166000,14.757000 26.626000,14.959000 27.091000,15.151000 27.559000,15.332000 28.032000,15.503000 28.508000,15.663000 28.987000,15.813000 29.470000,15.951000 29.956000,16.079000 30.445000,16.196000 30.936000,16.302000 31.429000,16.397000 31.924000,16.481000 32.422000,16.554000 32.920000,16.616000 33.420000,16.666000 33.921000,16.705000 34.423000,16.734000 35.427000,16.756000 35.427000,17.256000 34.913000,17.250000 34.400000,17.233000 33.887000,17.204000 33.375000,17.164000 32.864000,17.112000 32.355000,17.049000 31.846000,16.975000 31.340000,16.889000 30.836000,16.792000 30.334000,16.684000 29.834000,16.564000 29.338000,16.433000 28.844000,16.292000 28.354000,16.139000 27.867000,15.975000 27.384000,15.801000 26.905000,15.615000 26.430000,15.419000 25.960000,15.213000 25.494000,14.996000 25.034000,14.768000 24.579000,14.530000 24.129000,14.283000 23.685000,14.025000 23.246000,13.757000 22.814000,13.480000 22.388000,13.193000 21.969000,12.896000 21.556000,12.590000 21.151000,12.276000 20.752000,11.952000 20.361000,11.619000 19.977000,11.277000 19.601000,10.927000 19.233000,10.569000 18.873000,10.203000 18.522000,9.828000 18.179000,9.446000 17.844000,9.056000 17.518000,8.659000 17.200000,8.271000 16.873000,7.890000 16.537000,7.516000 16.193000,7.150000 15.841000,6.791000 15.481000,6.441000 15.113000,6.098000 14.738000,5.764000 14.355000,5.439000 13.965000,5.122000 13.569000,4.814000 13.165000,4.515000 12.755000,4.225000 12.338000,3.944000 11.915000,3.673000 11.487000,3.411000 11.052000,3.159000 10.612000,2.916000 10.167000,2.684000 9.716000,2.461000 9.261000,2.249000 8.801000,2.047000 8.336000,1.855000 7.868000,1.674000 7.395000,1.503000 6.919000,1.343000 6.440000,1.193000 5.957000,1.055000 5.471000,0.927000 4.982000,0.810000 4.491000,0.704000 3.998000,0.609000 3.503000,0.525000 3.005000,0.452000 2.507000,0.390000 2.007000,0.340000 1.506000,0.301000 1.004000,0.272000 0.000000,0.250000 z%22 /></g><g id=%22C219%22 data-name=%22as_component__PNGCOJINIPILRSBFUVHAAAKRQR7F7X5DOV45DHY3HPYOUZICQITA%22><path class=%22layer_1_0%22 d=%22M 9.889000,3.500000 0.000000,1.275000 0.000000,-1.275000 9.889000,-3.500000 16.000000,-3.500000 16.000000,3.500000 z%22 /><path class=%22layer_2_0%22 d=%22M 0.000000,-0.250000 10.000000,-2.500000 10.000000,2.500000 0.000000,0.250000 z%22 /><rect class=%22layer_2_0%22 x=%2210.300000%22 y=%22-2.500000%22 width=%220.300000%22 height=%225.000000%22 /><rect class=%22layer_2_0%22 x=%2210.900000%22 y=%22-2.500000%22 width=%220.300000%22 height=%225.000000%22 /><rect class=%22layer_2_0%22 x=%2211.500000%22 y=%22-2.500000%22 width=%220.300000%22 height=%225.000000%22 /><rect class=%22layer_2_0%22 x=%2212.100000%22 y=%22-2.500000%22 width=%220.300000%22 height=%225.000000%22 /><rect class=%22layer_2_0%22 x=%2212.700000%22 y=%22-2.500000%22 width=%220.300000%22 height=%225.000000%22 /><rect class=%22layer_2_0%22 x=%2213.300000%22 y=%22-2.500000%22 width=%220.300000%22 height=%225.000000%22 /><rect class=%22layer_2_0%22 x=%2213.900000%22 y=%22-2.500000%22 width=%220.300000%22 height=%225.000000%22 /><rect class=%22layer_2_0%22 x=%2214.500000%22 y=%22-2.500000%22 width=%220.300000%22 height=%225.000000%22 /><rect class=%22layer_2_0%22 x=%2215.100000%22 y=%22-2.500000%22 width=%220.300000%22 height=%225.000000%22 /><rect class=%22layer_2_0%22 x=%2215.700000%22 y=%22-2.500000%22 width=%220.300000%22 height=%225.000000%22 /></g><g id=%22C220%22 data-name=%22s_bend_l_25P50518583318196_o_32P25072487735933_p_Strip%22><path class=%22layer_1_0%22 d=%22M 0.000000,-1.250000 0.404000,-1.244000 0.809000,-1.227000 1.212000,-1.199000 1.615000,-1.159000 2.016000,-1.108000 2.415000,-1.045000 2.813000,-0.972000 3.209000,-0.887000 3.602000,-0.791000 3.992000,-0.684000 4.379000,-0.566000 4.762000,-0.437000 5.142000,-0.298000 5.888000,0.013000 6.255000,0.184000 6.973000,0.557000 7.323000,0.759000 7.668000,0.970000 8.007000,1.191000 8.340000,1.421000 8.666000,1.661000 8.985000,1.909000 9.601000,2.433000 9.898000,2.708000 10.187000,2.991000 10.468000,3.282000 10.740000,3.581000 11.004000,3.887000 11.260000,4.201000 11.506000,4.521000 11.743000,4.849000 11.971000,5.183000 12.190000,5.524000 12.399000,5.870000 12.598000,6.222000 12.786000,6.580000 12.965000,6.943000 13.134000,7.310000 13.292000,7.683000 13.439000,8.059000 13.576000,8.440000 13.702000,8.824000 13.817000,9.212000 13.921000,9.603000 14.015000,9.997000 14.097000,10.393000 14.167000,10.791000 14.227000,11.191000 14.275000,11.592000 14.312000,11.995000 14.338000,12.399000 14.352000,12.803000 14.355000,13.208000 14.346000,13.612000 14.326000,14.016000 14.295000,14.419000 14.252000,14.822000 14.198000,15.222000 14.133000,15.622000 14.057000,16.019000 13.969000,16.414000 13.896000,16.740000 13.779000,17.397000 13.700000,18.061000 13.657000,18.727000 13.652000,19.395000 13.685000,20.062000 13.756000,20.727000 13.863000,21.386000 14.008000,22.038000 14.189000,22.681000 14.406000,23.313000 14.659000,23.931000 14.945000,24.535000 15.266000,25.121000 15.618000,25.688000 16.003000,26.235000 16.417000,26.759000 16.860000,27.258000 17.092000,27.499000 17.576000,27.959000 18.085000,28.392000 18.618000,28.795000 19.172000,29.168000 19.747000,29.509000 20.339000,29.816000 20.642000,29.958000 21.259000,30.214000 21.572000,30.330000 22.209000,30.533000 22.531000,30.622000 23.182000,30.771000 23.840000,30.884000 24.504000,30.959000 25.171000,30.996000 25.505000,31.001000 25.505000,33.501000 25.101000,33.495000 24.696000,33.478000 24.293000,33.450000 23.890000,33.410000 23.489000,33.359000 23.090000,33.296000 22.692000,33.223000 22.296000,33.138000 21.903000,33.042000 21.513000,32.935000 21.126000,32.817000 20.743000,32.688000 20.363000,32.549000 19.617000,32.238000 19.250000,32.067000 18.889000,31.885000 18.532000,31.694000 18.182000,31.492000 17.837000,31.281000 17.498000,31.060000 17.165000,30.830000 16.839000,30.590000 16.520000,30.342000 15.904000,29.818000 15.607000,29.543000 15.318000,29.260000 15.037000,28.969000 14.765000,28.670000 14.501000,28.364000 14.245000,28.050000 13.999000,27.730000 13.762000,27.402000 13.534000,27.068000 13.315000,26.727000 13.106000,26.381000 12.907000,26.029000 12.719000,25.671000 12.540000,25.308000 12.371000,24.941000 12.213000,24.568000 12.066000,24.192000 11.929000,23.811000 11.803000,23.427000 11.688000,23.039000 11.584000,22.648000 11.490000,22.254000 11.408000,21.858000 11.338000,21.460000 11.278000,21.060000 11.230000,20.659000 11.193000,20.256000 11.167000,19.852000 11.153000,19.448000 11.150000,19.043000 11.159000,18.639000 11.179000,18.235000 11.210000,17.832000 11.253000,17.430000 11.307000,17.029000 11.372000,16.629000 11.448000,16.232000 11.536000,15.837000 11.609000,15.511000 11.726000,14.854000 11.806000,14.190000 11.848000,13.524000 11.853000,12.856000 11.820000,12.189000 11.749000,11.524000 11.642000,10.865000 11.497000,10.213000 11.316000,9.570000 11.099000,8.938000 10.846000,8.320000 10.560000,7.716000 10.239000,7.130000 9.887000,6.563000 9.698000,6.287000 9.299000,5.751000 8.870000,5.239000 8.413000,4.752000 7.929000,4.292000 7.420000,3.859000 6.887000,3.456000 6.333000,3.083000 6.048000,2.909000 5.464000,2.584000 4.863000,2.293000 4.556000,2.161000 3.933000,1.921000 3.616000,1.815000 2.974000,1.629000 2.323000,1.480000 1.665000,1.367000 1.001000,1.292000 0.668000,1.269000 0.000000,1.250000 z%22 /><path class=%22layer_2_0%22 d=%22M 0.000000,-0.250000 0.376000,-0.245000 0.752000,-0.229000 1.128000,-0.202000 1.502000,-0.165000 1.875000,-0.118000 2.247000,-0.060000 2.617000,0.009000 2.985000,0.088000 3.351000,0.177000 4.074000,0.386000 4.430000,0.506000 4.783000,0.636000 5.133000,0.776000 5.478000,0.925000 5.819000,1.084000 6.156000,1.253000 6.487000,1.431000 7.134000,1.815000 7.759000,2.235000 8.359000,2.689000 8.649000,2.929000 8.932000,3.177000 9.208000,3.432000 9.477000,3.695000 9.739000,3.966000 10.238000,4.529000 10.705000,5.119000 11.137000,5.735000 11.341000,6.052000 11.535000,6.374000 11.896000,7.034000 12.219000,7.714000 12.366000,8.061000 12.503000,8.411000 12.748000,9.123000 12.855000,9.483000 12.952000,9.847000 13.115000,10.582000 13.181000,10.952000 13.236000,11.324000 13.281000,11.698000 13.339000,12.448000 13.352000,12.824000 13.355000,13.201000 13.347000,13.577000 13.328000,13.953000 13.299000,14.328000 13.259000,14.702000 13.209000,15.075000 13.149000,15.446000 12.996000,16.183000 12.917000,16.537000 12.790000,17.250000 12.742000,17.609000 12.704000,17.969000 12.676000,18.330000 12.650000,19.054000 12.665000,19.778000 12.688000,20.140000 12.721000,20.500000 12.818000,21.218000 12.881000,21.575000 13.038000,22.282000 13.235000,22.979000 13.348000,23.324000 13.470000,23.664000 13.602000,24.002000 13.895000,24.664000 14.224000,25.310000 14.402000,25.625000 14.589000,25.935000 14.785000,26.240000 15.201000,26.833000 15.650000,27.401000 16.131000,27.943000 16.641000,28.457000 16.907000,28.703000 17.459000,29.172000 17.745000,29.395000 18.334000,29.815000 18.638000,30.013000 19.261000,30.383000 19.904000,30.717000 20.564000,31.014000 21.241000,31.273000 21.930000,31.494000 22.280000,31.590000 22.632000,31.676000 22.986000,31.752000 23.342000,31.818000 23.700000,31.874000 24.420000,31.955000 24.781000,31.981000 25.505000,32.001000 25.505000,32.501000 25.129000,32.496000 24.753000,32.480000 24.377000,32.453000 24.003000,32.416000 23.630000,32.369000 23.258000,32.311000 22.888000,32.242000 22.520000,32.163000 22.154000,32.074000 21.431000,31.865000 21.075000,31.745000 20.722000,31.615000 20.372000,31.475000 20.027000,31.326000 19.686000,31.167000 19.350000,30.998000 19.018000,30.820000 18.371000,30.436000 17.746000,30.016000 17.146000,29.562000 16.856000,29.322000 16.297000,28.819000 16.028000,28.556000 15.766000,28.285000 15.267000,27.722000 14.800000,27.132000 14.580000,26.827000 14.164000,26.199000 13.970000,25.877000 13.609000,25.217000 13.286000,24.537000 13.139000,24.191000 13.002000,23.840000 12.757000,23.128000 12.650000,22.768000 12.553000,22.404000 12.390000,21.669000 12.324000,21.299000 12.269000,20.927000 12.224000,20.553000 12.166000,19.803000 12.153000,19.427000 12.150000,19.050000 12.158000,18.674000 12.177000,18.298000 12.206000,17.923000 12.246000,17.549000 12.296000,17.176000 12.357000,16.805000 12.428000,16.435000 12.509000,16.068000 12.588000,15.714000 12.715000,15.001000 12.763000,14.642000 12.801000,14.282000 12.829000,13.921000 12.855000,13.197000 12.840000,12.473000 12.817000,12.111000 12.784000,11.751000 12.687000,11.033000 12.624000,10.676000 12.467000,9.969000 12.270000,9.272000 12.035000,8.587000 11.903000,8.249000 11.610000,7.587000 11.281000,6.941000 11.103000,6.626000 10.916000,6.316000 10.720000,6.011000 10.304000,5.418000 9.855000,4.850000 9.374000,4.308000 8.864000,3.794000 8.598000,3.548000 8.046000,3.079000 7.760000,2.856000 7.171000,2.436000 6.867000,2.238000 6.244000,1.868000 5.601000,1.534000 4.941000,1.237000 4.264000,0.978000 3.575000,0.757000 3.225000,0.661000 2.873000,0.575000 2.519000,0.499000 2.163000,0.433000 1.805000,0.377000 1.446000,0.332000 0.724000,0.270000 0.000000,0.250000 z%22 /></g><g id=%22C221%22 data-name=%22as_component__PNGCOJINIPILRSBFUVHAAAKRQR7F7X5DOV45DHY3HPYOUZICQITA%22><path class=%22layer_1_0%22 d=%22M 9.889000,3.500000 0.000000,1.275000 0.000000,-1.275000 9.889000,-3.500000 16.000000,-3.500000 16.000000,3.500000 z%22 /><path class=%22layer_2_0%22 d=%22M 0.000000,-0.250000 10.000000,-2.500000 10.000000,2.500000 0.000000,0.250000 z%22 /><rect class=%22layer_2_0%22 x=%2210.300000%22 y=%22-2.500000%22 width=%220.300000%22 height=%225.000000%22 /><rect class=%22layer_2_0%22 x=%2210.900000%22 y=%22-2.500000%22 width=%220.300000%22 height=%225.000000%22 /><rect class=%22layer_2_0%22 x=%2211.500000%22 y=%22-2.500000%22 width=%220.300000%22 height=%225.000000%22 /><rect class=%22layer_2_0%22 x=%2212.100000%22 y=%22-2.500000%22 width=%220.300000%22 height=%225.000000%22 /><rect class=%22layer_2_0%22 x=%2212.700000%22 y=%22-2.500000%22 width=%220.300000%22 height=%225.000000%22 /><rect class=%22layer_2_0%22 x=%2213.300000%22 y=%22-2.500000%22 width=%220.300000%22 height=%225.000000%22 /><rect class=%22layer_2_0%22 x=%2213.900000%22 y=%22-2.500000%22 width=%220.300000%22 height=%225.000000%22 /><rect class=%22layer_2_0%22 x=%2214.500000%22 y=%22-2.500000%22 width=%220.300000%22 height=%225.000000%22 /><rect class=%22layer_2_0%22 x=%2215.100000%22 y=%22-2.500000%22 width=%220.300000%22 height=%225.000000%22 /><rect class=%22layer_2_0%22 x=%2215.700000%22 y=%22-2.500000%22 width=%220.300000%22 height=%225.000000%22 /></g><g id=%22C222%22 data-name=%22s_bend_l_34P8744668054226_o_43P97123718743289_p_Strip%22><path class=%22layer_1_0%22 d=%22M 0.000000,-1.250000 0.466000,-1.244000 0.932000,-1.227000 1.397000,-1.199000 1.862000,-1.159000 2.325000,-1.108000 2.787000,-1.046000 3.247000,-0.973000 3.706000,-0.888000 4.162000,-0.792000 4.615000,-0.686000 5.066000,-0.568000 5.514000,-0.439000 5.959000,-0.300000 6.400000,-0.149000 6.838000,0.012000 7.271000,0.184000 7.700000,0.366000 8.125000,0.558000 8.544000,0.761000 8.959000,0.974000 9.368000,1.197000 9.772000,1.430000 10.170000,1.672000 10.948000,2.186000 11.327000,2.457000 11.700000,2.738000 12.065000,3.027000 12.424000,3.325000 12.775000,3.631000 13.118000,3.946000 13.454000,4.269000 13.782000,4.601000 14.102000,4.940000 14.413000,5.287000 14.716000,5.641000 15.010000,6.003000 15.295000,6.372000 15.571000,6.747000 15.838000,7.129000 16.096000,7.518000 16.344000,7.913000 16.582000,8.313000 16.810000,8.719000 17.029000,9.131000 17.237000,9.548000 17.436000,9.970000 17.624000,10.396000 17.801000,10.827000 17.968000,11.263000 18.125000,11.702000 18.270000,12.145000 18.405000,12.591000 18.529000,13.040000 18.642000,13.492000 18.744000,13.947000 18.834000,14.404000 18.914000,14.864000 18.983000,15.325000 19.040000,15.787000 19.086000,16.251000 19.144000,17.181000 19.156000,17.647000 19.156000,18.114000 19.146000,18.580000 19.124000,19.045000 19.090000,19.510000 19.046000,19.974000 18.990000,20.437000 18.923000,20.898000 18.844000,21.358000 18.755000,21.815000 18.654000,22.270000 18.489000,23.064000 18.362000,23.864000 18.275000,24.670000 18.246000,25.074000 18.217000,25.884000 18.228000,26.695000 18.279000,27.504000 18.319000,27.907000 18.428000,28.710000 18.497000,29.110000 18.665000,29.903000 18.763000,30.296000 18.988000,31.074000 19.251000,31.841000 19.396000,32.220000 19.550000,32.594000 19.886000,33.332000 20.067000,33.695000 20.257000,34.053000 20.663000,34.754000 21.103000,35.435000 21.575000,36.094000 22.079000,36.729000 22.613000,37.339000 23.176000,37.922000 23.766000,38.477000 24.383000,39.002000 24.701000,39.254000 25.355000,39.733000 25.690000,39.961000 26.377000,40.391000 27.084000,40.787000 27.810000,41.149000 28.552000,41.475000 29.309000,41.764000 29.692000,41.895000 30.469000,42.128000 31.255000,42.323000 32.051000,42.480000 32.451000,42.544000 32.852000,42.598000 33.659000,42.677000 34.469000,42.716000 34.874000,42.721000 34.874000,45.221000 34.408000,45.215000 33.942000,45.198000 33.477000,45.170000 33.012000,45.130000 32.549000,45.079000 32.087000,45.017000 31.627000,44.944000 31.168000,44.859000 30.712000,44.763000 30.259000,44.657000 29.808000,44.539000 29.360000,44.410000 28.915000,44.271000 28.474000,44.120000 28.036000,43.959000 27.603000,43.788000 26.749000,43.413000 26.330000,43.210000 25.915000,42.997000 25.506000,42.774000 25.102000,42.541000 24.704000,42.299000 23.926000,41.785000 23.547000,41.514000 23.174000,41.234000 22.809000,40.944000 22.450000,40.646000 22.099000,40.340000 21.756000,40.025000 21.420000,39.702000 21.092000,39.370000 20.772000,39.031000 20.461000,38.684000 20.158000,38.330000 19.864000,37.968000 19.579000,37.599000 19.303000,37.224000 19.036000,36.842000 18.778000,36.453000 18.530000,36.058000 18.292000,35.658000 18.064000,35.252000 17.845000,34.840000 17.637000,34.423000 17.438000,34.001000 17.250000,33.575000 17.073000,33.144000 16.906000,32.708000 16.749000,32.269000 16.604000,31.826000 16.469000,31.380000 16.345000,30.931000 16.232000,30.479000 16.130000,30.024000 16.040000,29.567000 15.960000,29.107000 15.891000,28.646000 15.834000,28.184000 15.788000,27.720000 15.730000,26.790000 15.718000,26.324000 15.718000,25.857000 15.728000,25.391000 15.750000,24.926000 15.784000,24.461000 15.828000,23.997000 15.884000,23.534000 15.951000,23.073000 16.030000,22.613000 16.119000,22.156000 16.220000,21.701000 16.385000,20.907000 16.512000,20.107000 16.599000,19.301000 16.628000,18.897000 16.657000,18.087000 16.646000,17.276000 16.595000,16.467000 16.555000,16.064000 16.446000,15.261000 16.377000,14.861000 16.298000,14.464000 16.111000,13.675000 15.886000,12.897000 15.759000,12.512000 15.478000,11.751000 15.324000,11.377000 15.160000,11.006000 14.807000,10.276000 14.617000,9.918000 14.211000,9.217000 13.771000,8.536000 13.299000,7.877000 12.795000,7.242000 12.261000,6.632000 11.698000,6.049000 11.108000,5.494000 10.802000,5.228000 10.173000,4.717000 9.849000,4.474000 9.184000,4.010000 8.497000,3.580000 7.790000,3.184000 7.064000,2.822000 6.322000,2.496000 5.945000,2.347000 5.182000,2.076000 4.405000,1.843000 3.619000,1.648000 2.823000,1.491000 2.423000,1.427000 2.022000,1.373000 1.215000,1.294000 0.810000,1.270000 0.000000,1.250000 z%22 /><path class=%22layer_2_0%22 d=%22M 0.000000,-0.250000 0.442000,-0.245000 1.324000,-0.202000 2.204000,-0.116000 2.641000,-0.057000 3.078000,0.013000 3.512000,0.093000 3.945000,0.184000 4.375000,0.285000 4.802000,0.396000 5.648000,0.651000 6.066000,0.793000 6.481000,0.946000 6.892000,1.109000 7.298000,1.281000 7.701000,1.464000 8.098000,1.656000 8.491000,1.858000 8.879000,2.069000 9.262000,2.290000 9.639000,2.520000 10.011000,2.759000 10.376000,3.007000 10.736000,3.264000 11.089000,3.529000 11.435000,3.803000 12.108000,4.376000 12.434000,4.675000 12.752000,4.981000 13.063000,5.295000 13.366000,5.617000 13.661000,5.946000 13.948000,6.282000 14.226000,6.624000 14.497000,6.974000 15.011000,7.692000 15.255000,8.060000 15.490000,8.434000 15.716000,8.814000 15.933000,9.199000 16.140000,9.589000 16.338000,9.984000 16.526000,10.384000 16.704000,10.789000 16.872000,11.197000 17.030000,11.609000 17.178000,12.026000 17.316000,12.445000 17.444000,12.868000 17.562000,13.294000 17.669000,13.723000 17.765000,14.154000 17.851000,14.587000 17.927000,15.022000 17.992000,15.459000 18.046000,15.898000 18.090000,16.338000 18.122000,16.778000 18.144000,17.219000 18.156000,17.661000 18.156000,18.103000 18.146000,18.544000 18.125000,18.986000 18.094000,19.426000 18.052000,19.866000 17.999000,20.305000 17.935000,20.742000 17.861000,21.177000 17.776000,21.611000 17.680000,22.042000 17.505000,22.884000 17.433000,23.307000 17.371000,23.732000 17.278000,24.586000 17.227000,25.444000 17.218000,26.303000 17.229000,26.733000 17.251000,27.162000 17.325000,28.018000 17.378000,28.444000 17.441000,28.869000 17.514000,29.292000 17.598000,29.714000 17.692000,30.133000 17.796000,30.550000 17.910000,30.964000 18.034000,31.375000 18.313000,32.188000 18.467000,32.589000 18.630000,32.986000 18.803000,33.380000 19.178000,34.153000 19.590000,34.907000 19.810000,35.276000 20.276000,35.998000 20.522000,36.350000 21.039000,37.036000 21.310000,37.369000 21.877000,38.016000 22.473000,38.634000 23.099000,39.222000 23.423000,39.505000 24.090000,40.046000 24.783000,40.554000 25.139000,40.795000 25.867000,41.251000 26.239000,41.466000 26.616000,41.671000 27.385000,42.054000 27.777000,42.232000 28.172000,42.400000 28.572000,42.558000 29.381000,42.845000 29.791000,42.974000 30.620000,43.201000 31.459000,43.388000 31.881000,43.466000 32.305000,43.533000 32.731000,43.590000 33.158000,43.637000 33.586000,43.674000 34.444000,43.716000 34.874000,43.721000 34.874000,44.221000 34.432000,44.216000 33.991000,44.200000 33.550000,44.173000 32.670000,44.087000 32.233000,44.028000 31.796000,43.958000 31.362000,43.878000 30.929000,43.787000 30.499000,43.686000 30.072000,43.575000 29.647000,43.453000 28.808000,43.178000 28.393000,43.025000 27.982000,42.862000 27.576000,42.690000 27.173000,42.507000 26.776000,42.315000 26.383000,42.113000 25.995000,41.902000 25.612000,41.681000 25.235000,41.451000 24.863000,41.212000 24.498000,40.964000 24.138000,40.707000 23.785000,40.442000 23.439000,40.168000 22.766000,39.595000 22.440000,39.296000 22.122000,38.990000 21.811000,38.676000 21.508000,38.354000 21.213000,38.025000 20.926000,37.689000 20.648000,37.347000 20.377000,36.997000 20.116000,36.641000 19.863000,36.279000 19.619000,35.911000 19.384000,35.537000 19.158000,35.157000 18.941000,34.772000 18.734000,34.382000 18.536000,33.987000 18.348000,33.587000 18.170000,33.183000 18.002000,32.774000 17.844000,32.362000 17.696000,31.945000 17.558000,31.526000 17.430000,31.103000 17.312000,30.677000 17.205000,30.248000 17.109000,29.817000 17.023000,29.384000 16.947000,28.949000 16.882000,28.512000 16.828000,28.073000 16.784000,27.633000 16.752000,27.193000 16.730000,26.752000 16.718000,26.310000 16.718000,25.868000 16.728000,25.427000 16.749000,24.985000 16.780000,24.545000 16.822000,24.105000 16.875000,23.666000 16.939000,23.229000 17.013000,22.794000 17.098000,22.360000 17.194000,21.929000 17.369000,21.087000 17.441000,20.664000 17.503000,20.239000 17.596000,19.385000 17.647000,18.527000 17.656000,17.668000 17.645000,17.238000 17.623000,16.809000 17.549000,15.953000 17.496000,15.527000 17.433000,15.102000 17.360000,14.679000 17.276000,14.257000 17.182000,13.838000 17.078000,13.421000 16.964000,13.007000 16.840000,12.596000 16.561000,11.783000 16.244000,10.985000 16.071000,10.591000 15.696000,9.818000 15.284000,9.064000 15.064000,8.695000 14.598000,7.973000 14.352000,7.621000 13.835000,6.935000 13.564000,6.602000 12.998000,5.955000 12.401000,5.337000 11.775000,4.749000 11.451000,4.466000 10.784000,3.925000 10.091000,3.417000 9.735000,3.176000 9.007000,2.720000 8.635000,2.505000 8.258000,2.300000 7.489000,1.917000 7.097000,1.739000 6.702000,1.571000 6.302000,1.413000 5.493000,1.126000 5.083000,0.997000 4.254000,0.770000 3.415000,0.583000 2.569000,0.438000 2.143000,0.381000 1.716000,0.334000 1.288000,0.297000 0.430000,0.255000 0.000000,0.250000 z%22 /></g><g id=%22C223%22 data-name=%22as_component__PNGCOJINIPILRSBFUVHAAAKRQR7F7X5DOV45DHY3HPYOUZICQITA%22><path class=%22layer_1_0%22 d=%22M 9.889000,3.500000 0.000000,1.275000 0.000000,-1.275000 9.889000,-3.500000 16.000000,-3.500000 16.000000,3.500000 z%22 /><path class=%22layer_2_0%22 d=%22M 0.000000,-0.250000 10.000000,-2.500000 10.000000,2.500000 0.000000,0.250000 z%22 /><rect class=%22layer_2_0%22 x=%2210.300000%22 y=%22-2.500000%22 width=%220.300000%22 height=%225.000000%22 /><rect class=%22layer_2_0%22 x=%2210.900000%22 y=%22-2.500000%22 width=%220.300000%22 height=%225.000000%22 /><rect class=%22layer_2_0%22 x=%2211.500000%22 y=%22-2.500000%22 width=%220.300000%22 height=%225.000000%22 /><rect class=%22layer_2_0%22 x=%2212.100000%22 y=%22-2.500000%22 width=%220.300000%22 height=%225.000000%22 /><rect class=%22layer_2_0%22 x=%2212.700000%22 y=%22-2.500000%22 width=%220.300000%22 height=%225.000000%22 /><rect class=%22layer_2_0%22 x=%2213.300000%22 y=%22-2.500000%22 width=%220.300000%22 height=%225.000000%22 /><rect class=%22layer_2_0%22 x=%2213.900000%22 y=%22-2.500000%22 width=%220.300000%22 height=%225.000000%22 /><rect class=%22layer_2_0%22 x=%2214.500000%22 y=%22-2.500000%22 width=%220.300000%22 height=%225.000000%22 /><rect class=%22layer_2_0%22 x=%2215.100000%22 y=%22-2.500000%22 width=%220.300000%22 height=%225.000000%22 /><rect class=%22layer_2_0%22 x=%2215.700000%22 y=%22-2.500000%22 width=%220.300000%22 height=%225.000000%22 /></g><g id=%22C224%22 data-name=%22s_bend_l_29P150282790001356_o_17P88846046080454_p_Strip%22><path class=%22layer_1_0%22 d=%22M 0.000000,-1.250000 0.461000,-1.244000 0.922000,-1.226000 1.382000,-1.196000 1.842000,-1.153000 2.300000,-1.099000 2.756000,-1.033000 3.210000,-0.955000 3.663000,-0.865000 4.113000,-0.763000 4.560000,-0.649000 5.003000,-0.524000 5.444000,-0.387000 5.881000,-0.238000 6.313000,-0.079000 6.742000,0.093000 7.165000,0.275000 7.584000,0.468000 7.997000,0.672000 8.406000,0.887000 8.808000,1.113000 9.204000,1.349000 9.594000,1.595000 9.977000,1.852000 10.354000,2.118000 10.723000,2.394000 11.085000,2.680000 11.439000,2.975000 11.786000,3.280000 12.124000,3.593000 12.454000,3.915000 12.776000,4.246000 13.089000,4.585000 13.392000,4.932000 13.687000,5.287000 13.972000,5.649000 14.248000,6.019000 14.514000,6.396000 14.769000,6.780000 15.015000,7.170000 15.250000,7.567000 15.475000,7.969000 15.689000,8.378000 16.066000,9.074000 16.268000,9.414000 16.698000,10.078000 16.926000,10.402000 17.407000,11.030000 17.921000,11.632000 18.189000,11.923000 18.465000,12.207000 19.038000,12.752000 19.640000,13.266000 19.950000,13.511000 20.590000,13.977000 20.919000,14.197000 21.593000,14.611000 22.289000,14.989000 22.643000,15.164000 23.003000,15.330000 23.366000,15.486000 23.734000,15.633000 24.105000,15.770000 24.857000,16.015000 25.622000,16.220000 26.396000,16.385000 26.786000,16.452000 27.177000,16.509000 27.570000,16.555000 27.964000,16.591000 28.359000,16.617000 28.754000,16.633000 29.150000,16.638000 29.150000,19.138000 28.689000,19.132000 28.228000,19.114000 27.768000,19.084000 27.308000,19.041000 26.850000,18.987000 26.394000,18.921000 25.940000,18.843000 25.487000,18.753000 25.037000,18.651000 24.590000,18.537000 24.147000,18.412000 23.706000,18.275000 23.269000,18.126000 22.837000,17.967000 22.409000,17.795000 21.985000,17.613000 21.566000,17.420000 21.153000,17.216000 20.744000,17.001000 20.342000,16.775000 19.946000,16.539000 19.556000,16.293000 19.173000,16.036000 18.796000,15.770000 18.427000,15.494000 18.065000,15.208000 17.711000,14.913000 17.364000,14.608000 17.026000,14.295000 16.696000,13.973000 16.374000,13.642000 16.061000,13.303000 15.758000,12.956000 15.463000,12.601000 15.178000,12.239000 14.902000,11.869000 14.636000,11.492000 14.381000,11.108000 14.135000,10.718000 13.900000,10.321000 13.675000,9.919000 13.461000,9.510000 13.084000,8.814000 12.882000,8.474000 12.452000,7.810000 12.224000,7.486000 11.743000,6.858000 11.490000,6.554000 10.961000,5.965000 10.685000,5.681000 10.112000,5.136000 9.814000,4.875000 9.200000,4.377000 8.560000,3.911000 8.231000,3.691000 7.557000,3.277000 6.861000,2.899000 6.507000,2.724000 6.147000,2.558000 5.784000,2.402000 5.416000,2.255000 5.045000,2.118000 4.293000,1.873000 3.528000,1.668000 2.754000,1.503000 2.364000,1.436000 1.973000,1.379000 1.580000,1.333000 1.186000,1.297000 0.396000,1.255000 0.000000,1.250000 z%22 /><path class=%22layer_2_0%22 d=%22M 0.000000,-0.250000 0.435000,-0.244000 0.870000,-0.227000 1.304000,-0.199000 1.737000,-0.159000 2.169000,-0.108000 2.599000,-0.045000 3.028000,0.029000 3.455000,0.114000 3.879000,0.210000 4.301000,0.317000 4.719000,0.435000 5.135000,0.564000 5.546000,0.704000 5.954000,0.855000 6.358000,1.016000 6.758000,1.188000 7.153000,1.370000 7.543000,1.563000 7.928000,1.766000 8.307000,1.979000 8.681000,2.201000 9.049000,2.434000 9.410000,2.675000 10.114000,3.187000 10.455000,3.457000 10.789000,3.735000 11.116000,4.022000 11.435000,4.318000 11.747000,4.622000 12.050000,4.934000 12.345000,5.253000 12.909000,5.915000 13.178000,6.257000 13.438000,6.606000 13.689000,6.962000 13.930000,7.324000 14.162000,7.692000 14.384000,8.066000 14.596000,8.446000 14.798000,8.831000 14.994000,9.204000 15.200000,9.573000 15.415000,9.936000 15.640000,10.293000 15.874000,10.644000 16.117000,10.988000 16.369000,11.327000 16.899000,11.983000 17.177000,12.301000 17.463000,12.611000 17.757000,12.913000 18.059000,13.208000 18.686000,13.773000 19.010000,14.043000 19.341000,14.304000 19.679000,14.557000 20.023000,14.801000 20.731000,15.261000 21.093000,15.477000 21.461000,15.683000 21.834000,15.880000 22.596000,16.243000 22.983000,16.410000 23.771000,16.713000 24.573000,16.974000 24.979000,17.088000 25.388000,17.192000 25.799000,17.285000 26.213000,17.368000 26.629000,17.439000 27.046000,17.500000 27.465000,17.550000 27.886000,17.588000 28.307000,17.616000 28.728000,17.632000 29.150000,17.638000 29.150000,18.138000 28.715000,18.132000 28.280000,18.115000 27.846000,18.087000 27.413000,18.047000 26.981000,17.996000 26.551000,17.933000 26.122000,17.859000 25.695000,17.774000 25.271000,17.678000 24.850000,17.571000 24.431000,17.453000 24.015000,17.324000 23.604000,17.184000 23.196000,17.033000 22.792000,16.872000 22.392000,16.700000 21.997000,16.518000 21.607000,16.325000 21.222000,16.122000 20.843000,15.909000 20.469000,15.687000 20.101000,15.454000 19.740000,15.213000 19.036000,14.701000 18.695000,14.431000 18.361000,14.153000 18.034000,13.866000 17.715000,13.570000 17.403000,13.266000 17.100000,12.954000 16.805000,12.635000 16.519000,12.307000 16.241000,11.973000 15.972000,11.631000 15.712000,11.282000 15.461000,10.926000 15.220000,10.564000 14.988000,10.196000 14.766000,9.822000 14.554000,9.442000 14.352000,9.057000 14.156000,8.684000 13.950000,8.315000 13.735000,7.952000 13.510000,7.595000 13.276000,7.244000 13.033000,6.900000 12.781000,6.561000 12.251000,5.905000 11.973000,5.588000 11.687000,5.277000 11.393000,4.975000 11.091000,4.680000 10.464000,4.115000 10.140000,3.845000 9.809000,3.584000 9.471000,3.331000 9.127000,3.087000 8.419000,2.627000 8.057000,2.411000 7.689000,2.205000 7.316000,2.008000 6.554000,1.645000 6.167000,1.478000 5.379000,1.175000 4.577000,0.914000 4.171000,0.800000 3.762000,0.696000 3.351000,0.603000 2.937000,0.520000 2.521000,0.449000 2.104000,0.388000 1.685000,0.338000 1.264000,0.300000 0.843000,0.272000 0.422000,0.256000 0.000000,0.250000 z%22 /></g><g id=%22C225%22 data-name=%22as_component__PNGCOJINIPILRSBFUVHAAAKRQR7F7X5DOV45DHY3HPYOUZICQITA%22><path class=%22layer_1_0%22 d=%22M 9.889000,3.500000 0.000000,1.275000 0.000000,-1.275000 9.889000,-3.500000 16.000000,-3.500000 16.000000,3.500000 z%22 /><path class=%22layer_2_0%22 d=%22M 0.000000,-0.250000 10.000000,-2.500000 10.000000,2.500000 0.000000,0.250000 z%22 /><rect class=%22layer_2_0%22 x=%2210.300000%22 y=%22-2.500000%22 width=%220.300000%22 height=%225.000000%22 /><rect class=%22layer_2_0%22 x=%2210.900000%22 y=%22-2.500000%22 width=%220.300000%22 height=%225.000000%22 /><rect class=%22layer_2_0%22 x=%2211.500000%22 y=%22-2.500000%22 width=%220.300000%22 height=%225.000000%22 /><rect class=%22layer_2_0%22 x=%2212.100000%22 y=%22-2.500000%22 width=%220.300000%22 height=%225.000000%22 /><rect class=%22layer_2_0%22 x=%2212.700000%22 y=%22-2.500000%22 width=%220.300000%22 height=%225.000000%22 /><rect class=%22layer_2_0%22 x=%2213.300000%22 y=%22-2.500000%22 width=%220.300000%22 height=%225.000000%22 /><rect class=%22layer_2_0%22 x=%2213.900000%22 y=%22-2.500000%22 width=%220.300000%22 height=%225.000000%22 /><rect class=%22layer_2_0%22 x=%2214.500000%22 y=%22-2.500000%22 width=%220.300000%22 height=%225.000000%22 /><rect class=%22layer_2_0%22 x=%2215.100000%22 y=%22-2.500000%22 width=%220.300000%22 height=%225.000000%22 /><rect class=%22layer_2_0%22 x=%2215.700000%22 y=%22-2.500000%22 width=%220.300000%22 height=%225.000000%22 /></g><g id=%22C226%22 data-name=%22s_bend_l_29P142254961166614_o_46P82343135185405_p_Strip%22><path class=%22layer_1_0%22 d=%22M 0.000000,-1.250000 0.886000,-1.228000 1.329000,-1.199000 1.771000,-1.160000 2.211000,-1.110000 2.650000,-1.048000 3.088000,-0.975000 3.523000,-0.892000 3.956000,-0.797000 4.387000,-0.691000 4.815000,-0.574000 5.239000,-0.447000 5.661000,-0.309000 6.078000,-0.160000 6.492000,-0.001000 6.902000,0.169000 7.307000,0.349000 8.103000,0.740000 8.493000,0.951000 8.878000,1.171000 9.257000,1.401000 9.630000,1.640000 9.997000,1.889000 10.358000,2.147000 10.712000,2.414000 11.059000,2.690000 11.399000,2.975000 11.731000,3.268000 12.056000,3.569000 12.374000,3.879000 12.683000,4.197000 12.984000,4.522000 13.277000,4.855000 13.562000,5.195000 14.104000,5.897000 14.362000,6.258000 14.610000,6.625000 14.849000,6.998000 15.079000,7.378000 15.298000,7.763000 15.508000,8.153000 15.708000,8.549000 15.898000,8.950000 16.078000,9.355000 16.247000,9.765000 16.406000,10.179000 16.555000,10.597000 16.692000,11.018000 16.819000,11.443000 16.936000,11.871000 17.041000,12.301000 17.219000,13.170000 17.291000,13.608000 17.352000,14.047000 17.402000,14.487000 17.441000,14.929000 17.469000,15.372000 17.485000,15.815000 17.490000,16.258000 17.484000,16.701000 17.467000,17.145000 17.438000,17.587000 17.398000,18.029000 17.348000,18.469000 17.285000,18.908000 17.212000,19.345000 17.128000,19.781000 17.033000,20.214000 16.927000,20.644000 16.810000,21.072000 16.682000,21.496000 16.543000,21.918000 16.394000,22.335000 16.234000,22.749000 16.064000,23.158000 15.883000,23.563000 15.693000,23.963000 15.374000,24.654000 15.228000,25.005000 14.964000,25.717000 14.735000,26.442000 14.544000,27.177000 14.462000,27.548000 14.327000,28.296000 14.230000,29.050000 14.172000,29.808000 14.152000,30.567000 14.170000,31.327000 14.227000,32.085000 14.270000,32.463000 14.385000,33.214000 14.537000,33.959000 14.627000,34.328000 14.836000,35.059000 15.081000,35.778000 15.362000,36.484000 15.679000,37.175000 15.850000,37.514000 16.219000,38.179000 16.415000,38.504000 16.833000,39.139000 17.283000,39.751000 17.763000,40.341000 18.272000,40.905000 18.809000,41.442000 19.373000,41.952000 19.961000,42.433000 20.574000,42.883000 21.208000,43.301000 21.863000,43.687000 22.536000,44.039000 23.227000,44.357000 23.933000,44.639000 24.652000,44.885000 25.382000,45.094000 26.123000,45.266000 26.496000,45.338000 27.247000,45.453000 28.003000,45.530000 28.382000,45.554000 29.142000,45.573000 29.142000,48.073000 28.256000,48.051000 27.813000,48.022000 27.371000,47.983000 26.931000,47.933000 26.492000,47.871000 26.054000,47.798000 25.619000,47.715000 25.186000,47.620000 24.755000,47.514000 24.327000,47.397000 23.903000,47.270000 23.481000,47.132000 23.064000,46.983000 22.650000,46.824000 22.240000,46.654000 21.835000,46.474000 21.435000,46.283000 21.039000,46.083000 20.649000,45.873000 20.264000,45.652000 19.885000,45.422000 19.512000,45.183000 19.145000,44.934000 18.784000,44.676000 18.430000,44.409000 18.083000,44.133000 17.743000,43.848000 17.411000,43.555000 17.086000,43.254000 16.768000,42.944000 16.459000,42.626000 16.158000,42.301000 15.865000,41.968000 15.580000,41.628000 15.038000,40.926000 14.780000,40.565000 14.532000,40.198000 14.293000,39.825000 14.063000,39.445000 13.844000,39.060000 13.634000,38.670000 13.434000,38.274000 13.244000,37.873000 13.064000,37.468000 12.895000,37.058000 12.736000,36.644000 12.587000,36.226000 12.450000,35.805000 12.323000,35.380000 12.206000,34.952000 12.101000,34.522000 11.923000,33.653000 11.851000,33.215000 11.790000,32.776000 11.740000,32.336000 11.701000,31.894000 11.673000,31.451000 11.657000,31.008000 11.652000,30.565000 11.658000,30.122000 11.675000,29.679000 11.704000,29.236000 11.744000,28.794000 11.794000,28.354000 11.857000,27.915000 11.930000,27.478000 12.014000,27.042000 12.109000,26.609000 12.215000,26.179000 12.460000,25.327000 12.599000,24.905000 12.748000,24.488000 12.908000,24.074000 13.078000,23.665000 13.259000,23.260000 13.449000,22.860000 13.613000,22.516000 13.914000,21.818000 14.178000,21.106000 14.407000,20.381000 14.507000,20.015000 14.680000,19.275000 14.815000,18.527000 14.912000,17.773000 14.946000,17.394000 14.985000,16.636000 14.986000,15.876000 14.948000,15.116000 14.872000,14.360000 14.819000,13.984000 14.686000,13.236000 14.515000,12.495000 14.415000,12.129000 14.188000,11.403000 13.925000,10.690000 13.626000,9.992000 13.292000,9.309000 13.112000,8.975000 12.727000,8.319000 12.522000,7.999000 12.088000,7.375000 11.623000,6.774000 11.128000,6.197000 10.605000,5.646000 10.055000,5.122000 9.769000,4.871000 9.181000,4.390000 8.568000,3.940000 7.934000,3.522000 7.279000,3.136000 6.606000,2.784000 5.915000,2.466000 5.209000,2.184000 4.490000,1.938000 3.760000,1.729000 3.391000,1.639000 2.646000,1.485000 1.895000,1.370000 1.518000,1.327000 0.760000,1.269000 0.000000,1.250000 z%22 /><path class=%22layer_2_0%22 d=%22M 0.000000,-0.250000 0.418000,-0.245000 0.836000,-0.229000 1.253000,-0.202000 1.669000,-0.165000 2.085000,-0.118000 2.499000,-0.060000 2.911000,0.009000 3.322000,0.088000 3.730000,0.177000 4.136000,0.277000 4.539000,0.387000 4.940000,0.507000 5.731000,0.778000 6.121000,0.928000 6.507000,1.088000 7.267000,1.437000 7.639000,1.626000 8.370000,2.032000 8.728000,2.249000 9.426000,2.709000 10.099000,3.204000 10.427000,3.465000 10.747000,3.733000 11.061000,4.010000 11.367000,4.294000 11.958000,4.885000 12.242000,5.192000 12.518000,5.506000 13.046000,6.154000 13.298000,6.488000 13.775000,7.175000 14.000000,7.527000 14.424000,8.247000 14.622000,8.616000 14.810000,8.989000 14.989000,9.367000 15.159000,9.749000 15.468000,10.525000 15.608000,10.919000 15.738000,11.317000 15.858000,11.717000 16.067000,12.527000 16.156000,12.935000 16.234000,13.346000 16.302000,13.758000 16.360000,14.172000 16.407000,14.588000 16.444000,15.004000 16.470000,15.421000 16.490000,16.257000 16.484000,16.675000 16.468000,17.093000 16.441000,17.510000 16.404000,17.926000 16.356000,18.342000 16.297000,18.756000 16.228000,19.168000 16.149000,19.578000 16.059000,19.987000 15.959000,20.392000 15.728000,21.196000 15.597000,21.593000 15.306000,22.377000 14.975000,23.145000 14.795000,23.522000 14.456000,24.258000 14.300000,24.632000 14.154000,25.011000 13.891000,25.777000 13.774000,26.165000 13.667000,26.556000 13.570000,26.950000 13.483000,27.346000 13.406000,27.744000 13.339000,28.144000 13.282000,28.545000 13.199000,29.352000 13.173000,29.756000 13.157000,30.161000 13.157000,30.972000 13.172000,31.377000 13.197000,31.781000 13.232000,32.185000 13.278000,32.588000 13.334000,32.990000 13.400000,33.390000 13.476000,33.788000 13.659000,34.578000 13.765000,34.969000 13.881000,35.357000 14.007000,35.742000 14.288000,36.503000 14.607000,37.248000 14.964000,37.976000 15.156000,38.333000 15.566000,39.032000 15.785000,39.374000 16.012000,39.709000 16.492000,40.363000 17.003000,40.992000 17.271000,41.296000 17.829000,41.884000 18.417000,42.443000 18.721000,42.711000 19.349000,43.223000 19.672000,43.467000 20.338000,43.931000 20.679000,44.150000 21.025000,44.360000 21.734000,44.754000 22.462000,45.111000 23.207000,45.431000 23.967000,45.712000 24.352000,45.839000 25.131000,46.062000 25.525000,46.159000 26.319000,46.322000 27.121000,46.445000 27.523000,46.491000 27.927000,46.527000 28.737000,46.568000 29.142000,46.573000 29.142000,47.073000 28.724000,47.068000 28.306000,47.052000 27.889000,47.025000 27.473000,46.988000 27.057000,46.941000 26.643000,46.883000 26.231000,46.814000 25.820000,46.735000 25.412000,46.646000 25.006000,46.546000 24.603000,46.436000 24.202000,46.316000 23.805000,46.186000 23.021000,45.895000 22.635000,45.735000 21.875000,45.386000 21.503000,45.197000 20.772000,44.791000 20.414000,44.574000 19.716000,44.114000 19.043000,43.619000 18.715000,43.358000 18.395000,43.090000 18.081000,42.813000 17.775000,42.529000 17.184000,41.938000 16.900000,41.631000 16.624000,41.317000 16.096000,40.669000 15.602000,39.995000 15.367000,39.648000 15.142000,39.296000 14.718000,38.576000 14.520000,38.207000 14.332000,37.834000 14.153000,37.456000 13.983000,37.074000 13.674000,36.298000 13.534000,35.904000 13.404000,35.506000 13.284000,35.106000 13.075000,34.296000 12.986000,33.888000 12.908000,33.477000 12.840000,33.065000 12.782000,32.651000 12.735000,32.235000 12.698000,31.819000 12.672000,31.402000 12.652000,30.566000 12.674000,29.730000 12.701000,29.313000 12.738000,28.897000 12.786000,28.481000 12.845000,28.067000 12.914000,27.655000 12.993000,27.245000 13.083000,26.836000 13.183000,26.431000 13.414000,25.627000 13.545000,25.230000 13.836000,24.446000 14.167000,23.678000 14.347000,23.301000 14.521000,22.935000 14.842000,22.191000 14.988000,21.812000 15.251000,21.046000 15.368000,20.658000 15.475000,20.267000 15.572000,19.873000 15.659000,19.477000 15.736000,19.079000 15.803000,18.679000 15.860000,18.278000 15.943000,17.471000 15.969000,17.067000 15.985000,16.662000 15.985000,15.851000 15.970000,15.446000 15.910000,14.638000 15.864000,14.235000 15.808000,13.833000 15.742000,13.433000 15.666000,13.035000 15.483000,12.245000 15.377000,11.854000 15.261000,11.466000 15.135000,11.081000 14.854000,10.320000 14.535000,9.575000 14.178000,8.847000 13.986000,8.490000 13.576000,7.791000 13.130000,7.114000 12.650000,6.460000 12.139000,5.831000 11.871000,5.527000 11.313000,4.939000 10.725000,4.380000 10.421000,4.112000 9.793000,3.600000 9.470000,3.356000 8.804000,2.892000 8.463000,2.673000 8.117000,2.463000 7.408000,2.069000 6.680000,1.712000 5.935000,1.392000 5.557000,1.247000 4.790000,0.984000 4.011000,0.761000 3.617000,0.664000 2.823000,0.501000 2.021000,0.378000 1.619000,0.332000 1.215000,0.296000 0.405000,0.255000 0.000000,0.250000 z%22 /></g><g id=%22C227%22 data-name=%22as_component__PNGCOJINIPILRSBFUVHAAAKRQR7F7X5DOV45DHY3HPYOUZICQITA%22><path class=%22layer_1_0%22 d=%22M 9.889000,3.500000 0.000000,1.275000 0.000000,-1.275000 9.889000,-3.500000 16.000000,-3.500000 16.000000,3.500000 z%22 /><path class=%22layer_2_0%22 d=%22M 0.000000,-0.250000 10.000000,-2.500000 10.000000,2.500000 0.000000,0.250000 z%22 /><rect class=%22layer_2_0%22 x=%2210.300000%22 y=%22-2.500000%22 width=%220.300000%22 height=%225.000000%22 /><rect class=%22layer_2_0%22 x=%2210.900000%22 y=%22-2.500000%22 width=%220.300000%22 height=%225.000000%22 /><rect class=%22layer_2_0%22 x=%2211.500000%22 y=%22-2.500000%22 width=%220.300000%22 height=%225.000000%22 /><rect class=%22layer_2_0%22 x=%2212.100000%22 y=%22-2.500000%22 width=%220.300000%22 height=%225.000000%22 /><rect class=%22layer_2_0%22 x=%2212.700000%22 y=%22-2.500000%22 width=%220.300000%22 height=%225.000000%22 /><rect class=%22layer_2_0%22 x=%2213.300000%22 y=%22-2.500000%22 width=%220.300000%22 height=%225.000000%22 /><rect class=%22layer_2_0%22 x=%2213.900000%22 y=%22-2.500000%22 width=%220.300000%22 height=%225.000000%22 /><rect class=%22layer_2_0%22 x=%2214.500000%22 y=%22-2.500000%22 width=%220.300000%22 height=%225.000000%22 /><rect class=%22layer_2_0%22 x=%2215.100000%22 y=%22-2.500000%22 width=%220.300000%22 height=%225.000000%22 /><rect class=%22layer_2_0%22 x=%2215.700000%22 y=%22-2.500000%22 width=%220.300000%22 height=%225.000000%22 /></g><g id=%22C228%22 data-name=%22s_bend_l_33P5844604504685_o_38P81628701292334_p_Strip%22><path class=%22layer_1_0%22 d=%22M 0.000000,-1.250000 0.459000,-1.244000 0.919000,-1.227000 1.377000,-1.198000 1.835000,-1.157000 2.291000,-1.105000 2.746000,-1.042000 3.200000,-0.967000 3.651000,-0.880000 4.100000,-0.783000 4.546000,-0.674000 4.990000,-0.553000 5.430000,-0.422000 5.867000,-0.279000 6.300000,-0.126000 6.729000,0.038000 7.154000,0.213000 7.574000,0.399000 7.990000,0.595000 8.400000,0.802000 8.805000,1.019000 9.205000,1.246000 9.598000,1.483000 9.986000,1.730000 10.367000,1.987000 10.741000,2.253000 11.109000,2.529000 11.470000,2.814000 11.823000,3.107000 12.169000,3.410000 12.507000,3.721000 12.837000,4.041000 13.159000,4.369000 13.472000,4.704000 13.777000,5.048000 14.074000,5.399000 14.361000,5.758000 14.639000,6.124000 14.908000,6.496000 15.167000,6.876000 15.417000,7.261000 15.657000,7.653000 15.887000,8.051000 16.107000,8.454000 16.316000,8.863000 16.515000,9.277000 16.704000,9.696000 16.882000,10.120000 17.049000,10.548000 17.206000,10.980000 17.352000,11.416000 17.486000,11.855000 17.609000,12.298000 17.722000,12.743000 17.823000,13.191000 17.912000,13.642000 17.990000,14.095000 18.057000,14.550000 18.112000,15.006000 18.156000,15.463000 18.188000,15.921000 18.209000,16.380000 18.218000,16.840000 18.215000,17.299000 18.201000,17.759000 18.175000,18.217000 18.138000,18.675000 18.089000,19.132000 18.029000,19.588000 17.977000,19.981000 17.935000,20.375000 17.880000,21.166000 17.868000,21.562000 17.866000,21.959000 17.892000,22.751000 17.919000,23.146000 17.957000,23.541000 18.062000,24.327000 18.207000,25.106000 18.294000,25.493000 18.497000,26.259000 18.739000,27.014000 18.874000,27.387000 19.172000,28.122000 19.507000,28.840000 19.877000,29.541000 20.283000,30.223000 20.722000,30.883000 21.194000,31.520000 21.697000,32.132000 21.960000,32.429000 22.509000,33.001000 23.085000,33.546000 23.688000,34.060000 24.000000,34.306000 24.640000,34.773000 24.969000,34.995000 25.303000,35.208000 25.987000,35.608000 26.691000,35.974000 27.049000,36.143000 27.778000,36.454000 28.522000,36.729000 28.899000,36.852000 29.661000,37.069000 30.434000,37.247000 30.823000,37.322000 31.607000,37.441000 32.001000,37.486000 32.791000,37.546000 33.584000,37.566000 33.584000,40.066000 33.125000,40.060000 32.665000,40.043000 32.207000,40.014000 31.749000,39.973000 31.293000,39.921000 30.838000,39.858000 30.384000,39.783000 29.933000,39.696000 29.484000,39.599000 29.038000,39.490000 28.594000,39.369000 28.154000,39.238000 27.717000,39.095000 27.284000,38.942000 26.855000,38.778000 26.430000,38.603000 26.010000,38.417000 25.594000,38.221000 25.184000,38.014000 24.779000,37.797000 24.379000,37.570000 23.986000,37.333000 23.598000,37.086000 23.217000,36.829000 22.843000,36.563000 22.475000,36.287000 22.114000,36.002000 21.761000,35.709000 21.415000,35.406000 21.077000,35.095000 20.747000,34.775000 20.425000,34.447000 20.112000,34.112000 19.807000,33.768000 19.510000,33.417000 19.223000,33.058000 18.945000,32.692000 18.676000,32.320000 18.417000,31.940000 18.167000,31.555000 17.927000,31.163000 17.697000,30.765000 17.477000,30.362000 17.268000,29.953000 17.069000,29.539000 16.880000,29.120000 16.702000,28.696000 16.535000,28.268000 16.378000,27.836000 16.232000,27.400000 16.098000,26.961000 15.975000,26.518000 15.862000,26.073000 15.761000,25.625000 15.672000,25.174000 15.594000,24.721000 15.527000,24.266000 15.472000,23.810000 15.428000,23.353000 15.396000,22.895000 15.375000,22.436000 15.366000,21.976000 15.369000,21.517000 15.383000,21.057000 15.409000,20.599000 15.446000,20.141000 15.495000,19.684000 15.555000,19.228000 15.607000,18.835000 15.649000,18.441000 15.704000,17.650000 15.716000,17.254000 15.718000,16.857000 15.710000,16.461000 15.665000,15.670000 15.627000,15.275000 15.522000,14.489000 15.377000,13.710000 15.290000,13.323000 15.087000,12.557000 14.845000,11.802000 14.710000,11.429000 14.412000,10.694000 14.077000,9.976000 13.707000,9.275000 13.301000,8.593000 12.862000,7.933000 12.390000,7.296000 12.142000,6.987000 11.624000,6.387000 11.075000,5.815000 10.499000,5.270000 9.896000,4.756000 9.584000,4.510000 9.267000,4.273000 8.615000,3.821000 8.281000,3.608000 7.597000,3.208000 6.893000,2.842000 6.535000,2.673000 6.172000,2.513000 5.806000,2.362000 5.062000,2.087000 4.685000,1.964000 3.923000,1.747000 3.537000,1.653000 2.761000,1.494000 1.977000,1.375000 1.583000,1.330000 0.793000,1.270000 0.000000,1.250000 z%22 /><path class=%22layer_2_0%22 d=%22M 0.000000,-0.250000 0.434000,-0.245000 1.302000,-0.201000 2.166000,-0.113000 2.596000,-0.053000 3.024000,0.018000 3.451000,0.099000 3.875000,0.192000 4.297000,0.295000 4.716000,0.408000 5.545000,0.667000 5.954000,0.812000 6.360000,0.968000 6.761000,1.133000 7.159000,1.309000 7.551000,1.494000 7.939000,1.690000 8.322000,1.895000 8.699000,2.109000 9.071000,2.333000 9.798000,2.809000 10.152000,3.061000 10.499000,3.321000 11.174000,3.868000 11.501000,4.154000 11.820000,4.448000 12.132000,4.750000 12.436000,5.060000 12.733000,5.378000 13.021000,5.702000 13.301000,6.034000 13.573000,6.373000 14.090000,7.071000 14.335000,7.430000 14.571000,7.794000 15.015000,8.540000 15.421000,9.308000 15.609000,9.700000 15.787000,10.095000 16.114000,10.900000 16.262000,11.309000 16.399000,11.720000 16.526000,12.136000 16.643000,12.554000 16.749000,12.975000 16.844000,13.399000 16.929000,13.825000 17.003000,14.253000 17.066000,14.682000 17.118000,15.113000 17.159000,15.546000 17.190000,15.979000 17.218000,16.847000 17.202000,17.715000 17.178000,18.149000 17.143000,18.582000 17.039000,19.444000 16.984000,19.862000 16.939000,20.281000 16.905000,20.701000 16.881000,21.122000 16.868000,21.544000 16.866000,21.966000 16.874000,22.387000 16.893000,22.808000 16.923000,23.229000 16.963000,23.649000 17.075000,24.485000 17.147000,24.900000 17.229000,25.314000 17.322000,25.725000 17.424000,26.134000 17.661000,26.943000 17.938000,27.740000 18.255000,28.521000 18.428000,28.905000 18.611000,29.285000 19.005000,30.031000 19.216000,30.396000 19.436000,30.756000 19.904000,31.458000 20.150000,31.799000 20.669000,32.464000 20.941000,32.787000 21.221000,33.102000 21.804000,33.711000 22.417000,34.290000 23.059000,34.837000 23.727000,35.351000 24.421000,35.831000 24.776000,36.058000 25.504000,36.484000 26.252000,36.873000 26.633000,37.053000 27.409000,37.384000 27.803000,37.535000 28.200000,37.675000 28.601000,37.806000 29.005000,37.927000 29.412000,38.037000 29.822000,38.137000 30.234000,38.227000 30.648000,38.306000 31.064000,38.375000 31.481000,38.433000 31.900000,38.481000 32.320000,38.518000 32.741000,38.545000 33.162000,38.561000 33.584000,38.566000 33.584000,39.066000 33.150000,39.061000 32.282000,39.017000 31.418000,38.929000 30.988000,38.869000 30.560000,38.798000 30.133000,38.717000 29.709000,38.624000 29.287000,38.521000 28.868000,38.408000 28.039000,38.149000 27.630000,38.004000 27.224000,37.848000 26.823000,37.683000 26.425000,37.507000 26.033000,37.322000 25.645000,37.127000 24.885000,36.707000 24.513000,36.483000 23.786000,36.007000 23.432000,35.755000 23.085000,35.495000 22.744000,35.226000 22.410000,34.948000 22.083000,34.662000 21.764000,34.368000 21.452000,34.066000 21.148000,33.756000 20.851000,33.438000 20.563000,33.114000 20.283000,32.782000 20.011000,32.443000 19.494000,31.745000 19.249000,31.386000 19.013000,31.022000 18.569000,30.276000 18.163000,29.508000 17.975000,29.116000 17.797000,28.721000 17.470000,27.916000 17.322000,27.507000 17.185000,27.096000 17.058000,26.680000 16.941000,26.262000 16.835000,25.841000 16.740000,25.417000 16.655000,24.991000 16.581000,24.563000 16.518000,24.134000 16.466000,23.703000 16.425000,23.270000 16.394000,22.837000 16.366000,21.969000 16.382000,21.101000 16.406000,20.667000 16.441000,20.234000 16.488000,19.803000 16.545000,19.372000 16.600000,18.954000 16.645000,18.535000 16.679000,18.115000 16.703000,17.694000 16.716000,17.272000 16.718000,16.850000 16.710000,16.429000 16.691000,16.008000 16.661000,15.587000 16.621000,15.167000 16.570000,14.749000 16.509000,14.332000 16.437000,13.916000 16.355000,13.502000 16.263000,13.091000 16.160000,12.682000 15.923000,11.873000 15.646000,11.076000 15.329000,10.295000 15.156000,9.911000 14.973000,9.531000 14.579000,8.785000 14.368000,8.420000 14.148000,8.060000 13.680000,7.358000 13.434000,7.017000 12.915000,6.352000 12.643000,6.029000 12.363000,5.714000 11.780000,5.105000 11.167000,4.526000 10.525000,3.979000 9.857000,3.465000 9.163000,2.985000 8.808000,2.758000 8.080000,2.332000 7.332000,1.943000 6.951000,1.763000 6.175000,1.432000 5.781000,1.281000 4.983000,1.010000 4.579000,0.889000 4.172000,0.779000 3.762000,0.679000 3.350000,0.589000 2.936000,0.510000 2.520000,0.441000 2.103000,0.383000 1.684000,0.335000 1.264000,0.298000 0.843000,0.271000 0.422000,0.255000 0.000000,0.250000 z%22 /></g><g id=%22C229%22 data-name=%22as_component__PNGCOJINIPILRSBFUVHAAAKRQR7F7X5DOV45DHY3HPYOUZICQITA%22><path class=%22layer_1_0%22 d=%22M 9.889000,3.500000 0.000000,1.275000 0.000000,-1.275000 9.889000,-3.500000 16.000000,-3.500000 16.000000,3.500000 z%22 /><path class=%22layer_2_0%22 d=%22M 0.000000,-0.250000 10.000000,-2.500000 10.000000,2.500000 0.000000,0.250000 z%22 /><rect class=%22layer_2_0%22 x=%2210.300000%22 y=%22-2.500000%22 width=%220.300000%22 height=%225.000000%22 /><rect class=%22layer_2_0%22 x=%2210.900000%22 y=%22-2.500000%22 width=%220.300000%22 height=%225.000000%22 /><rect class=%22layer_2_0%22 x=%2211.500000%22 y=%22-2.500000%22 width=%220.300000%22 height=%225.000000%22 /><rect class=%22layer_2_0%22 x=%2212.100000%22 y=%22-2.500000%22 width=%220.300000%22 height=%225.000000%22 /><rect class=%22layer_2_0%22 x=%2212.700000%22 y=%22-2.500000%22 width=%220.300000%22 height=%225.000000%22 /><rect class=%22layer_2_0%22 x=%2213.300000%22 y=%22-2.500000%22 width=%220.300000%22 height=%225.000000%22 /><rect class=%22layer_2_0%22 x=%2213.900000%22 y=%22-2.500000%22 width=%220.300000%22 height=%225.000000%22 /><rect class=%22layer_2_0%22 x=%2214.500000%22 y=%22-2.500000%22 width=%220.300000%22 height=%225.000000%22 /><rect class=%22layer_2_0%22 x=%2215.100000%22 y=%22-2.500000%22 width=%220.300000%22 height=%225.000000%22 /><rect class=%22layer_2_0%22 x=%2215.700000%22 y=%22-2.500000%22 width=%220.300000%22 height=%225.000000%22 /></g><g id=%22C230%22 data-name=%22s_bend_l_33P09879262227115_o_12P506163106255746_p_Strip%22><path class=%22layer_1_0%22 d=%22M 0.000000,-1.250000 0.558000,-1.244000 1.116000,-1.226000 1.674000,-1.197000 2.231000,-1.155000 2.787000,-1.102000 3.341000,-1.037000 3.894000,-0.960000 4.446000,-0.871000 4.995000,-0.771000 5.542000,-0.659000 6.087000,-0.535000 6.628000,-0.400000 7.167000,-0.254000 7.703000,-0.096000 8.235000,0.074000 8.763000,0.254000 9.288000,0.446000 9.808000,0.649000 10.324000,0.863000 10.835000,1.088000 11.341000,1.323000 11.842000,1.570000 12.338000,1.827000 12.828000,2.094000 13.312000,2.372000 13.791000,2.660000 14.263000,2.958000 14.729000,3.266000 15.188000,3.584000 15.640000,3.911000 16.085000,4.248000 16.523000,4.595000 16.953000,4.951000 17.376000,5.315000 18.148000,5.967000 18.544000,6.281000 18.947000,6.586000 19.356000,6.882000 19.772000,7.170000 20.193000,7.449000 21.053000,7.979000 21.935000,8.472000 22.384000,8.705000 22.837000,8.928000 23.295000,9.141000 24.224000,9.538000 25.170000,9.895000 26.129000,10.212000 27.101000,10.487000 27.592000,10.609000 28.084000,10.721000 28.579000,10.822000 29.076000,10.913000 29.575000,10.993000 30.076000,11.063000 30.577000,11.122000 31.080000,11.170000 31.584000,11.208000 32.089000,11.235000 32.594000,11.251000 33.099000,11.256000 33.099000,13.756000 32.541000,13.750000 31.983000,13.732000 31.425000,13.703000 30.868000,13.661000 30.312000,13.608000 29.758000,13.543000 29.205000,13.466000 28.653000,13.377000 28.104000,13.277000 27.557000,13.165000 27.012000,13.041000 26.471000,12.906000 25.932000,12.760000 25.396000,12.602000 24.864000,12.432000 24.336000,12.252000 23.811000,12.060000 23.291000,11.857000 22.775000,11.643000 22.264000,11.418000 21.758000,11.183000 21.257000,10.936000 20.761000,10.679000 20.271000,10.412000 19.787000,10.134000 19.308000,9.846000 18.836000,9.548000 18.370000,9.240000 17.911000,8.922000 17.459000,8.595000 17.014000,8.258000 16.576000,7.911000 16.146000,7.555000 15.723000,7.191000 15.340000,6.861000 14.951000,6.539000 14.555000,6.225000 14.152000,5.920000 13.743000,5.624000 13.327000,5.336000 12.906000,5.057000 12.046000,4.527000 11.164000,4.034000 10.715000,3.801000 10.262000,3.578000 9.804000,3.365000 8.875000,2.968000 7.929000,2.611000 6.970000,2.294000 5.998000,2.019000 5.015000,1.785000 4.520000,1.684000 4.023000,1.593000 3.524000,1.513000 3.023000,1.443000 2.522000,1.384000 2.019000,1.336000 1.515000,1.298000 1.010000,1.271000 0.505000,1.255000 0.000000,1.250000 z%22 /><path class=%22layer_2_0%22 d=%22M 0.000000,-0.250000 0.537000,-0.244000 1.074000,-0.227000 1.610000,-0.199000 2.146000,-0.159000 2.681000,-0.107000 3.214000,-0.045000 3.746000,0.029000 4.276000,0.114000 4.805000,0.211000 5.331000,0.319000 5.855000,0.437000 6.376000,0.567000 6.894000,0.708000 7.410000,0.860000 7.921000,1.023000 8.430000,1.197000 8.934000,1.382000 9.434000,1.577000 9.931000,1.782000 10.422000,1.999000 10.909000,2.225000 11.391000,2.462000 11.868000,2.709000 12.340000,2.967000 12.806000,3.234000 13.266000,3.511000 13.720000,3.798000 14.168000,4.094000 14.610000,4.400000 15.045000,4.715000 15.473000,5.039000 15.894000,5.372000 16.715000,6.065000 17.113000,6.409000 17.519000,6.745000 17.932000,7.072000 18.778000,7.698000 19.211000,7.998000 19.650000,8.288000 20.096000,8.569000 20.547000,8.841000 21.003000,9.103000 21.466000,9.355000 21.933000,9.597000 22.406000,9.830000 22.883000,10.052000 23.365000,10.264000 23.851000,10.465000 24.342000,10.657000 24.836000,10.838000 25.334000,11.008000 25.836000,11.168000 26.341000,11.317000 26.849000,11.455000 27.360000,11.582000 27.873000,11.699000 28.389000,11.804000 28.907000,11.899000 29.427000,11.982000 29.948000,12.055000 30.471000,12.116000 30.995000,12.167000 31.521000,12.206000 32.046000,12.234000 33.099000,12.256000 33.099000,12.756000 32.562000,12.750000 32.025000,12.733000 31.489000,12.705000 30.953000,12.665000 30.418000,12.613000 29.885000,12.551000 29.353000,12.477000 28.823000,12.392000 28.294000,12.295000 27.768000,12.187000 27.244000,12.069000 26.723000,11.939000 26.205000,11.798000 25.689000,11.646000 25.178000,11.483000 24.669000,11.309000 24.165000,11.124000 23.665000,10.929000 23.168000,10.724000 22.190000,10.281000 21.708000,10.044000 21.231000,9.797000 20.759000,9.539000 20.293000,9.272000 19.833000,8.995000 19.379000,8.708000 18.931000,8.412000 18.489000,8.106000 18.054000,7.791000 17.626000,7.467000 17.205000,7.134000 16.384000,6.441000 15.986000,6.097000 15.580000,5.761000 15.167000,5.435000 14.747000,5.117000 14.321000,4.808000 13.888000,4.508000 13.449000,4.218000 13.003000,3.937000 12.552000,3.665000 12.096000,3.403000 11.633000,3.151000 11.166000,2.909000 10.693000,2.676000 10.216000,2.454000 9.734000,2.242000 9.248000,2.041000 8.757000,1.849000 8.263000,1.668000 7.765000,1.498000 7.263000,1.338000 6.758000,1.189000 6.250000,1.051000 5.739000,0.924000 5.226000,0.807000 4.710000,0.702000 4.192000,0.607000 3.672000,0.524000 3.151000,0.451000 2.628000,0.390000 2.104000,0.339000 1.578000,0.300000 1.053000,0.272000 0.526000,0.256000 0.000000,0.250000 z%22 /></g><g id=%22C231%22 data-name=%22as_component__PNGCOJINIPILRSBFUVHAAAKRQR7F7X5DOV45DHY3HPYOUZICQITA%22><path class=%22layer_1_0%22 d=%22M 9.889000,3.500000 0.000000,1.275000 0.000000,-1.275000 9.889000,-3.500000 16.000000,-3.500000 16.000000,3.500000 z%22 /><path class=%22layer_2_0%22 d=%22M 0.000000,-0.250000 10.000000,-2.500000 10.000000,2.500000 0.000000,0.250000 z%22 /><rect class=%22layer_2_0%22 x=%2210.300000%22 y=%22-2.500000%22 width=%220.300000%22 height=%225.000000%22 /><rect class=%22layer_2_0%22 x=%2210.900000%22 y=%22-2.500000%22 width=%220.300000%22 height=%225.000000%22 /><rect class=%22layer_2_0%22 x=%2211.500000%22 y=%22-2.500000%22 width=%220.300000%22 height=%225.000000%22 /><rect class=%22layer_2_0%22 x=%2212.100000%22 y=%22-2.500000%22 width=%220.300000%22 height=%225.000000%22 /><rect class=%22layer_2_0%22 x=%2212.700000%22 y=%22-2.500000%22 width=%220.300000%22 height=%225.000000%22 /><rect class=%22layer_2_0%22 x=%2213.300000%22 y=%22-2.500000%22 width=%220.300000%22 height=%225.000000%22 /><rect class=%22layer_2_0%22 x=%2213.900000%22 y=%22-2.500000%22 width=%220.300000%22 height=%225.000000%22 /><rect class=%22layer_2_0%22 x=%2214.500000%22 y=%22-2.500000%22 width=%220.300000%22 height=%225.000000%22 /><rect class=%22layer_2_0%22 x=%2215.100000%22 y=%22-2.500000%22 width=%220.300000%22 height=%225.000000%22 /><rect class=%22layer_2_0%22 x=%2215.700000%22 y=%22-2.500000%22 width=%220.300000%22 height=%225.000000%22 /></g><g id=%22C232%22 data-name=%22s_bend_l_32P90441283911336_o_33P75110368234118_p_Strip%22><path class=%22layer_1_0%22 d=%22M 0.000000,-1.250000 0.456000,-1.244000 0.911000,-1.227000 1.366000,-1.197000 1.820000,-1.156000 2.273000,-1.103000 2.724000,-1.039000 3.174000,-0.963000 3.621000,-0.876000 4.066000,-0.777000 4.509000,-0.666000 4.948000,-0.545000 5.384000,-0.412000 5.816000,-0.267000 6.245000,-0.112000 6.670000,0.054000 7.090000,0.231000 7.505000,0.419000 7.915000,0.618000 8.320000,0.827000 8.720000,1.046000 9.114000,1.276000 9.502000,1.515000 9.883000,1.765000 10.258000,2.024000 10.626000,2.293000 10.987000,2.571000 11.341000,2.859000 11.687000,3.155000 12.026000,3.460000 12.357000,3.774000 12.679000,4.096000 12.993000,4.427000 13.298000,4.765000 13.595000,5.112000 13.883000,5.465000 14.161000,5.826000 14.430000,6.194000 14.689000,6.569000 14.939000,6.951000 15.179000,7.338000 15.408000,7.732000 15.628000,8.132000 15.837000,8.537000 16.036000,8.947000 16.224000,9.362000 16.401000,9.782000 16.567000,10.207000 16.723000,10.635000 16.867000,11.068000 17.000000,11.504000 17.122000,11.943000 17.233000,12.385000 17.332000,12.830000 17.419000,13.278000 17.496000,13.727000 17.560000,14.178000 17.613000,14.631000 17.654000,15.085000 17.684000,15.540000 17.701000,15.996000 17.707000,16.451000 17.702000,16.907000 17.702000,17.690000 17.742000,18.472000 17.823000,19.251000 17.944000,20.024000 18.019000,20.409000 18.104000,20.791000 18.199000,21.171000 18.418000,21.922000 18.542000,22.294000 18.819000,23.026000 19.132000,23.744000 19.482000,24.444000 19.868000,25.125000 20.074000,25.458000 20.511000,26.108000 20.981000,26.734000 21.228000,27.038000 21.745000,27.626000 22.292000,28.186000 22.576000,28.456000 23.164000,28.973000 23.778000,29.458000 24.416000,29.912000 25.077000,30.332000 25.758000,30.718000 26.459000,31.068000 26.815000,31.229000 27.541000,31.524000 28.280000,31.781000 29.032000,32.000000 29.412000,32.095000 29.794000,32.180000 30.178000,32.255000 30.564000,32.320000 30.952000,32.375000 31.731000,32.456000 32.121000,32.481000 32.904000,32.501000 32.904000,35.001000 32.448000,34.995000 31.993000,34.978000 31.538000,34.948000 31.084000,34.907000 30.631000,34.854000 30.180000,34.790000 29.730000,34.714000 29.283000,34.627000 28.838000,34.528000 28.395000,34.417000 27.956000,34.296000 27.520000,34.163000 27.088000,34.018000 26.659000,33.863000 26.235000,33.697000 25.814000,33.520000 25.399000,33.332000 24.989000,33.133000 24.584000,32.924000 24.184000,32.705000 23.790000,32.475000 23.402000,32.236000 23.021000,31.986000 22.646000,31.727000 22.278000,31.458000 21.917000,31.180000 21.563000,30.892000 21.217000,30.596000 20.878000,30.291000 20.547000,29.977000 20.225000,29.655000 19.911000,29.324000 19.606000,28.986000 19.309000,28.639000 19.021000,28.286000 18.743000,27.925000 18.474000,27.557000 18.215000,27.182000 17.965000,26.800000 17.725000,26.413000 17.496000,26.019000 17.276000,25.619000 17.067000,25.214000 16.868000,24.804000 16.680000,24.389000 16.503000,23.969000 16.337000,23.544000 16.181000,23.116000 16.037000,22.683000 15.904000,22.247000 15.782000,21.808000 15.671000,21.366000 15.572000,20.921000 15.485000,20.473000 15.408000,20.024000 15.344000,19.573000 15.291000,19.120000 15.250000,18.666000 15.220000,18.211000 15.203000,17.755000 15.197000,17.300000 15.202000,16.844000 15.202000,16.061000 15.162000,15.279000 15.081000,14.500000 14.960000,13.727000 14.885000,13.342000 14.800000,12.960000 14.705000,12.580000 14.486000,11.829000 14.362000,11.457000 14.228000,11.089000 14.085000,10.725000 13.772000,10.007000 13.422000,9.307000 13.036000,8.626000 12.830000,8.293000 12.393000,7.643000 12.162000,7.327000 11.676000,6.713000 11.159000,6.125000 10.889000,5.842000 10.328000,5.295000 9.740000,4.778000 9.126000,4.293000 8.488000,3.839000 7.827000,3.419000 7.146000,3.033000 6.445000,2.683000 6.089000,2.522000 5.363000,2.227000 4.624000,1.970000 3.872000,1.751000 3.492000,1.656000 3.110000,1.571000 2.726000,1.496000 2.340000,1.431000 1.952000,1.376000 1.173000,1.295000 0.783000,1.270000 0.000000,1.250000 z%22 /><path class=%22layer_2_0%22 d=%22M 0.000000,-0.250000 0.430000,-0.244000 0.860000,-0.228000 1.289000,-0.200000 1.718000,-0.161000 2.145000,-0.112000 2.571000,-0.051000 2.995000,0.021000 3.417000,0.103000 3.837000,0.196000 4.254000,0.301000 4.668000,0.416000 5.080000,0.541000 5.488000,0.677000 6.293000,0.980000 7.081000,1.325000 7.468000,1.512000 7.851000,1.709000 8.228000,1.916000 8.599000,2.133000 8.965000,2.359000 9.325000,2.594000 9.679000,2.839000 10.367000,3.355000 10.701000,3.627000 11.027000,3.906000 11.347000,4.194000 11.659000,4.490000 12.259000,5.106000 12.827000,5.752000 13.099000,6.086000 13.361000,6.427000 13.615000,6.774000 13.860000,7.128000 14.322000,7.853000 14.538000,8.225000 14.745000,8.602000 14.943000,8.984000 15.130000,9.371000 15.308000,9.763000 15.475000,10.159000 15.632000,10.560000 15.915000,11.372000 16.040000,11.783000 16.155000,12.198000 16.260000,12.615000 16.353000,13.035000 16.436000,13.457000 16.508000,13.881000 16.568000,14.307000 16.618000,14.734000 16.657000,15.163000 16.685000,15.592000 16.702000,16.022000 16.702000,16.882000 16.702000,17.716000 16.718000,18.133000 16.745000,18.550000 16.831000,19.380000 16.960000,20.204000 17.040000,20.614000 17.131000,21.021000 17.232000,21.426000 17.344000,21.828000 17.466000,22.227000 17.598000,22.622000 17.740000,23.015000 17.892000,23.403000 18.055000,23.788000 18.227000,24.168000 18.408000,24.543000 18.600000,24.914000 18.801000,25.280000 19.011000,25.640000 19.459000,26.344000 19.696000,26.687000 20.197000,27.355000 20.732000,27.995000 21.012000,28.305000 21.299000,28.607000 21.594000,28.902000 21.897000,29.190000 22.207000,29.469000 22.847000,30.004000 23.515000,30.504000 23.858000,30.742000 24.207000,30.970000 24.923000,31.400000 25.659000,31.792000 26.415000,32.145000 26.799000,32.307000 27.188000,32.460000 27.580000,32.602000 27.976000,32.734000 28.777000,32.967000 29.182000,33.068000 29.999000,33.239000 30.410000,33.308000 30.823000,33.367000 31.653000,33.453000 32.070000,33.480000 32.487000,33.496000 32.904000,33.501000 32.904000,34.001000 32.044000,33.979000 31.615000,33.951000 30.759000,33.863000 30.333000,33.802000 29.909000,33.730000 29.487000,33.648000 29.067000,33.555000 28.650000,33.450000 28.236000,33.335000 27.824000,33.210000 27.416000,33.074000 26.611000,32.771000 25.823000,32.426000 25.436000,32.239000 25.053000,32.042000 24.676000,31.835000 24.305000,31.618000 23.939000,31.392000 23.579000,31.157000 23.225000,30.912000 22.537000,30.396000 22.203000,30.124000 21.877000,29.845000 21.557000,29.557000 21.245000,29.261000 20.645000,28.645000 20.357000,28.325000 20.077000,27.999000 19.805000,27.665000 19.289000,26.977000 19.044000,26.623000 18.582000,25.898000 18.366000,25.526000 18.159000,25.149000 17.961000,24.767000 17.774000,24.380000 17.596000,23.988000 17.429000,23.592000 17.272000,23.191000 16.989000,22.379000 16.864000,21.968000 16.749000,21.553000 16.644000,21.136000 16.551000,20.716000 16.468000,20.294000 16.396000,19.870000 16.336000,19.444000 16.286000,19.017000 16.247000,18.588000 16.219000,18.159000 16.202000,17.729000 16.202000,16.869000 16.202000,16.035000 16.186000,15.618000 16.159000,15.201000 16.073000,14.371000 16.014000,13.958000 15.944000,13.547000 15.864000,13.138000 15.773000,12.730000 15.672000,12.325000 15.560000,11.923000 15.438000,11.524000 15.306000,11.129000 15.164000,10.736000 15.012000,10.348000 14.849000,9.963000 14.677000,9.583000 14.496000,9.208000 14.304000,8.837000 14.103000,8.471000 13.893000,8.111000 13.445000,7.407000 13.208000,7.064000 12.707000,6.396000 12.172000,5.756000 11.892000,5.446000 11.605000,5.144000 11.310000,4.849000 11.007000,4.561000 10.697000,4.282000 10.057000,3.747000 9.726000,3.493000 9.046000,3.009000 8.697000,2.781000 7.981000,2.351000 7.245000,1.959000 6.869000,1.778000 6.489000,1.606000 6.105000,1.444000 5.716000,1.291000 5.324000,1.149000 4.928000,1.017000 4.127000,0.784000 3.722000,0.683000 2.905000,0.512000 2.494000,0.443000 2.081000,0.384000 1.251000,0.298000 0.834000,0.271000 0.417000,0.255000 0.000000,0.250000 z%22 /></g><g id=%22C233%22 data-name=%22as_component__PNGCOJINIPILRSBFUVHAAAKRQR7F7X5DOV45DHY3HPYOUZICQITA%22><path class=%22layer_1_0%22 d=%22M 9.889000,3.500000 0.000000,1.275000 0.000000,-1.275000 9.889000,-3.500000 16.000000,-3.500000 16.000000,3.500000 z%22 /><path class=%22layer_2_0%22 d=%22M 0.000000,-0.250000 10.000000,-2.500000 10.000000,2.500000 0.000000,0.250000 z%22 /><rect class=%22layer_2_0%22 x=%2210.300000%22 y=%22-2.500000%22 width=%220.300000%22 height=%225.000000%22 /><rect class=%22layer_2_0%22 x=%2210.900000%22 y=%22-2.500000%22 width=%220.300000%22 height=%225.000000%22 /><rect class=%22layer_2_0%22 x=%2211.500000%22 y=%22-2.500000%22 width=%220.300000%22 height=%225.000000%22 /><rect class=%22layer_2_0%22 x=%2212.100000%22 y=%22-2.500000%22 width=%220.300000%22 height=%225.000000%22 /><rect class=%22layer_2_0%22 x=%2212.700000%22 y=%22-2.500000%22 width=%220.300000%22 height=%225.000000%22 /><rect class=%22layer_2_0%22 x=%2213.300000%22 y=%22-2.500000%22 width=%220.300000%22 height=%225.000000%22 /><rect class=%22layer_2_0%22 x=%2213.900000%22 y=%22-2.500000%22 width=%220.300000%22 height=%225.000000%22 /><rect class=%22layer_2_0%22 x=%2214.500000%22 y=%22-2.500000%22 width=%220.300000%22 height=%225.000000%22 /><rect class=%22layer_2_0%22 x=%2215.100000%22 y=%22-2.500000%22 width=%220.300000%22 height=%225.000000%22 /><rect class=%22layer_2_0%22 x=%2215.700000%22 y=%22-2.500000%22 width=%220.300000%22 height=%225.000000%22 /></g><g id=%22C234%22 data-name=%22s_bend_l_32P78462528647653_o_29P259641082623176_p_Strip%22><path class=%22layer_1_0%22 d=%22M 0.000000,-1.250000 0.446000,-1.244000 0.892000,-1.228000 1.337000,-1.200000 1.781000,-1.160000 2.224000,-1.110000 2.666000,-1.049000 3.106000,-0.976000 3.544000,-0.893000 4.413000,-0.693000 4.843000,-0.576000 5.271000,-0.449000 5.695000,-0.312000 6.115000,-0.163000 6.532000,-0.004000 6.945000,0.165000 7.353000,0.345000 7.756000,0.534000 8.155000,0.734000 8.548000,0.944000 8.936000,1.164000 9.319000,1.393000 9.695000,1.632000 10.066000,1.880000 10.430000,2.138000 10.787000,2.404000 11.138000,2.680000 11.482000,2.964000 11.818000,3.257000 12.147000,3.558000 12.468000,3.867000 12.782000,4.184000 13.087000,4.509000 13.384000,4.842000 13.673000,5.182000 13.953000,5.529000 14.224000,5.883000 14.486000,6.244000 14.739000,6.611000 14.983000,6.984000 15.217000,7.364000 15.442000,7.749000 15.657000,8.140000 15.862000,8.536000 16.057000,8.937000 16.242000,9.342000 16.417000,9.753000 16.581000,10.167000 16.735000,10.586000 16.878000,11.008000 17.011000,11.434000 17.133000,11.863000 17.244000,12.295000 17.344000,12.729000 17.433000,13.166000 17.511000,13.605000 17.578000,14.046000 17.634000,14.488000 17.740000,15.247000 17.884000,16.000000 17.970000,16.373000 18.170000,17.113000 18.407000,17.841000 18.681000,18.557000 18.831000,18.910000 19.157000,19.603000 19.518000,20.279000 19.912000,20.936000 20.339000,21.572000 20.798000,22.186000 21.286000,22.776000 21.541000,23.062000 22.073000,23.614000 22.632000,24.138000 23.216000,24.634000 23.824000,25.099000 24.137000,25.321000 24.779000,25.739000 25.441000,26.125000 26.121000,26.477000 26.819000,26.794000 27.173000,26.940000 27.892000,27.204000 28.624000,27.431000 29.366000,27.622000 30.117000,27.775000 30.874000,27.890000 31.637000,27.967000 32.019000,27.991000 32.785000,28.010000 32.785000,30.510000 31.893000,30.488000 31.448000,30.460000 31.004000,30.420000 30.561000,30.370000 30.119000,30.309000 29.679000,30.236000 29.241000,30.153000 28.372000,29.953000 27.942000,29.836000 27.514000,29.709000 27.090000,29.572000 26.670000,29.423000 26.253000,29.264000 25.840000,29.095000 25.432000,28.915000 25.029000,28.726000 24.630000,28.526000 24.237000,28.316000 23.849000,28.096000 23.466000,27.867000 23.090000,27.628000 22.719000,27.380000 22.355000,27.122000 21.998000,26.856000 21.647000,26.580000 21.303000,26.296000 20.967000,26.003000 20.638000,25.702000 20.317000,25.393000 20.003000,25.076000 19.698000,24.751000 19.401000,24.418000 19.112000,24.078000 18.832000,23.731000 18.561000,23.377000 18.299000,23.016000 18.046000,22.649000 17.802000,22.276000 17.568000,21.896000 17.343000,21.511000 17.128000,21.120000 16.923000,20.724000 16.728000,20.323000 16.543000,19.918000 16.368000,19.507000 16.204000,19.093000 16.050000,18.674000 15.907000,18.252000 15.774000,17.826000 15.652000,17.397000 15.541000,16.965000 15.441000,16.531000 15.352000,16.094000 15.274000,15.655000 15.207000,15.214000 15.151000,14.772000 15.045000,14.013000 14.901000,13.260000 14.815000,12.887000 14.615000,12.147000 14.378000,11.419000 14.245000,11.059000 13.954000,10.350000 13.628000,9.657000 13.267000,8.981000 12.873000,8.324000 12.446000,7.688000 12.220000,7.378000 11.747000,6.776000 11.244000,6.198000 10.712000,5.646000 10.436000,5.381000 9.864000,4.870000 9.268000,4.390000 8.648000,3.939000 8.006000,3.521000 7.344000,3.135000 6.664000,2.783000 6.317000,2.620000 5.612000,2.320000 4.893000,2.056000 4.161000,1.829000 3.419000,1.638000 2.668000,1.485000 1.911000,1.370000 1.530000,1.327000 0.766000,1.269000 0.000000,1.250000 z%22 /><path class=%22layer_2_0%22 d=%22M 0.000000,-0.250000 0.421000,-0.245000 0.841000,-0.229000 1.261000,-0.202000 1.680000,-0.165000 2.099000,-0.118000 2.515000,-0.060000 2.931000,0.008000 3.344000,0.087000 3.755000,0.176000 4.164000,0.276000 4.570000,0.386000 4.974000,0.506000 5.374000,0.636000 5.771000,0.776000 6.164000,0.926000 6.553000,1.085000 6.938000,1.255000 7.319000,1.434000 8.067000,1.821000 8.433000,2.028000 8.794000,2.244000 9.499000,2.704000 9.842000,2.947000 10.511000,3.458000 11.152000,4.003000 11.463000,4.287000 12.062000,4.878000 12.350000,5.185000 12.630000,5.499000 12.902000,5.819000 13.167000,6.147000 13.423000,6.481000 13.670000,6.821000 13.909000,7.168000 14.139000,7.520000 14.360000,7.878000 14.572000,8.242000 14.775000,8.611000 14.968000,8.984000 15.327000,9.746000 15.492000,10.133000 15.647000,10.524000 15.792000,10.919000 15.927000,11.317000 16.052000,11.719000 16.167000,12.124000 16.272000,12.532000 16.367000,12.942000 16.451000,13.354000 16.525000,13.768000 16.588000,14.184000 16.641000,14.602000 16.692000,15.007000 16.825000,15.812000 16.907000,16.212000 17.100000,17.005000 17.333000,17.788000 17.605000,18.558000 17.916000,19.313000 18.085000,19.684000 18.451000,20.414000 18.648000,20.772000 19.068000,21.472000 19.291000,21.814000 19.763000,22.480000 20.011000,22.804000 20.532000,23.433000 21.083000,24.035000 21.370000,24.325000 21.966000,24.884000 22.274000,25.152000 22.588000,25.412000 22.909000,25.664000 23.570000,26.144000 23.909000,26.371000 24.254000,26.590000 24.604000,26.800000 24.959000,27.001000 25.319000,27.193000 25.684000,27.376000 26.427000,27.715000 26.805000,27.870000 27.572000,28.151000 27.960000,28.277000 28.745000,28.500000 29.541000,28.683000 30.345000,28.826000 30.749000,28.882000 31.561000,28.964000 32.377000,29.005000 32.785000,29.010000 32.785000,29.510000 32.364000,29.505000 31.944000,29.489000 31.524000,29.462000 31.105000,29.425000 30.686000,29.378000 29.854000,29.252000 29.441000,29.173000 29.030000,29.084000 28.621000,28.984000 28.215000,28.874000 27.811000,28.754000 27.411000,28.624000 26.621000,28.335000 26.232000,28.175000 25.847000,28.005000 25.466000,27.826000 24.718000,27.439000 24.352000,27.232000 23.991000,27.016000 23.286000,26.556000 22.943000,26.313000 22.274000,25.802000 21.950000,25.533000 21.322000,24.973000 20.723000,24.382000 20.435000,24.075000 19.883000,23.441000 19.618000,23.113000 19.362000,22.779000 19.115000,22.439000 18.876000,22.092000 18.646000,21.740000 18.425000,21.382000 18.213000,21.018000 18.010000,20.649000 17.817000,20.276000 17.633000,19.897000 17.458000,19.514000 17.293000,19.127000 17.138000,18.736000 16.993000,18.341000 16.858000,17.943000 16.733000,17.541000 16.618000,17.136000 16.513000,16.728000 16.418000,16.318000 16.334000,15.906000 16.260000,15.492000 16.197000,15.076000 16.144000,14.658000 16.093000,14.253000 15.960000,13.448000 15.878000,13.048000 15.685000,12.255000 15.452000,11.472000 15.180000,10.702000 14.869000,9.947000 14.700000,9.576000 14.334000,8.846000 14.137000,8.488000 13.717000,7.788000 13.494000,7.446000 13.262000,7.110000 12.774000,6.456000 12.253000,5.827000 11.702000,5.225000 11.415000,4.935000 10.819000,4.376000 10.197000,3.848000 9.876000,3.596000 9.215000,3.116000 8.531000,2.670000 8.181000,2.460000 7.826000,2.259000 7.466000,2.067000 7.101000,1.884000 6.358000,1.545000 5.980000,1.390000 5.214000,1.109000 4.825000,0.983000 4.040000,0.760000 3.244000,0.577000 2.440000,0.434000 2.036000,0.378000 1.224000,0.296000 0.408000,0.255000 0.000000,0.250000 z%22 /></g><g id=%22C235%22 data-name=%22as_component__PNGCOJINIPILRSBFUVHAAAKRQR7F7X5DOV45DHY3HPYOUZICQITA%22><path class=%22layer_1_0%22 d=%22M 9.889000,3.500000 0.000000,1.275000 0.000000,-1.275000 9.889000,-3.500000 16.000000,-3.500000 16.000000,3.500000 z%22 /><path class=%22layer_2_0%22 d=%22M 0.000000,-0.250000 10.000000,-2.500000 10.000000,2.500000 0.000000,0.250000 z%22 /><rect class=%22layer_2_0%22 x=%2210.300000%22 y=%22-2.500000%22 width=%220.300000%22 height=%225.000000%22 /><rect class=%22layer_2_0%22 x=%2210.900000%22 y=%22-2.500000%22 width=%220.300000%22 height=%225.000000%22 /><rect class=%22layer_2_0%22 x=%2211.500000%22 y=%22-2.500000%22 width=%220.300000%22 height=%225.000000%22 /><rect class=%22layer_2_0%22 x=%2212.100000%22 y=%22-2.500000%22 width=%220.300000%22 height=%225.000000%22 /><rect class=%22layer_2_0%22 x=%2212.700000%22 y=%22-2.500000%22 width=%220.300000%22 height=%225.000000%22 /><rect class=%22layer_2_0%22 x=%2213.300000%22 y=%22-2.500000%22 width=%220.300000%22 height=%225.000000%22 /><rect class=%22layer_2_0%22 x=%2213.900000%22 y=%22-2.500000%22 width=%220.300000%22 height=%225.000000%22 /><rect class=%22layer_2_0%22 x=%2214.500000%22 y=%22-2.500000%22 width=%220.300000%22 height=%225.000000%22 /><rect class=%22layer_2_0%22 x=%2215.100000%22 y=%22-2.500000%22 width=%220.300000%22 height=%225.000000%22 /><rect class=%22layer_2_0%22 x=%2215.700000%22 y=%22-2.500000%22 width=%220.300000%22 height=%225.000000%22 /></g><g id=%22C236%22 data-name=%22s_bend_l_31P868634128588827_o_45P33123461114299_p_Strip%22><path class=%22layer_1_0%22 d=%22M 0.000000,-1.250000 0.458000,-1.244000 0.917000,-1.227000 1.374000,-1.198000 1.831000,-1.158000 2.286000,-1.106000 2.740000,-1.042000 3.192000,-0.968000 3.643000,-0.881000 4.091000,-0.784000 4.536000,-0.675000 4.979000,-0.555000 5.418000,-0.424000 5.854000,-0.282000 6.286000,-0.129000 6.714000,0.035000 7.138000,0.209000 7.557000,0.395000 7.972000,0.591000 8.381000,0.797000 8.785000,1.013000 9.184000,1.240000 9.577000,1.476000 9.963000,1.722000 10.344000,1.978000 10.717000,2.244000 11.084000,2.519000 11.444000,2.803000 11.797000,3.096000 12.142000,3.398000 12.479000,3.708000 12.809000,4.027000 13.130000,4.354000 13.443000,4.689000 13.747000,5.031000 14.043000,5.382000 14.330000,5.739000 14.607000,6.104000 14.876000,6.476000 15.135000,6.854000 15.384000,7.239000 15.623000,7.630000 15.853000,8.027000 16.072000,8.429000 16.282000,8.837000 16.481000,9.250000 16.669000,9.668000 16.847000,10.090000 17.014000,10.517000 17.171000,10.948000 17.316000,11.383000 17.450000,11.821000 17.574000,12.263000 17.686000,12.707000 17.787000,13.155000 17.876000,13.604000 17.955000,14.056000 18.022000,14.509000 18.077000,14.964000 18.121000,15.421000 18.153000,15.878000 18.174000,16.336000 18.183000,16.794000 18.181000,17.253000 18.167000,17.711000 18.142000,18.169000 18.105000,18.626000 18.057000,19.082000 17.997000,19.536000 17.926000,19.989000 17.843000,20.440000 17.749000,20.889000 17.643000,21.335000 17.527000,21.778000 17.399000,22.218000 17.260000,22.655000 17.111000,23.089000 16.862000,23.839000 16.651000,24.601000 16.560000,24.986000 16.479000,25.373000 16.346000,26.153000 16.253000,26.938000 16.221000,27.332000 16.187000,28.122000 16.194000,28.913000 16.239000,29.702000 16.277000,30.096000 16.325000,30.488000 16.450000,31.269000 16.615000,32.043000 16.711000,32.426000 16.934000,33.185000 17.059000,33.560000 17.338000,34.300000 17.654000,35.025000 18.006000,35.733000 18.394000,36.422000 18.600000,36.759000 19.038000,37.417000 19.509000,38.052000 20.012000,38.663000 20.274000,38.959000 20.821000,39.530000 21.397000,40.072000 21.694000,40.333000 22.309000,40.830000 22.625000,41.067000 23.276000,41.517000 23.609000,41.730000 23.948000,41.934000 24.640000,42.316000 24.993000,42.494000 25.713000,42.822000 26.078000,42.973000 26.820000,43.246000 27.196000,43.369000 27.575000,43.482000 28.341000,43.679000 28.727000,43.763000 29.506000,43.902000 29.897000,43.957000 30.684000,44.036000 31.474000,44.076000 31.869000,44.081000 31.869000,46.581000 31.411000,46.575000 30.953000,46.558000 30.495000,46.529000 30.038000,46.489000 29.583000,46.437000 29.129000,46.373000 28.677000,46.299000 28.226000,46.212000 27.778000,46.115000 27.333000,46.006000 26.890000,45.886000 26.451000,45.755000 26.015000,45.613000 25.583000,45.460000 25.155000,45.296000 24.731000,45.122000 24.312000,44.936000 23.897000,44.740000 23.488000,44.534000 23.084000,44.318000 22.685000,44.091000 22.292000,43.855000 21.906000,43.609000 21.525000,43.353000 21.152000,43.087000 20.785000,42.812000 20.425000,42.528000 20.072000,42.235000 19.727000,41.933000 19.390000,41.623000 19.060000,41.304000 18.739000,40.977000 18.426000,40.642000 18.122000,40.300000 17.826000,39.949000 17.539000,39.592000 17.262000,39.227000 16.993000,38.855000 16.734000,38.477000 16.485000,38.092000 16.246000,37.701000 16.016000,37.304000 15.797000,36.902000 15.587000,36.494000 15.388000,36.081000 15.200000,35.663000 15.022000,35.241000 14.855000,34.814000 14.698000,34.383000 14.553000,33.948000 14.419000,33.510000 14.295000,33.068000 14.183000,32.624000 14.082000,32.176000 13.993000,31.727000 13.914000,31.275000 13.847000,30.822000 13.792000,30.367000 13.748000,29.910000 13.716000,29.453000 13.695000,28.995000 13.686000,28.537000 13.688000,28.078000 13.702000,27.620000 13.727000,27.162000 13.764000,26.705000 13.812000,26.249000 13.872000,25.795000 13.944000,25.342000 14.026000,24.891000 14.120000,24.442000 14.226000,23.996000 14.342000,23.553000 14.470000,23.113000 14.609000,22.676000 14.758000,22.242000 15.007000,21.492000 15.218000,20.730000 15.309000,20.345000 15.390000,19.958000 15.523000,19.178000 15.616000,18.393000 15.648000,17.999000 15.670000,17.604000 15.684000,16.814000 15.675000,16.418000 15.630000,15.629000 15.592000,15.235000 15.544000,14.843000 15.419000,14.062000 15.341000,13.674000 15.158000,12.905000 15.051000,12.524000 14.810000,11.771000 14.531000,11.031000 14.215000,10.306000 13.863000,9.598000 13.673000,9.251000 13.269000,8.572000 12.831000,7.914000 12.360000,7.279000 12.112000,6.970000 11.595000,6.372000 11.048000,5.801000 10.763000,5.526000 10.175000,4.998000 9.871000,4.746000 9.244000,4.264000 8.921000,4.035000 8.260000,3.601000 7.921000,3.397000 7.229000,3.015000 6.876000,2.837000 6.518000,2.669000 5.791000,2.358000 5.422000,2.217000 4.673000,1.962000 4.294000,1.849000 3.528000,1.652000 3.142000,1.568000 2.754000,1.494000 1.972000,1.374000 1.185000,1.295000 0.791000,1.270000 0.000000,1.250000 z%22 /><path class=%22layer_2_0%22 d=%22M 0.000000,-0.250000 0.433000,-0.245000 0.866000,-0.228000 1.298000,-0.201000 1.730000,-0.163000 2.160000,-0.114000 2.590000,-0.054000 3.017000,0.017000 3.442000,0.098000 3.866000,0.190000 4.287000,0.293000 5.120000,0.530000 5.940000,0.809000 6.345000,0.964000 6.745000,1.129000 7.142000,1.304000 7.533000,1.489000 7.920000,1.684000 8.302000,1.889000 8.679000,2.103000 9.050000,2.326000 9.415000,2.559000 9.775000,2.801000 10.128000,3.052000 10.475000,3.312000 10.815000,3.580000 11.148000,3.857000 11.474000,4.142000 11.793000,4.435000 12.408000,5.046000 12.704000,5.362000 13.271000,6.017000 13.542000,6.355000 14.058000,7.051000 14.538000,7.772000 14.764000,8.142000 14.981000,8.517000 15.189000,8.897000 15.386000,9.282000 15.574000,9.673000 15.752000,10.068000 15.921000,10.467000 16.079000,10.870000 16.364000,11.688000 16.491000,12.102000 16.607000,12.520000 16.713000,12.940000 16.809000,13.362000 16.893000,13.787000 16.967000,14.214000 17.031000,14.643000 17.083000,15.073000 17.124000,15.504000 17.155000,15.936000 17.175000,16.369000 17.181000,17.235000 17.168000,17.668000 17.144000,18.101000 17.109000,18.533000 17.064000,18.963000 17.007000,19.393000 16.940000,19.821000 16.862000,20.247000 16.773000,20.671000 16.673000,21.093000 16.563000,21.512000 16.442000,21.928000 16.311000,22.341000 16.170000,22.750000 16.032000,23.148000 15.905000,23.549000 15.788000,23.953000 15.681000,24.359000 15.584000,24.769000 15.498000,25.180000 15.422000,25.594000 15.357000,26.010000 15.302000,26.427000 15.257000,26.845000 15.200000,27.684000 15.186000,28.525000 15.194000,28.946000 15.213000,29.366000 15.283000,30.204000 15.334000,30.622000 15.395000,31.038000 15.467000,31.452000 15.549000,31.865000 15.642000,32.275000 15.745000,32.683000 15.858000,33.088000 15.981000,33.490000 16.258000,34.284000 16.412000,34.676000 16.575000,35.064000 16.930000,35.826000 17.122000,36.200000 17.534000,36.934000 17.754000,37.292000 18.220000,37.992000 18.721000,38.668000 18.984000,38.996000 19.256000,39.318000 19.822000,39.940000 20.117000,40.240000 20.419000,40.532000 21.045000,41.094000 21.369000,41.363000 21.699000,41.623000 22.379000,42.119000 22.728000,42.354000 23.082000,42.580000 23.808000,43.005000 24.179000,43.203000 24.935000,43.572000 25.320000,43.742000 25.709000,43.902000 26.498000,44.193000 27.301000,44.444000 27.707000,44.554000 28.527000,44.743000 28.940000,44.822000 29.771000,44.949000 30.189000,44.996000 30.608000,45.033000 31.028000,45.060000 31.448000,45.076000 31.869000,45.081000 31.869000,45.581000 31.436000,45.576000 31.003000,45.559000 30.571000,45.532000 30.139000,45.494000 29.709000,45.445000 29.279000,45.385000 28.852000,45.314000 28.427000,45.233000 28.003000,45.141000 27.582000,45.038000 26.749000,44.801000 25.929000,44.522000 25.524000,44.367000 25.124000,44.202000 24.727000,44.027000 24.336000,43.842000 23.949000,43.647000 23.567000,43.442000 23.190000,43.228000 22.819000,43.005000 22.454000,42.772000 22.094000,42.530000 21.394000,42.020000 21.054000,41.751000 20.721000,41.474000 20.395000,41.189000 20.076000,40.896000 19.461000,40.285000 19.165000,39.969000 18.598000,39.314000 18.327000,38.976000 17.811000,38.280000 17.331000,37.559000 17.105000,37.189000 16.888000,36.814000 16.680000,36.434000 16.483000,36.049000 16.295000,35.658000 16.117000,35.263000 15.948000,34.864000 15.790000,34.461000 15.505000,33.643000 15.378000,33.229000 15.262000,32.811000 15.156000,32.391000 15.060000,31.969000 14.976000,31.544000 14.902000,31.117000 14.838000,30.688000 14.786000,30.258000 14.745000,29.827000 14.714000,29.395000 14.694000,28.962000 14.686000,28.529000 14.688000,28.096000 14.701000,27.663000 14.725000,27.230000 14.760000,26.798000 14.805000,26.368000 14.862000,25.938000 14.929000,25.510000 15.007000,25.084000 15.096000,24.660000 15.196000,24.238000 15.306000,23.819000 15.427000,23.403000 15.558000,22.990000 15.699000,22.581000 15.837000,22.183000 15.964000,21.782000 16.081000,21.378000 16.188000,20.972000 16.285000,20.562000 16.371000,20.151000 16.447000,19.737000 16.512000,19.321000 16.567000,18.904000 16.612000,18.486000 16.669000,17.647000 16.681000,17.226000 16.675000,16.385000 16.656000,15.965000 16.586000,15.127000 16.535000,14.709000 16.474000,14.293000 16.402000,13.879000 16.320000,13.466000 16.227000,13.056000 16.124000,12.648000 16.011000,12.243000 15.888000,11.841000 15.611000,11.047000 15.294000,10.267000 14.939000,9.505000 14.747000,9.131000 14.335000,8.397000 14.115000,8.039000 13.649000,7.339000 13.148000,6.663000 12.885000,6.335000 12.613000,6.013000 12.047000,5.391000 11.752000,5.091000 11.450000,4.799000 10.824000,4.237000 10.500000,3.968000 10.170000,3.708000 9.490000,3.212000 9.141000,2.977000 8.787000,2.751000 8.061000,2.326000 7.690000,2.128000 6.934000,1.759000 6.549000,1.589000 6.160000,1.429000 5.371000,1.138000 4.568000,0.887000 4.162000,0.777000 3.342000,0.588000 2.929000,0.509000 2.098000,0.382000 1.680000,0.335000 1.261000,0.298000 0.841000,0.271000 0.421000,0.255000 0.000000,0.250000 z%22 /></g><g id=%22C237%22 data-name=%22as_component__PNGCOJINIPILRSBFUVHAAAKRQR7F7X5DOV45DHY3HPYOUZICQITA%22><path class=%22layer_1_0%22 d=%22M 9.889000,3.500000 0.000000,1.275000 0.000000,-1.275000 9.889000,-3.500000 16.000000,-3.500000 16.000000,3.500000 z%22 /><path class=%22layer_2_0%22 d=%22M 0.000000,-0.250000 10.000000,-2.500000 10.000000,2.500000 0.000000,0.250000 z%22 /><rect class=%22layer_2_0%22 x=%2210.300000%22 y=%22-2.500000%22 width=%220.300000%22 height=%225.000000%22 /><rect class=%22layer_2_0%22 x=%2210.900000%22 y=%22-2.500000%22 width=%220.300000%22 height=%225.000000%22 /><rect class=%22layer_2_0%22 x=%2211.500000%22 y=%22-2.500000%22 width=%220.300000%22 height=%225.000000%22 /><rect class=%22layer_2_0%22 x=%2212.100000%22 y=%22-2.500000%22 width=%220.300000%22 height=%225.000000%22 /><rect class=%22layer_2_0%22 x=%2212.700000%22 y=%22-2.500000%22 width=%220.300000%22 height=%225.000000%22 /><rect class=%22layer_2_0%22 x=%2213.300000%22 y=%22-2.500000%22 width=%220.300000%22 height=%225.000000%22 /><rect class=%22layer_2_0%22 x=%2213.900000%22 y=%22-2.500000%22 width=%220.300000%22 height=%225.000000%22 /><rect class=%22layer_2_0%22 x=%2214.500000%22 y=%22-2.500000%22 width=%220.300000%22 height=%225.000000%22 /><rect class=%22layer_2_0%22 x=%2215.100000%22 y=%22-2.500000%22 width=%220.300000%22 height=%225.000000%22 /><rect class=%22layer_2_0%22 x=%2215.700000%22 y=%22-2.500000%22 width=%220.300000%22 height=%225.000000%22 /></g><g id=%22C238%22 data-name=%22s_bend_l_70P42773593088695_o_70P38506395332873_p_Strip%22><path class=%22layer_1_0%22 d=%22M 0.000000,-1.250000 0.622000,-1.245000 1.244000,-1.229000 1.866000,-1.202000 2.487000,-1.165000 3.108000,-1.117000 3.728000,-1.059000 4.346000,-0.990000 4.963000,-0.911000 5.579000,-0.821000 6.193000,-0.720000 6.806000,-0.609000 7.416000,-0.488000 8.024000,-0.356000 8.630000,-0.214000 9.233000,-0.062000 9.834000,0.101000 10.432000,0.274000 11.027000,0.457000 11.618000,0.650000 12.791000,1.067000 13.372000,1.290000 14.522000,1.766000 15.091000,2.019000 16.215000,2.554000 16.770000,2.835000 17.320000,3.126000 17.865000,3.426000 18.939000,4.054000 19.469000,4.382000 19.992000,4.719000 20.509000,5.065000 21.021000,5.419000 21.526000,5.782000 22.026000,6.154000 23.004000,6.922000 23.484000,7.319000 23.957000,7.724000 24.881000,8.558000 25.332000,8.986000 25.776000,9.422000 26.641000,10.317000 27.062000,10.775000 27.881000,11.713000 28.278000,12.192000 29.047000,13.171000 29.419000,13.670000 30.137000,14.686000 30.483000,15.204000 30.820000,15.727000 31.148000,16.255000 31.467000,16.790000 31.777000,17.330000 32.369000,18.424000 32.651000,18.979000 33.186000,20.103000 33.439000,20.672000 33.682000,21.244000 34.139000,22.402000 34.353000,22.987000 34.556000,23.575000 34.750000,24.166000 34.934000,24.761000 35.107000,25.358000 35.270000,25.959000 35.423000,26.562000 35.565000,27.168000 35.697000,27.776000 35.819000,28.387000 35.930000,28.999000 36.031000,29.613000 36.122000,30.229000 36.271000,31.464000 36.378000,32.704000 36.442000,33.947000 36.458000,34.569000 36.464000,35.192000 36.484000,36.351000 36.545000,37.509000 36.589000,38.087000 36.644000,38.664000 36.783000,39.815000 36.867000,40.388000 36.961000,40.960000 37.178000,42.099000 37.434000,43.230000 37.728000,44.351000 38.060000,45.462000 38.430000,46.560000 38.838000,47.646000 39.055000,48.183000 39.518000,49.246000 39.762000,49.771000 40.016000,50.293000 40.550000,51.322000 41.118000,52.332000 41.721000,53.322000 42.035000,53.810000 42.688000,54.768000 43.026000,55.238000 43.727000,56.162000 44.459000,57.061000 44.836000,57.501000 45.613000,58.361000 46.419000,59.195000 47.253000,60.000000 47.680000,60.392000 48.554000,61.153000 49.454000,61.885000 50.377000,62.585000 51.325000,63.253000 52.294000,63.889000 53.285000,64.491000 54.296000,65.059000 54.808000,65.330000 55.846000,65.846000 56.902000,66.325000 57.435000,66.552000 58.514000,66.977000 59.606000,67.365000 60.157000,67.545000 61.268000,67.877000 62.390000,68.170000 63.520000,68.425000 64.659000,68.642000 65.805000,68.819000 66.380000,68.893000 66.956000,68.957000 68.111000,69.056000 69.269000,69.115000 69.848000,69.130000 70.428000,69.135000 70.428000,71.635000 69.806000,71.630000 69.184000,71.614000 68.562000,71.587000 67.941000,71.550000 67.320000,71.502000 66.700000,71.444000 66.082000,71.375000 65.465000,71.296000 64.849000,71.206000 64.235000,71.105000 63.622000,70.994000 63.012000,70.873000 62.404000,70.741000 61.798000,70.599000 61.195000,70.447000 60.594000,70.284000 59.996000,70.111000 59.401000,69.928000 58.810000,69.735000 57.637000,69.318000 57.056000,69.095000 55.906000,68.619000 55.337000,68.366000 54.213000,67.831000 53.658000,67.550000 53.108000,67.259000 52.563000,66.959000 51.489000,66.331000 50.959000,66.003000 50.436000,65.666000 49.407000,64.966000 48.902000,64.603000 48.402000,64.231000 47.424000,63.463000 46.944000,63.066000 46.471000,62.661000 45.547000,61.827000 45.096000,61.399000 44.652000,60.963000 43.787000,60.068000 43.366000,59.610000 42.547000,58.672000 42.150000,58.193000 41.381000,57.214000 41.009000,56.715000 40.291000,55.699000 39.945000,55.181000 39.608000,54.658000 39.280000,54.130000 38.961000,53.595000 38.651000,53.055000 38.059000,51.961000 37.777000,51.406000 37.242000,50.282000 36.989000,49.713000 36.746000,49.141000 36.289000,47.983000 36.075000,47.398000 35.678000,46.219000 35.494000,45.624000 35.321000,45.027000 35.158000,44.426000 35.005000,43.823000 34.863000,43.217000 34.731000,42.609000 34.609000,41.998000 34.498000,41.386000 34.397000,40.772000 34.306000,40.156000 34.157000,38.921000 34.050000,37.681000 33.986000,36.438000 33.970000,35.816000 33.964000,35.193000 33.944000,34.034000 33.918000,33.455000 33.839000,32.299000 33.784000,31.721000 33.645000,30.570000 33.561000,29.997000 33.467000,29.425000 33.250000,28.286000 32.994000,27.155000 32.700000,26.034000 32.368000,24.924000 31.998000,23.825000 31.798000,23.280000 31.373000,22.202000 31.146000,21.669000 30.666000,20.614000 30.150000,19.576000 29.878000,19.063000 29.310000,18.053000 29.012000,17.555000 28.393000,16.575000 28.071000,16.094000 27.402000,15.147000 26.701000,14.223000 26.339000,13.771000 25.592000,12.884000 24.815000,12.024000 24.009000,11.190000 23.595000,10.784000 22.748000,9.993000 21.874000,9.232000 20.974000,8.500000 20.051000,7.800000 19.103000,7.132000 18.134000,6.496000 17.143000,5.894000 16.640000,5.606000 15.620000,5.055000 14.582000,4.539000 14.056000,4.295000 12.993000,3.833000 11.914000,3.408000 10.822000,3.020000 10.271000,2.840000 9.717000,2.670000 8.600000,2.357000 8.038000,2.215000 6.908000,1.960000 5.769000,1.743000 4.623000,1.566000 4.048000,1.492000 3.472000,1.428000 2.317000,1.329000 1.738000,1.295000 0.580000,1.255000 0.000000,1.250000 z%22 /><path class=%22layer_2_0%22 d=%22M 0.000000,-0.250000 0.605000,-0.245000 1.815000,-0.204000 3.023000,-0.121000 4.227000,0.003000 4.827000,0.080000 6.023000,0.265000 6.619000,0.373000 7.213000,0.491000 7.804000,0.619000 8.980000,0.906000 9.564000,1.064000 10.146000,1.232000 10.724000,1.410000 11.300000,1.598000 11.872000,1.796000 13.005000,2.221000 13.566000,2.447000 14.124000,2.684000 15.226000,3.185000 15.770000,3.449000 16.310000,3.723000 16.845000,4.006000 17.375000,4.298000 17.900000,4.599000 18.420000,4.909000 19.444000,5.555000 19.947000,5.891000 20.936000,6.589000 21.901000,7.320000 22.374000,7.698000 23.300000,8.478000 23.753000,8.879000 24.637000,9.705000 25.494000,10.561000 26.320000,11.445000 26.722000,11.898000 27.502000,12.824000 27.880000,13.296000 28.612000,14.260000 28.965000,14.752000 29.647000,15.752000 29.975000,16.261000 30.294000,16.775000 30.604000,17.295000 31.198000,18.350000 31.481000,18.885000 32.020000,19.969000 32.522000,21.070000 32.985000,22.189000 33.203000,22.753000 33.411000,23.322000 33.609000,23.894000 33.976000,25.047000 34.303000,26.213000 34.590000,27.389000 34.837000,28.574000 34.945000,29.169000 35.043000,29.767000 35.131000,30.365000 35.209000,30.966000 35.276000,31.567000 35.380000,32.773000 35.443000,33.982000 35.464000,35.192000 35.469000,35.789000 35.485000,36.386000 35.511000,36.982000 35.593000,38.172000 35.649000,38.766000 35.792000,39.951000 35.879000,40.542000 36.082000,41.718000 36.199000,42.303000 36.462000,43.467000 36.765000,44.621000 37.107000,45.764000 37.293000,46.332000 37.488000,46.895000 37.693000,47.456000 38.132000,48.566000 38.365000,49.115000 38.859000,50.201000 39.391000,51.270000 39.958000,52.320000 40.561000,53.350000 41.199000,54.358000 41.871000,55.345000 42.219000,55.829000 42.576000,56.308000 43.314000,57.246000 43.694000,57.705000 44.479000,58.604000 44.883000,59.044000 45.712000,59.902000 46.571000,60.731000 47.010000,61.134000 47.910000,61.918000 48.370000,62.299000 49.309000,63.036000 49.787000,63.392000 50.762000,64.080000 51.259000,64.412000 52.268000,65.049000 53.298000,65.651000 54.348000,66.218000 54.880000,66.488000 55.417000,66.749000 56.503000,67.243000 57.053000,67.476000 58.163000,67.913000 58.724000,68.118000 59.288000,68.313000 60.425000,68.674000 61.574000,68.995000 62.153000,69.142000 62.734000,69.278000 63.902000,69.521000 65.078000,69.723000 65.669000,69.810000 66.261000,69.886000 66.854000,69.952000 67.448000,70.008000 68.043000,70.054000 69.235000,70.115000 69.831000,70.130000 70.428000,70.135000 70.428000,70.635000 69.823000,70.630000 68.613000,70.589000 67.405000,70.506000 66.201000,70.382000 65.601000,70.305000 64.405000,70.120000 63.809000,70.012000 63.215000,69.894000 62.624000,69.766000 61.448000,69.479000 60.864000,69.321000 60.282000,69.153000 59.704000,68.975000 59.128000,68.787000 58.556000,68.589000 57.988000,68.381000 56.862000,67.938000 56.304000,67.701000 55.202000,67.200000 54.658000,66.936000 54.118000,66.662000 53.583000,66.379000 53.053000,66.087000 52.528000,65.786000 52.008000,65.476000 50.984000,64.830000 50.481000,64.494000 49.492000,63.796000 48.527000,63.065000 48.054000,62.687000 47.588000,62.301000 46.675000,61.506000 45.791000,60.680000 44.934000,59.824000 44.108000,58.940000 43.312000,58.028000 42.548000,57.089000 41.816000,56.125000 41.118000,55.136000 40.781000,54.633000 40.453000,54.124000 40.134000,53.610000 39.824000,53.090000 39.230000,52.035000 38.947000,51.500000 38.408000,50.416000 37.906000,49.315000 37.670000,48.757000 37.225000,47.632000 37.017000,47.063000 36.819000,46.491000 36.452000,45.338000 36.125000,44.172000 35.838000,42.996000 35.591000,41.811000 35.483000,41.216000 35.297000,40.020000 35.219000,39.419000 35.152000,38.818000 35.048000,37.612000 34.985000,36.403000 34.964000,35.193000 34.959000,34.596000 34.943000,33.999000 34.917000,33.403000 34.835000,32.213000 34.779000,31.619000 34.636000,30.434000 34.549000,29.843000 34.346000,28.667000 34.229000,28.082000 33.966000,26.918000 33.663000,25.764000 33.497000,25.191000 33.321000,24.621000 33.135000,24.053000 32.940000,23.490000 32.735000,22.929000 32.520000,22.372000 32.063000,21.270000 31.569000,20.184000 31.037000,19.115000 30.470000,18.065000 29.867000,17.035000 29.229000,16.027000 28.557000,15.040000 28.209000,14.556000 27.487000,13.605000 26.734000,12.680000 26.345000,12.227000 25.545000,11.341000 24.716000,10.483000 24.290000,10.065000 23.418000,9.251000 22.971000,8.855000 22.058000,8.086000 21.120000,7.349000 20.641000,6.993000 19.666000,6.305000 19.169000,5.973000 18.160000,5.336000 17.130000,4.734000 16.080000,4.167000 15.548000,3.897000 15.011000,3.636000 13.925000,3.142000 13.375000,2.909000 12.822000,2.686000 11.704000,2.267000 11.140000,2.072000 10.003000,1.711000 9.430000,1.546000 8.275000,1.243000 7.694000,1.107000 6.526000,0.864000 5.938000,0.758000 4.759000,0.575000 4.167000,0.499000 3.574000,0.433000 2.980000,0.377000 2.385000,0.331000 1.193000,0.270000 0.597000,0.255000 0.000000,0.250000 z%22 /></g><g id=%22C239%22 data-name=%22as_component__PNGCOJINIPILRSBFUVHAAAKRQR7F7X5DOV45DHY3HPYOUZICQITA%22><path class=%22layer_1_0%22 d=%22M 9.889000,3.500000 0.000000,1.275000 0.000000,-1.275000 9.889000,-3.500000 16.000000,-3.500000 16.000000,3.500000 z%22 /><path class=%22layer_2_0%22 d=%22M 0.000000,-0.250000 10.000000,-2.500000 10.000000,2.500000 0.000000,0.250000 z%22 /><rect class=%22layer_2_0%22 x=%2210.300000%22 y=%22-2.500000%22 width=%220.300000%22 height=%225.000000%22 /><rect class=%22layer_2_0%22 x=%2210.900000%22 y=%22-2.500000%22 width=%220.300000%22 height=%225.000000%22 /><rect class=%22layer_2_0%22 x=%2211.500000%22 y=%22-2.500000%22 width=%220.300000%22 height=%225.000000%22 /><rect class=%22layer_2_0%22 x=%2212.100000%22 y=%22-2.500000%22 width=%220.300000%22 height=%225.000000%22 /><rect class=%22layer_2_0%22 x=%2212.700000%22 y=%22-2.500000%22 width=%220.300000%22 height=%225.000000%22 /><rect class=%22layer_2_0%22 x=%2213.300000%22 y=%22-2.500000%22 width=%220.300000%22 height=%225.000000%22 /><rect class=%22layer_2_0%22 x=%2213.900000%22 y=%22-2.500000%22 width=%220.300000%22 height=%225.000000%22 /><rect class=%22layer_2_0%22 x=%2214.500000%22 y=%22-2.500000%22 width=%220.300000%22 height=%225.000000%22 /><rect class=%22layer_2_0%22 x=%2215.100000%22 y=%22-2.500000%22 width=%220.300000%22 height=%225.000000%22 /><rect class=%22layer_2_0%22 x=%2215.700000%22 y=%22-2.500000%22 width=%220.300000%22 height=%225.000000%22 /></g><g id=%22C240%22 data-name=%22s_bend_l_30P821708331216914_o_30P146829087938034_p_Strip%22><path class=%22layer_1_0%22 d=%22M 0.000000,-1.250000 0.445000,-1.244000 0.890000,-1.226000 1.333000,-1.197000 1.776000,-1.155000 2.218000,-1.102000 2.658000,-1.037000 3.097000,-0.960000 3.533000,-0.871000 3.966000,-0.771000 4.397000,-0.659000 4.825000,-0.536000 5.249000,-0.402000 5.669000,-0.256000 6.085000,-0.099000 6.497000,0.069000 6.905000,0.248000 7.307000,0.438000 7.705000,0.638000 8.096000,0.849000 8.482000,1.070000 8.862000,1.302000 9.236000,1.543000 9.603000,1.795000 9.963000,2.056000 10.316000,2.327000 10.662000,2.607000 11.000000,2.896000 11.330000,3.194000 11.653000,3.501000 11.967000,3.817000 12.272000,4.140000 12.569000,4.472000 12.856000,4.811000 13.135000,5.158000 13.404000,5.513000 13.663000,5.874000 13.913000,6.242000 14.153000,6.617000 14.383000,6.998000 14.603000,7.385000 14.812000,7.778000 15.010000,8.176000 15.198000,8.579000 15.375000,8.987000 15.542000,9.400000 15.697000,9.817000 15.840000,10.238000 15.973000,10.663000 16.094000,11.091000 16.204000,11.522000 16.302000,11.956000 16.388000,12.393000 16.463000,12.831000 16.526000,13.272000 16.578000,13.714000 16.617000,14.157000 16.645000,14.601000 16.661000,15.046000 16.674000,15.424000 16.731000,16.178000 16.828000,16.928000 16.892000,17.301000 17.049000,18.041000 17.142000,18.407000 17.245000,18.771000 17.480000,19.490000 17.612000,19.845000 17.753000,20.195000 18.063000,20.885000 18.232000,21.224000 18.597000,21.886000 18.792000,22.210000 19.208000,22.842000 19.658000,23.450000 19.894000,23.745000 20.139000,24.034000 20.651000,24.590000 20.917000,24.859000 21.472000,25.373000 22.053000,25.857000 22.660000,26.309000 22.972000,26.523000 23.612000,26.925000 23.940000,27.113000 24.611000,27.463000 25.299000,27.776000 25.649000,27.919000 26.361000,28.176000 27.085000,28.395000 27.451000,28.490000 27.819000,28.575000 28.562000,28.716000 29.312000,28.816000 29.689000,28.852000 30.066000,28.877000 30.822000,28.897000 30.822000,31.397000 30.377000,31.391000 29.932000,31.373000 29.489000,31.344000 29.046000,31.302000 28.604000,31.249000 28.164000,31.184000 27.725000,31.107000 27.289000,31.018000 26.856000,30.918000 26.425000,30.806000 25.997000,30.683000 25.573000,30.549000 25.153000,30.403000 24.737000,30.246000 24.325000,30.078000 23.917000,29.899000 23.515000,29.709000 23.117000,29.509000 22.726000,29.298000 22.340000,29.077000 21.960000,28.845000 21.586000,28.604000 21.219000,28.352000 20.859000,28.091000 20.506000,27.820000 20.160000,27.540000 19.822000,27.251000 19.492000,26.953000 19.169000,26.646000 18.855000,26.330000 18.550000,26.007000 18.253000,25.675000 17.966000,25.336000 17.687000,24.989000 17.418000,24.634000 17.159000,24.273000 16.909000,23.905000 16.669000,23.530000 16.439000,23.149000 16.219000,22.762000 16.010000,22.369000 15.812000,21.971000 15.624000,21.568000 15.447000,21.160000 15.280000,20.747000 15.125000,20.330000 14.982000,19.909000 14.849000,19.484000 14.728000,19.056000 14.618000,18.625000 14.520000,18.191000 14.434000,17.754000 14.359000,17.316000 14.296000,16.875000 14.244000,16.433000 14.205000,15.990000 14.177000,15.546000 14.161000,15.101000 14.148000,14.723000 14.091000,13.969000 13.994000,13.219000 13.930000,12.846000 13.773000,12.106000 13.680000,11.740000 13.577000,11.376000 13.342000,10.657000 13.210000,10.302000 13.069000,9.952000 12.759000,9.262000 12.590000,8.923000 12.412000,8.590000 12.030000,7.937000 11.614000,7.305000 11.393000,6.998000 10.928000,6.402000 10.431000,5.832000 9.905000,5.289000 9.350000,4.774000 8.769000,4.290000 8.468000,4.060000 7.850000,3.624000 7.210000,3.222000 6.882000,3.034000 6.211000,2.684000 5.869000,2.523000 5.173000,2.228000 4.461000,1.971000 3.737000,1.752000 3.371000,1.657000 3.003000,1.572000 2.260000,1.431000 1.885000,1.376000 1.133000,1.295000 0.756000,1.270000 0.000000,1.250000 z%22 /><path class=%22layer_2_0%22 d=%22M 0.000000,-0.250000 0.418000,-0.244000 0.836000,-0.228000 1.253000,-0.200000 1.670000,-0.161000 2.085000,-0.111000 2.499000,-0.049000 2.911000,0.023000 3.321000,0.106000 3.728000,0.200000 4.133000,0.305000 4.535000,0.421000 4.934000,0.547000 5.329000,0.684000 5.720000,0.832000 6.108000,0.990000 6.491000,1.158000 6.869000,1.336000 7.242000,1.525000 7.610000,1.723000 7.973000,1.931000 8.330000,2.149000 8.682000,2.376000 9.027000,2.612000 9.697000,3.112000 10.340000,3.647000 10.650000,3.928000 10.953000,4.216000 11.536000,4.817000 12.085000,5.448000 12.347000,5.774000 12.600000,6.107000 12.844000,6.447000 13.304000,7.145000 13.520000,7.503000 13.726000,7.867000 13.923000,8.236000 14.110000,8.610000 14.286000,8.989000 14.453000,9.373000 14.609000,9.761000 14.755000,10.153000 14.890000,10.549000 15.014000,10.948000 15.128000,11.351000 15.231000,11.756000 15.324000,12.164000 15.405000,12.574000 15.475000,12.986000 15.535000,13.400000 15.583000,13.816000 15.620000,14.233000 15.646000,14.650000 15.661000,15.068000 15.675000,15.473000 15.700000,15.877000 15.736000,16.280000 15.783000,16.682000 15.841000,17.083000 15.909000,17.482000 15.987000,17.879000 16.077000,18.274000 16.177000,18.667000 16.287000,19.056000 16.407000,19.443000 16.538000,19.826000 16.679000,20.205000 16.992000,20.953000 17.163000,21.320000 17.343000,21.682000 17.534000,22.039000 17.734000,22.391000 17.943000,22.738000 18.161000,23.079000 18.388000,23.414000 18.625000,23.743000 18.870000,24.065000 19.123000,24.381000 19.385000,24.690000 19.655000,24.992000 20.218000,25.573000 20.511000,25.853000 20.812000,26.124000 21.434000,26.642000 22.083000,27.126000 22.417000,27.355000 22.757000,27.575000 23.103000,27.786000 23.454000,27.987000 23.811000,28.179000 24.172000,28.361000 24.539000,28.534000 24.909000,28.697000 25.284000,28.850000 25.663000,28.993000 26.432000,29.248000 26.821000,29.360000 27.213000,29.461000 27.607000,29.552000 28.004000,29.633000 28.403000,29.703000 28.803000,29.762000 29.205000,29.811000 30.013000,29.875000 30.417000,29.892000 30.822000,29.897000 30.822000,30.397000 29.986000,30.375000 29.569000,30.347000 29.152000,30.308000 28.737000,30.258000 28.323000,30.196000 27.911000,30.124000 27.501000,30.041000 27.094000,29.947000 26.689000,29.842000 26.287000,29.726000 25.888000,29.600000 25.493000,29.463000 25.102000,29.315000 24.714000,29.157000 24.331000,28.989000 23.953000,28.811000 23.580000,28.622000 23.212000,28.424000 22.849000,28.216000 22.492000,27.998000 22.140000,27.771000 21.795000,27.535000 21.125000,27.035000 20.482000,26.500000 19.869000,25.931000 19.574000,25.634000 19.287000,25.330000 19.008000,25.018000 18.737000,24.699000 18.475000,24.373000 18.222000,24.040000 17.978000,23.700000 17.744000,23.354000 17.518000,23.002000 17.302000,22.644000 17.096000,22.280000 16.899000,21.911000 16.712000,21.537000 16.536000,21.158000 16.369000,20.774000 16.213000,20.386000 16.067000,19.994000 15.932000,19.598000 15.808000,19.199000 15.694000,18.796000 15.591000,18.391000 15.498000,17.983000 15.417000,17.573000 15.347000,17.161000 15.287000,16.747000 15.239000,16.331000 15.202000,15.914000 15.176000,15.497000 15.161000,15.079000 15.147000,14.674000 15.122000,14.270000 15.086000,13.867000 15.039000,13.465000 14.981000,13.064000 14.913000,12.665000 14.835000,12.268000 14.745000,11.873000 14.645000,11.480000 14.535000,11.091000 14.415000,10.704000 14.284000,10.321000 14.143000,9.942000 13.830000,9.194000 13.659000,8.827000 13.479000,8.465000 13.288000,8.108000 13.088000,7.756000 12.879000,7.409000 12.661000,7.068000 12.434000,6.733000 12.197000,6.404000 11.699000,5.766000 11.437000,5.457000 11.167000,5.155000 10.604000,4.574000 10.311000,4.294000 10.010000,4.023000 9.388000,3.505000 9.066000,3.259000 8.739000,3.021000 8.405000,2.792000 8.065000,2.572000 7.719000,2.361000 7.368000,2.160000 7.011000,1.968000 6.650000,1.786000 6.283000,1.613000 5.913000,1.450000 5.538000,1.297000 5.159000,1.154000 4.390000,0.899000 4.001000,0.787000 3.609000,0.686000 3.215000,0.595000 2.818000,0.514000 2.419000,0.444000 2.019000,0.385000 1.617000,0.336000 1.213000,0.299000 0.405000,0.255000 0.000000,0.250000 z%22 /></g><g id=%22C241%22 data-name=%22as_component__PNGCOJINIPILRSBFUVHAAAKRQR7F7X5DOV45DHY3HPYOUZICQITA%22><path class=%22layer_1_0%22 d=%22M 9.889000,3.500000 0.000000,1.275000 0.000000,-1.275000 9.889000,-3.500000 16.000000,-3.500000 16.000000,3.500000 z%22 /><path class=%22layer_2_0%22 d=%22M 0.000000,-0.250000 10.000000,-2.500000 10.000000,2.500000 0.000000,0.250000 z%22 /><rect class=%22layer_2_0%22 x=%2210.300000%22 y=%22-2.500000%22 width=%220.300000%22 height=%225.000000%22 /><rect class=%22layer_2_0%22 x=%2210.900000%22 y=%22-2.500000%22 width=%220.300000%22 height=%225.000000%22 /><rect class=%22layer_2_0%22 x=%2211.500000%22 y=%22-2.500000%22 width=%220.300000%22 height=%225.000000%22 /><rect class=%22layer_2_0%22 x=%2212.100000%22 y=%22-2.500000%22 width=%220.300000%22 height=%225.000000%22 /><rect class=%22layer_2_0%22 x=%2212.700000%22 y=%22-2.500000%22 width=%220.300000%22 height=%225.000000%22 /><rect class=%22layer_2_0%22 x=%2213.300000%22 y=%22-2.500000%22 width=%220.300000%22 height=%225.000000%22 /><rect class=%22layer_2_0%22 x=%2213.900000%22 y=%22-2.500000%22 width=%220.300000%22 height=%225.000000%22 /><rect class=%22layer_2_0%22 x=%2214.500000%22 y=%22-2.500000%22 width=%220.300000%22 height=%225.000000%22 /><rect class=%22layer_2_0%22 x=%2215.100000%22 y=%22-2.500000%22 width=%220.300000%22 height=%225.000000%22 /><rect class=%22layer_2_0%22 x=%2215.700000%22 y=%22-2.500000%22 width=%220.300000%22 height=%225.000000%22 /></g><g id=%22C242%22 data-name=%22s_bend_l_21P291021601785104_o_12P000167223404334_p_Strip%22><path class=%22layer_1_0%22 d=%22M 0.000000,-1.250000 0.413000,-1.244000 0.826000,-1.225000 1.239000,-1.194000 1.650000,-1.150000 2.059000,-1.094000 2.467000,-1.026000 2.872000,-0.945000 3.275000,-0.853000 3.675000,-0.748000 4.072000,-0.631000 4.465000,-0.502000 4.853000,-0.361000 5.238000,-0.209000 5.617000,-0.045000 5.992000,0.130000 6.361000,0.317000 6.724000,0.514000 7.081000,0.723000 7.431000,0.942000 7.775000,1.171000 8.112000,1.411000 8.441000,1.661000 8.763000,1.921000 9.077000,2.190000 9.382000,2.469000 9.679000,2.757000 9.967000,3.053000 10.246000,3.358000 10.515000,3.672000 10.775000,3.993000 11.025000,4.322000 11.266000,4.659000 11.495000,5.002000 11.715000,5.353000 11.894000,5.639000 12.278000,6.195000 12.695000,6.727000 13.144000,7.232000 13.379000,7.475000 13.872000,7.938000 14.128000,8.158000 14.660000,8.575000 14.935000,8.771000 15.503000,9.137000 15.795000,9.308000 16.393000,9.622000 16.699000,9.765000 17.010000,9.899000 17.642000,10.138000 17.963000,10.244000 18.287000,10.339000 18.614000,10.425000 18.943000,10.501000 19.274000,10.567000 19.608000,10.623000 20.279000,10.704000 20.616000,10.730000 20.953000,10.745000 21.291000,10.750000 21.291000,13.250000 20.878000,13.244000 20.465000,13.225000 20.052000,13.194000 19.641000,13.150000 19.232000,13.094000 18.824000,13.026000 18.419000,12.945000 18.016000,12.853000 17.616000,12.748000 17.219000,12.631000 16.826000,12.502000 16.438000,12.361000 16.053000,12.209000 15.674000,12.045000 15.299000,11.870000 14.930000,11.683000 14.567000,11.486000 14.210000,11.277000 13.860000,11.058000 13.516000,10.829000 13.179000,10.589000 12.850000,10.339000 12.528000,10.079000 12.214000,9.810000 11.909000,9.531000 11.612000,9.243000 11.324000,8.947000 11.045000,8.642000 10.776000,8.328000 10.516000,8.007000 10.266000,7.678000 10.025000,7.341000 9.796000,6.998000 9.576000,6.647000 9.397000,6.361000 9.013000,5.805000 8.596000,5.273000 8.375000,5.017000 7.912000,4.525000 7.669000,4.290000 7.163000,3.842000 6.631000,3.425000 6.356000,3.229000 6.075000,3.042000 5.496000,2.692000 4.898000,2.378000 4.592000,2.235000 4.281000,2.101000 3.967000,1.977000 3.649000,1.862000 3.328000,1.756000 2.677000,1.575000 2.348000,1.499000 2.017000,1.433000 1.683000,1.377000 1.349000,1.332000 0.675000,1.270000 0.338000,1.255000 0.000000,1.250000 z%22 /><path class=%22layer_2_0%22 d=%22M 0.000000,-0.250000 0.383000,-0.244000 0.766000,-0.227000 1.148000,-0.198000 1.529000,-0.158000 1.909000,-0.106000 2.287000,-0.042000 2.663000,0.032000 3.036000,0.118000 3.407000,0.216000 3.774000,0.324000 4.139000,0.444000 4.499000,0.574000 4.855000,0.715000 5.207000,0.867000 5.554000,1.030000 5.896000,1.202000 6.233000,1.385000 6.564000,1.579000 6.889000,1.782000 7.207000,1.995000 7.520000,2.217000 7.825000,2.449000 8.123000,2.689000 8.414000,2.939000 8.697000,3.197000 8.972000,3.464000 9.239000,3.739000 9.497000,4.022000 9.747000,4.312000 9.988000,4.610000 10.220000,4.915000 10.443000,5.227000 10.656000,5.546000 10.859000,5.871000 11.259000,6.489000 11.473000,6.788000 11.696000,7.081000 11.928000,7.367000 12.168000,7.647000 12.416000,7.918000 12.672000,8.182000 12.937000,8.439000 13.209000,8.687000 13.488000,8.927000 13.774000,9.158000 14.368000,9.594000 14.674000,9.798000 14.986000,9.993000 15.304000,10.179000 15.627000,10.355000 15.956000,10.521000 16.289000,10.677000 16.627000,10.823000 17.315000,11.084000 18.018000,11.303000 18.374000,11.396000 18.733000,11.479000 19.094000,11.550000 19.457000,11.611000 19.822000,11.661000 20.188000,11.700000 20.555000,11.728000 21.291000,11.750000 21.291000,12.250000 20.908000,12.244000 20.525000,12.227000 20.143000,12.198000 19.762000,12.158000 19.382000,12.106000 19.004000,12.042000 18.628000,11.968000 18.255000,11.882000 17.884000,11.784000 17.517000,11.676000 17.152000,11.556000 16.792000,11.426000 16.436000,11.285000 16.084000,11.133000 15.737000,10.970000 15.395000,10.798000 15.058000,10.615000 14.727000,10.421000 14.402000,10.218000 14.084000,10.005000 13.771000,9.783000 13.466000,9.551000 13.168000,9.311000 12.877000,9.061000 12.594000,8.803000 12.319000,8.536000 12.052000,8.261000 11.794000,7.978000 11.544000,7.688000 11.303000,7.390000 11.071000,7.085000 10.848000,6.773000 10.635000,6.454000 10.432000,6.129000 10.032000,5.511000 9.818000,5.212000 9.595000,4.919000 9.123000,4.353000 8.875000,4.082000 8.619000,3.818000 8.354000,3.561000 8.082000,3.313000 7.517000,2.842000 6.923000,2.406000 6.617000,2.202000 6.305000,2.007000 5.987000,1.821000 5.664000,1.645000 5.335000,1.479000 5.002000,1.323000 4.664000,1.177000 3.976000,0.916000 3.273000,0.697000 2.917000,0.604000 2.558000,0.521000 2.197000,0.450000 1.834000,0.389000 1.469000,0.339000 1.103000,0.300000 0.736000,0.272000 0.368000,0.256000 0.000000,0.250000 z%22 /></g><g id=%22C243%22 data-name=%22as_component__PNGCOJINIPILRSBFUVHAAAKRQR7F7X5DOV45DHY3HPYOUZICQITA%22><path class=%22layer_1_0%22 d=%22M 9.889000,3.500000 0.000000,1.275000 0.000000,-1.275000 9.889000,-3.500000 16.000000,-3.500000 16.000000,3.500000 z%22 /><path class=%22layer_2_0%22 d=%22M 0.000000,-0.250000 10.000000,-2.500000 10.000000,2.500000 0.000000,0.250000 z%22 /><rect class=%22layer_2_0%22 x=%2210.300000%22 y=%22-2.500000%22 width=%220.300000%22 height=%225.000000%22 /><rect class=%22layer_2_0%22 x=%2210.900000%22 y=%22-2.500000%22 width=%220.300000%22 height=%225.000000%22 /><rect class=%22layer_2_0%22 x=%2211.500000%22 y=%22-2.500000%22 width=%220.300000%22 height=%225.000000%22 /><rect class=%22layer_2_0%22 x=%2212.100000%22 y=%22-2.500000%22 width=%220.300000%22 height=%225.000000%22 /><rect class=%22layer_2_0%22 x=%2212.700000%22 y=%22-2.500000%22 width=%220.300000%22 height=%225.000000%22 /><rect class=%22layer_2_0%22 x=%2213.300000%22 y=%22-2.500000%22 width=%220.300000%22 height=%225.000000%22 /><rect class=%22layer_2_0%22 x=%2213.900000%22 y=%22-2.500000%22 width=%220.300000%22 height=%225.000000%22 /><rect class=%22layer_2_0%22 x=%2214.500000%22 y=%22-2.500000%22 width=%220.300000%22 height=%225.000000%22 /><rect class=%22layer_2_0%22 x=%2215.100000%22 y=%22-2.500000%22 width=%220.300000%22 height=%225.000000%22 /><rect class=%22layer_2_0%22 x=%2215.700000%22 y=%22-2.500000%22 width=%220.300000%22 height=%225.000000%22 /></g><g id=%22C244%22 data-name=%22s_bend_l_16P99448099815197_o_13P384255880775292_p_Strip%22><path class=%22layer_1_0%22 d=%22M 0.000000,-1.250000 0.351000,-1.244000 0.701000,-1.225000 1.050000,-1.195000 1.399000,-1.152000 1.745000,-1.096000 2.089000,-1.029000 2.431000,-0.950000 2.769000,-0.858000 3.105000,-0.755000 3.436000,-0.640000 3.763000,-0.514000 4.086000,-0.376000 4.403000,-0.227000 4.716000,-0.067000 5.022000,0.104000 5.322000,0.285000 5.615000,0.477000 5.902000,0.680000 6.181000,0.892000 6.453000,1.114000 6.717000,1.345000 6.972000,1.585000 7.219000,1.834000 7.457000,2.092000 7.686000,2.358000 7.905000,2.632000 8.115000,2.913000 8.314000,3.201000 8.504000,3.497000 8.683000,3.798000 8.851000,4.106000 9.008000,4.420000 9.154000,4.739000 9.289000,5.063000 9.412000,5.391000 9.524000,5.723000 9.624000,6.060000 9.712000,6.399000 9.853000,6.906000 10.030000,7.401000 10.240000,7.883000 10.484000,8.349000 10.760000,8.796000 11.067000,9.224000 11.403000,9.628000 11.766000,10.008000 12.156000,10.362000 12.569000,10.687000 13.004000,10.983000 13.459000,11.247000 13.931000,11.479000 14.418000,11.677000 14.918000,11.840000 15.171000,11.909000 15.686000,12.019000 16.206000,12.092000 16.468000,12.116000 16.994000,12.134000 16.994000,14.634000 16.643000,14.628000 16.293000,14.609000 15.944000,14.579000 15.596000,14.536000 15.249000,14.480000 14.905000,14.413000 14.563000,14.334000 14.225000,14.242000 13.889000,14.139000 13.558000,14.024000 13.231000,13.898000 12.908000,13.760000 12.591000,13.611000 12.279000,13.451000 11.972000,13.280000 11.672000,13.099000 11.379000,12.907000 11.092000,12.704000 10.813000,12.492000 10.541000,12.270000 10.277000,12.039000 10.022000,11.799000 9.775000,11.550000 9.537000,11.292000 9.308000,11.026000 9.089000,10.752000 8.879000,10.471000 8.680000,10.183000 8.490000,9.887000 8.312000,9.586000 8.143000,9.278000 7.986000,8.964000 7.840000,8.645000 7.705000,8.321000 7.582000,7.993000 7.470000,7.661000 7.370000,7.324000 7.282000,6.985000 7.216000,6.730000 7.057000,6.229000 6.863000,5.740000 6.636000,5.266000 6.376000,4.809000 6.084000,4.371000 5.763000,3.955000 5.413000,3.563000 5.036000,3.196000 4.635000,2.856000 4.210000,2.545000 3.765000,2.265000 3.302000,2.017000 2.822000,1.802000 2.328000,1.621000 1.823000,1.475000 1.308000,1.365000 1.049000,1.324000 0.526000,1.268000 0.000000,1.250000 z%22 /><path class=%22layer_2_0%22 d=%22M 0.000000,-0.250000 0.316000,-0.244000 0.631000,-0.228000 0.945000,-0.200000 1.259000,-0.161000 1.570000,-0.112000 1.880000,-0.051000 2.187000,0.020000 2.492000,0.102000 2.794000,0.195000 3.387000,0.412000 3.677000,0.536000 3.963000,0.670000 4.244000,0.814000 4.519000,0.968000 4.789000,1.132000 5.053000,1.305000 5.563000,1.677000 5.807000,1.877000 6.044000,2.085000 6.274000,2.301000 6.497000,2.526000 6.711000,2.758000 6.917000,2.997000 7.114000,3.243000 7.303000,3.496000 7.482000,3.756000 7.652000,4.022000 7.813000,4.293000 7.965000,4.570000 8.106000,4.852000 8.238000,5.139000 8.359000,5.431000 8.470000,5.726000 8.571000,6.025000 8.661000,6.328000 8.740000,6.633000 8.815000,6.922000 8.900000,7.208000 8.995000,7.490000 9.214000,8.044000 9.472000,8.582000 9.615000,8.844000 9.767000,9.100000 9.928000,9.351000 10.276000,9.835000 10.462000,10.068000 10.859000,10.513000 11.286000,10.929000 11.510000,11.125000 11.741000,11.314000 11.978000,11.494000 12.222000,11.666000 12.471000,11.829000 12.987000,12.129000 13.252000,12.265000 13.796000,12.509000 14.355000,12.714000 14.928000,12.879000 15.511000,13.004000 16.101000,13.087000 16.398000,13.113000 16.696000,13.129000 16.994000,13.134000 16.994000,13.634000 16.678000,13.628000 16.363000,13.612000 16.049000,13.584000 15.735000,13.545000 15.424000,13.496000 15.114000,13.435000 14.807000,13.364000 14.502000,13.282000 14.200000,13.189000 13.902000,13.086000 13.607000,12.972000 13.317000,12.848000 13.031000,12.714000 12.751000,12.570000 12.475000,12.416000 12.205000,12.252000 11.941000,12.079000 11.431000,11.707000 11.187000,11.507000 10.950000,11.299000 10.720000,11.083000 10.497000,10.858000 10.283000,10.626000 10.077000,10.387000 9.880000,10.141000 9.691000,9.888000 9.512000,9.628000 9.342000,9.362000 9.181000,9.091000 9.029000,8.814000 8.888000,8.532000 8.756000,8.245000 8.635000,7.953000 8.524000,7.658000 8.423000,7.359000 8.333000,7.056000 8.254000,6.751000 8.179000,6.462000 8.094000,6.176000 7.999000,5.894000 7.780000,5.340000 7.522000,4.802000 7.379000,4.540000 7.227000,4.284000 7.066000,4.033000 6.896000,3.788000 6.532000,3.316000 6.135000,2.871000 5.708000,2.455000 5.253000,2.070000 5.016000,1.890000 4.772000,1.718000 4.523000,1.555000 4.008000,1.255000 3.742000,1.119000 3.472000,0.993000 3.198000,0.875000 2.639000,0.670000 2.066000,0.505000 1.483000,0.381000 1.189000,0.334000 0.893000,0.297000 0.596000,0.271000 0.298000,0.255000 0.000000,0.250000 z%22 /></g><g id=%22C245%22 data-name=%22as_component__PNGCOJINIPILRSBFUVHAAAKRQR7F7X5DOV45DHY3HPYOUZICQITA%22><path class=%22layer_1_0%22 d=%22M 9.889000,3.500000 0.000000,1.275000 0.000000,-1.275000 9.889000,-3.500000 16.000000,-3.500000 16.000000,3.500000 z%22 /><path class=%22layer_2_0%22 d=%22M 0.000000,-0.250000 10.000000,-2.500000 10.000000,2.500000 0.000000,0.250000 z%22 /><rect class=%22layer_2_0%22 x=%2210.300000%22 y=%22-2.500000%22 width=%220.300000%22 height=%225.000000%22 /><rect class=%22layer_2_0%22 x=%2210.900000%22 y=%22-2.500000%22 width=%220.300000%22 height=%225.000000%22 /><rect class=%22layer_2_0%22 x=%2211.500000%22 y=%22-2.500000%22 width=%220.300000%22 height=%225.000000%22 /><rect class=%22layer_2_0%22 x=%2212.100000%22 y=%22-2.500000%22 width=%220.300000%22 height=%225.000000%22 /><rect class=%22layer_2_0%22 x=%2212.700000%22 y=%22-2.500000%22 width=%220.300000%22 height=%225.000000%22 /><rect class=%22layer_2_0%22 x=%2213.300000%22 y=%22-2.500000%22 width=%220.300000%22 height=%225.000000%22 /><rect class=%22layer_2_0%22 x=%2213.900000%22 y=%22-2.500000%22 width=%220.300000%22 height=%225.000000%22 /><rect class=%22layer_2_0%22 x=%2214.500000%22 y=%22-2.500000%22 width=%220.300000%22 height=%225.000000%22 /><rect class=%22layer_2_0%22 x=%2215.100000%22 y=%22-2.500000%22 width=%220.300000%22 height=%225.000000%22 /><rect class=%22layer_2_0%22 x=%2215.700000%22 y=%22-2.500000%22 width=%220.300000%22 height=%225.000000%22 /></g><g id=%22C246%22 data-name=%22s_bend_l_16P410001543782222_o_2P494658794392924_p_Strip%22><path class=%22layer_1_0%22 d=%22M 0.000000,-1.250000 0.622000,-1.243000 1.244000,-1.223000 1.865000,-1.190000 2.485000,-1.143000 3.104000,-1.083000 3.722000,-1.009000 4.338000,-0.922000 4.951000,-0.822000 5.563000,-0.709000 6.172000,-0.582000 6.778000,-0.443000 7.381000,-0.290000 7.981000,-0.124000 8.577000,0.054000 9.121000,0.217000 9.668000,0.368000 10.219000,0.508000 10.773000,0.635000 11.329000,0.751000 11.888000,0.854000 12.448000,0.946000 13.011000,1.025000 13.575000,1.092000 14.140000,1.147000 14.707000,1.190000 15.274000,1.221000 15.842000,1.239000 16.410000,1.245000 16.410000,3.745000 15.788000,3.738000 15.166000,3.718000 14.545000,3.685000 13.925000,3.638000 13.306000,3.578000 12.688000,3.504000 12.072000,3.417000 11.459000,3.317000 10.847000,3.204000 10.238000,3.077000 9.632000,2.938000 9.029000,2.785000 8.429000,2.619000 7.833000,2.441000 7.289000,2.278000 6.742000,2.127000 6.191000,1.987000 5.637000,1.860000 5.081000,1.744000 4.522000,1.641000 3.962000,1.549000 3.399000,1.470000 2.835000,1.403000 2.270000,1.348000 1.703000,1.305000 1.136000,1.274000 0.568000,1.256000 0.000000,1.250000 z%22 /><path class=%22layer_2_0%22 d=%22M 0.000000,-0.250000 0.600000,-0.244000 1.201000,-0.224000 1.800000,-0.192000 2.399000,-0.147000 2.996000,-0.088000 3.593000,-0.017000 4.187000,0.067000 4.780000,0.163000 5.370000,0.273000 5.958000,0.395000 6.543000,0.529000 7.125000,0.677000 7.704000,0.837000 8.279000,1.009000 8.844000,1.178000 9.413000,1.335000 9.984000,1.480000 10.559000,1.612000 11.136000,1.732000 11.716000,1.839000 12.298000,1.934000 12.882000,2.017000 13.467000,2.086000 14.054000,2.143000 14.642000,2.188000 15.231000,2.220000 15.820000,2.239000 16.410000,2.245000 16.410000,2.745000 15.810000,2.739000 15.209000,2.719000 14.610000,2.687000 14.011000,2.642000 13.414000,2.583000 12.817000,2.512000 12.223000,2.429000 11.630000,2.332000 11.040000,2.222000 10.452000,2.100000 9.867000,1.966000 9.285000,1.818000 8.706000,1.658000 8.131000,1.486000 7.566000,1.317000 6.997000,1.160000 6.426000,1.015000 5.851000,0.883000 5.274000,0.763000 4.694000,0.656000 4.112000,0.561000 3.528000,0.478000 2.943000,0.409000 2.356000,0.352000 1.768000,0.307000 1.179000,0.275000 0.590000,0.256000 0.000000,0.250000 z%22 /></g><g id=%22C247%22 data-name=%22as_component__PNGCOJINIPILRSBFUVHAAAKRQR7F7X5DOV45DHY3HPYOUZICQITA%22><path class=%22layer_1_0%22 d=%22M 9.889000,3.500000 0.000000,1.275000 0.000000,-1.275000 9.889000,-3.500000 16.000000,-3.500000 16.000000,3.500000 z%22 /><path class=%22layer_2_0%22 d=%22M 0.000000,-0.250000 10.000000,-2.500000 10.000000,2.500000 0.000000,0.250000 z%22 /><rect class=%22layer_2_0%22 x=%2210.300000%22 y=%22-2.500000%22 width=%220.300000%22 height=%225.000000%22 /><rect class=%22layer_2_0%22 x=%2210.900000%22 y=%22-2.500000%22 width=%220.300000%22 height=%225.000000%22 /><rect class=%22layer_2_0%22 x=%2211.500000%22 y=%22-2.500000%22 width=%220.300000%22 height=%225.000000%22 /><rect class=%22layer_2_0%22 x=%2212.100000%22 y=%22-2.500000%22 width=%220.300000%22 height=%225.000000%22 /><rect class=%22layer_2_0%22 x=%2212.700000%22 y=%22-2.500000%22 width=%220.300000%22 height=%225.000000%22 /><rect class=%22layer_2_0%22 x=%2213.300000%22 y=%22-2.500000%22 width=%220.300000%22 height=%225.000000%22 /><rect class=%22layer_2_0%22 x=%2213.900000%22 y=%22-2.500000%22 width=%220.300000%22 height=%225.000000%22 /><rect class=%22layer_2_0%22 x=%2214.500000%22 y=%22-2.500000%22 width=%220.300000%22 height=%225.000000%22 /><rect class=%22layer_2_0%22 x=%2215.100000%22 y=%22-2.500000%22 width=%220.300000%22 height=%225.000000%22 /><rect class=%22layer_2_0%22 x=%2215.700000%22 y=%22-2.500000%22 width=%220.300000%22 height=%225.000000%22 /></g><g id=%22C248%22 data-name=%22s_bend_l_16P285474179948388_o_12P44007521980052_p_Strip%22><path class=%22layer_1_0%22 d=%22M 0.000000,-1.250000 0.351000,-1.244000 0.702000,-1.225000 1.051000,-1.193000 1.400000,-1.148000 1.746000,-1.091000 2.090000,-1.022000 2.432000,-0.940000 2.770000,-0.846000 3.105000,-0.739000 3.435000,-0.621000 3.761000,-0.490000 4.082000,-0.348000 4.398000,-0.194000 4.708000,-0.029000 5.012000,0.147000 5.309000,0.334000 5.599000,0.532000 5.882000,0.740000 6.157000,0.958000 6.424000,1.186000 6.683000,1.423000 6.933000,1.670000 7.173000,1.926000 7.405000,2.190000 7.626000,2.462000 7.838000,2.742000 8.039000,3.030000 8.230000,3.325000 8.410000,3.627000 8.579000,3.934000 8.736000,4.248000 8.882000,4.568000 9.017000,4.892000 9.139000,5.221000 9.250000,5.554000 9.349000,5.891000 9.504000,6.389000 9.694000,6.873000 9.920000,7.343000 10.045000,7.572000 10.320000,8.014000 10.626000,8.436000 10.962000,8.834000 11.326000,9.206000 11.716000,9.552000 12.130000,9.868000 12.566000,10.154000 13.022000,10.407000 13.494000,10.626000 13.981000,10.811000 14.481000,10.960000 14.734000,11.021000 15.246000,11.115000 15.764000,11.171000 16.285000,11.190000 16.285000,13.690000 15.934000,13.684000 15.583000,13.665000 15.234000,13.633000 14.885000,13.588000 14.539000,13.531000 14.195000,13.462000 13.853000,13.380000 13.515000,13.286000 13.180000,13.179000 12.850000,13.061000 12.524000,12.930000 12.203000,12.788000 11.887000,12.634000 11.577000,12.469000 11.273000,12.293000 10.976000,12.106000 10.686000,11.908000 10.403000,11.700000 10.128000,11.482000 9.861000,11.254000 9.602000,11.017000 9.352000,10.770000 9.112000,10.514000 8.880000,10.250000 8.659000,9.978000 8.447000,9.698000 8.246000,9.410000 8.055000,9.115000 7.875000,8.813000 7.706000,8.506000 7.549000,8.192000 7.403000,7.872000 7.268000,7.548000 7.146000,7.219000 7.035000,6.886000 6.937000,6.549000 6.781000,6.051000 6.591000,5.567000 6.482000,5.330000 6.240000,4.868000 5.965000,4.426000 5.659000,4.004000 5.323000,3.606000 4.959000,3.234000 4.569000,2.888000 4.155000,2.572000 3.719000,2.286000 3.493000,2.156000 3.029000,1.919000 2.549000,1.717000 2.055000,1.550000 1.551000,1.419000 1.039000,1.325000 0.521000,1.269000 0.000000,1.250000 z%22 /><path class=%22layer_2_0%22 d=%22M 0.000000,-0.250000 0.315000,-0.244000 0.629000,-0.227000 0.943000,-0.199000 1.255000,-0.159000 1.566000,-0.108000 1.875000,-0.045000 2.181000,0.028000 2.484000,0.113000 2.784000,0.208000 3.081000,0.314000 3.373000,0.431000 3.661000,0.559000 3.944000,0.697000 4.222000,0.845000 4.495000,1.003000 4.761000,1.170000 5.275000,1.534000 5.522000,1.730000 5.761000,1.934000 5.993000,2.147000 6.217000,2.369000 6.433000,2.598000 6.640000,2.835000 6.839000,3.079000 7.029000,3.330000 7.209000,3.588000 7.380000,3.853000 7.542000,4.123000 7.693000,4.399000 7.835000,4.681000 7.966000,4.967000 8.086000,5.258000 8.196000,5.553000 8.295000,5.852000 8.384000,6.154000 8.467000,6.439000 8.560000,6.721000 8.664000,6.999000 8.901000,7.543000 9.034000,7.808000 9.177000,8.068000 9.329000,8.323000 9.490000,8.572000 9.661000,8.816000 9.839000,9.052000 10.027000,9.283000 10.222000,9.506000 10.637000,9.931000 10.855000,10.131000 11.081000,10.324000 11.314000,10.508000 11.553000,10.684000 11.798000,10.851000 12.049000,11.009000 12.306000,11.158000 12.568000,11.298000 12.835000,11.428000 13.106000,11.548000 13.382000,11.658000 13.661000,11.758000 13.944000,11.848000 14.230000,11.928000 14.518000,11.997000 14.809000,12.056000 15.102000,12.104000 15.396000,12.142000 15.692000,12.169000 15.988000,12.185000 16.285000,12.190000 16.285000,12.690000 15.970000,12.684000 15.656000,12.667000 15.342000,12.639000 15.030000,12.599000 14.719000,12.548000 14.410000,12.485000 14.104000,12.412000 13.801000,12.327000 13.501000,12.232000 13.204000,12.126000 12.912000,12.009000 12.624000,11.881000 12.341000,11.743000 12.063000,11.595000 11.790000,11.437000 11.524000,11.270000 11.010000,10.906000 10.763000,10.710000 10.524000,10.506000 10.292000,10.293000 10.068000,10.071000 9.852000,9.842000 9.645000,9.605000 9.446000,9.361000 9.256000,9.110000 9.076000,8.852000 8.905000,8.587000 8.743000,8.317000 8.592000,8.041000 8.450000,7.759000 8.319000,7.473000 8.199000,7.182000 8.089000,6.887000 7.990000,6.588000 7.901000,6.286000 7.818000,6.001000 7.725000,5.719000 7.621000,5.441000 7.384000,4.897000 7.251000,4.632000 7.108000,4.372000 6.956000,4.117000 6.795000,3.868000 6.624000,3.624000 6.446000,3.388000 6.258000,3.157000 6.063000,2.934000 5.648000,2.509000 5.430000,2.309000 5.204000,2.116000 4.732000,1.756000 4.487000,1.589000 4.236000,1.431000 3.979000,1.282000 3.717000,1.142000 3.450000,1.012000 3.179000,0.892000 2.903000,0.782000 2.624000,0.682000 2.341000,0.592000 2.055000,0.512000 1.767000,0.443000 1.476000,0.384000 1.183000,0.336000 0.889000,0.298000 0.297000,0.255000 0.000000,0.250000 z%22 /></g><g id=%22C249%22 data-name=%22as_component__PNGCOJINIPILRSBFUVHAAAKRQR7F7X5DOV45DHY3HPYOUZICQITA%22><path class=%22layer_1_0%22 d=%22M 9.889000,3.500000 0.000000,1.275000 0.000000,-1.275000 9.889000,-3.500000 16.000000,-3.500000 16.000000,3.500000 z%22 /><path class=%22layer_2_0%22 d=%22M 0.000000,-0.250000 10.000000,-2.500000 10.000000,2.500000 0.000000,0.250000 z%22 /><rect class=%22layer_2_0%22 x=%2210.300000%22 y=%22-2.500000%22 width=%220.300000%22 height=%225.000000%22 /><rect class=%22layer_2_0%22 x=%2210.900000%22 y=%22-2.500000%22 width=%220.300000%22 height=%225.000000%22 /><rect class=%22layer_2_0%22 x=%2211.500000%22 y=%22-2.500000%22 width=%220.300000%22 height=%225.000000%22 /><rect class=%22layer_2_0%22 x=%2212.100000%22 y=%22-2.500000%22 width=%220.300000%22 height=%225.000000%22 /><rect class=%22layer_2_0%22 x=%2212.700000%22 y=%22-2.500000%22 width=%220.300000%22 height=%225.000000%22 /><rect class=%22layer_2_0%22 x=%2213.300000%22 y=%22-2.500000%22 width=%220.300000%22 height=%225.000000%22 /><rect class=%22layer_2_0%22 x=%2213.900000%22 y=%22-2.500000%22 width=%220.300000%22 height=%225.000000%22 /><rect class=%22layer_2_0%22 x=%2214.500000%22 y=%22-2.500000%22 width=%220.300000%22 height=%225.000000%22 /><rect class=%22layer_2_0%22 x=%2215.100000%22 y=%22-2.500000%22 width=%220.300000%22 height=%225.000000%22 /><rect class=%22layer_2_0%22 x=%2215.700000%22 y=%22-2.500000%22 width=%220.300000%22 height=%225.000000%22 /></g><g id=%22C250%22 data-name=%22s_bend_l_16P185009352625887_o_20P849846438119553_p_Strip%22><path class=%22layer_1_0%22 d=%22M 0.000000,-1.250000 0.350000,-1.244000 0.699000,-1.225000 1.047000,-1.193000 1.394000,-1.148000 1.740000,-1.091000 2.082000,-1.022000 2.422000,-0.939000 2.759000,-0.845000 3.092000,-0.738000 3.421000,-0.620000 3.746000,-0.489000 4.066000,-0.347000 4.380000,-0.193000 4.688000,-0.028000 4.990000,0.148000 5.286000,0.336000 5.574000,0.533000 5.855000,0.742000 6.129000,0.960000 6.394000,1.188000 6.651000,1.426000 6.899000,1.672000 7.137000,1.928000 7.367000,2.192000 7.586000,2.465000 7.796000,2.745000 7.995000,3.033000 8.183000,3.327000 8.361000,3.629000 8.527000,3.936000 8.682000,4.250000 8.826000,4.569000 8.958000,4.893000 9.078000,5.221000 9.186000,5.554000 9.282000,5.890000 9.366000,6.230000 9.437000,6.572000 9.495000,6.917000 9.541000,7.264000 9.575000,7.612000 9.595000,7.962000 9.603000,8.311000 9.599000,8.661000 9.581000,9.010000 9.551000,9.359000 9.508000,9.706000 9.452000,10.051000 9.384000,10.395000 9.303000,10.735000 9.193000,11.241000 9.152000,11.496000 9.098000,12.011000 9.085000,12.269000 9.087000,12.786000 9.127000,13.302000 9.161000,13.559000 9.257000,14.067000 9.390000,14.567000 9.559000,15.056000 9.656000,15.296000 9.878000,15.764000 10.132000,16.214000 10.419000,16.645000 10.736000,17.054000 11.082000,17.438000 11.456000,17.797000 11.854000,18.127000 12.275000,18.427000 12.717000,18.696000 13.178000,18.932000 13.654000,19.134000 13.898000,19.222000 14.393000,19.370000 14.898000,19.483000 15.410000,19.558000 15.926000,19.595000 16.185000,19.600000 16.185000,22.100000 15.835000,22.094000 15.486000,22.075000 15.138000,22.043000 14.791000,21.998000 14.445000,21.941000 14.103000,21.872000 13.763000,21.789000 13.426000,21.695000 13.093000,21.588000 12.764000,21.470000 12.439000,21.339000 12.119000,21.197000 11.805000,21.043000 11.497000,20.878000 11.195000,20.702000 10.899000,20.514000 10.611000,20.317000 10.330000,20.108000 10.056000,19.890000 9.791000,19.662000 9.534000,19.424000 9.286000,19.178000 9.048000,18.922000 8.818000,18.658000 8.599000,18.385000 8.389000,18.105000 8.190000,17.818000 8.002000,17.523000 7.824000,17.221000 7.658000,16.914000 7.503000,16.600000 7.359000,16.281000 7.227000,15.957000 7.107000,15.629000 6.999000,15.296000 6.903000,14.960000 6.819000,14.620000 6.748000,14.278000 6.690000,13.933000 6.644000,13.586000 6.610000,13.238000 6.590000,12.888000 6.582000,12.539000 6.586000,12.189000 6.604000,11.840000 6.634000,11.491000 6.677000,11.144000 6.733000,10.799000 6.801000,10.455000 6.882000,10.115000 6.992000,9.609000 7.033000,9.354000 7.064000,9.097000 7.100000,8.581000 7.098000,8.064000 7.082000,7.805000 7.024000,7.291000 6.980000,7.036000 6.866000,6.531000 6.715000,6.037000 6.529000,5.554000 6.307000,5.086000 6.053000,4.636000 5.766000,4.205000 5.449000,3.796000 5.279000,3.601000 4.919000,3.229000 4.533000,2.885000 4.123000,2.569000 3.691000,2.284000 3.240000,2.032000 2.771000,1.813000 2.287000,1.628000 1.792000,1.480000 1.287000,1.368000 0.775000,1.292000 0.517000,1.269000 0.000000,1.250000 z%22 /><path class=%22layer_2_0%22 d=%22M 0.000000,-0.250000 0.313000,-0.244000 0.626000,-0.227000 0.938000,-0.199000 1.249000,-0.159000 1.558000,-0.108000 1.866000,-0.045000 2.170000,0.028000 2.472000,0.113000 2.770000,0.208000 3.065000,0.315000 3.356000,0.432000 3.642000,0.559000 3.924000,0.697000 4.200000,0.845000 4.471000,1.003000 4.735000,1.170000 4.994000,1.348000 5.246000,1.534000 5.491000,1.730000 5.728000,1.934000 5.958000,2.147000 6.180000,2.368000 6.394000,2.597000 6.600000,2.834000 6.796000,3.078000 6.984000,3.329000 7.162000,3.587000 7.331000,3.851000 7.490000,4.121000 7.639000,4.396000 7.778000,4.677000 7.907000,4.963000 8.025000,5.253000 8.133000,5.547000 8.230000,5.845000 8.316000,6.147000 8.390000,6.451000 8.454000,6.758000 8.507000,7.067000 8.548000,7.378000 8.578000,7.690000 8.596000,8.002000 8.603000,8.316000 8.599000,8.629000 8.583000,8.942000 8.556000,9.254000 8.518000,9.565000 8.468000,9.875000 8.407000,10.182000 8.335000,10.487000 8.267000,10.774000 8.209000,11.064000 8.162000,11.355000 8.126000,11.648000 8.101000,11.942000 8.086000,12.237000 8.088000,12.827000 8.106000,13.122000 8.134000,13.416000 8.173000,13.708000 8.222000,13.999000 8.282000,14.288000 8.353000,14.575000 8.434000,14.859000 8.525000,15.140000 8.626000,15.417000 8.737000,15.690000 8.990000,16.224000 9.130000,16.483000 9.280000,16.738000 9.439000,16.986000 9.607000,17.229000 9.784000,17.466000 9.969000,17.695000 10.163000,17.918000 10.364000,18.134000 10.573000,18.342000 10.790000,18.543000 11.244000,18.920000 11.481000,19.095000 11.725000,19.262000 11.974000,19.420000 12.229000,19.569000 12.489000,19.708000 12.754000,19.838000 13.024000,19.958000 13.298000,20.068000 13.576000,20.168000 13.857000,20.258000 14.141000,20.338000 14.428000,20.407000 14.717000,20.466000 15.008000,20.514000 15.301000,20.552000 15.595000,20.579000 15.890000,20.595000 16.185000,20.600000 16.185000,21.100000 15.872000,21.094000 15.559000,21.077000 15.247000,21.049000 14.936000,21.009000 14.627000,20.958000 14.320000,20.895000 14.015000,20.822000 13.713000,20.737000 13.415000,20.642000 13.120000,20.535000 12.829000,20.418000 12.543000,20.291000 12.261000,20.153000 11.985000,20.005000 11.714000,19.847000 11.450000,19.680000 11.191000,19.502000 10.939000,19.316000 10.694000,19.120000 10.457000,18.916000 10.227000,18.703000 10.005000,18.482000 9.791000,18.253000 9.586000,18.016000 9.389000,17.772000 9.201000,17.521000 9.023000,17.263000 8.854000,16.999000 8.695000,16.729000 8.546000,16.454000 8.407000,16.173000 8.278000,15.887000 8.160000,15.597000 8.052000,15.303000 7.955000,15.005000 7.869000,14.703000 7.795000,14.399000 7.731000,14.092000 7.678000,13.783000 7.637000,13.472000 7.607000,13.161000 7.589000,12.848000 7.582000,12.534000 7.586000,12.221000 7.602000,11.908000 7.629000,11.596000 7.667000,11.285000 7.717000,10.975000 7.778000,10.668000 7.850000,10.363000 7.918000,10.076000 7.976000,9.786000 8.023000,9.495000 8.059000,9.202000 8.084000,8.908000 8.099000,8.613000 8.097000,8.023000 8.079000,7.728000 8.051000,7.434000 8.012000,7.142000 7.963000,6.851000 7.903000,6.562000 7.832000,6.275000 7.751000,5.991000 7.660000,5.710000 7.559000,5.433000 7.448000,5.160000 7.326000,4.891000 7.195000,4.626000 7.055000,4.367000 6.905000,4.112000 6.746000,3.864000 6.578000,3.621000 6.401000,3.384000 6.023000,2.932000 5.821000,2.716000 5.612000,2.508000 5.395000,2.307000 5.171000,2.115000 4.941000,1.931000 4.704000,1.755000 4.460000,1.588000 4.211000,1.430000 3.956000,1.281000 3.696000,1.142000 3.431000,1.012000 3.161000,0.892000 2.887000,0.782000 2.609000,0.682000 2.328000,0.592000 2.044000,0.512000 1.757000,0.443000 1.468000,0.384000 1.177000,0.336000 0.884000,0.298000 0.295000,0.255000 0.000000,0.250000 z%22 /></g><g id=%22C251%22 data-name=%22as_component__PNGCOJINIPILRSBFUVHAAAKRQR7F7X5DOV45DHY3HPYOUZICQITA%22><path class=%22layer_1_0%22 d=%22M 9.889000,3.500000 0.000000,1.275000 0.000000,-1.275000 9.889000,-3.500000 16.000000,-3.500000 16.000000,3.500000 z%22 /><path class=%22layer_2_0%22 d=%22M 0.000000,-0.250000 10.000000,-2.500000 10.000000,2.500000 0.000000,0.250000 z%22 /><rect class=%22layer_2_0%22 x=%2210.300000%22 y=%22-2.500000%22 width=%220.300000%22 height=%225.000000%22 /><rect class=%22layer_2_0%22 x=%2210.900000%22 y=%22-2.500000%22 width=%220.300000%22 height=%225.000000%22 /><rect class=%22layer_2_0%22 x=%2211.500000%22 y=%22-2.500000%22 width=%220.300000%22 height=%225.000000%22 /><rect class=%22layer_2_0%22 x=%2212.100000%22 y=%22-2.500000%22 width=%220.300000%22 height=%225.000000%22 /><rect class=%22layer_2_0%22 x=%2212.700000%22 y=%22-2.500000%22 width=%220.300000%22 height=%225.000000%22 /><rect class=%22layer_2_0%22 x=%2213.300000%22 y=%22-2.500000%22 width=%220.300000%22 height=%225.000000%22 /><rect class=%22layer_2_0%22 x=%2213.900000%22 y=%22-2.500000%22 width=%220.300000%22 height=%225.000000%22 /><rect class=%22layer_2_0%22 x=%2214.500000%22 y=%22-2.500000%22 width=%220.300000%22 height=%225.000000%22 /><rect class=%22layer_2_0%22 x=%2215.100000%22 y=%22-2.500000%22 width=%220.300000%22 height=%225.000000%22 /><rect class=%22layer_2_0%22 x=%2215.700000%22 y=%22-2.500000%22 width=%220.300000%22 height=%225.000000%22 /></g><g id=%22C252%22 data-name=%22s_bend_l_12P969426162294672_o_2P734463879160939_p_Strip%22><path class=%22layer_1_0%22 d=%22M 0.000000,-1.250000 0.514000,-1.242000 1.027000,-1.219000 1.540000,-1.181000 2.051000,-1.128000 2.560000,-1.060000 3.067000,-0.976000 3.571000,-0.878000 4.073000,-0.764000 4.570000,-0.636000 5.064000,-0.493000 5.553000,-0.335000 6.037000,-0.163000 6.516000,0.023000 6.989000,0.223000 7.394000,0.395000 7.804000,0.554000 8.218000,0.701000 8.636000,0.836000 9.059000,0.959000 9.485000,1.068000 9.913000,1.165000 10.345000,1.250000 10.779000,1.321000 11.214000,1.380000 11.652000,1.425000 12.090000,1.458000 12.529000,1.477000 12.969000,1.484000 12.969000,3.984000 12.455000,3.976000 11.942000,3.954000 11.429000,3.915000 10.918000,3.862000 10.409000,3.794000 9.902000,3.710000 9.398000,3.612000 8.896000,3.498000 8.399000,3.370000 7.905000,3.227000 7.416000,3.069000 6.932000,2.897000 6.453000,2.711000 5.980000,2.511000 5.575000,2.339000 5.165000,2.180000 4.751000,2.033000 4.333000,1.898000 3.910000,1.775000 3.484000,1.666000 3.056000,1.569000 2.624000,1.484000 2.190000,1.413000 1.755000,1.354000 1.317000,1.309000 0.879000,1.276000 0.440000,1.257000 0.000000,1.250000 z%22 /><path class=%22layer_2_0%22 d=%22M 0.000000,-0.250000 0.484000,-0.243000 0.968000,-0.221000 1.451000,-0.185000 1.932000,-0.135000 2.412000,-0.071000 2.890000,0.008000 3.365000,0.101000 3.837000,0.208000 4.306000,0.329000 4.771000,0.463000 5.232000,0.612000 5.688000,0.774000 6.140000,0.949000 6.585000,1.138000 7.018000,1.321000 7.455000,1.492000 7.897000,1.649000 8.344000,1.793000 8.795000,1.923000 9.249000,2.040000 9.707000,2.144000 10.168000,2.234000 10.631000,2.310000 11.096000,2.373000 11.563000,2.421000 12.031000,2.456000 12.500000,2.477000 12.969000,2.484000 12.969000,2.984000 12.485000,2.977000 12.001000,2.955000 11.518000,2.919000 11.037000,2.869000 10.557000,2.805000 10.079000,2.726000 9.604000,2.633000 9.132000,2.526000 8.663000,2.405000 8.198000,2.271000 7.737000,2.122000 7.281000,1.960000 6.829000,1.785000 6.384000,1.596000 5.951000,1.413000 5.514000,1.242000 5.072000,1.085000 4.625000,0.941000 4.174000,0.811000 3.720000,0.694000 3.262000,0.590000 2.801000,0.500000 2.338000,0.424000 1.873000,0.361000 1.406000,0.313000 0.938000,0.278000 0.469000,0.257000 0.000000,0.250000 z%22 /></g><g id=%22C253%22 data-name=%22as_component__PNGCOJINIPILRSBFUVHAAAKRQR7F7X5DOV45DHY3HPYOUZICQITA%22><path class=%22layer_1_0%22 d=%22M 9.889000,3.500000 0.000000,1.275000 0.000000,-1.275000 9.889000,-3.500000 16.000000,-3.500000 16.000000,3.500000 z%22 /><path class=%22layer_2_0%22 d=%22M 0.000000,-0.250000 10.000000,-2.500000 10.000000,2.500000 0.000000,0.250000 z%22 /><rect class=%22layer_2_0%22 x=%2210.300000%22 y=%22-2.500000%22 width=%220.300000%22 height=%225.000000%22 /><rect class=%22layer_2_0%22 x=%2210.900000%22 y=%22-2.500000%22 width=%220.300000%22 height=%225.000000%22 /><rect class=%22layer_2_0%22 x=%2211.500000%22 y=%22-2.500000%22 width=%220.300000%22 height=%225.000000%22 /><rect class=%22layer_2_0%22 x=%2212.100000%22 y=%22-2.500000%22 width=%220.300000%22 height=%225.000000%22 /><rect class=%22layer_2_0%22 x=%2212.700000%22 y=%22-2.500000%22 width=%220.300000%22 height=%225.000000%22 /><rect class=%22layer_2_0%22 x=%2213.300000%22 y=%22-2.500000%22 width=%220.300000%22 height=%225.000000%22 /><rect class=%22layer_2_0%22 x=%2213.900000%22 y=%22-2.500000%22 width=%220.300000%22 height=%225.000000%22 /><rect class=%22layer_2_0%22 x=%2214.500000%22 y=%22-2.500000%22 width=%220.300000%22 height=%225.000000%22 /><rect class=%22layer_2_0%22 x=%2215.100000%22 y=%22-2.500000%22 width=%220.300000%22 height=%225.000000%22 /><rect class=%22layer_2_0%22 x=%2215.700000%22 y=%22-2.500000%22 width=%220.300000%22 height=%225.000000%22 /></g><g id=%22C254%22 data-name=%22s_bend_l_12P246507603438637_o_9P729117368828026_p_Strip%22><path class=%22layer_1_0%22 d=%22M 0.000000,-1.250000 0.316000,-1.243000 0.632000,-1.223000 0.946000,-1.190000 1.259000,-1.144000 1.569000,-1.085000 1.877000,-1.012000 2.182000,-0.927000 2.482000,-0.829000 2.779000,-0.719000 3.070000,-0.596000 3.356000,-0.461000 3.636000,-0.315000 3.910000,-0.156000 4.177000,0.013000 4.436000,0.194000 4.688000,0.385000 4.931000,0.587000 5.166000,0.799000 5.392000,1.021000 5.608000,1.251000 5.814000,1.491000 6.010000,1.739000 6.195000,1.995000 6.370000,2.259000 6.533000,2.530000 6.685000,2.807000 6.825000,3.090000 6.953000,3.379000 7.069000,3.674000 7.172000,3.972000 7.263000,4.275000 7.341000,4.582000 7.454000,4.989000 7.600000,5.385000 7.780000,5.768000 7.990000,6.134000 8.231000,6.481000 8.500000,6.807000 8.795000,7.110000 9.114000,7.386000 9.456000,7.635000 9.817000,7.854000 10.195000,8.042000 10.588000,8.198000 10.992000,8.320000 11.198000,8.369000 11.615000,8.439000 12.036000,8.475000 12.247000,8.479000 12.247000,10.979000 11.931000,10.972000 11.615000,10.952000 11.301000,10.919000 10.988000,10.873000 10.678000,10.814000 10.370000,10.741000 10.065000,10.656000 9.765000,10.558000 9.468000,10.448000 9.177000,10.325000 8.891000,10.190000 8.611000,10.044000 8.337000,9.885000 8.070000,9.716000 7.811000,9.535000 7.559000,9.344000 7.316000,9.142000 7.081000,8.930000 6.855000,8.708000 6.639000,8.478000 6.433000,8.238000 6.237000,7.990000 6.052000,7.734000 5.877000,7.470000 5.714000,7.199000 5.562000,6.922000 5.422000,6.639000 5.294000,6.350000 5.178000,6.055000 5.075000,5.757000 4.984000,5.454000 4.906000,5.147000 4.793000,4.740000 4.647000,4.344000 4.468000,3.961000 4.366000,3.776000 4.140000,3.419000 3.885000,3.082000 3.603000,2.767000 3.295000,2.478000 2.965000,2.215000 2.613000,1.981000 2.243000,1.777000 1.857000,1.605000 1.458000,1.466000 1.049000,1.360000 0.841000,1.321000 0.422000,1.268000 0.000000,1.250000 z%22 /><path class=%22layer_2_0%22 d=%22M 0.000000,-0.250000 0.274000,-0.244000 0.548000,-0.227000 0.821000,-0.198000 1.092000,-0.158000 1.361000,-0.107000 1.628000,-0.044000 1.892000,0.030000 2.153000,0.115000 2.410000,0.211000 2.663000,0.317000 2.911000,0.434000 3.154000,0.561000 3.391000,0.698000 3.622000,0.846000 3.848000,1.002000 4.066000,1.168000 4.277000,1.343000 4.480000,1.527000 4.676000,1.719000 4.864000,1.919000 5.042000,2.127000 5.212000,2.342000 5.373000,2.565000 5.525000,2.793000 5.666000,3.028000 5.798000,3.269000 5.920000,3.514000 6.031000,3.765000 6.131000,4.020000 6.221000,4.280000 6.299000,4.542000 6.367000,4.808000 6.429000,5.053000 6.502000,5.296000 6.585000,5.535000 6.780000,6.003000 6.892000,6.230000 7.014000,6.452000 7.145000,6.669000 7.433000,7.085000 7.590000,7.284000 7.755000,7.476000 8.109000,7.838000 8.492000,8.169000 8.902000,8.467000 9.115000,8.603000 9.335000,8.730000 9.559000,8.847000 10.021000,9.054000 10.499000,9.221000 10.743000,9.289000 10.990000,9.347000 11.239000,9.394000 11.489000,9.431000 11.741000,9.458000 11.994000,9.474000 12.247000,9.479000 12.247000,9.979000 11.973000,9.973000 11.699000,9.956000 11.426000,9.927000 11.155000,9.887000 10.886000,9.836000 10.619000,9.773000 10.355000,9.699000 10.094000,9.614000 9.837000,9.518000 9.584000,9.412000 9.336000,9.295000 9.093000,9.168000 8.856000,9.031000 8.399000,8.727000 8.181000,8.561000 7.970000,8.386000 7.767000,8.202000 7.571000,8.010000 7.383000,7.810000 7.205000,7.602000 7.035000,7.387000 6.874000,7.164000 6.722000,6.936000 6.581000,6.701000 6.449000,6.460000 6.327000,6.215000 6.216000,5.964000 6.116000,5.709000 6.026000,5.450000 5.948000,5.187000 5.880000,4.921000 5.818000,4.676000 5.745000,4.433000 5.662000,4.194000 5.467000,3.726000 5.355000,3.499000 5.233000,3.277000 5.102000,3.060000 4.814000,2.644000 4.657000,2.445000 4.492000,2.253000 4.138000,1.891000 3.755000,1.560000 3.553000,1.407000 3.345000,1.262000 3.132000,1.126000 2.912000,0.999000 2.688000,0.882000 2.226000,0.675000 1.748000,0.508000 1.504000,0.440000 1.257000,0.382000 1.008000,0.335000 0.758000,0.298000 0.506000,0.271000 0.253000,0.255000 0.000000,0.250000 z%22 /></g><g id=%22C255%22 data-name=%22as_component__PNGCOJINIPILRSBFUVHAAAKRQR7F7X5DOV45DHY3HPYOUZICQITA%22><path class=%22layer_1_0%22 d=%22M 9.889000,3.500000 0.000000,1.275000 0.000000,-1.275000 9.889000,-3.500000 16.000000,-3.500000 16.000000,3.500000 z%22 /><path class=%22layer_2_0%22 d=%22M 0.000000,-0.250000 10.000000,-2.500000 10.000000,2.500000 0.000000,0.250000 z%22 /><rect class=%22layer_2_0%22 x=%2210.300000%22 y=%22-2.500000%22 width=%220.300000%22 height=%225.000000%22 /><rect class=%22layer_2_0%22 x=%2210.900000%22 y=%22-2.500000%22 width=%220.300000%22 height=%225.000000%22 /><rect class=%22layer_2_0%22 x=%2211.500000%22 y=%22-2.500000%22 width=%220.300000%22 height=%225.000000%22 /><rect class=%22layer_2_0%22 x=%2212.100000%22 y=%22-2.500000%22 width=%220.300000%22 height=%225.000000%22 /><rect class=%22layer_2_0%22 x=%2212.700000%22 y=%22-2.500000%22 width=%220.300000%22 height=%225.000000%22 /><rect class=%22layer_2_0%22 x=%2213.300000%22 y=%22-2.500000%22 width=%220.300000%22 height=%225.000000%22 /><rect class=%22layer_2_0%22 x=%2213.900000%22 y=%22-2.500000%22 width=%220.300000%22 height=%225.000000%22 /><rect class=%22layer_2_0%22 x=%2214.500000%22 y=%22-2.500000%22 width=%220.300000%22 height=%225.000000%22 /><rect class=%22layer_2_0%22 x=%2215.100000%22 y=%22-2.500000%22 width=%220.300000%22 height=%225.000000%22 /><rect class=%22layer_2_0%22 x=%2215.700000%22 y=%22-2.500000%22 width=%220.300000%22 height=%225.000000%22 /></g><g id=%22C256%22 data-name=%22s_bend_l_16P09663377933711_o_3P8808969416889525_p_Strip%22><path class=%22layer_1_0%22 d=%22M 0.000000,-1.250000 0.497000,-1.243000 0.994000,-1.224000 1.490000,-1.191000 1.985000,-1.146000 2.479000,-1.087000 2.970000,-1.015000 3.460000,-0.931000 3.948000,-0.833000 4.433000,-0.723000 4.914000,-0.600000 5.393000,-0.465000 5.867000,-0.317000 6.338000,-0.156000 6.804000,0.016000 7.265000,0.201000 7.722000,0.398000 8.173000,0.607000 8.618000,0.828000 9.005000,1.019000 9.396000,1.201000 9.792000,1.372000 10.193000,1.532000 10.597000,1.682000 11.006000,1.821000 11.417000,1.950000 11.832000,2.067000 12.250000,2.174000 12.671000,2.269000 13.094000,2.354000 13.519000,2.427000 13.946000,2.489000 14.375000,2.540000 14.804000,2.580000 15.235000,2.608000 15.666000,2.625000 16.097000,2.631000 16.097000,5.131000 15.600000,5.124000 15.103000,5.105000 14.607000,5.072000 14.112000,5.027000 13.619000,4.968000 13.127000,4.896000 12.637000,4.812000 12.149000,4.714000 11.664000,4.604000 11.183000,4.481000 10.704000,4.346000 10.230000,4.198000 9.759000,4.037000 9.293000,3.865000 8.832000,3.680000 8.375000,3.483000 7.924000,3.274000 7.479000,3.053000 6.701000,2.680000 6.305000,2.509000 5.904000,2.349000 5.500000,2.199000 5.092000,2.060000 4.680000,1.931000 4.265000,1.814000 3.847000,1.707000 3.426000,1.612000 3.003000,1.527000 2.578000,1.454000 2.151000,1.392000 1.722000,1.341000 1.293000,1.301000 0.862000,1.273000 0.431000,1.256000 0.000000,1.250000 z%22 /><path class=%22layer_2_0%22 d=%22M 0.000000,-0.250000 0.471000,-0.244000 0.941000,-0.225000 1.411000,-0.194000 1.880000,-0.151000 2.347000,-0.096000 2.813000,-0.028000 3.277000,0.052000 3.739000,0.145000 4.198000,0.249000 4.654000,0.365000 5.107000,0.494000 5.557000,0.634000 6.003000,0.786000 6.444000,0.949000 6.881000,1.124000 7.313000,1.311000 7.741000,1.509000 8.162000,1.718000 8.573000,1.921000 8.988000,2.114000 9.408000,2.295000 9.833000,2.465000 10.262000,2.624000 10.695000,2.772000 11.132000,2.908000 11.573000,3.033000 12.016000,3.146000 12.462000,3.247000 12.911000,3.337000 13.362000,3.415000 13.815000,3.481000 14.270000,3.535000 14.725000,3.577000 15.182000,3.607000 15.639000,3.625000 16.097000,3.631000 16.097000,4.131000 15.626000,4.125000 15.156000,4.106000 14.686000,4.075000 14.217000,4.032000 13.750000,3.977000 13.284000,3.909000 12.820000,3.829000 12.358000,3.736000 11.899000,3.632000 11.443000,3.516000 10.990000,3.387000 10.540000,3.247000 10.095000,3.095000 9.653000,2.932000 9.216000,2.757000 8.784000,2.570000 8.356000,2.372000 7.935000,2.163000 7.524000,1.960000 7.109000,1.767000 6.689000,1.586000 6.264000,1.416000 5.835000,1.257000 5.402000,1.109000 4.965000,0.973000 4.524000,0.848000 4.081000,0.735000 3.635000,0.634000 3.186000,0.544000 2.735000,0.466000 2.282000,0.400000 1.827000,0.346000 1.372000,0.304000 0.915000,0.274000 0.458000,0.256000 0.000000,0.250000 z%22 /></g><g id=%22C257%22 data-name=%22as_component__PNGCOJINIPILRSBFUVHAAAKRQR7F7X5DOV45DHY3HPYOUZICQITA%22><path class=%22layer_1_0%22 d=%22M 9.889000,3.500000 0.000000,1.275000 0.000000,-1.275000 9.889000,-3.500000 16.000000,-3.500000 16.000000,3.500000 z%22 /><path class=%22layer_2_0%22 d=%22M 0.000000,-0.250000 10.000000,-2.500000 10.000000,2.500000 0.000000,0.250000 z%22 /><rect class=%22layer_2_0%22 x=%2210.300000%22 y=%22-2.500000%22 width=%220.300000%22 height=%225.000000%22 /><rect class=%22layer_2_0%22 x=%2210.900000%22 y=%22-2.500000%22 width=%220.300000%22 height=%225.000000%22 /><rect class=%22layer_2_0%22 x=%2211.500000%22 y=%22-2.500000%22 width=%220.300000%22 height=%225.000000%22 /><rect class=%22layer_2_0%22 x=%2212.100000%22 y=%22-2.500000%22 width=%220.300000%22 height=%225.000000%22 /><rect class=%22layer_2_0%22 x=%2212.700000%22 y=%22-2.500000%22 width=%220.300000%22 height=%225.000000%22 /><rect class=%22layer_2_0%22 x=%2213.300000%22 y=%22-2.500000%22 width=%220.300000%22 height=%225.000000%22 /><rect class=%22layer_2_0%22 x=%2213.900000%22 y=%22-2.500000%22 width=%220.300000%22 height=%225.000000%22 /><rect class=%22layer_2_0%22 x=%2214.500000%22 y=%22-2.500000%22 width=%220.300000%22 height=%225.000000%22 /><rect class=%22layer_2_0%22 x=%2215.100000%22 y=%22-2.500000%22 width=%220.300000%22 height=%225.000000%22 /><rect class=%22layer_2_0%22 x=%2215.700000%22 y=%22-2.500000%22 width=%220.300000%22 height=%225.000000%22 /></g><g id=%22C258%22 data-name=%22s_bend_l_13P768601277051044_o_3P5074058530982017_p_Strip%22><path class=%22layer_1_0%22 d=%22M 0.000000,-1.250000 0.488000,-1.242000 0.975000,-1.220000 1.461000,-1.182000 1.945000,-1.129000 2.428000,-1.060000 2.909000,-0.977000 3.386000,-0.879000 3.861000,-0.766000 4.331000,-0.638000 4.798000,-0.496000 5.259000,-0.339000 5.716000,-0.168000 6.167000,0.017000 6.612000,0.216000 7.051000,0.429000 7.482000,0.656000 7.845000,0.846000 8.214000,1.025000 8.588000,1.192000 8.967000,1.348000 9.350000,1.492000 9.738000,1.624000 10.130000,1.743000 10.525000,1.850000 10.924000,1.945000 11.325000,2.028000 11.729000,2.098000 12.135000,2.155000 12.542000,2.200000 12.950000,2.231000 13.359000,2.251000 13.769000,2.257000 13.769000,4.757000 13.281000,4.749000 12.794000,4.727000 12.308000,4.689000 11.824000,4.636000 11.341000,4.567000 10.860000,4.484000 10.383000,4.386000 9.908000,4.273000 9.438000,4.145000 8.971000,4.003000 8.510000,3.846000 8.053000,3.675000 7.602000,3.490000 7.157000,3.291000 6.718000,3.078000 6.287000,2.851000 5.924000,2.661000 5.555000,2.482000 5.181000,2.315000 4.802000,2.159000 4.419000,2.015000 4.031000,1.883000 3.639000,1.764000 3.244000,1.657000 2.845000,1.562000 2.444000,1.479000 2.040000,1.409000 1.635000,1.352000 1.227000,1.307000 0.819000,1.276000 0.410000,1.256000 0.000000,1.250000 z%22 /><path class=%22layer_2_0%22 d=%22M 0.000000,-0.250000 0.456000,-0.243000 0.912000,-0.222000 1.367000,-0.186000 1.821000,-0.136000 2.273000,-0.072000 2.723000,0.005000 3.170000,0.097000 3.614000,0.203000 4.054000,0.323000 4.491000,0.456000 4.923000,0.603000 5.351000,0.763000 5.773000,0.936000 6.189000,1.123000 6.600000,1.322000 7.004000,1.534000 7.394000,1.739000 7.791000,1.931000 8.193000,2.111000 8.601000,2.279000 9.014000,2.434000 9.431000,2.575000 9.853000,2.704000 10.279000,2.819000 10.707000,2.922000 11.139000,3.010000 11.574000,3.086000 12.010000,3.147000 12.448000,3.195000 12.888000,3.230000 13.328000,3.250000 13.769000,3.257000 13.769000,3.757000 13.313000,3.750000 12.857000,3.729000 12.402000,3.693000 11.948000,3.643000 11.496000,3.579000 11.046000,3.502000 10.599000,3.410000 10.155000,3.304000 9.715000,3.184000 9.278000,3.051000 8.846000,2.905000 8.418000,2.744000 7.996000,2.571000 7.580000,2.384000 7.169000,2.185000 6.765000,1.973000 6.375000,1.768000 5.978000,1.576000 5.576000,1.396000 5.168000,1.228000 4.755000,1.073000 4.338000,0.932000 3.916000,0.803000 3.490000,0.688000 3.062000,0.585000 2.630000,0.497000 2.195000,0.421000 1.759000,0.360000 1.321000,0.312000 0.881000,0.277000 0.441000,0.257000 0.000000,0.250000 z%22 /></g><g id=%22C259%22 data-name=%22as_component__PNGCOJINIPILRSBFUVHAAAKRQR7F7X5DOV45DHY3HPYOUZICQITA%22><path class=%22layer_1_0%22 d=%22M 9.889000,3.500000 0.000000,1.275000 0.000000,-1.275000 9.889000,-3.500000 16.000000,-3.500000 16.000000,3.500000 z%22 /><path class=%22layer_2_0%22 d=%22M 0.000000,-0.250000 10.000000,-2.500000 10.000000,2.500000 0.000000,0.250000 z%22 /><rect class=%22layer_2_0%22 x=%2210.300000%22 y=%22-2.500000%22 width=%220.300000%22 height=%225.000000%22 /><rect class=%22layer_2_0%22 x=%2210.900000%22 y=%22-2.500000%22 width=%220.300000%22 height=%225.000000%22 /><rect class=%22layer_2_0%22 x=%2211.500000%22 y=%22-2.500000%22 width=%220.300000%22 height=%225.000000%22 /><rect class=%22layer_2_0%22 x=%2212.100000%22 y=%22-2.500000%22 width=%220.300000%22 height=%225.000000%22 /><rect class=%22layer_2_0%22 x=%2212.700000%22 y=%22-2.500000%22 width=%220.300000%22 height=%225.000000%22 /><rect class=%22layer_2_0%22 x=%2213.300000%22 y=%22-2.500000%22 width=%220.300000%22 height=%225.000000%22 /><rect class=%22layer_2_0%22 x=%2213.900000%22 y=%22-2.500000%22 width=%220.300000%22 height=%225.000000%22 /><rect class=%22layer_2_0%22 x=%2214.500000%22 y=%22-2.500000%22 width=%220.300000%22 height=%225.000000%22 /><rect class=%22layer_2_0%22 x=%2215.100000%22 y=%22-2.500000%22 width=%220.300000%22 height=%225.000000%22 /><rect class=%22layer_2_0%22 x=%2215.700000%22 y=%22-2.500000%22 width=%220.300000%22 height=%225.000000%22 /></g><g id=%22C260%22 data-name=%22s_bend_l_70P1020339400343_o_80P06339617799577_p_Strip%22><path class=%22layer_1_0%22 d=%22M 0.000000,-1.250000 0.624000,-1.245000 1.247000,-1.229000 1.870000,-1.202000 2.492000,-1.165000 3.114000,-1.117000 3.735000,-1.059000 4.355000,-0.990000 4.973000,-0.911000 5.590000,-0.821000 6.206000,-0.720000 6.819000,-0.609000 7.431000,-0.488000 8.648000,-0.214000 9.252000,-0.062000 9.854000,0.101000 10.453000,0.274000 11.049000,0.457000 11.642000,0.650000 12.818000,1.067000 13.400000,1.290000 14.553000,1.767000 15.123000,2.019000 16.249000,2.554000 16.806000,2.835000 17.904000,3.426000 18.445000,3.736000 18.981000,4.055000 19.512000,4.383000 20.036000,4.719000 20.555000,5.065000 21.068000,5.420000 21.575000,5.783000 22.076000,6.155000 23.058000,6.923000 23.539000,7.320000 24.013000,7.725000 24.480000,8.138000 24.940000,8.559000 25.839000,9.424000 26.277000,9.868000 26.707000,10.319000 27.130000,10.778000 27.544000,11.243000 28.350000,12.195000 29.122000,13.174000 29.496000,13.674000 29.861000,14.179000 30.218000,14.691000 30.565000,15.208000 30.904000,15.732000 31.234000,16.261000 31.555000,16.796000 32.169000,17.881000 32.462000,18.432000 32.745000,18.987000 33.019000,19.547000 33.284000,20.112000 33.539000,20.681000 33.784000,21.254000 34.245000,22.413000 34.666000,23.587000 34.862000,24.179000 35.047000,24.775000 35.222000,25.373000 35.387000,25.974000 35.542000,26.578000 35.686000,27.185000 35.820000,27.794000 35.944000,28.405000 36.057000,29.018000 36.160000,29.634000 36.252000,30.250000 36.334000,30.868000 36.405000,31.488000 36.466000,32.109000 36.516000,32.730000 36.556000,33.352000 36.585000,33.975000 36.611000,35.222000 36.608000,35.846000 36.570000,37.092000 36.535000,37.715000 36.490000,38.337000 36.434000,38.958000 36.367000,39.578000 36.290000,40.197000 36.218000,40.773000 36.104000,41.929000 36.029000,43.089000 35.994000,44.250000 35.991000,44.831000 36.016000,45.993000 36.043000,46.573000 36.079000,47.153000 36.183000,48.311000 36.249000,48.888000 36.325000,49.464000 36.411000,50.038000 36.612000,51.183000 36.853000,52.320000 36.987000,52.885000 37.131000,53.448000 37.448000,54.565000 37.803000,55.672000 38.196000,56.766000 38.625000,57.845000 38.853000,58.380000 39.337000,59.436000 39.857000,60.475000 40.130000,60.988000 40.702000,61.999000 41.308000,62.991000 41.948000,63.961000 42.620000,64.908000 42.968000,65.374000 43.688000,66.286000 44.438000,67.173000 45.219000,68.034000 46.028000,68.868000 46.865000,69.674000 47.293000,70.066000 48.171000,70.828000 49.073000,71.560000 50.000000,72.260000 50.472000,72.599000 51.434000,73.251000 51.923000,73.565000 52.916000,74.167000 53.930000,74.736000 54.962000,75.269000 56.012000,75.767000 57.078000,76.229000 58.160000,76.654000 58.705000,76.853000 59.807000,77.222000 60.362000,77.393000 61.482000,77.706000 62.045000,77.848000 63.178000,78.103000 63.748000,78.216000 64.893000,78.413000 65.468000,78.497000 66.622000,78.635000 67.780000,78.734000 68.940000,78.793000 70.102000,78.813000 70.102000,81.313000 69.478000,81.308000 68.855000,81.292000 68.232000,81.265000 67.610000,81.228000 66.988000,81.180000 66.367000,81.122000 65.747000,81.053000 65.129000,80.974000 64.512000,80.884000 63.896000,80.783000 63.283000,80.672000 62.671000,80.551000 61.454000,80.277000 60.850000,80.125000 60.248000,79.962000 59.649000,79.789000 59.053000,79.606000 58.460000,79.413000 57.284000,78.996000 56.702000,78.773000 56.124000,78.539000 55.549000,78.296000 54.979000,78.044000 54.414000,77.781000 53.296000,77.228000 52.198000,76.637000 51.657000,76.327000 51.121000,76.008000 50.590000,75.680000 50.066000,75.344000 49.547000,74.998000 48.527000,74.280000 48.026000,73.908000 47.044000,73.140000 46.563000,72.743000 46.089000,72.338000 45.622000,71.925000 45.162000,71.504000 44.263000,70.639000 43.825000,70.195000 43.395000,69.744000 42.972000,69.285000 42.558000,68.820000 41.752000,67.868000 41.362000,67.381000 40.980000,66.889000 40.606000,66.389000 40.241000,65.884000 39.884000,65.372000 39.537000,64.855000 39.198000,64.331000 38.868000,63.802000 38.547000,63.267000 37.933000,62.182000 37.640000,61.631000 37.357000,61.076000 37.083000,60.516000 36.818000,59.951000 36.563000,59.382000 36.318000,58.809000 35.857000,57.650000 35.436000,56.476000 35.055000,55.288000 34.880000,54.690000 34.715000,54.089000 34.560000,53.485000 34.416000,52.878000 34.282000,52.269000 34.158000,51.658000 34.045000,51.045000 33.942000,50.429000 33.850000,49.813000 33.768000,49.195000 33.697000,48.575000 33.636000,47.954000 33.586000,47.333000 33.546000,46.711000 33.517000,46.088000 33.491000,44.841000 33.494000,44.217000 33.532000,42.971000 33.567000,42.348000 33.612000,41.726000 33.668000,41.105000 33.735000,40.485000 33.812000,39.866000 33.884000,39.290000 33.998000,38.134000 34.073000,36.974000 34.108000,35.813000 34.111000,35.232000 34.086000,34.070000 34.023000,32.910000 33.976000,32.331000 33.853000,31.175000 33.777000,30.599000 33.691000,30.025000 33.490000,28.880000 33.374000,28.311000 33.115000,27.178000 32.971000,26.615000 32.654000,25.498000 32.299000,24.391000 31.906000,23.297000 31.696000,22.756000 31.249000,21.683000 30.765000,20.627000 30.509000,20.105000 29.972000,19.075000 29.400000,18.064000 28.794000,17.072000 28.154000,16.102000 27.822000,15.626000 27.134000,14.689000 26.414000,13.777000 25.664000,12.890000 24.883000,12.029000 24.074000,11.195000 23.659000,10.789000 22.809000,9.997000 21.931000,9.235000 21.029000,8.503000 20.568000,8.149000 19.630000,7.464000 19.152000,7.134000 18.179000,6.498000 17.186000,5.896000 16.172000,5.327000 15.140000,4.794000 14.090000,4.296000 13.024000,3.834000 12.485000,3.617000 11.397000,3.210000 10.847000,3.021000 9.740000,2.670000 8.620000,2.357000 8.057000,2.215000 6.924000,1.960000 6.354000,1.847000 5.209000,1.650000 4.634000,1.566000 3.480000,1.428000 2.322000,1.329000 1.162000,1.270000 0.000000,1.250000 z%22 /><path class=%22layer_2_0%22 d=%22M 0.000000,-0.250000 0.607000,-0.245000 1.819000,-0.204000 3.029000,-0.121000 3.633000,-0.064000 4.236000,0.003000 4.837000,0.080000 6.036000,0.265000 6.633000,0.373000 7.228000,0.491000 7.821000,0.619000 9.000000,0.906000 9.585000,1.064000 10.168000,1.232000 11.324000,1.599000 11.898000,1.796000 13.034000,2.221000 13.597000,2.448000 14.155000,2.684000 14.710000,2.930000 15.260000,3.185000 15.806000,3.450000 16.347000,3.724000 16.883000,4.007000 17.415000,4.299000 18.463000,4.910000 19.489000,5.556000 20.493000,6.237000 21.473000,6.952000 21.954000,7.322000 22.896000,8.086000 23.812000,8.882000 24.700000,9.708000 25.559000,10.564000 25.978000,11.003000 26.389000,11.449000 27.188000,12.362000 27.576000,12.828000 28.327000,13.780000 29.046000,14.758000 29.392000,15.255000 29.730000,15.759000 30.060000,16.268000 30.381000,16.783000 30.693000,17.303000 30.996000,17.828000 31.575000,18.894000 31.851000,19.434000 32.118000,19.979000 32.375000,20.528000 32.623000,21.082000 33.090000,22.201000 33.310000,22.767000 33.719000,23.909000 34.090000,25.064000 34.421000,26.231000 34.712000,27.408000 34.962000,28.595000 35.072000,29.192000 35.172000,29.790000 35.262000,30.390000 35.342000,30.991000 35.470000,32.197000 35.519000,32.802000 35.557000,33.407000 35.603000,34.619000 35.611000,35.226000 35.595000,36.439000 35.537000,37.651000 35.439000,38.860000 35.374000,39.463000 35.299000,40.065000 35.225000,40.658000 35.107000,41.848000 35.030000,43.042000 35.007000,43.639000 34.991000,44.835000 35.016000,46.031000 35.082000,47.225000 35.130000,47.821000 35.188000,48.416000 35.335000,49.603000 35.423000,50.195000 35.522000,50.785000 35.749000,51.959000 36.016000,53.125000 36.323000,54.281000 36.491000,54.855000 36.856000,55.994000 37.053000,56.558000 37.476000,57.677000 37.702000,58.231000 37.937000,58.780000 38.435000,59.868000 38.970000,60.938000 39.541000,61.988000 39.840000,62.506000 40.464000,63.527000 41.122000,64.525000 41.814000,65.501000 42.539000,66.452000 43.296000,67.378000 43.686000,67.832000 44.489000,68.718000 44.902000,69.151000 45.749000,69.995000 46.625000,70.809000 47.073000,71.206000 47.989000,71.975000 48.931000,72.712000 49.897000,73.417000 50.389000,73.757000 51.390000,74.411000 51.899000,74.726000 52.932000,75.328000 53.456000,75.616000 54.518000,76.165000 55.056000,76.426000 55.599000,76.678000 56.696000,77.153000 57.251000,77.377000 57.809000,77.591000 58.937000,77.990000 59.505000,78.176000 60.651000,78.517000 61.229000,78.673000 62.391000,78.956000 63.562000,79.199000 64.151000,79.305000 65.333000,79.488000 65.926000,79.564000 66.520000,79.630000 67.115000,79.686000 67.712000,79.732000 68.906000,79.793000 70.102000,79.813000 70.102000,80.313000 69.495000,80.308000 68.283000,80.267000 67.073000,80.184000 66.469000,80.127000 65.866000,80.060000 65.265000,79.983000 64.066000,79.798000 63.469000,79.690000 62.874000,79.572000 62.281000,79.444000 61.102000,79.157000 60.517000,78.999000 59.934000,78.831000 59.354000,78.652000 58.204000,78.267000 57.068000,77.842000 56.505000,77.615000 55.947000,77.379000 55.392000,77.133000 54.842000,76.878000 54.296000,76.613000 53.755000,76.339000 52.687000,75.764000 51.639000,75.153000 50.613000,74.507000 49.609000,73.826000 48.629000,73.111000 48.148000,72.741000 47.206000,71.977000 46.290000,71.181000 45.402000,70.355000 44.543000,69.499000 44.124000,69.060000 43.713000,68.614000 43.310000,68.161000 42.526000,67.235000 41.775000,66.283000 41.056000,65.305000 40.710000,64.808000 40.042000,63.795000 39.721000,63.280000 39.409000,62.760000 39.106000,62.235000 38.527000,61.169000 38.251000,60.629000 37.984000,60.084000 37.727000,59.535000 37.479000,58.981000 37.012000,57.862000 36.792000,57.296000 36.383000,56.154000 36.012000,54.999000 35.681000,53.832000 35.390000,52.655000 35.140000,51.468000 35.030000,50.871000 34.930000,50.273000 34.840000,49.673000 34.760000,49.072000 34.632000,47.866000 34.583000,47.261000 34.545000,46.656000 34.499000,45.444000 34.491000,44.837000 34.494000,44.231000 34.531000,43.018000 34.565000,42.412000 34.663000,41.203000 34.728000,40.600000 34.803000,39.998000 34.877000,39.405000 34.995000,38.215000 35.072000,37.021000 35.095000,36.424000 35.111000,35.228000 35.086000,34.032000 35.020000,32.838000 34.972000,32.242000 34.914000,31.647000 34.845000,31.052000 34.679000,29.868000 34.580000,29.278000 34.353000,28.104000 34.086000,26.938000 33.779000,25.782000 33.611000,25.208000 33.246000,24.069000 33.049000,23.505000 32.626000,22.386000 32.400000,21.832000 32.165000,21.283000 31.667000,20.195000 31.132000,19.125000 30.561000,18.075000 30.262000,17.557000 29.638000,16.536000 28.980000,15.538000 28.288000,14.562000 27.563000,13.611000 27.188000,13.145000 26.416000,12.231000 25.613000,11.345000 25.200000,10.912000 24.353000,10.068000 23.918000,9.657000 23.029000,8.857000 22.113000,8.089000 21.171000,7.351000 20.205000,6.646000 19.713000,6.306000 19.215000,5.975000 18.203000,5.337000 17.170000,4.735000 16.646000,4.447000 15.584000,3.898000 15.046000,3.637000 14.503000,3.385000 13.406000,2.910000 12.851000,2.686000 12.293000,2.472000 11.731000,2.268000 10.597000,1.887000 9.451000,1.546000 8.873000,1.390000 7.711000,1.107000 6.540000,0.864000 5.951000,0.758000 4.769000,0.575000 4.176000,0.499000 3.582000,0.433000 2.987000,0.377000 2.390000,0.331000 1.196000,0.270000 0.000000,0.250000 z%22 /></g><g id=%22C261%22 data-name=%22as_component__PNGCOJINIPILRSBFUVHAAAKRQR7F7X5DOV45DHY3HPYOUZICQITA%22><path class=%22layer_1_0%22 d=%22M 9.889000,3.500000 0.000000,1.275000 0.000000,-1.275000 9.889000,-3.500000 16.000000,-3.500000 16.000000,3.500000 z%22 /><path class=%22layer_2_0%22 d=%22M 0.000000,-0.250000 10.000000,-2.500000 10.000000,2.500000 0.000000,0.250000 z%22 /><rect class=%22layer_2_0%22 x=%2210.300000%22 y=%22-2.500000%22 width=%220.300000%22 height=%225.000000%22 /><rect class=%22layer_2_0%22 x=%2210.900000%22 y=%22-2.500000%22 width=%220.300000%22 height=%225.000000%22 /><rect class=%22layer_2_0%22 x=%2211.500000%22 y=%22-2.500000%22 width=%220.300000%22 height=%225.000000%22 /><rect class=%22layer_2_0%22 x=%2212.100000%22 y=%22-2.500000%22 width=%220.300000%22 height=%225.000000%22 /><rect class=%22layer_2_0%22 x=%2212.700000%22 y=%22-2.500000%22 width=%220.300000%22 height=%225.000000%22 /><rect class=%22layer_2_0%22 x=%2213.300000%22 y=%22-2.500000%22 width=%220.300000%22 height=%225.000000%22 /><rect class=%22layer_2_0%22 x=%2213.900000%22 y=%22-2.500000%22 width=%220.300000%22 height=%225.000000%22 /><rect class=%22layer_2_0%22 x=%2214.500000%22 y=%22-2.500000%22 width=%220.300000%22 height=%225.000000%22 /><rect class=%22layer_2_0%22 x=%2215.100000%22 y=%22-2.500000%22 width=%220.300000%22 height=%225.000000%22 /><rect class=%22layer_2_0%22 x=%2215.700000%22 y=%22-2.500000%22 width=%220.300000%22 height=%225.000000%22 /></g><g id=%22C262%22 data-name=%22s_bend_l_15P605204003702553_o_4P05237305687562_p_Strip%22><path class=%22layer_1_0%22 d=%22M 0.000000,-1.250000 0.488000,-1.243000 0.975000,-1.222000 1.462000,-1.188000 1.948000,-1.140000 2.432000,-1.078000 2.914000,-1.003000 3.394000,-0.914000 3.871000,-0.811000 4.345000,-0.695000 4.815000,-0.566000 5.282000,-0.423000 5.744000,-0.268000 6.202000,-0.099000 6.655000,0.082000 7.103000,0.277000 7.545000,0.483000 7.981000,0.703000 8.411000,0.934000 8.778000,1.132000 9.151000,1.319000 9.529000,1.496000 9.912000,1.662000 10.300000,1.817000 10.691000,1.962000 11.087000,2.095000 11.486000,2.217000 11.889000,2.327000 12.294000,2.427000 12.702000,2.514000 13.112000,2.590000 13.525000,2.655000 13.939000,2.708000 14.354000,2.749000 14.771000,2.778000 15.188000,2.796000 15.605000,2.802000 15.605000,5.302000 15.117000,5.295000 14.630000,5.274000 14.143000,5.240000 13.657000,5.192000 13.173000,5.130000 12.691000,5.055000 12.211000,4.966000 11.734000,4.863000 11.260000,4.747000 10.790000,4.618000 10.323000,4.475000 9.861000,4.320000 9.403000,4.151000 8.950000,3.970000 8.502000,3.775000 8.060000,3.569000 7.624000,3.349000 7.194000,3.118000 6.827000,2.920000 6.454000,2.733000 6.076000,2.556000 5.693000,2.390000 5.305000,2.235000 4.914000,2.090000 4.518000,1.957000 4.119000,1.835000 3.716000,1.725000 3.311000,1.625000 2.903000,1.538000 2.493000,1.462000 2.080000,1.397000 1.666000,1.344000 1.251000,1.303000 0.834000,1.274000 0.417000,1.256000 0.000000,1.250000 z%22 /><path class=%22layer_2_0%22 d=%22M 0.000000,-0.250000 0.460000,-0.244000 0.919000,-0.224000 1.378000,-0.192000 1.835000,-0.146000 2.291000,-0.088000 2.745000,-0.017000 3.197000,0.067000 3.647000,0.164000 4.093000,0.273000 4.537000,0.395000 4.976000,0.529000 5.412000,0.676000 5.844000,0.834000 6.270000,1.005000 6.692000,1.188000 7.109000,1.383000 7.519000,1.590000 7.924000,1.808000 8.316000,2.019000 8.715000,2.219000 9.118000,2.408000 9.527000,2.585000 9.941000,2.751000 10.359000,2.905000 10.781000,3.047000 11.208000,3.177000 11.637000,3.295000 12.070000,3.401000 12.506000,3.495000 12.944000,3.576000 13.384000,3.645000 13.826000,3.701000 14.270000,3.745000 14.714000,3.777000 15.159000,3.796000 15.605000,3.802000 15.605000,4.302000 15.145000,4.296000 14.686000,4.276000 14.227000,4.244000 13.770000,4.198000 13.314000,4.140000 12.860000,4.069000 12.408000,3.985000 11.958000,3.888000 11.512000,3.779000 11.068000,3.657000 10.629000,3.523000 10.193000,3.376000 9.761000,3.218000 9.335000,3.047000 8.913000,2.864000 8.496000,2.669000 8.086000,2.462000 7.681000,2.244000 7.289000,2.033000 6.890000,1.833000 6.487000,1.644000 6.078000,1.467000 5.664000,1.301000 5.246000,1.147000 4.824000,1.005000 4.397000,0.875000 3.968000,0.757000 3.535000,0.651000 3.099000,0.557000 2.661000,0.476000 2.221000,0.407000 1.779000,0.351000 1.335000,0.307000 0.891000,0.275000 0.446000,0.256000 0.000000,0.250000 z%22 /></g><g id=%22C263%22 data-name=%22as_component__PNGCOJINIPILRSBFUVHAAAKRQR7F7X5DOV45DHY3HPYOUZICQITA%22><path class=%22layer_1_0%22 d=%22M 9.889000,3.500000 0.000000,1.275000 0.000000,-1.275000 9.889000,-3.500000 16.000000,-3.500000 16.000000,3.500000 z%22 /><path class=%22layer_2_0%22 d=%22M 0.000000,-0.250000 10.000000,-2.500000 10.000000,2.500000 0.000000,0.250000 z%22 /><rect class=%22layer_2_0%22 x=%2210.300000%22 y=%22-2.500000%22 width=%220.300000%22 height=%225.000000%22 /><rect class=%22layer_2_0%22 x=%2210.900000%22 y=%22-2.500000%22 width=%220.300000%22 height=%225.000000%22 /><rect class=%22layer_2_0%22 x=%2211.500000%22 y=%22-2.500000%22 width=%220.300000%22 height=%225.000000%22 /><rect class=%22layer_2_0%22 x=%2212.100000%22 y=%22-2.500000%22 width=%220.300000%22 height=%225.000000%22 /><rect class=%22layer_2_0%22 x=%2212.700000%22 y=%22-2.500000%22 width=%220.300000%22 height=%225.000000%22 /><rect class=%22layer_2_0%22 x=%2213.300000%22 y=%22-2.500000%22 width=%220.300000%22 height=%225.000000%22 /><rect class=%22layer_2_0%22 x=%2213.900000%22 y=%22-2.500000%22 width=%220.300000%22 height=%225.000000%22 /><rect class=%22layer_2_0%22 x=%2214.500000%22 y=%22-2.500000%22 width=%220.300000%22 height=%225.000000%22 /><rect class=%22layer_2_0%22 x=%2215.100000%22 y=%22-2.500000%22 width=%220.300000%22 height=%225.000000%22 /><rect class=%22layer_2_0%22 x=%2215.700000%22 y=%22-2.500000%22 width=%220.300000%22 height=%225.000000%22 /></g><g id=%22C264%22 data-name=%22s_bend_l_14P477170807809603_o_11P406011192514422_p_Strip%22><path class=%22layer_1_0%22 d=%22M 0.000000,-1.250000 0.341000,-1.243000 0.682000,-1.223000 1.022000,-1.190000 1.360000,-1.143000 1.696000,-1.083000 2.029000,-1.010000 2.359000,-0.924000 2.686000,-0.825000 3.008000,-0.713000 3.326000,-0.589000 3.639000,-0.452000 3.946000,-0.303000 4.247000,-0.142000 4.541000,0.030000 4.829000,0.214000 5.109000,0.409000 5.381000,0.615000 5.645000,0.832000 5.900000,1.058000 6.146000,1.295000 6.383000,1.541000 6.610000,1.796000 6.826000,2.059000 7.033000,2.331000 7.228000,2.611000 7.412000,2.899000 7.585000,3.193000 7.746000,3.494000 7.895000,3.801000 8.032000,4.114000 8.156000,4.431000 8.268000,4.754000 8.367000,5.080000 8.454000,5.410000 8.515000,5.646000 8.666000,6.108000 8.852000,6.557000 8.958000,6.776000 9.196000,7.200000 9.466000,7.604000 9.768000,7.986000 9.929000,8.168000 10.273000,8.511000 10.643000,8.827000 11.036000,9.113000 11.451000,9.367000 11.884000,9.587000 12.107000,9.685000 12.563000,9.853000 12.796000,9.924000 13.269000,10.037000 13.508000,10.080000 13.991000,10.137000 14.477000,10.156000 14.477000,12.656000 14.136000,12.649000 13.795000,12.629000 13.455000,12.596000 13.117000,12.549000 12.781000,12.489000 12.448000,12.416000 12.118000,12.330000 11.791000,12.231000 11.469000,12.119000 11.151000,11.995000 10.838000,11.858000 10.531000,11.709000 10.230000,11.548000 9.936000,11.376000 9.648000,11.192000 9.368000,10.997000 9.096000,10.791000 8.832000,10.574000 8.577000,10.348000 8.331000,10.111000 8.094000,9.865000 7.867000,9.610000 7.651000,9.347000 7.445000,9.075000 7.249000,8.795000 7.065000,8.507000 6.892000,8.213000 6.731000,7.912000 6.582000,7.605000 6.445000,7.292000 6.321000,6.975000 6.209000,6.652000 6.110000,6.326000 6.023000,5.996000 5.962000,5.760000 5.811000,5.298000 5.722000,5.072000 5.519000,4.630000 5.404000,4.416000 5.150000,4.001000 4.864000,3.608000 4.548000,3.238000 4.204000,2.895000 3.834000,2.579000 3.441000,2.293000 3.026000,2.039000 2.811000,1.925000 2.370000,1.721000 2.143000,1.633000 1.681000,1.482000 1.446000,1.421000 0.969000,1.326000 0.486000,1.269000 0.000000,1.250000 z%22 /><path class=%22layer_2_0%22 d=%22M 0.000000,-0.250000 0.302000,-0.244000 0.604000,-0.226000 0.904000,-0.197000 1.203000,-0.155000 1.501000,-0.102000 1.796000,-0.038000 2.088000,0.039000 2.377000,0.126000 2.662000,0.225000 2.944000,0.335000 3.220000,0.456000 3.492000,0.588000 3.759000,0.730000 4.019000,0.883000 4.274000,1.046000 4.521000,1.218000 4.762000,1.401000 4.996000,1.592000 5.222000,1.793000 5.440000,2.002000 5.649000,2.220000 5.850000,2.445000 6.041000,2.679000 6.224000,2.920000 6.397000,3.167000 6.559000,3.422000 6.712000,3.682000 6.855000,3.948000 6.987000,4.220000 7.108000,4.497000 7.218000,4.778000 7.317000,5.063000 7.405000,5.352000 7.482000,5.645000 7.553000,5.918000 7.635000,6.188000 7.728000,6.455000 7.831000,6.718000 7.944000,6.976000 8.068000,7.230000 8.201000,7.479000 8.344000,7.723000 8.496000,7.961000 8.828000,8.418000 9.007000,8.636000 9.195000,8.847000 9.391000,9.050000 9.595000,9.246000 10.024000,9.613000 10.249000,9.783000 10.481000,9.944000 10.719000,10.097000 10.963000,10.239000 11.212000,10.372000 11.466000,10.496000 11.725000,10.609000 11.988000,10.712000 12.254000,10.804000 12.525000,10.886000 12.798000,10.957000 13.074000,11.018000 13.352000,11.067000 13.632000,11.106000 13.913000,11.134000 14.477000,11.156000 14.477000,11.656000 14.175000,11.650000 13.874000,11.632000 13.573000,11.603000 13.274000,11.561000 12.976000,11.508000 12.681000,11.444000 12.389000,11.367000 12.100000,11.280000 11.815000,11.181000 11.533000,11.071000 11.257000,10.950000 10.985000,10.818000 10.718000,10.676000 10.458000,10.523000 10.203000,10.360000 9.956000,10.188000 9.715000,10.005000 9.481000,9.814000 9.255000,9.613000 9.038000,9.404000 8.828000,9.186000 8.627000,8.961000 8.436000,8.727000 8.253000,8.486000 8.080000,8.239000 7.918000,7.984000 7.765000,7.724000 7.622000,7.458000 7.490000,7.186000 7.369000,6.909000 7.259000,6.628000 7.160000,6.343000 7.072000,6.054000 6.995000,5.762000 6.924000,5.488000 6.842000,5.218000 6.749000,4.951000 6.646000,4.688000 6.533000,4.430000 6.409000,4.176000 6.276000,3.927000 6.133000,3.683000 5.981000,3.445000 5.649000,2.989000 5.470000,2.770000 5.282000,2.559000 5.086000,2.356000 4.882000,2.160000 4.453000,1.793000 4.228000,1.623000 3.758000,1.309000 3.514000,1.167000 3.265000,1.034000 3.011000,0.910000 2.752000,0.797000 2.489000,0.694000 2.223000,0.602000 1.952000,0.520000 1.679000,0.449000 1.403000,0.388000 1.125000,0.339000 0.845000,0.300000 0.564000,0.272000 0.282000,0.256000 0.000000,0.250000 z%22 /></g><g id=%22C265%22 data-name=%22as_component__PNGCOJINIPILRSBFUVHAAAKRQR7F7X5DOV45DHY3HPYOUZICQITA%22><path class=%22layer_1_0%22 d=%22M 9.889000,3.500000 0.000000,1.275000 0.000000,-1.275000 9.889000,-3.500000 16.000000,-3.500000 16.000000,3.500000 z%22 /><path class=%22layer_2_0%22 d=%22M 0.000000,-0.250000 10.000000,-2.500000 10.000000,2.500000 0.000000,0.250000 z%22 /><rect class=%22layer_2_0%22 x=%2210.300000%22 y=%22-2.500000%22 width=%220.300000%22 height=%225.000000%22 /><rect class=%22layer_2_0%22 x=%2210.900000%22 y=%22-2.500000%22 width=%220.300000%22 height=%225.000000%22 /><rect class=%22layer_2_0%22 x=%2211.500000%22 y=%22-2.500000%22 width=%220.300000%22 height=%225.000000%22 /><rect class=%22layer_2_0%22 x=%2212.100000%22 y=%22-2.500000%22 width=%220.300000%22 height=%225.000000%22 /><rect class=%22layer_2_0%22 x=%2212.700000%22 y=%22-2.500000%22 width=%220.300000%22 height=%225.000000%22 /><rect class=%22layer_2_0%22 x=%2213.300000%22 y=%22-2.500000%22 width=%220.300000%22 height=%225.000000%22 /><rect class=%22layer_2_0%22 x=%2213.900000%22 y=%22-2.500000%22 width=%220.300000%22 height=%225.000000%22 /><rect class=%22layer_2_0%22 x=%2214.500000%22 y=%22-2.500000%22 width=%220.300000%22 height=%225.000000%22 /><rect class=%22layer_2_0%22 x=%2215.100000%22 y=%22-2.500000%22 width=%220.300000%22 height=%225.000000%22 /><rect class=%22layer_2_0%22 x=%2215.700000%22 y=%22-2.500000%22 width=%220.300000%22 height=%225.000000%22 /></g><g id=%22C266%22 data-name=%22s_bend_l_13P70440949825748_o_50P67830826924883_p_Strip%22><path class=%22layer_1_0%22 d=%22M 0.000000,-1.250000 0.413000,-1.244000 0.825000,-1.227000 1.237000,-1.198000 1.648000,-1.158000 2.057000,-1.107000 2.465000,-1.044000 2.871000,-0.970000 3.275000,-0.884000 3.676000,-0.788000 4.075000,-0.680000 4.470000,-0.561000 4.862000,-0.431000 5.250000,-0.291000 5.634000,-0.140000 6.013000,0.022000 6.388000,0.195000 6.758000,0.378000 7.123000,0.571000 7.483000,0.774000 7.836000,0.987000 8.184000,1.209000 8.525000,1.442000 8.859000,1.683000 9.187000,1.934000 9.508000,2.194000 9.821000,2.463000 10.127000,2.740000 10.425000,3.026000 10.996000,3.621000 11.269000,3.931000 11.533000,4.248000 11.789000,4.572000 12.035000,4.903000 12.272000,5.241000 12.499000,5.586000 12.717000,5.936000 12.925000,6.293000 13.123000,6.655000 13.311000,7.022000 13.489000,7.395000 13.656000,7.772000 13.813000,8.154000 13.959000,8.540000 14.094000,8.930000 14.218000,9.324000 14.331000,9.721000 14.433000,10.120000 14.524000,10.523000 14.604000,10.928000 14.673000,11.335000 14.730000,11.744000 14.776000,12.154000 14.810000,12.565000 14.833000,12.977000 14.845000,13.390000 14.845000,13.803000 14.833000,14.215000 14.810000,14.627000 14.776000,15.039000 14.730000,15.449000 14.673000,15.858000 14.604000,16.265000 14.524000,16.670000 14.433000,17.072000 14.331000,17.472000 14.218000,17.869000 14.093000,18.262000 13.958000,18.652000 13.812000,19.038000 13.656000,19.420000 13.489000,19.798000 13.311000,20.170000 13.123000,20.538000 12.925000,20.900000 12.717000,21.256000 12.499000,21.607000 12.272000,21.951000 12.035000,22.289000 11.533000,22.945000 11.268000,23.262000 10.995000,23.571000 10.714000,23.873000 10.424000,24.167000 10.126000,24.452000 9.820000,24.730000 9.507000,24.998000 9.187000,25.258000 8.859000,25.509000 8.524000,25.751000 8.183000,25.983000 7.836000,26.206000 7.482000,26.419000 6.899000,26.781000 6.337000,27.175000 5.798000,27.600000 5.537000,27.823000 5.035000,28.291000 4.560000,28.787000 4.113000,29.308000 3.696000,29.853000 3.310000,30.420000 2.956000,31.008000 2.791000,31.309000 2.487000,31.925000 2.348000,32.238000 2.096000,32.877000 1.880000,33.529000 1.701000,34.191000 1.559000,34.863000 1.502000,35.201000 1.416000,35.882000 1.369000,36.567000 1.359000,37.253000 1.388000,37.939000 1.416000,38.281000 1.502000,38.962000 1.625000,39.637000 1.786000,40.305000 1.880000,40.635000 2.096000,41.286000 2.217000,41.608000 2.487000,42.239000 2.634000,42.549000 2.955000,43.156000 3.309000,43.744000 3.696000,44.311000 4.113000,44.856000 4.560000,45.377000 5.035000,45.872000 5.537000,46.341000 6.064000,46.780000 6.615000,47.190000 7.187000,47.568000 7.780000,47.914000 8.391000,48.227000 9.019000,48.505000 9.661000,48.747000 10.316000,48.954000 10.647000,49.044000 11.316000,49.195000 11.654000,49.257000 12.334000,49.352000 13.018000,49.409000 13.704000,49.428000 13.704000,51.928000 13.291000,51.922000 12.879000,51.905000 12.467000,51.876000 12.056000,51.836000 11.647000,51.785000 11.239000,51.722000 10.833000,51.648000 10.429000,51.562000 10.028000,51.466000 9.629000,51.358000 9.234000,51.239000 8.842000,51.109000 8.454000,50.969000 8.070000,50.818000 7.691000,50.656000 7.316000,50.483000 6.946000,50.300000 6.581000,50.107000 6.221000,49.904000 5.868000,49.691000 5.520000,49.469000 5.179000,49.236000 4.845000,48.995000 4.517000,48.744000 4.196000,48.484000 3.883000,48.215000 3.577000,47.938000 3.279000,47.652000 2.708000,47.057000 2.435000,46.747000 2.171000,46.430000 1.915000,46.106000 1.669000,45.775000 1.432000,45.437000 1.205000,45.092000 0.987000,44.742000 0.779000,44.385000 0.581000,44.023000 0.393000,43.656000 0.215000,43.283000 0.048000,42.906000 -0.109000,42.524000 -0.255000,42.138000 -0.390000,41.748000 -0.514000,41.354000 -0.627000,40.957000 -0.729000,40.558000 -0.820000,40.155000 -0.900000,39.750000 -0.969000,39.343000 -1.026000,38.934000 -1.072000,38.524000 -1.106000,38.113000 -1.129000,37.701000 -1.141000,37.288000 -1.140000,36.875000 -1.129000,36.463000 -1.106000,36.051000 -1.072000,35.639000 -1.026000,35.229000 -0.969000,34.820000 -0.900000,34.413000 -0.820000,34.009000 -0.729000,33.606000 -0.627000,33.206000 -0.514000,32.809000 -0.389000,32.416000 -0.254000,32.026000 -0.108000,31.640000 0.048000,31.258000 0.215000,30.880000 0.393000,30.508000 0.581000,30.140000 0.779000,29.778000 0.987000,29.422000 1.205000,29.071000 1.432000,28.727000 1.669000,28.389000 2.171000,27.733000 2.436000,27.417000 2.709000,27.107000 2.990000,26.805000 3.280000,26.511000 3.578000,26.226000 3.884000,25.948000 4.197000,25.680000 4.517000,25.420000 4.845000,25.169000 5.180000,24.927000 5.521000,24.695000 5.868000,24.472000 6.222000,24.259000 6.516000,24.082000 7.089000,23.704000 7.640000,23.294000 8.167000,22.855000 8.669000,22.387000 8.910000,22.142000 9.371000,21.634000 9.803000,21.101000 10.205000,20.544000 10.575000,19.966000 10.913000,19.369000 11.069000,19.063000 11.356000,18.440000 11.608000,17.801000 11.824000,17.149000 12.003000,16.487000 12.145000,15.815000 12.202000,15.477000 12.288000,14.796000 12.316000,14.454000 12.345000,13.768000 12.335000,13.082000 12.288000,12.397000 12.202000,11.716000 12.145000,11.377000 12.003000,10.706000 11.824000,10.043000 11.720000,9.716000 11.487000,9.070000 11.356000,8.753000 11.070000,8.129000 10.749000,7.522000 10.395000,6.935000 10.008000,6.367000 9.591000,5.822000 9.144000,5.301000 8.669000,4.806000 8.167000,4.337000 7.640000,3.898000 7.089000,3.488000 6.517000,3.110000 5.924000,2.764000 5.313000,2.451000 4.685000,2.173000 4.366000,2.048000 3.717000,1.823000 3.057000,1.634000 2.723000,1.554000 2.050000,1.421000 1.370000,1.326000 0.686000,1.269000 0.000000,1.250000 z%22 /><path class=%22layer_2_0%22 d=%22M 0.000000,-0.250000 0.385000,-0.245000 0.770000,-0.229000 1.154000,-0.202000 1.537000,-0.164000 1.919000,-0.116000 2.299000,-0.058000 2.678000,0.011000 3.054000,0.091000 3.428000,0.181000 4.169000,0.392000 4.534000,0.513000 5.254000,0.786000 5.608000,0.937000 5.958000,1.097000 6.303000,1.268000 6.979000,1.637000 7.308000,1.836000 7.632000,2.044000 7.951000,2.260000 8.263000,2.486000 8.867000,2.962000 9.445000,3.471000 9.993000,4.012000 10.255000,4.293000 10.510000,4.582000 10.995000,5.180000 11.445000,5.804000 11.658000,6.125000 11.861000,6.452000 12.055000,6.785000 12.415000,7.465000 12.736000,8.164000 12.882000,8.521000 13.018000,8.881000 13.144000,9.244000 13.260000,9.611000 13.366000,9.982000 13.461000,10.355000 13.546000,10.730000 13.621000,11.108000 13.738000,11.869000 13.813000,12.635000 13.834000,13.019000 13.845000,13.404000 13.845000,13.789000 13.834000,14.174000 13.812000,14.558000 13.738000,15.324000 13.684000,15.705000 13.620000,16.085000 13.546000,16.462000 13.461000,16.838000 13.366000,17.211000 13.260000,17.581000 13.144000,17.948000 13.018000,18.312000 12.882000,18.672000 12.736000,19.028000 12.580000,19.380000 12.414000,19.727000 12.239000,20.070000 12.054000,20.408000 11.860000,20.740000 11.657000,21.067000 11.445000,21.388000 11.224000,21.704000 10.756000,22.315000 10.509000,22.610000 10.255000,22.899000 9.992000,23.181000 9.722000,23.455000 9.159000,23.980000 8.568000,24.473000 8.262000,24.707000 7.632000,25.149000 6.978000,25.555000 6.660000,25.746000 6.041000,26.155000 5.446000,26.598000 5.157000,26.832000 4.876000,27.073000 4.333000,27.579000 3.820000,28.115000 3.574000,28.393000 3.336000,28.678000 2.885000,29.267000 2.672000,29.571000 2.272000,30.196000 2.085000,30.516000 1.738000,31.172000 1.578000,31.507000 1.287000,32.189000 1.156000,32.537000 0.923000,33.241000 0.821000,33.598000 0.729000,33.957000 0.647000,34.319000 0.575000,34.683000 0.462000,35.416000 0.421000,35.785000 0.390000,36.155000 0.359000,36.896000 0.359000,37.267000 0.390000,38.009000 0.462000,38.747000 0.575000,39.480000 0.647000,39.844000 0.729000,40.206000 0.821000,40.566000 1.034000,41.276000 1.287000,41.974000 1.578000,42.657000 1.738000,42.992000 1.907000,43.322000 2.085000,43.647000 2.272000,43.968000 2.467000,44.283000 2.672000,44.593000 3.106000,45.194000 3.336000,45.486000 3.819000,46.049000 4.072000,46.320000 4.600000,46.841000 5.157000,47.332000 5.445000,47.566000 6.041000,48.008000 6.347000,48.217000 6.977000,48.609000 7.628000,48.965000 8.298000,49.284000 8.640000,49.430000 8.985000,49.566000 9.686000,49.809000 10.041000,49.916000 10.760000,50.099000 11.123000,50.176000 11.488000,50.243000 12.223000,50.346000 12.592000,50.382000 13.333000,50.423000 13.704000,50.428000 13.704000,50.928000 13.319000,50.923000 12.935000,50.907000 12.551000,50.880000 12.167000,50.842000 11.785000,50.794000 11.405000,50.736000 11.026000,50.667000 10.650000,50.587000 10.276000,50.497000 9.535000,50.286000 9.170000,50.165000 8.808000,50.033000 8.450000,49.892000 7.746000,49.581000 7.401000,49.410000 6.725000,49.041000 6.396000,48.842000 5.753000,48.418000 5.441000,48.192000 5.136000,47.958000 4.837000,47.716000 4.259000,47.207000 3.711000,46.666000 3.449000,46.385000 3.194000,46.096000 2.709000,45.498000 2.480000,45.189000 2.046000,44.553000 1.843000,44.226000 1.649000,43.893000 1.289000,43.213000 0.968000,42.514000 0.822000,42.157000 0.686000,41.797000 0.560000,41.434000 0.444000,41.067000 0.338000,40.696000 0.243000,40.323000 0.158000,39.948000 0.083000,39.570000 -0.034000,38.809000 -0.109000,38.043000 -0.130000,37.659000 -0.141000,37.274000 -0.141000,36.889000 -0.130000,36.504000 -0.108000,36.120000 -0.034000,35.354000 0.020000,34.973000 0.084000,34.593000 0.158000,34.216000 0.243000,33.840000 0.338000,33.467000 0.444000,33.097000 0.560000,32.730000 0.686000,32.366000 0.822000,32.006000 0.968000,31.650000 1.124000,31.298000 1.465000,30.608000 1.650000,30.270000 1.844000,29.938000 2.047000,29.611000 2.259000,29.290000 2.480000,28.974000 2.948000,28.363000 3.449000,27.779000 3.712000,27.497000 3.982000,27.223000 4.545000,26.698000 5.136000,26.205000 5.442000,25.971000 6.072000,25.529000 6.726000,25.123000 7.044000,24.932000 7.663000,24.523000 8.258000,24.080000 8.547000,23.846000 8.828000,23.605000 9.371000,23.099000 9.631000,22.834000 10.130000,22.285000 10.368000,22.000000 10.819000,21.411000 11.032000,21.107000 11.432000,20.482000 11.619000,20.162000 11.966000,19.506000 12.126000,19.171000 12.417000,18.489000 12.670000,17.791000 12.883000,17.080000 12.975000,16.721000 13.057000,16.359000 13.129000,15.995000 13.242000,15.262000 13.283000,14.893000 13.314000,14.523000 13.345000,13.782000 13.345000,13.411000 13.314000,12.669000 13.242000,11.931000 13.129000,11.198000 13.057000,10.834000 12.975000,10.472000 12.883000,10.112000 12.670000,9.402000 12.417000,8.704000 12.126000,8.021000 11.966000,7.686000 11.797000,7.356000 11.619000,7.031000 11.237000,6.395000 11.032000,6.085000 10.598000,5.484000 10.368000,5.192000 9.885000,4.629000 9.632000,4.358000 9.104000,3.837000 8.829000,3.588000 8.259000,3.112000 7.964000,2.887000 7.357000,2.461000 6.727000,2.069000 6.076000,1.713000 5.406000,1.394000 5.064000,1.248000 4.719000,1.112000 4.018000,0.869000 3.663000,0.762000 2.944000,0.579000 2.581000,0.502000 2.216000,0.435000 1.481000,0.332000 1.112000,0.296000 0.371000,0.255000 0.000000,0.250000 z%22 /></g><g id=%22C267%22 data-name=%22as_component__PNGCOJINIPILRSBFUVHAAAKRQR7F7X5DOV45DHY3HPYOUZICQITA%22><path class=%22layer_1_0%22 d=%22M 9.889000,3.500000 0.000000,1.275000 0.000000,-1.275000 9.889000,-3.500000 16.000000,-3.500000 16.000000,3.500000 z%22 /><path class=%22layer_2_0%22 d=%22M 0.000000,-0.250000 10.000000,-2.500000 10.000000,2.500000 0.000000,0.250000 z%22 /><rect class=%22layer_2_0%22 x=%2210.300000%22 y=%22-2.500000%22 width=%220.300000%22 height=%225.000000%22 /><rect class=%22layer_2_0%22 x=%2210.900000%22 y=%22-2.500000%22 width=%220.300000%22 height=%225.000000%22 /><rect class=%22layer_2_0%22 x=%2211.500000%22 y=%22-2.500000%22 width=%220.300000%22 height=%225.000000%22 /><rect class=%22layer_2_0%22 x=%2212.100000%22 y=%22-2.500000%22 width=%220.300000%22 height=%225.000000%22 /><rect class=%22layer_2_0%22 x=%2212.700000%22 y=%22-2.500000%22 width=%220.300000%22 height=%225.000000%22 /><rect class=%22layer_2_0%22 x=%2213.300000%22 y=%22-2.500000%22 width=%220.300000%22 height=%225.000000%22 /><rect class=%22layer_2_0%22 x=%2213.900000%22 y=%22-2.500000%22 width=%220.300000%22 height=%225.000000%22 /><rect class=%22layer_2_0%22 x=%2214.500000%22 y=%22-2.500000%22 width=%220.300000%22 height=%225.000000%22 /><rect class=%22layer_2_0%22 x=%2215.100000%22 y=%22-2.500000%22 width=%220.300000%22 height=%225.000000%22 /><rect class=%22layer_2_0%22 x=%2215.700000%22 y=%22-2.500000%22 width=%220.300000%22 height=%225.000000%22 /></g><g id=%22C268%22 data-name=%22s_bend_l_10P353379540704765_o_45P20095955167888_p_Strip%22><path class=%22layer_1_0%22 d=%22M 0.000000,-1.250000 0.393000,-1.244000 0.786000,-1.226000 1.177000,-1.197000 1.568000,-1.156000 1.958000,-1.103000 2.345000,-1.039000 2.731000,-0.963000 3.114000,-0.876000 3.495000,-0.777000 3.872000,-0.667000 4.246000,-0.545000 4.616000,-0.413000 4.982000,-0.269000 5.343000,-0.115000 5.700000,0.050000 6.051000,0.226000 6.397000,0.412000 6.738000,0.608000 7.072000,0.815000 7.400000,1.031000 7.722000,1.257000 8.036000,1.493000 8.343000,1.738000 8.643000,1.992000 8.935000,2.255000 9.220000,2.526000 9.496000,2.806000 9.763000,3.094000 10.022000,3.390000 10.272000,3.693000 10.512000,4.004000 10.743000,4.322000 10.965000,4.646000 11.177000,4.978000 11.378000,5.315000 11.570000,5.658000 11.751000,6.007000 11.922000,6.361000 12.082000,6.720000 12.231000,7.083000 12.370000,7.451000 12.497000,7.823000 12.613000,8.198000 12.718000,8.577000 12.811000,8.959000 12.893000,9.343000 12.964000,9.730000 13.023000,10.118000 13.070000,10.508000 13.105000,10.900000 13.129000,11.292000 13.141000,11.685000 13.142000,12.078000 13.130000,12.471000 13.107000,12.863000 13.072000,13.255000 13.026000,13.645000 12.968000,14.033000 12.898000,14.420000 12.817000,14.805000 12.724000,15.187000 12.620000,15.566000 12.504000,15.941000 12.378000,16.313000 12.240000,16.681000 12.091000,17.045000 11.932000,17.404000 11.762000,17.759000 11.581000,18.108000 11.390000,18.451000 11.189000,18.789000 10.978000,19.120000 10.757000,19.445000 10.526000,19.763000 10.286000,20.075000 10.037000,20.378000 9.779000,20.675000 9.512000,20.963000 9.236000,21.244000 8.953000,21.516000 8.661000,21.779000 8.361000,22.033000 8.055000,22.279000 7.740000,22.515000 7.419000,22.742000 7.092000,22.959000 6.758000,23.166000 6.418000,23.363000 6.072000,23.550000 5.721000,23.726000 5.156000,24.020000 4.610000,24.347000 4.085000,24.706000 3.582000,25.096000 3.103000,25.516000 2.651000,25.963000 2.225000,26.437000 1.829000,26.935000 1.642000,27.192000 1.292000,27.724000 0.975000,28.275000 0.691000,28.845000 0.441000,29.430000 0.227000,30.030000 0.050000,30.641000 -0.026000,30.950000 -0.148000,31.575000 -0.233000,32.205000 -0.280000,32.840000 -0.289000,33.476000 -0.260000,34.112000 -0.193000,34.745000 -0.088000,35.373000 0.054000,35.993000 0.233000,36.604000 0.448000,37.203000 0.699000,37.788000 0.837000,38.075000 1.139000,38.635000 1.302000,38.908000 1.653000,39.439000 2.035000,39.948000 2.447000,40.433000 2.887000,40.893000 3.354000,41.326000 3.846000,41.730000 4.100000,41.921000 4.626000,42.279000 5.173000,42.605000 5.453000,42.756000 6.026000,43.032000 6.615000,43.273000 7.218000,43.479000 7.831000,43.648000 8.141000,43.719000 8.768000,43.832000 9.083000,43.875000 9.717000,43.932000 10.353000,43.951000 10.353000,46.451000 9.960000,46.445000 9.567000,46.428000 9.176000,46.398000 8.785000,46.357000 8.395000,46.304000 8.008000,46.240000 7.622000,46.164000 7.239000,46.077000 6.858000,45.978000 6.481000,45.868000 6.107000,45.746000 5.737000,45.614000 5.371000,45.470000 5.010000,45.316000 4.653000,45.151000 4.302000,44.975000 3.956000,44.789000 3.615000,44.593000 3.281000,44.386000 2.953000,44.170000 2.631000,43.944000 2.317000,43.708000 2.010000,43.463000 1.710000,43.209000 1.418000,42.946000 1.133000,42.675000 0.857000,42.395000 0.590000,42.107000 0.331000,41.811000 0.081000,41.508000 -0.159000,41.197000 -0.390000,40.879000 -0.612000,40.555000 -0.824000,40.223000 -1.025000,39.886000 -1.217000,39.543000 -1.398000,39.194000 -1.569000,38.840000 -1.729000,38.481000 -1.878000,38.118000 -2.017000,37.750000 -2.144000,37.378000 -2.260000,37.003000 -2.365000,36.624000 -2.458000,36.242000 -2.540000,35.858000 -2.611000,35.471000 -2.670000,35.083000 -2.717000,34.693000 -2.752000,34.301000 -2.776000,33.909000 -2.788000,33.516000 -2.789000,33.123000 -2.777000,32.730000 -2.754000,32.338000 -2.719000,31.946000 -2.673000,31.556000 -2.615000,31.168000 -2.545000,30.781000 -2.463000,30.396000 -2.371000,30.014000 -2.267000,29.635000 -2.151000,29.260000 -2.024000,28.888000 -1.887000,28.520000 -1.738000,28.156000 -1.579000,27.797000 -1.409000,27.442000 -1.228000,27.093000 -1.037000,26.750000 -0.836000,26.412000 -0.625000,26.081000 -0.404000,25.756000 -0.173000,25.438000 0.067000,25.126000 0.316000,24.823000 0.574000,24.526000 0.841000,24.238000 1.117000,23.957000 1.400000,23.685000 1.692000,23.422000 2.298000,22.922000 2.613000,22.686000 2.934000,22.459000 3.261000,22.242000 3.595000,22.035000 3.935000,21.838000 4.281000,21.651000 4.632000,21.475000 5.197000,21.181000 5.743000,20.854000 6.268000,20.495000 6.771000,20.105000 7.250000,19.685000 7.479000,19.465000 7.919000,19.004000 8.329000,18.518000 8.711000,18.009000 9.061000,17.477000 9.378000,16.926000 9.662000,16.356000 9.912000,15.771000 10.126000,15.171000 10.219000,14.867000 10.379000,14.251000 10.501000,13.626000 10.586000,12.996000 10.633000,12.361000 10.642000,11.725000 10.613000,11.089000 10.546000,10.456000 10.441000,9.828000 10.299000,9.208000 10.214000,8.901000 10.017000,8.296000 9.784000,7.704000 9.516000,7.126000 9.369000,6.844000 9.051000,6.293000 8.700000,5.762000 8.318000,5.253000 7.906000,4.768000 7.689000,4.535000 7.236000,4.088000 6.756000,3.670000 6.253000,3.280000 5.992000,3.097000 5.456000,2.755000 4.900000,2.445000 4.327000,2.169000 3.738000,1.928000 3.135000,1.722000 2.830000,1.633000 2.212000,1.482000 1.899000,1.421000 1.270000,1.326000 0.636000,1.269000 0.000000,1.250000 z%22 /><path class=%22layer_2_0%22 d=%22M 0.000000,-0.250000 0.363000,-0.245000 0.726000,-0.228000 1.088000,-0.201000 1.449000,-0.163000 1.809000,-0.115000 2.167000,-0.055000 2.523000,0.015000 2.877000,0.096000 3.229000,0.187000 3.577000,0.289000 3.923000,0.401000 4.264000,0.523000 4.602000,0.656000 4.936000,0.799000 5.266000,0.951000 5.591000,1.114000 6.225000,1.467000 6.534000,1.658000 6.837000,1.858000 7.425000,2.284000 7.986000,2.745000 8.256000,2.988000 8.518000,3.239000 8.773000,3.497000 9.259000,4.037000 9.490000,4.317000 9.712000,4.604000 9.926000,4.898000 10.131000,5.198000 10.513000,5.815000 10.690000,6.132000 11.015000,6.782000 11.163000,7.113000 11.301000,7.449000 11.546000,8.132000 11.653000,8.479000 11.750000,8.829000 11.837000,9.182000 11.912000,9.537000 11.977000,9.894000 12.032000,10.253000 12.108000,10.975000 12.142000,11.701000 12.142000,12.064000 12.131000,12.427000 12.110000,12.789000 12.078000,13.151000 12.035000,13.511000 11.981000,13.871000 11.916000,14.228000 11.841000,14.583000 11.756000,14.936000 11.553000,15.633000 11.436000,15.977000 11.309000,16.317000 11.024000,16.985000 10.867000,17.312000 10.700000,17.635000 10.338000,18.264000 9.938000,18.871000 9.725000,19.165000 9.273000,19.733000 9.035000,20.007000 8.534000,20.532000 8.271000,20.783000 8.002000,21.027000 7.442000,21.489000 7.151000,21.707000 6.855000,21.916000 6.552000,22.117000 6.243000,22.308000 5.929000,22.490000 5.610000,22.663000 5.285000,22.826000 4.974000,22.982000 4.668000,23.147000 4.071000,23.505000 3.780000,23.697000 3.218000,24.107000 2.681000,24.550000 2.422000,24.784000 1.927000,25.273000 1.690000,25.528000 1.241000,26.060000 1.028000,26.336000 0.628000,26.906000 0.441000,27.199000 0.263000,27.498000 -0.066000,28.112000 -0.217000,28.426000 -0.490000,29.066000 -0.612000,29.392000 -0.724000,29.722000 -0.919000,30.390000 -1.073000,31.069000 -1.135000,31.412000 -1.186000,31.756000 -1.227000,32.102000 -1.279000,32.796000 -1.289000,33.492000 -1.257000,34.188000 -1.225000,34.535000 -1.183000,34.880000 -1.131000,35.224000 -1.069000,35.567000 -0.996000,35.907000 -0.821000,36.581000 -0.718000,36.914000 -0.605000,37.243000 -0.350000,37.891000 -0.057000,38.523000 0.273000,39.135000 0.452000,39.434000 0.836000,40.015000 1.041000,40.297000 1.475000,40.841000 1.704000,41.103000 1.941000,41.358000 2.437000,41.846000 2.696000,42.079000 3.234000,42.521000 3.513000,42.730000 3.797000,42.930000 4.088000,43.122000 4.384000,43.305000 4.686000,43.479000 4.993000,43.644000 5.620000,43.946000 6.264000,44.209000 6.592000,44.327000 7.257000,44.532000 7.934000,44.697000 8.275000,44.764000 8.619000,44.821000 8.964000,44.868000 9.310000,44.904000 9.657000,44.930000 10.005000,44.946000 10.353000,44.951000 10.353000,45.451000 9.990000,45.446000 9.627000,45.429000 9.265000,45.402000 8.904000,45.364000 8.544000,45.316000 8.186000,45.256000 7.830000,45.186000 7.476000,45.105000 7.124000,45.014000 6.776000,44.912000 6.430000,44.800000 6.089000,44.678000 5.751000,44.545000 5.417000,44.402000 5.087000,44.250000 4.762000,44.087000 4.128000,43.734000 3.819000,43.543000 3.516000,43.343000 2.928000,42.917000 2.367000,42.456000 2.097000,42.213000 1.580000,41.704000 1.333000,41.438000 0.863000,40.884000 0.641000,40.597000 0.427000,40.303000 0.222000,40.003000 -0.160000,39.386000 -0.337000,39.069000 -0.662000,38.419000 -0.810000,38.088000 -0.948000,37.752000 -1.193000,37.069000 -1.300000,36.722000 -1.397000,36.372000 -1.484000,36.019000 -1.559000,35.664000 -1.624000,35.307000 -1.679000,34.948000 -1.722000,34.587000 -1.755000,34.226000 -1.789000,33.500000 -1.789000,33.137000 -1.778000,32.774000 -1.757000,32.412000 -1.725000,32.050000 -1.682000,31.690000 -1.628000,31.330000 -1.563000,30.973000 -1.488000,30.618000 -1.403000,30.265000 -1.200000,29.568000 -1.083000,29.224000 -0.956000,28.884000 -0.671000,28.216000 -0.514000,27.889000 -0.347000,27.566000 0.015000,26.937000 0.415000,26.330000 0.628000,26.036000 1.080000,25.468000 1.318000,25.194000 1.819000,24.669000 2.351000,24.174000 2.911000,23.712000 3.202000,23.494000 3.498000,23.285000 3.801000,23.084000 4.110000,22.893000 4.424000,22.711000 4.743000,22.538000 5.068000,22.375000 5.379000,22.219000 5.685000,22.054000 6.282000,21.696000 6.573000,21.504000 7.135000,21.094000 7.672000,20.651000 7.931000,20.417000 8.182000,20.176000 8.663000,19.673000 9.112000,19.141000 9.325000,18.865000 9.725000,18.295000 9.912000,18.002000 10.090000,17.703000 10.259000,17.398000 10.419000,17.089000 10.570000,16.775000 10.843000,16.135000 10.965000,15.809000 11.077000,15.479000 11.272000,14.811000 11.426000,14.132000 11.488000,13.789000 11.539000,13.445000 11.580000,13.099000 11.632000,12.405000 11.642000,11.709000 11.610000,11.013000 11.578000,10.666000 11.536000,10.321000 11.484000,9.977000 11.422000,9.634000 11.349000,9.294000 11.174000,8.620000 11.071000,8.287000 10.958000,7.958000 10.703000,7.310000 10.410000,6.678000 10.080000,6.066000 9.901000,5.767000 9.517000,5.186000 9.312000,4.904000 8.878000,4.360000 8.649000,4.098000 8.412000,3.843000 7.916000,3.355000 7.657000,3.122000 7.119000,2.680000 6.840000,2.471000 6.556000,2.271000 6.265000,2.079000 5.969000,1.896000 5.361000,1.557000 4.733000,1.255000 4.413000,1.119000 3.761000,0.874000 3.096000,0.669000 2.419000,0.504000 2.078000,0.437000 1.734000,0.380000 1.389000,0.333000 1.043000,0.297000 0.696000,0.271000 0.348000,0.255000 0.000000,0.250000 z%22 /></g><g id=%22C269%22 data-name=%22as_component__PNGCOJINIPILRSBFUVHAAAKRQR7F7X5DOV45DHY3HPYOUZICQITA%22><path class=%22layer_1_0%22 d=%22M 9.889000,3.500000 0.000000,1.275000 0.000000,-1.275000 9.889000,-3.500000 16.000000,-3.500000 16.000000,3.500000 z%22 /><path class=%22layer_2_0%22 d=%22M 0.000000,-0.250000 10.000000,-2.500000 10.000000,2.500000 0.000000,0.250000 z%22 /><rect class=%22layer_2_0%22 x=%2210.300000%22 y=%22-2.500000%22 width=%220.300000%22 height=%225.000000%22 /><rect class=%22layer_2_0%22 x=%2210.900000%22 y=%22-2.500000%22 width=%220.300000%22 height=%225.000000%22 /><rect class=%22layer_2_0%22 x=%2211.500000%22 y=%22-2.500000%22 width=%220.300000%22 height=%225.000000%22 /><rect class=%22layer_2_0%22 x=%2212.100000%22 y=%22-2.500000%22 width=%220.300000%22 height=%225.000000%22 /><rect class=%22layer_2_0%22 x=%2212.700000%22 y=%22-2.500000%22 width=%220.300000%22 height=%225.000000%22 /><rect class=%22layer_2_0%22 x=%2213.300000%22 y=%22-2.500000%22 width=%220.300000%22 height=%225.000000%22 /><rect class=%22layer_2_0%22 x=%2213.900000%22 y=%22-2.500000%22 width=%220.300000%22 height=%225.000000%22 /><rect class=%22layer_2_0%22 x=%2214.500000%22 y=%22-2.500000%22 width=%220.300000%22 height=%225.000000%22 /><rect class=%22layer_2_0%22 x=%2215.100000%22 y=%22-2.500000%22 width=%220.300000%22 height=%225.000000%22 /><rect class=%22layer_2_0%22 x=%2215.700000%22 y=%22-2.500000%22 width=%220.300000%22 height=%225.000000%22 /></g><g id=%22C270%22 data-name=%22s_bend_l_2P645752482174227_o_41P64966253826368_p_Strip%22><path class=%22layer_1_0%22 d=%22M 0.000000,-1.250000 0.368000,-1.244000 0.735000,-1.227000 1.101000,-1.198000 1.466000,-1.158000 1.830000,-1.106000 2.192000,-1.043000 2.552000,-0.968000 2.910000,-0.883000 3.264000,-0.786000 3.615000,-0.678000 3.963000,-0.559000 4.307000,-0.429000 4.647000,-0.288000 4.982000,-0.137000 5.312000,0.025000 5.637000,0.197000 5.956000,0.379000 6.269000,0.571000 6.577000,0.772000 7.171000,1.204000 7.458000,1.434000 7.738000,1.673000 8.010000,1.920000 8.274000,2.176000 8.530000,2.439000 8.777000,2.711000 9.016000,2.991000 9.246000,3.277000 9.467000,3.571000 9.678000,3.872000 9.880000,4.179000 10.072000,4.492000 10.254000,4.811000 10.426000,5.136000 10.588000,5.466000 10.740000,5.801000 10.881000,6.141000 11.011000,6.484000 11.130000,6.832000 11.238000,7.183000 11.335000,7.538000 11.421000,7.895000 11.496000,8.255000 11.559000,8.617000 11.611000,8.981000 11.652000,9.346000 11.681000,9.712000 11.699000,10.080000 11.705000,10.447000 11.699000,10.815000 11.682000,11.182000 11.653000,11.548000 11.613000,11.913000 11.562000,12.277000 11.499000,12.640000 11.424000,12.999000 11.339000,13.357000 11.242000,13.712000 11.134000,14.063000 11.016000,14.411000 10.886000,14.755000 10.746000,15.094000 10.595000,15.429000 10.433000,15.760000 10.261000,16.085000 10.080000,16.404000 9.888000,16.718000 9.686000,17.025000 9.475000,17.326000 9.255000,17.620000 9.025000,17.907000 8.787000,18.187000 8.540000,18.459000 8.284000,18.723000 8.021000,18.979000 7.749000,19.227000 7.470000,19.466000 7.183000,19.696000 6.889000,19.917000 6.589000,20.128000 6.282000,20.330000 5.969000,20.523000 5.650000,20.705000 5.325000,20.878000 4.995000,21.040000 4.660000,21.191000 4.321000,21.332000 3.977000,21.463000 3.630000,21.582000 3.279000,21.691000 2.924000,21.788000 2.567000,21.874000 2.207000,21.949000 1.845000,22.013000 1.481000,22.065000 0.910000,22.156000 0.346000,22.283000 0.068000,22.359000 -0.482000,22.539000 -1.019000,22.752000 -1.542000,22.999000 -2.048000,23.278000 -2.536000,23.588000 -3.003000,23.928000 -3.448000,24.297000 -3.869000,24.693000 -4.264000,25.115000 -4.632000,25.561000 -4.971000,26.028000 -5.281000,26.517000 -5.559000,27.024000 -5.686000,27.283000 -5.915000,27.814000 -6.110000,28.358000 -6.271000,28.913000 -6.397000,29.477000 -6.487000,30.048000 -6.541000,30.624000 -6.559000,31.201000 -6.540000,31.779000 -6.485000,32.354000 -6.395000,32.925000 -6.268000,33.489000 -6.107000,34.044000 -5.910000,34.588000 -5.681000,35.118000 -5.418000,35.633000 -5.124000,36.131000 -4.799000,36.609000 -4.444000,37.065000 -4.062000,37.499000 -3.653000,37.907000 -3.219000,38.289000 -2.994000,38.470000 -2.526000,38.810000 -2.038000,39.119000 -1.531000,39.398000 -1.008000,39.644000 -0.471000,39.856000 0.079000,40.035000 0.639000,40.179000 1.207000,40.287000 1.780000,40.359000 2.068000,40.382000 2.646000,40.400000 2.646000,42.900000 2.279000,42.894000 1.911000,42.877000 1.545000,42.848000 1.180000,42.808000 0.816000,42.756000 0.454000,42.693000 0.094000,42.618000 -0.264000,42.533000 -0.618000,42.436000 -0.969000,42.328000 -1.317000,42.209000 -1.661000,42.079000 -2.001000,41.938000 -2.336000,41.787000 -2.666000,41.625000 -2.991000,41.453000 -3.310000,41.271000 -3.623000,41.079000 -3.931000,40.878000 -4.525000,40.446000 -4.812000,40.216000 -5.092000,39.977000 -5.364000,39.730000 -5.628000,39.474000 -5.884000,39.211000 -6.131000,38.939000 -6.370000,38.659000 -6.600000,38.373000 -6.821000,38.079000 -7.032000,37.778000 -7.234000,37.471000 -7.426000,37.158000 -7.608000,36.839000 -7.780000,36.514000 -7.942000,36.184000 -8.094000,35.849000 -8.365000,35.166000 -8.484000,34.818000 -8.592000,34.467000 -8.689000,34.112000 -8.775000,33.755000 -8.850000,33.395000 -8.913000,33.033000 -8.965000,32.669000 -9.006000,32.304000 -9.035000,31.938000 -9.053000,31.570000 -9.059000,31.203000 -9.053000,30.835000 -9.036000,30.468000 -9.007000,30.102000 -8.967000,29.737000 -8.916000,29.373000 -8.853000,29.010000 -8.693000,28.293000 -8.596000,27.938000 -8.488000,27.587000 -8.370000,27.239000 -8.240000,26.895000 -8.100000,26.556000 -7.949000,26.221000 -7.787000,25.890000 -7.615000,25.565000 -7.434000,25.246000 -7.242000,24.932000 -7.040000,24.625000 -6.829000,24.324000 -6.609000,24.030000 -6.379000,23.743000 -6.141000,23.463000 -5.894000,23.191000 -5.638000,22.927000 -5.375000,22.671000 -5.103000,22.423000 -4.824000,22.184000 -4.537000,21.954000 -4.243000,21.733000 -3.943000,21.522000 -3.636000,21.320000 -3.323000,21.127000 -3.004000,20.945000 -2.679000,20.772000 -2.349000,20.610000 -2.014000,20.459000 -1.675000,20.318000 -1.331000,20.187000 -0.984000,20.068000 -0.632000,19.959000 -0.278000,19.862000 0.079000,19.776000 0.439000,19.701000 0.801000,19.637000 1.165000,19.585000 1.451000,19.544000 2.019000,19.435000 2.578000,19.291000 2.854000,19.205000 3.398000,19.009000 3.928000,18.779000 4.443000,18.516000 4.940000,18.221000 5.418000,17.896000 5.874000,17.541000 6.307000,17.158000 6.716000,16.749000 7.098000,16.315000 7.451000,15.858000 7.776000,15.380000 8.070000,14.882000 8.332000,14.367000 8.561000,13.836000 8.756000,13.292000 8.917000,12.737000 9.043000,12.173000 9.133000,11.602000 9.187000,11.026000 9.205000,10.449000 9.186000,9.871000 9.131000,9.296000 9.041000,8.725000 8.982000,8.442000 8.838000,7.882000 8.659000,7.332000 8.446000,6.795000 8.199000,6.272000 7.921000,5.766000 7.611000,5.278000 7.271000,4.810000 6.902000,4.365000 6.507000,3.944000 6.085000,3.548000 5.640000,3.180000 5.172000,2.840000 4.684000,2.531000 4.177000,2.252000 3.654000,2.006000 3.117000,1.794000 2.567000,1.615000 2.007000,1.472000 1.439000,1.363000 1.153000,1.323000 0.578000,1.268000 0.000000,1.250000 z%22 /><path class=%22layer_2_0%22 d=%22M 0.000000,-0.250000 0.336000,-0.245000 0.672000,-0.229000 1.007000,-0.203000 1.341000,-0.166000 2.005000,-0.061000 2.661000,0.086000 2.985000,0.175000 3.307000,0.274000 3.625000,0.382000 3.939000,0.501000 4.250000,0.630000 4.556000,0.768000 4.858000,0.916000 5.155000,1.073000 5.734000,1.415000 6.290000,1.793000 6.559000,1.995000 7.077000,2.423000 7.567000,2.883000 7.801000,3.124000 8.246000,3.628000 8.658000,4.159000 9.036000,4.715000 9.212000,5.002000 9.536000,5.591000 9.684000,5.892000 9.951000,6.509000 10.070000,6.823000 10.179000,7.141000 10.278000,7.463000 10.367000,7.787000 10.514000,8.443000 10.572000,8.774000 10.619000,9.107000 10.656000,9.441000 10.683000,9.776000 10.705000,10.448000 10.684000,11.120000 10.658000,11.455000 10.621000,11.789000 10.574000,12.122000 10.516000,12.453000 10.448000,12.782000 10.370000,13.109000 10.282000,13.433000 10.075000,14.073000 9.828000,14.698000 9.542000,15.306000 9.385000,15.604000 9.043000,16.182000 8.859000,16.464000 8.666000,16.739000 8.464000,17.008000 8.036000,17.526000 7.810000,17.775000 7.576000,18.017000 7.335000,18.251000 7.087000,18.477000 6.832000,18.696000 6.301000,19.108000 6.026000,19.302000 5.745000,19.487000 5.459000,19.663000 4.870000,19.987000 4.262000,20.274000 3.952000,20.403000 3.637000,20.522000 3.320000,20.631000 2.998000,20.731000 2.674000,20.820000 2.018000,20.967000 1.687000,21.025000 1.355000,21.073000 0.722000,21.174000 0.408000,21.239000 -0.212000,21.399000 -0.822000,21.598000 -1.417000,21.835000 -1.997000,22.108000 -2.280000,22.258000 -2.831000,22.585000 -3.099000,22.761000 -3.617000,23.139000 -3.866000,23.339000 -4.347000,23.763000 -4.799000,24.217000 -5.015000,24.454000 -5.423000,24.948000 -5.799000,25.467000 -5.975000,25.735000 -6.142000,26.008000 -6.450000,26.570000 -6.591000,26.858000 -6.845000,27.446000 -6.958000,27.746000 -7.155000,28.356000 -7.240000,28.665000 -7.379000,29.291000 -7.434000,29.606000 -7.479000,29.923000 -7.539000,30.561000 -7.559000,31.202000 -7.538000,31.842000 -7.513000,32.162000 -7.432000,32.798000 -7.377000,33.113000 -7.312000,33.427000 -7.237000,33.739000 -7.152000,34.048000 -6.954000,34.657000 -6.717000,35.253000 -6.585000,35.545000 -6.294000,36.115000 -5.968000,36.667000 -5.792000,36.935000 -5.415000,37.453000 -5.006000,37.946000 -4.567000,38.413000 -4.337000,38.636000 -4.100000,38.852000 -3.606000,39.260000 -3.350000,39.453000 -2.820000,39.813000 -2.268000,40.139000 -1.985000,40.289000 -1.697000,40.430000 -1.109000,40.684000 -0.809000,40.797000 -0.506000,40.901000 0.109000,41.080000 0.735000,41.219000 1.368000,41.320000 1.686000,41.355000 2.326000,41.395000 2.646000,41.400000 2.646000,41.900000 2.310000,41.895000 1.974000,41.879000 1.639000,41.853000 1.305000,41.816000 0.641000,41.711000 -0.015000,41.564000 -0.661000,41.377000 -0.979000,41.268000 -1.293000,41.149000 -1.604000,41.020000 -1.910000,40.882000 -2.212000,40.734000 -2.509000,40.577000 -3.088000,40.235000 -3.644000,39.857000 -3.913000,39.655000 -4.175000,39.445000 -4.431000,39.227000 -4.921000,38.767000 -5.155000,38.526000 -5.600000,38.022000 -6.012000,37.491000 -6.390000,36.935000 -6.566000,36.648000 -6.890000,36.059000 -7.038000,35.758000 -7.305000,35.141000 -7.424000,34.827000 -7.533000,34.509000 -7.632000,34.187000 -7.721000,33.863000 -7.868000,33.207000 -7.926000,32.876000 -7.973000,32.543000 -8.010000,32.209000 -8.037000,31.874000 -8.059000,31.202000 -8.038000,30.530000 -8.012000,30.195000 -7.975000,29.861000 -7.928000,29.528000 -7.870000,29.197000 -7.802000,28.868000 -7.724000,28.541000 -7.636000,28.217000 -7.537000,27.895000 -7.310000,27.263000 -7.182000,26.952000 -6.896000,26.344000 -6.739000,26.046000 -6.572000,25.754000 -6.213000,25.186000 -6.020000,24.911000 -5.818000,24.642000 -5.390000,24.124000 -5.164000,23.875000 -4.930000,23.633000 -4.689000,23.399000 -4.186000,22.954000 -3.655000,22.542000 -3.380000,22.348000 -3.099000,22.163000 -2.813000,21.987000 -2.224000,21.663000 -1.922000,21.515000 -1.616000,21.376000 -1.306000,21.247000 -0.991000,21.128000 -0.674000,21.019000 -0.352000,20.919000 -0.028000,20.830000 0.628000,20.683000 0.959000,20.625000 1.291000,20.577000 1.924000,20.476000 2.238000,20.411000 2.858000,20.251000 3.468000,20.052000 4.063000,19.815000 4.643000,19.542000 4.926000,19.392000 5.477000,19.065000 5.745000,18.889000 6.263000,18.511000 6.512000,18.311000 6.993000,17.887000 7.223000,17.663000 7.661000,17.196000 8.069000,16.702000 8.261000,16.445000 8.621000,15.915000 8.788000,15.642000 9.096000,15.080000 9.369000,14.500000 9.604000,13.904000 9.707000,13.600000 9.886000,12.985000 10.025000,12.360000 10.080000,12.044000 10.125000,11.727000 10.185000,11.089000 10.205000,10.448000 10.199000,10.128000 10.159000,9.488000 10.078000,8.852000 10.023000,8.537000 9.958000,8.223000 9.883000,7.911000 9.798000,7.602000 9.600000,6.993000 9.486000,6.693000 9.231000,6.105000 8.940000,5.535000 8.614000,4.983000 8.438000,4.715000 8.061000,4.197000 7.860000,3.947000 7.436000,3.467000 7.213000,3.237000 6.746000,2.798000 6.502000,2.590000 5.996000,2.197000 5.466000,1.837000 5.193000,1.670000 4.631000,1.361000 4.343000,1.220000 3.755000,0.966000 3.152000,0.749000 2.537000,0.570000 1.911000,0.431000 1.278000,0.330000 0.960000,0.295000 0.640000,0.270000 0.000000,0.250000 z%22 /></g><g id=%22C271%22 data-name=%22as_component__PNGCOJINIPILRSBFUVHAAAKRQR7F7X5DOV45DHY3HPYOUZICQITA%22><path class=%22layer_1_0%22 d=%22M 9.889000,3.500000 0.000000,1.275000 0.000000,-1.275000 9.889000,-3.500000 16.000000,-3.500000 16.000000,3.500000 z%22 /><path class=%22layer_2_0%22 d=%22M 0.000000,-0.250000 10.000000,-2.500000 10.000000,2.500000 0.000000,0.250000 z%22 /><rect class=%22layer_2_0%22 x=%2210.300000%22 y=%22-2.500000%22 width=%220.300000%22 height=%225.000000%22 /><rect class=%22layer_2_0%22 x=%2210.900000%22 y=%22-2.500000%22 width=%220.300000%22 height=%225.000000%22 /><rect class=%22layer_2_0%22 x=%2211.500000%22 y=%22-2.500000%22 width=%220.300000%22 height=%225.000000%22 /><rect class=%22layer_2_0%22 x=%2212.100000%22 y=%22-2.500000%22 width=%220.300000%22 height=%225.000000%22 /><rect class=%22layer_2_0%22 x=%2212.700000%22 y=%22-2.500000%22 width=%220.300000%22 height=%225.000000%22 /><rect class=%22layer_2_0%22 x=%2213.300000%22 y=%22-2.500000%22 width=%220.300000%22 height=%225.000000%22 /><rect class=%22layer_2_0%22 x=%2213.900000%22 y=%22-2.500000%22 width=%220.300000%22 height=%225.000000%22 /><rect class=%22layer_2_0%22 x=%2214.500000%22 y=%22-2.500000%22 width=%220.300000%22 height=%225.000000%22 /><rect class=%22layer_2_0%22 x=%2215.100000%22 y=%22-2.500000%22 width=%220.300000%22 height=%225.000000%22 /><rect class=%22layer_2_0%22 x=%2215.700000%22 y=%22-2.500000%22 width=%220.300000%22 height=%225.000000%22 /></g><g id=%22C272%22 data-name=%22s_bend_l_9P619053368217212_o_2P716809293081549_p_Strip%22><path class=%22layer_1_0%22 d=%22M 0.000000,-1.250000 0.411000,-1.242000 0.821000,-1.218000 1.229000,-1.177000 1.636000,-1.121000 2.040000,-1.049000 2.441000,-0.961000 2.839000,-0.857000 3.232000,-0.737000 3.619000,-0.603000 4.002000,-0.453000 4.378000,-0.288000 4.747000,-0.109000 5.109000,0.085000 5.463000,0.293000 5.733000,0.451000 6.008000,0.599000 6.289000,0.735000 6.575000,0.861000 6.866000,0.975000 7.161000,1.077000 7.460000,1.168000 7.762000,1.247000 8.067000,1.314000 8.375000,1.369000 8.684000,1.412000 8.995000,1.442000 9.307000,1.461000 9.619000,1.467000 9.619000,3.967000 9.208000,3.959000 8.798000,3.935000 8.390000,3.894000 7.983000,3.838000 7.579000,3.766000 7.178000,3.678000 6.780000,3.574000 6.387000,3.454000 6.000000,3.320000 5.617000,3.170000 5.241000,3.005000 4.872000,2.826000 4.510000,2.632000 4.156000,2.424000 3.886000,2.266000 3.611000,2.118000 3.330000,1.982000 3.044000,1.856000 2.753000,1.742000 2.458000,1.640000 2.159000,1.549000 1.857000,1.470000 1.552000,1.403000 1.244000,1.348000 0.935000,1.305000 0.624000,1.275000 0.312000,1.256000 0.000000,1.250000 z%22 /><path class=%22layer_2_0%22 d=%22M 0.000000,-0.250000 0.371000,-0.243000 0.742000,-0.221000 1.111000,-0.184000 1.479000,-0.133000 1.845000,-0.068000 2.208000,0.012000 2.567000,0.106000 2.922000,0.214000 3.273000,0.335000 3.619000,0.471000 3.959000,0.620000 4.293000,0.782000 4.620000,0.957000 4.940000,1.145000 5.244000,1.324000 5.554000,1.490000 5.870000,1.643000 6.192000,1.784000 6.519000,1.913000 6.852000,2.028000 7.188000,2.130000 7.528000,2.219000 7.872000,2.295000 8.218000,2.357000 8.566000,2.405000 8.916000,2.439000 9.267000,2.460000 9.619000,2.467000 9.619000,2.967000 9.248000,2.960000 8.877000,2.938000 8.508000,2.901000 8.140000,2.850000 7.774000,2.785000 7.411000,2.705000 7.052000,2.611000 6.697000,2.504000 6.346000,2.382000 6.000000,2.246000 5.660000,2.097000 5.326000,1.935000 4.999000,1.760000 4.679000,1.572000 4.375000,1.394000 4.065000,1.228000 3.749000,1.074000 3.427000,0.933000 3.100000,0.804000 2.767000,0.689000 2.431000,0.587000 2.091000,0.498000 1.747000,0.422000 1.401000,0.360000 1.053000,0.312000 0.703000,0.278000 0.352000,0.257000 0.000000,0.250000 z%22 /></g><g id=%22C273%22 data-name=%22as_component__PNGCOJINIPILRSBFUVHAAAKRQR7F7X5DOV45DHY3HPYOUZICQITA%22><path class=%22layer_1_0%22 d=%22M 9.889000,3.500000 0.000000,1.275000 0.000000,-1.275000 9.889000,-3.500000 16.000000,-3.500000 16.000000,3.500000 z%22 /><path class=%22layer_2_0%22 d=%22M 0.000000,-0.250000 10.000000,-2.500000 10.000000,2.500000 0.000000,0.250000 z%22 /><rect class=%22layer_2_0%22 x=%2210.300000%22 y=%22-2.500000%22 width=%220.300000%22 height=%225.000000%22 /><rect class=%22layer_2_0%22 x=%2210.900000%22 y=%22-2.500000%22 width=%220.300000%22 height=%225.000000%22 /><rect class=%22layer_2_0%22 x=%2211.500000%22 y=%22-2.500000%22 width=%220.300000%22 height=%225.000000%22 /><rect class=%22layer_2_0%22 x=%2212.100000%22 y=%22-2.500000%22 width=%220.300000%22 height=%225.000000%22 /><rect class=%22layer_2_0%22 x=%2212.700000%22 y=%22-2.500000%22 width=%220.300000%22 height=%225.000000%22 /><rect class=%22layer_2_0%22 x=%2213.300000%22 y=%22-2.500000%22 width=%220.300000%22 height=%225.000000%22 /><rect class=%22layer_2_0%22 x=%2213.900000%22 y=%22-2.500000%22 width=%220.300000%22 height=%225.000000%22 /><rect class=%22layer_2_0%22 x=%2214.500000%22 y=%22-2.500000%22 width=%220.300000%22 height=%225.000000%22 /><rect class=%22layer_2_0%22 x=%2215.100000%22 y=%22-2.500000%22 width=%220.300000%22 height=%225.000000%22 /><rect class=%22layer_2_0%22 x=%2215.700000%22 y=%22-2.500000%22 width=%220.300000%22 height=%225.000000%22 /></g><g id=%22C274%22 data-name=%22s_bend_l_11P52490244355053_o_24P122113104117044_p_Strip%22><path class=%22layer_1_0%22 d=%22M 0.000000,-1.250000 0.325000,-1.244000 0.649000,-1.226000 0.972000,-1.195000 1.294000,-1.153000 1.614000,-1.098000 1.932000,-1.032000 2.247000,-0.953000 2.559000,-0.863000 2.867000,-0.762000 3.171000,-0.648000 3.471000,-0.524000 3.766000,-0.388000 4.055000,-0.241000 4.339000,-0.084000 4.617000,0.084000 4.888000,0.262000 5.153000,0.451000 5.410000,0.649000 5.660000,0.856000 5.901000,1.073000 6.135000,1.299000 6.359000,1.533000 6.575000,1.776000 6.782000,2.026000 6.979000,2.284000 7.166000,2.550000 7.343000,2.822000 7.510000,3.100000 7.666000,3.385000 7.811000,3.675000 7.946000,3.971000 8.069000,4.271000 8.181000,4.576000 8.281000,4.884000 8.370000,5.197000 8.447000,5.512000 8.512000,5.830000 8.565000,6.150000 8.606000,6.472000 8.635000,6.796000 8.652000,7.120000 8.657000,7.444000 8.650000,7.769000 8.630000,8.093000 8.598000,8.416000 8.554000,8.738000 8.498000,9.058000 8.430000,9.375000 8.351000,9.690000 8.259000,10.001000 8.156000,10.309000 8.042000,10.613000 7.916000,10.912000 7.779000,11.207000 7.631000,11.496000 7.472000,11.779000 7.303000,12.056000 7.124000,12.326000 6.934000,12.590000 6.735000,12.846000 6.459000,13.216000 6.211000,13.606000 5.993000,14.013000 5.806000,14.435000 5.651000,14.870000 5.529000,15.315000 5.441000,15.768000 5.387000,16.227000 5.368000,16.688000 5.383000,17.150000 5.433000,17.609000 5.517000,18.063000 5.635000,18.509000 5.786000,18.945000 5.969000,19.369000 6.184000,19.778000 6.429000,20.170000 6.702000,20.542000 7.002000,20.893000 7.328000,21.220000 7.677000,21.522000 8.048000,21.796000 8.439000,22.043000 8.847000,22.259000 9.270000,22.444000 9.705000,22.597000 10.151000,22.717000 10.605000,22.803000 11.064000,22.855000 11.525000,22.872000 11.525000,25.372000 11.200000,25.366000 10.876000,25.348000 10.553000,25.317000 10.231000,25.275000 9.911000,25.220000 9.593000,25.154000 9.278000,25.075000 8.966000,24.985000 8.658000,24.884000 8.354000,24.770000 8.054000,24.646000 7.759000,24.510000 7.470000,24.363000 7.186000,24.206000 6.908000,24.038000 6.637000,23.860000 6.372000,23.671000 6.115000,23.473000 5.865000,23.266000 5.624000,23.049000 5.390000,22.823000 5.166000,22.589000 4.950000,22.346000 4.743000,22.096000 4.546000,21.838000 4.359000,21.572000 4.182000,21.300000 4.015000,21.022000 3.859000,20.737000 3.714000,20.447000 3.579000,20.151000 3.456000,19.851000 3.344000,19.546000 3.244000,19.238000 3.155000,18.925000 3.078000,18.610000 3.013000,18.292000 2.960000,17.972000 2.919000,17.650000 2.890000,17.326000 2.873000,17.002000 2.868000,16.678000 2.875000,16.353000 2.895000,16.029000 2.927000,15.706000 2.971000,15.384000 3.027000,15.064000 3.095000,14.747000 3.174000,14.432000 3.266000,14.121000 3.369000,13.813000 3.483000,13.509000 3.609000,13.210000 3.746000,12.915000 3.894000,12.626000 4.053000,12.343000 4.222000,12.066000 4.401000,11.796000 4.591000,11.532000 4.790000,11.276000 5.066000,10.906000 5.314000,10.516000 5.532000,10.109000 5.719000,9.687000 5.874000,9.252000 5.996000,8.807000 6.084000,8.354000 6.138000,7.895000 6.157000,7.434000 6.142000,6.972000 6.092000,6.513000 6.008000,6.059000 5.890000,5.613000 5.739000,5.177000 5.556000,4.753000 5.341000,4.344000 5.096000,3.952000 4.823000,3.580000 4.523000,3.229000 4.197000,2.902000 3.848000,2.600000 3.477000,2.326000 3.086000,2.079000 2.678000,1.863000 2.255000,1.678000 1.820000,1.525000 1.374000,1.405000 0.920000,1.319000 0.461000,1.267000 0.000000,1.250000 z%22 /><path class=%22layer_2_0%22 d=%22M 0.000000,-0.250000 0.287000,-0.245000 0.860000,-0.202000 1.144000,-0.164000 1.427000,-0.116000 1.708000,-0.057000 1.987000,0.012000 2.263000,0.092000 2.536000,0.182000 2.805000,0.282000 3.070000,0.392000 3.331000,0.512000 3.587000,0.642000 3.838000,0.781000 4.084000,0.930000 4.558000,1.254000 4.785000,1.429000 5.006000,1.613000 5.220000,1.805000 5.426000,2.004000 5.816000,2.426000 6.173000,2.876000 6.495000,3.351000 6.780000,3.849000 6.909000,4.106000 7.028000,4.367000 7.137000,4.633000 7.236000,4.903000 7.325000,5.176000 7.403000,5.452000 7.471000,5.731000 7.529000,6.012000 7.576000,6.295000 7.612000,6.580000 7.638000,6.866000 7.653000,7.153000 7.657000,7.440000 7.650000,7.727000 7.633000,8.014000 7.605000,8.300000 7.566000,8.584000 7.517000,8.867000 7.457000,9.148000 7.386000,9.426000 7.305000,9.702000 7.214000,9.974000 7.113000,10.243000 7.001000,10.507000 6.880000,10.768000 6.609000,11.274000 6.301000,11.758000 5.957000,12.218000 5.792000,12.430000 5.487000,12.872000 5.347000,13.101000 5.216000,13.335000 4.981000,13.817000 4.782000,14.316000 4.621000,14.828000 4.555000,15.088000 4.499000,15.350000 4.453000,15.615000 4.390000,16.148000 4.368000,16.684000 4.372000,16.952000 4.410000,17.488000 4.444000,17.754000 4.541000,18.282000 4.679000,18.801000 4.854000,19.308000 5.067000,19.800000 5.316000,20.276000 5.454000,20.506000 5.756000,20.950000 5.918000,21.163000 6.089000,21.371000 6.453000,21.765000 6.846000,22.131000 7.265000,22.466000 7.484000,22.622000 7.938000,22.908000 8.172000,23.038000 8.656000,23.272000 8.903000,23.375000 9.410000,23.552000 9.668000,23.627000 9.928000,23.692000 10.191000,23.747000 10.455000,23.792000 10.721000,23.827000 11.257000,23.867000 11.525000,23.872000 11.525000,24.372000 11.238000,24.367000 10.665000,24.324000 10.381000,24.286000 10.098000,24.238000 9.817000,24.179000 9.538000,24.110000 9.262000,24.030000 8.989000,23.940000 8.720000,23.840000 8.455000,23.730000 8.194000,23.610000 7.938000,23.480000 7.687000,23.341000 7.441000,23.192000 6.967000,22.868000 6.740000,22.693000 6.519000,22.509000 6.305000,22.317000 6.099000,22.118000 5.709000,21.696000 5.352000,21.246000 5.030000,20.771000 4.745000,20.273000 4.616000,20.016000 4.497000,19.755000 4.388000,19.489000 4.289000,19.219000 4.200000,18.946000 4.122000,18.670000 4.054000,18.391000 3.996000,18.110000 3.949000,17.827000 3.913000,17.542000 3.887000,17.256000 3.872000,16.969000 3.868000,16.682000 3.875000,16.395000 3.892000,16.108000 3.920000,15.822000 3.959000,15.538000 4.008000,15.255000 4.068000,14.974000 4.139000,14.696000 4.220000,14.420000 4.311000,14.148000 4.412000,13.879000 4.645000,13.354000 4.916000,12.848000 5.224000,12.364000 5.568000,11.904000 5.733000,11.692000 6.038000,11.250000 6.178000,11.021000 6.309000,10.787000 6.544000,10.305000 6.743000,9.806000 6.904000,9.294000 6.970000,9.034000 7.026000,8.772000 7.072000,8.507000 7.135000,7.974000 7.151000,7.706000 7.153000,7.170000 7.115000,6.634000 7.081000,6.368000 6.984000,5.840000 6.846000,5.321000 6.671000,4.814000 6.458000,4.322000 6.209000,3.846000 6.071000,3.616000 5.770000,3.172000 5.436000,2.751000 5.072000,2.357000 4.679000,1.991000 4.473000,1.820000 4.041000,1.500000 3.817000,1.353000 3.353000,1.084000 2.869000,0.850000 2.622000,0.747000 2.370000,0.654000 1.857000,0.495000 1.597000,0.430000 1.334000,0.375000 1.070000,0.330000 0.804000,0.295000 0.536000,0.270000 0.000000,0.250000 z%22 /></g><g id=%22C275%22 data-name=%22as_component__PNGCOJINIPILRSBFUVHAAAKRQR7F7X5DOV45DHY3HPYOUZICQITA%22><path class=%22layer_1_0%22 d=%22M 9.889000,3.500000 0.000000,1.275000 0.000000,-1.275000 9.889000,-3.500000 16.000000,-3.500000 16.000000,3.500000 z%22 /><path class=%22layer_2_0%22 d=%22M 0.000000,-0.250000 10.000000,-2.500000 10.000000,2.500000 0.000000,0.250000 z%22 /><rect class=%22layer_2_0%22 x=%2210.300000%22 y=%22-2.500000%22 width=%220.300000%22 height=%225.000000%22 /><rect class=%22layer_2_0%22 x=%2210.900000%22 y=%22-2.500000%22 width=%220.300000%22 height=%225.000000%22 /><rect class=%22layer_2_0%22 x=%2211.500000%22 y=%22-2.500000%22 width=%220.300000%22 height=%225.000000%22 /><rect class=%22layer_2_0%22 x=%2212.100000%22 y=%22-2.500000%22 width=%220.300000%22 height=%225.000000%22 /><rect class=%22layer_2_0%22 x=%2212.700000%22 y=%22-2.500000%22 width=%220.300000%22 height=%225.000000%22 /><rect class=%22layer_2_0%22 x=%2213.300000%22 y=%22-2.500000%22 width=%220.300000%22 height=%225.000000%22 /><rect class=%22layer_2_0%22 x=%2213.900000%22 y=%22-2.500000%22 width=%220.300000%22 height=%225.000000%22 /><rect class=%22layer_2_0%22 x=%2214.500000%22 y=%22-2.500000%22 width=%220.300000%22 height=%225.000000%22 /><rect class=%22layer_2_0%22 x=%2215.100000%22 y=%22-2.500000%22 width=%220.300000%22 height=%225.000000%22 /><rect class=%22layer_2_0%22 x=%2215.700000%22 y=%22-2.500000%22 width=%220.300000%22 height=%225.000000%22 /></g><g id=%22C276%22 data-name=%22s_bend_l_8P193723396952242_o_20P44412748524155_p_Strip%22><path class=%22layer_1_0%22 d=%22M 0.000000,-1.250000 0.305000,-1.244000 0.610000,-1.224000 0.913000,-1.192000 1.215000,-1.147000 1.514000,-1.089000 1.811000,-1.018000 2.105000,-0.935000 2.394000,-0.839000 2.680000,-0.731000 2.960000,-0.611000 3.236000,-0.480000 3.505000,-0.337000 3.768000,-0.182000 4.024000,-0.017000 4.273000,0.160000 4.515000,0.346000 4.748000,0.543000 4.972000,0.750000 5.188000,0.966000 5.394000,1.190000 5.591000,1.424000 5.777000,1.665000 5.953000,1.915000 6.119000,2.171000 6.273000,2.434000 6.416000,2.704000 6.547000,2.979000 6.667000,3.260000 6.774000,3.546000 6.869000,3.836000 6.952000,4.129000 7.022000,4.426000 7.080000,4.726000 7.125000,5.027000 7.157000,5.331000 7.176000,5.635000 7.182000,5.940000 7.175000,6.246000 7.155000,6.550000 7.123000,6.853000 7.077000,7.155000 7.019000,7.455000 6.948000,7.751000 6.864000,8.045000 6.768000,8.334000 6.660000,8.620000 6.540000,8.900000 6.408000,9.175000 6.265000,9.444000 6.110000,9.707000 5.944000,9.963000 5.767000,10.212000 5.580000,10.453000 5.383000,10.686000 5.176000,10.911000 4.960000,11.126000 4.685000,11.413000 4.434000,11.722000 4.211000,12.051000 4.017000,12.398000 3.852000,12.760000 3.719000,13.135000 3.618000,13.519000 3.551000,13.911000 3.516000,14.308000 3.516000,14.705000 3.549000,15.102000 3.616000,15.494000 3.716000,15.879000 3.848000,16.254000 4.012000,16.616000 4.205000,16.964000 4.428000,17.293000 4.677000,17.603000 4.952000,17.890000 5.251000,18.153000 5.570000,18.390000 5.909000,18.599000 6.264000,18.778000 6.633000,18.926000 7.013000,19.043000 7.402000,19.127000 7.797000,19.177000 8.194000,19.194000 8.194000,21.694000 7.889000,21.688000 7.584000,21.668000 7.281000,21.636000 6.979000,21.591000 6.680000,21.533000 6.383000,21.462000 6.089000,21.379000 5.800000,21.283000 5.514000,21.175000 5.234000,21.056000 4.958000,20.924000 4.689000,20.781000 4.426000,20.626000 4.170000,20.461000 3.921000,20.284000 3.679000,20.098000 3.446000,19.901000 3.222000,19.694000 3.006000,19.478000 2.800000,19.254000 2.603000,19.020000 2.417000,18.779000 2.241000,18.529000 2.075000,18.273000 1.921000,18.010000 1.778000,17.740000 1.647000,17.465000 1.527000,17.184000 1.420000,16.898000 1.325000,16.608000 1.242000,16.315000 1.172000,16.018000 1.114000,15.718000 1.069000,15.417000 1.037000,15.113000 1.018000,14.809000 1.012000,14.504000 1.019000,14.199000 1.039000,13.894000 1.071000,13.591000 1.117000,13.289000 1.175000,12.990000 1.246000,12.693000 1.330000,12.399000 1.426000,12.110000 1.534000,11.824000 1.654000,11.544000 1.786000,11.269000 1.929000,11.000000 2.084000,10.737000 2.250000,10.481000 2.427000,10.232000 2.614000,9.991000 2.811000,9.758000 3.018000,9.533000 3.234000,9.318000 3.509000,9.031000 3.760000,8.722000 3.983000,8.393000 4.178000,8.046000 4.342000,7.684000 4.475000,7.309000 4.576000,6.925000 4.643000,6.533000 4.678000,6.136000 4.678000,5.739000 4.645000,5.342000 4.578000,4.950000 4.478000,4.565000 4.346000,4.190000 4.182000,3.828000 3.989000,3.480000 3.766000,3.151000 3.517000,2.841000 3.242000,2.554000 2.943000,2.291000 2.624000,2.054000 2.285000,1.845000 1.930000,1.666000 1.561000,1.518000 1.181000,1.401000 0.792000,1.317000 0.397000,1.267000 0.000000,1.250000 z%22 /><path class=%22layer_2_0%22 d=%22M 0.000000,-0.250000 0.263000,-0.244000 0.525000,-0.228000 0.786000,-0.200000 1.046000,-0.161000 1.303000,-0.111000 1.559000,-0.050000 1.812000,0.021000 2.307000,0.196000 2.785000,0.413000 3.017000,0.536000 3.243000,0.669000 3.464000,0.812000 3.678000,0.963000 3.886000,1.124000 4.087000,1.294000 4.280000,1.471000 4.466000,1.657000 4.643000,1.851000 4.973000,2.259000 5.267000,2.695000 5.399000,2.921000 5.522000,3.153000 5.635000,3.390000 5.738000,3.632000 5.831000,3.878000 5.913000,4.127000 5.984000,4.380000 6.045000,4.636000 6.094000,4.894000 6.133000,5.153000 6.177000,5.677000 6.182000,5.939000 6.176000,6.202000 6.159000,6.464000 6.131000,6.725000 6.092000,6.985000 6.042000,7.243000 5.909000,7.751000 5.826000,8.000000 5.733000,8.245000 5.629000,8.487000 5.516000,8.724000 5.392000,8.955000 5.259000,9.182000 5.116000,9.402000 4.964000,9.616000 4.803000,9.824000 4.634000,10.024000 4.456000,10.217000 4.270000,10.403000 4.099000,10.573000 3.779000,10.935000 3.631000,11.126000 3.360000,11.525000 3.124000,11.946000 2.925000,12.386000 2.839000,12.611000 2.763000,12.841000 2.697000,13.073000 2.641000,13.307000 2.595000,13.544000 2.559000,13.783000 2.533000,14.023000 2.517000,14.264000 2.517000,14.747000 2.532000,14.988000 2.557000,15.228000 2.638000,15.703000 2.759000,16.171000 2.920000,16.626000 3.014000,16.848000 3.118000,17.066000 3.231000,17.279000 3.353000,17.487000 3.623000,17.888000 3.926000,18.263000 4.089000,18.441000 4.260000,18.612000 4.622000,18.931000 4.813000,19.079000 5.213000,19.349000 5.634000,19.585000 6.074000,19.784000 6.529000,19.945000 6.996000,20.066000 7.233000,20.112000 7.472000,20.148000 7.712000,20.174000 8.194000,20.194000 8.194000,20.694000 7.931000,20.688000 7.669000,20.672000 7.408000,20.644000 7.148000,20.605000 6.891000,20.555000 6.635000,20.494000 6.382000,20.423000 5.887000,20.248000 5.646000,20.144000 5.409000,20.031000 5.177000,19.908000 4.951000,19.775000 4.730000,19.632000 4.516000,19.481000 4.308000,19.320000 4.107000,19.150000 3.914000,18.973000 3.728000,18.787000 3.551000,18.593000 3.221000,18.185000 2.927000,17.749000 2.795000,17.523000 2.672000,17.291000 2.559000,17.054000 2.456000,16.812000 2.363000,16.566000 2.281000,16.317000 2.210000,16.064000 2.149000,15.808000 2.100000,15.550000 2.061000,15.291000 2.017000,14.767000 2.012000,14.505000 2.018000,14.242000 2.035000,13.980000 2.063000,13.719000 2.102000,13.459000 2.152000,13.201000 2.285000,12.693000 2.368000,12.444000 2.461000,12.199000 2.565000,11.957000 2.678000,11.720000 2.935000,11.262000 3.078000,11.042000 3.230000,10.828000 3.391000,10.620000 3.560000,10.420000 3.738000,10.227000 3.924000,10.041000 4.095000,9.871000 4.415000,9.509000 4.563000,9.318000 4.834000,8.919000 5.070000,8.498000 5.174000,8.280000 5.355000,7.833000 5.431000,7.603000 5.497000,7.371000 5.553000,7.137000 5.599000,6.900000 5.635000,6.661000 5.661000,6.421000 5.677000,6.180000 5.677000,5.697000 5.662000,5.456000 5.637000,5.216000 5.556000,4.741000 5.435000,4.273000 5.359000,4.044000 5.180000,3.596000 5.076000,3.378000 4.963000,3.165000 4.841000,2.957000 4.571000,2.557000 4.423000,2.365000 4.105000,2.003000 3.934000,1.832000 3.572000,1.513000 3.381000,1.365000 2.981000,1.095000 2.560000,0.859000 2.120000,0.660000 1.665000,0.499000 1.198000,0.378000 0.961000,0.332000 0.722000,0.296000 0.241000,0.255000 0.000000,0.250000 z%22 /></g><g id=%22C277%22 data-name=%22as_component__PNGCOJINIPILRSBFUVHAAAKRQR7F7X5DOV45DHY3HPYOUZICQITA%22><path class=%22layer_1_0%22 d=%22M 9.889000,3.500000 0.000000,1.275000 0.000000,-1.275000 9.889000,-3.500000 16.000000,-3.500000 16.000000,3.500000 z%22 /><path class=%22layer_2_0%22 d=%22M 0.000000,-0.250000 10.000000,-2.500000 10.000000,2.500000 0.000000,0.250000 z%22 /><rect class=%22layer_2_0%22 x=%2210.300000%22 y=%22-2.500000%22 width=%220.300000%22 height=%225.000000%22 /><rect class=%22layer_2_0%22 x=%2210.900000%22 y=%22-2.500000%22 width=%220.300000%22 height=%225.000000%22 /><rect class=%22layer_2_0%22 x=%2211.500000%22 y=%22-2.500000%22 width=%220.300000%22 height=%225.000000%22 /><rect class=%22layer_2_0%22 x=%2212.100000%22 y=%22-2.500000%22 width=%220.300000%22 height=%225.000000%22 /><rect class=%22layer_2_0%22 x=%2212.700000%22 y=%22-2.500000%22 width=%220.300000%22 height=%225.000000%22 /><rect class=%22layer_2_0%22 x=%2213.300000%22 y=%22-2.500000%22 width=%220.300000%22 height=%225.000000%22 /><rect class=%22layer_2_0%22 x=%2213.900000%22 y=%22-2.500000%22 width=%220.300000%22 height=%225.000000%22 /><rect class=%22layer_2_0%22 x=%2214.500000%22 y=%22-2.500000%22 width=%220.300000%22 height=%225.000000%22 /><rect class=%22layer_2_0%22 x=%2215.100000%22 y=%22-2.500000%22 width=%220.300000%22 height=%225.000000%22 /><rect class=%22layer_2_0%22 x=%2215.700000%22 y=%22-2.500000%22 width=%220.300000%22 height=%225.000000%22 /></g><g id=%22C278%22 data-name=%22s_bend_l_3P291079059528407_o_7P497346034716714_p_Strip%22><path class=%22layer_1_0%22 d=%22M 0.000000,-1.250000 0.252000,-1.241000 0.502000,-1.214000 0.750000,-1.168000 0.994000,-1.105000 1.233000,-1.025000 1.465000,-0.927000 1.690000,-0.813000 1.906000,-0.683000 2.112000,-0.537000 2.307000,-0.378000 2.489000,-0.204000 2.659000,-0.018000 2.815000,0.180000 2.956000,0.389000 3.082000,0.608000 3.191000,0.834000 3.284000,1.069000 3.360000,1.309000 3.418000,1.554000 3.459000,1.803000 3.481000,2.054000 3.485000,2.306000 3.470000,2.558000 3.438000,2.808000 3.388000,3.055000 3.320000,3.297000 3.234000,3.534000 3.132000,3.765000 3.013000,3.987000 2.879000,4.200000 2.729000,4.403000 2.566000,4.595000 2.477000,4.706000 2.406000,4.829000 2.352000,4.961000 2.319000,5.100000 2.306000,5.242000 2.313000,5.384000 2.341000,5.523000 2.389000,5.658000 2.455000,5.784000 2.539000,5.899000 2.639000,6.000000 2.752000,6.087000 2.877000,6.156000 3.010000,6.206000 3.149000,6.237000 3.291000,6.247000 3.291000,8.747000 3.039000,8.738000 2.789000,8.711000 2.541000,8.665000 2.297000,8.602000 2.058000,8.522000 1.826000,8.424000 1.601000,8.310000 1.385000,8.180000 1.179000,8.034000 0.984000,7.875000 0.802000,7.701000 0.632000,7.515000 0.476000,7.317000 0.335000,7.108000 0.209000,6.890000 0.100000,6.663000 0.007000,6.428000 -0.069000,6.188000 -0.127000,5.943000 -0.167000,5.694000 -0.190000,5.443000 -0.194000,5.191000 -0.179000,4.939000 -0.147000,4.689000 -0.097000,4.442000 -0.029000,4.200000 0.057000,3.963000 0.159000,3.732000 0.278000,3.510000 0.412000,3.297000 0.562000,3.094000 0.725000,2.902000 0.814000,2.791000 0.886000,2.668000 0.939000,2.536000 0.972000,2.397000 0.985000,2.255000 0.978000,2.113000 0.950000,1.974000 0.902000,1.839000 0.836000,1.713000 0.752000,1.598000 0.652000,1.497000 0.539000,1.410000 0.414000,1.341000 0.281000,1.291000 0.142000,1.260000 0.000000,1.250000 z%22 /><path class=%22layer_2_0%22 d=%22M 0.000000,-0.250000 0.180000,-0.243000 0.358000,-0.224000 0.535000,-0.192000 0.709000,-0.147000 0.879000,-0.089000 1.045000,-0.020000 1.205000,0.062000 1.359000,0.155000 1.506000,0.258000 1.645000,0.372000 1.775000,0.496000 1.896000,0.629000 2.007000,0.770000 2.108000,0.919000 2.198000,1.075000 2.276000,1.236000 2.342000,1.403000 2.396000,1.575000 2.438000,1.750000 2.466000,1.927000 2.482000,2.106000 2.485000,2.286000 2.475000,2.465000 2.452000,2.643000 2.416000,2.820000 2.367000,2.993000 2.306000,3.162000 2.233000,3.326000 2.149000,3.484000 2.053000,3.636000 1.946000,3.781000 1.830000,3.918000 1.736000,4.027000 1.651000,4.142000 1.507000,4.390000 1.400000,4.657000 1.361000,4.795000 1.314000,5.078000 1.306000,5.221000 1.308000,5.365000 1.321000,5.508000 1.344000,5.650000 1.377000,5.789000 1.420000,5.926000 1.473000,6.060000 1.535000,6.189000 1.687000,6.432000 1.776000,6.545000 1.977000,6.750000 2.205000,6.924000 2.328000,6.998000 2.456000,7.063000 2.589000,7.119000 2.725000,7.165000 3.005000,7.226000 3.148000,7.242000 3.291000,7.247000 3.291000,7.747000 3.111000,7.741000 2.933000,7.721000 2.756000,7.689000 2.582000,7.644000 2.412000,7.586000 2.246000,7.517000 2.086000,7.435000 1.932000,7.342000 1.785000,7.239000 1.646000,7.125000 1.516000,7.001000 1.395000,6.868000 1.284000,6.727000 1.183000,6.578000 1.093000,6.422000 1.015000,6.261000 0.949000,6.094000 0.895000,5.922000 0.854000,5.747000 0.825000,5.570000 0.809000,5.391000 0.806000,5.211000 0.816000,5.032000 0.839000,4.854000 0.875000,4.677000 0.924000,4.504000 0.985000,4.335000 1.058000,4.171000 1.142000,4.013000 1.238000,3.861000 1.345000,3.716000 1.461000,3.579000 1.555000,3.470000 1.640000,3.355000 1.717000,3.233000 1.784000,3.107000 1.842000,2.975000 1.891000,2.840000 1.930000,2.702000 1.977000,2.419000 1.985000,2.276000 1.983000,2.132000 1.970000,1.989000 1.947000,1.847000 1.914000,1.708000 1.871000,1.571000 1.818000,1.437000 1.756000,1.308000 1.604000,1.065000 1.515000,0.952000 1.314000,0.747000 1.086000,0.573000 0.963000,0.499000 0.835000,0.434000 0.702000,0.378000 0.566000,0.333000 0.427000,0.297000 0.286000,0.271000 0.143000,0.255000 0.000000,0.250000 z%22 /></g><g id=%22C279%22 data-name=%22as_component__PNGCOJINIPILRSBFUVHAAAKRQR7F7X5DOV45DHY3HPYOUZICQITA%22><path class=%22layer_1_0%22 d=%22M 9.889000,3.500000 0.000000,1.275000 0.000000,-1.275000 9.889000,-3.500000 16.000000,-3.500000 16.000000,3.500000 z%22 /><path class=%22layer_2_0%22 d=%22M 0.000000,-0.250000 10.000000,-2.500000 10.000000,2.500000 0.000000,0.250000 z%22 /><rect class=%22layer_2_0%22 x=%2210.300000%22 y=%22-2.500000%22 width=%220.300000%22 height=%225.000000%22 /><rect class=%22layer_2_0%22 x=%2210.900000%22 y=%22-2.500000%22 width=%220.300000%22 height=%225.000000%22 /><rect class=%22layer_2_0%22 x=%2211.500000%22 y=%22-2.500000%22 width=%220.300000%22 height=%225.000000%22 /><rect class=%22layer_2_0%22 x=%2212.100000%22 y=%22-2.500000%22 width=%220.300000%22 height=%225.000000%22 /><rect class=%22layer_2_0%22 x=%2212.700000%22 y=%22-2.500000%22 width=%220.300000%22 height=%225.000000%22 /><rect class=%22layer_2_0%22 x=%2213.300000%22 y=%22-2.500000%22 width=%220.300000%22 height=%225.000000%22 /><rect class=%22layer_2_0%22 x=%2213.900000%22 y=%22-2.500000%22 width=%220.300000%22 height=%225.000000%22 /><rect class=%22layer_2_0%22 x=%2214.500000%22 y=%22-2.500000%22 width=%220.300000%22 height=%225.000000%22 /><rect class=%22layer_2_0%22 x=%2215.100000%22 y=%22-2.500000%22 width=%220.300000%22 height=%225.000000%22 /><rect class=%22layer_2_0%22 x=%2215.700000%22 y=%22-2.500000%22 width=%220.300000%22 height=%225.000000%22 /></g><g id=%22C280%22 data-name=%22s_bend_l_2P8074796720696016_o_5P081468727594478_p_Strip%22><path class=%22layer_1_0%22 d=%22M 0.000000,-1.250000 0.238000,-1.240000 0.475000,-1.211000 0.708000,-1.162000 0.937000,-1.095000 1.159000,-1.009000 1.374000,-0.905000 1.579000,-0.784000 1.774000,-0.646000 1.957000,-0.493000 2.126000,-0.326000 2.282000,-0.145000 2.422000,0.048000 2.545000,0.252000 2.652000,0.465000 2.741000,0.686000 2.811000,0.914000 2.863000,1.147000 2.895000,1.383000 2.908000,1.621000 2.901000,1.859000 2.875000,2.096000 2.829000,2.330000 2.765000,2.560000 2.681000,2.783000 2.580000,2.999000 2.462000,3.206000 2.431000,3.265000 2.410000,3.329000 2.400000,3.395000 2.401000,3.462000 2.413000,3.527000 2.435000,3.590000 2.467000,3.649000 2.509000,3.701000 2.558000,3.746000 2.614000,3.783000 2.676000,3.809000 2.740000,3.826000 2.807000,3.831000 2.807000,6.331000 2.569000,6.321000 2.332000,6.292000 2.099000,6.243000 1.870000,6.176000 1.648000,6.090000 1.433000,5.986000 1.228000,5.865000 1.033000,5.727000 0.850000,5.574000 0.681000,5.407000 0.525000,5.226000 0.385000,5.033000 0.262000,4.829000 0.155000,4.616000 0.066000,4.395000 -0.004000,4.167000 -0.056000,3.934000 -0.088000,3.698000 -0.101000,3.460000 -0.094000,3.222000 -0.068000,2.985000 -0.022000,2.751000 0.042000,2.521000 0.126000,2.298000 0.227000,2.082000 0.345000,1.875000 0.376000,1.816000 0.397000,1.752000 0.407000,1.686000 0.406000,1.619000 0.394000,1.554000 0.372000,1.491000 0.340000,1.432000 0.298000,1.380000 0.249000,1.335000 0.193000,1.298000 0.131000,1.272000 0.067000,1.255000 0.000000,1.250000 z%22 /><path class=%22layer_2_0%22 d=%22M 0.000000,-0.250000 0.156000,-0.244000 0.312000,-0.224000 0.465000,-0.193000 0.615000,-0.148000 0.761000,-0.092000 0.901000,-0.024000 1.036000,0.056000 1.164000,0.146000 1.284000,0.246000 1.395000,0.356000 1.497000,0.475000 1.589000,0.602000 1.670000,0.735000 1.740000,0.875000 1.798000,1.020000 1.844000,1.170000 1.878000,1.323000 1.899000,1.478000 1.908000,1.634000 1.903000,1.790000 1.886000,1.946000 1.856000,2.099000 1.814000,2.250000 1.759000,2.396000 1.693000,2.538000 1.615000,2.674000 1.509000,2.878000 1.468000,2.986000 1.415000,3.211000 1.399000,3.441000 1.421000,3.671000 1.480000,3.894000 1.575000,4.104000 1.702000,4.296000 1.860000,4.465000 2.042000,4.605000 2.246000,4.714000 2.464000,4.789000 2.692000,4.826000 2.807000,4.831000 2.807000,5.331000 2.651000,5.325000 2.495000,5.305000 2.342000,5.274000 2.192000,5.229000 2.046000,5.173000 1.906000,5.105000 1.771000,5.025000 1.643000,4.935000 1.523000,4.835000 1.412000,4.725000 1.310000,4.606000 1.218000,4.479000 1.137000,4.346000 1.067000,4.206000 1.009000,4.061000 0.963000,3.911000 0.929000,3.758000 0.908000,3.603000 0.899000,3.447000 0.904000,3.291000 0.921000,3.135000 0.951000,2.982000 0.993000,2.831000 1.048000,2.685000 1.114000,2.543000 1.192000,2.407000 1.249000,2.307000 1.339000,2.095000 1.392000,1.870000 1.408000,1.640000 1.386000,1.410000 1.327000,1.187000 1.232000,0.977000 1.105000,0.785000 0.947000,0.616000 0.765000,0.476000 0.561000,0.367000 0.343000,0.292000 0.230000,0.269000 0.000000,0.250000 z%22 /></g><g id=%22C281%22 data-name=%22as_component__PNGCOJINIPILRSBFUVHAAAKRQR7F7X5DOV45DHY3HPYOUZICQITA%22><path class=%22layer_1_0%22 d=%22M 9.889000,3.500000 0.000000,1.275000 0.000000,-1.275000 9.889000,-3.500000 16.000000,-3.500000 16.000000,3.500000 z%22 /><path class=%22layer_2_0%22 d=%22M 0.000000,-0.250000 10.000000,-2.500000 10.000000,2.500000 0.000000,0.250000 z%22 /><rect class=%22layer_2_0%22 x=%2210.300000%22 y=%22-2.500000%22 width=%220.300000%22 height=%225.000000%22 /><rect class=%22layer_2_0%22 x=%2210.900000%22 y=%22-2.500000%22 width=%220.300000%22 height=%225.000000%22 /><rect class=%22layer_2_0%22 x=%2211.500000%22 y=%22-2.500000%22 width=%220.300000%22 height=%225.000000%22 /><rect class=%22layer_2_0%22 x=%2212.100000%22 y=%22-2.500000%22 width=%220.300000%22 height=%225.000000%22 /><rect class=%22layer_2_0%22 x=%2212.700000%22 y=%22-2.500000%22 width=%220.300000%22 height=%225.000000%22 /><rect class=%22layer_2_0%22 x=%2213.300000%22 y=%22-2.500000%22 width=%220.300000%22 height=%225.000000%22 /><rect class=%22layer_2_0%22 x=%2213.900000%22 y=%22-2.500000%22 width=%220.300000%22 height=%225.000000%22 /><rect class=%22layer_2_0%22 x=%2214.500000%22 y=%22-2.500000%22 width=%220.300000%22 height=%225.000000%22 /><rect class=%22layer_2_0%22 x=%2215.100000%22 y=%22-2.500000%22 width=%220.300000%22 height=%225.000000%22 /><rect class=%22layer_2_0%22 x=%2215.700000%22 y=%22-2.500000%22 width=%220.300000%22 height=%225.000000%22 /></g><g id=%22C282%22 data-name=%22s_bend_l_65P54890788221194_o_29P1928394068276_p_Strip%22><path class=%22layer_1_0%22 d=%22M 0.000000,-1.250000 0.704000,-1.245000 2.110000,-1.201000 2.813000,-1.163000 3.515000,-1.114000 4.216000,-1.054000 4.916000,-0.983000 5.615000,-0.901000 6.312000,-0.808000 7.008000,-0.705000 7.703000,-0.591000 8.395000,-0.466000 9.086000,-0.330000 9.774000,-0.184000 10.460000,-0.027000 11.143000,0.141000 11.824000,0.319000 12.502000,0.507000 13.848000,0.916000 14.516000,1.136000 15.181000,1.367000 15.843000,1.608000 16.500000,1.859000 17.153000,2.120000 17.803000,2.391000 18.448000,2.672000 19.088000,2.963000 19.724000,3.265000 20.355000,3.576000 20.981000,3.896000 21.603000,4.227000 22.219000,4.567000 22.829000,4.916000 23.435000,5.275000 24.628000,6.021000 25.216000,6.408000 25.797000,6.804000 26.373000,7.209000 26.942000,7.622000 27.505000,8.045000 28.061000,8.476000 29.153000,9.364000 29.688000,9.820000 30.216000,10.285000 30.737000,10.758000 31.251000,11.239000 31.757000,11.728000 32.746000,12.729000 33.229000,13.241000 33.704000,13.760000 34.152000,14.251000 34.608000,14.735000 35.543000,15.681000 36.506000,16.597000 37.498000,17.483000 38.516000,18.338000 39.561000,19.161000 40.092000,19.560000 40.630000,19.951000 41.724000,20.707000 42.279000,21.073000 42.840000,21.429000 43.978000,22.117000 44.555000,22.447000 45.137000,22.768000 45.724000,23.080000 46.912000,23.677000 47.513000,23.962000 48.728000,24.503000 49.341000,24.759000 49.959000,25.006000 50.580000,25.243000 51.833000,25.688000 52.464000,25.896000 53.099000,26.094000 54.377000,26.461000 55.666000,26.788000 56.314000,26.936000 56.964000,27.074000 57.617000,27.202000 58.271000,27.320000 58.927000,27.428000 59.585000,27.526000 60.244000,27.613000 60.904000,27.690000 62.228000,27.814000 63.555000,27.897000 64.884000,27.938000 65.549000,27.943000 65.549000,30.443000 64.845000,30.438000 63.439000,30.394000 62.736000,30.356000 62.034000,30.307000 61.333000,30.247000 60.633000,30.176000 59.934000,30.094000 59.237000,30.001000 58.541000,29.898000 57.846000,29.784000 57.154000,29.659000 56.463000,29.523000 55.775000,29.377000 55.089000,29.220000 54.406000,29.052000 53.725000,28.874000 53.047000,28.686000 51.701000,28.277000 51.033000,28.057000 50.368000,27.826000 49.707000,27.585000 49.049000,27.334000 48.396000,27.073000 47.746000,26.802000 47.101000,26.521000 46.461000,26.230000 45.825000,25.928000 45.194000,25.617000 44.568000,25.297000 43.946000,24.966000 43.330000,24.626000 42.720000,24.277000 42.114000,23.918000 41.515000,23.549000 40.921000,23.172000 40.333000,22.785000 39.752000,22.389000 39.176000,21.984000 38.607000,21.571000 38.044000,21.148000 37.488000,20.717000 36.396000,19.829000 35.861000,19.373000 35.333000,18.908000 34.812000,18.435000 34.298000,17.954000 33.792000,17.465000 32.803000,16.464000 32.320000,15.952000 31.845000,15.433000 31.397000,14.942000 30.941000,14.458000 30.006000,13.512000 29.043000,12.596000 28.051000,11.710000 27.033000,10.855000 25.988000,10.032000 25.457000,9.633000 24.919000,9.242000 24.375000,8.860000 23.270000,8.120000 22.143000,7.416000 21.571000,7.076000 20.994000,6.746000 20.412000,6.425000 19.825000,6.113000 18.637000,5.516000 18.036000,5.231000 16.821000,4.690000 16.208000,4.434000 15.590000,4.187000 14.969000,3.950000 13.716000,3.505000 13.085000,3.297000 12.450000,3.099000 11.172000,2.732000 9.883000,2.405000 9.235000,2.257000 8.585000,2.119000 7.932000,1.991000 7.278000,1.873000 6.622000,1.765000 5.964000,1.667000 5.305000,1.580000 4.645000,1.503000 3.321000,1.379000 1.994000,1.296000 0.665000,1.255000 0.000000,1.250000 z%22 /><path class=%22layer_2_0%22 d=%22M 0.000000,-0.250000 0.688000,-0.245000 1.376000,-0.229000 2.064000,-0.202000 2.751000,-0.165000 3.437000,-0.117000 4.123000,-0.058000 4.807000,0.011000 5.491000,0.091000 6.173000,0.182000 6.854000,0.283000 7.533000,0.394000 8.885000,0.649000 9.558000,0.792000 10.229000,0.946000 10.897000,1.110000 11.563000,1.284000 12.226000,1.469000 12.886000,1.664000 13.543000,1.869000 14.196000,2.084000 14.847000,2.309000 16.136000,2.790000 16.775000,3.045000 18.041000,3.586000 19.289000,4.165000 19.906000,4.469000 20.519000,4.783000 21.729000,5.438000 22.326000,5.780000 22.918000,6.131000 24.085000,6.861000 24.660000,7.239000 25.229000,7.626000 25.791000,8.022000 26.348000,8.427000 26.898000,8.840000 27.442000,9.261000 27.979000,9.691000 28.510000,10.130000 29.033000,10.576000 29.550000,11.031000 30.060000,11.493000 31.057000,12.442000 32.024000,13.421000 32.496000,13.921000 32.960000,14.429000 33.419000,14.931000 33.886000,15.426000 34.361000,15.914000 35.332000,16.867000 35.828000,17.332000 36.843000,18.239000 37.885000,19.114000 38.416000,19.539000 38.954000,19.956000 40.048000,20.764000 40.605000,21.156000 41.167000,21.538000 41.736000,21.912000 42.310000,22.277000 42.890000,22.634000 43.475000,22.981000 44.065000,23.319000 45.262000,23.967000 45.867000,24.277000 46.478000,24.578000 47.092000,24.869000 47.712000,25.151000 48.335000,25.423000 48.963000,25.685000 50.231000,26.180000 50.870000,26.413000 52.159000,26.848000 52.808000,27.051000 53.461000,27.244000 54.116000,27.426000 55.435000,27.761000 56.764000,28.054000 57.432000,28.185000 58.101000,28.306000 58.773000,28.416000 59.446000,28.516000 60.120000,28.606000 60.796000,28.685000 61.473000,28.753000 62.829000,28.859000 63.509000,28.896000 64.188000,28.922000 64.869000,28.938000 65.549000,28.943000 65.549000,29.443000 64.861000,29.438000 64.173000,29.422000 63.485000,29.395000 62.798000,29.358000 62.112000,29.310000 61.426000,29.251000 60.742000,29.182000 60.058000,29.102000 59.376000,29.011000 58.695000,28.910000 58.016000,28.799000 56.664000,28.544000 55.991000,28.401000 55.320000,28.247000 54.652000,28.083000 53.986000,27.909000 53.323000,27.724000 52.663000,27.529000 52.006000,27.324000 51.353000,27.109000 50.702000,26.884000 49.413000,26.403000 48.774000,26.148000 48.139000,25.882000 47.508000,25.607000 46.260000,25.028000 45.643000,24.724000 45.030000,24.410000 43.820000,23.755000 43.223000,23.413000 42.631000,23.062000 41.464000,22.332000 40.889000,21.954000 40.320000,21.567000 39.758000,21.171000 39.201000,20.766000 38.107000,19.932000 37.570000,19.502000 37.039000,19.063000 36.516000,18.617000 35.489000,17.700000 34.492000,16.751000 34.005000,16.266000 33.053000,15.272000 32.589000,14.764000 32.130000,14.262000 31.663000,13.767000 30.707000,12.799000 29.721000,11.861000 28.706000,10.954000 27.664000,10.079000 27.133000,9.654000 26.595000,9.237000 25.501000,8.429000 24.944000,8.037000 24.382000,7.655000 23.813000,7.281000 22.659000,6.559000 22.074000,6.212000 21.484000,5.874000 20.287000,5.226000 19.682000,4.916000 19.072000,4.615000 18.457000,4.324000 17.837000,4.042000 17.214000,3.770000 16.586000,3.508000 15.318000,3.013000 14.679000,2.780000 14.036000,2.558000 13.390000,2.345000 12.741000,2.142000 12.088000,1.949000 11.433000,1.767000 10.114000,1.432000 8.785000,1.139000 8.117000,1.008000 7.448000,0.887000 6.776000,0.777000 6.103000,0.677000 5.429000,0.587000 4.753000,0.508000 4.076000,0.440000 2.720000,0.334000 1.361000,0.271000 0.680000,0.255000 0.000000,0.250000 z%22 /></g><g id=%22C283%22 data-name=%22as_component__PNGCOJINIPILRSBFUVHAAAKRQR7F7X5DOV45DHY3HPYOUZICQITA%22><path class=%22layer_1_0%22 d=%22M 9.889000,3.500000 0.000000,1.275000 0.000000,-1.275000 9.889000,-3.500000 16.000000,-3.500000 16.000000,3.500000 z%22 /><path class=%22layer_2_0%22 d=%22M 0.000000,-0.250000 10.000000,-2.500000 10.000000,2.500000 0.000000,0.250000 z%22 /><rect class=%22layer_2_0%22 x=%2210.300000%22 y=%22-2.500000%22 width=%220.300000%22 height=%225.000000%22 /><rect class=%22layer_2_0%22 x=%2210.900000%22 y=%22-2.500000%22 width=%220.300000%22 height=%225.000000%22 /><rect class=%22layer_2_0%22 x=%2211.500000%22 y=%22-2.500000%22 width=%220.300000%22 height=%225.000000%22 /><rect class=%22layer_2_0%22 x=%2212.100000%22 y=%22-2.500000%22 width=%220.300000%22 height=%225.000000%22 /><rect class=%22layer_2_0%22 x=%2212.700000%22 y=%22-2.500000%22 width=%220.300000%22 height=%225.000000%22 /><rect class=%22layer_2_0%22 x=%2213.300000%22 y=%22-2.500000%22 width=%220.300000%22 height=%225.000000%22 /><rect class=%22layer_2_0%22 x=%2213.900000%22 y=%22-2.500000%22 width=%220.300000%22 height=%225.000000%22 /><rect class=%22layer_2_0%22 x=%2214.500000%22 y=%22-2.500000%22 width=%220.300000%22 height=%225.000000%22 /><rect class=%22layer_2_0%22 x=%2215.100000%22 y=%22-2.500000%22 width=%220.300000%22 height=%225.000000%22 /><rect class=%22layer_2_0%22 x=%2215.700000%22 y=%22-2.500000%22 width=%220.300000%22 height=%225.000000%22 /></g><g id=%22C284%22 data-name=%22s_bend_l_5P084286898987836_o_6P8975679900461895_p_Strip%22><path class=%22layer_1_0%22 d=%22M 0.000000,-1.250000 0.261000,-1.241000 0.521000,-1.215000 0.779000,-1.172000 1.033000,-1.111000 1.283000,-1.034000 1.527000,-0.940000 1.764000,-0.830000 1.993000,-0.704000 2.213000,-0.564000 2.424000,-0.409000 2.623000,-0.240000 2.811000,-0.058000 2.987000,0.136000 3.149000,0.341000 3.296000,0.556000 3.430000,0.781000 3.548000,1.014000 3.650000,1.255000 3.735000,1.502000 3.805000,1.754000 3.857000,2.010000 3.892000,2.269000 3.909000,2.530000 3.909000,2.791000 3.892000,3.052000 3.857000,3.311000 3.805000,3.567000 3.736000,3.819000 3.692000,4.002000 3.674000,4.190000 3.680000,4.378000 3.711000,4.564000 3.767000,4.744000 3.847000,4.915000 3.948000,5.074000 4.070000,5.218000 4.209000,5.344000 4.365000,5.451000 4.533000,5.536000 4.711000,5.598000 4.896000,5.635000 5.084000,5.648000 5.084000,8.148000 4.823000,8.139000 4.563000,8.113000 4.305000,8.070000 4.051000,8.009000 3.801000,7.932000 3.557000,7.838000 3.320000,7.728000 3.091000,7.602000 2.871000,7.462000 2.660000,7.307000 2.461000,7.138000 2.273000,6.956000 2.097000,6.762000 1.935000,6.557000 1.788000,6.342000 1.654000,6.117000 1.536000,5.884000 1.434000,5.643000 1.349000,5.396000 1.279000,5.144000 1.227000,4.888000 1.192000,4.629000 1.175000,4.368000 1.175000,4.107000 1.192000,3.846000 1.227000,3.587000 1.279000,3.331000 1.348000,3.079000 1.392000,2.896000 1.410000,2.708000 1.404000,2.520000 1.373000,2.334000 1.317000,2.154000 1.237000,1.983000 1.136000,1.824000 1.014000,1.680000 0.875000,1.554000 0.719000,1.447000 0.551000,1.362000 0.373000,1.300000 0.188000,1.263000 0.000000,1.250000 z%22 /><path class=%22layer_2_0%22 d=%22M 0.000000,-0.250000 0.194000,-0.243000 0.388000,-0.224000 0.580000,-0.192000 0.769000,-0.147000 0.955000,-0.089000 1.136000,-0.019000 1.313000,0.063000 1.483000,0.156000 1.647000,0.261000 1.804000,0.376000 1.953000,0.502000 2.092000,0.637000 2.223000,0.781000 2.344000,0.934000 2.454000,1.094000 2.553000,1.262000 2.641000,1.435000 2.717000,1.614000 2.780000,1.798000 2.832000,1.986000 2.871000,2.176000 2.897000,2.369000 2.910000,2.563000 2.910000,2.758000 2.897000,2.952000 2.871000,3.145000 2.832000,3.335000 2.781000,3.523000 2.738000,3.678000 2.706000,3.836000 2.685000,3.996000 2.674000,4.157000 2.674000,4.318000 2.685000,4.479000 2.706000,4.638000 2.781000,4.952000 2.834000,5.104000 2.897000,5.252000 2.970000,5.396000 3.052000,5.535000 3.143000,5.667000 3.243000,5.794000 3.351000,5.913000 3.467000,6.025000 3.590000,6.129000 3.720000,6.225000 3.855000,6.311000 3.997000,6.389000 4.143000,6.457000 4.293000,6.515000 4.604000,6.600000 4.923000,6.643000 5.084000,6.648000 5.084000,7.148000 4.890000,7.142000 4.696000,7.122000 4.504000,7.090000 4.315000,7.045000 4.129000,6.987000 3.948000,6.917000 3.771000,6.835000 3.601000,6.742000 3.437000,6.637000 3.280000,6.522000 3.131000,6.396000 2.992000,6.261000 2.861000,6.117000 2.740000,5.964000 2.630000,5.804000 2.531000,5.636000 2.443000,5.463000 2.367000,5.284000 2.304000,5.100000 2.252000,4.912000 2.213000,4.722000 2.187000,4.529000 2.174000,4.335000 2.174000,4.140000 2.187000,3.946000 2.213000,3.753000 2.252000,3.563000 2.303000,3.375000 2.346000,3.220000 2.378000,3.062000 2.399000,2.902000 2.410000,2.741000 2.410000,2.580000 2.399000,2.419000 2.378000,2.260000 2.303000,1.946000 2.250000,1.794000 2.187000,1.646000 2.114000,1.502000 2.032000,1.363000 1.941000,1.231000 1.841000,1.104000 1.733000,0.985000 1.617000,0.873000 1.494000,0.769000 1.364000,0.673000 1.229000,0.587000 1.087000,0.509000 0.941000,0.441000 0.791000,0.383000 0.480000,0.298000 0.161000,0.255000 0.000000,0.250000 z%22 /></g><g id=%22C285%22 data-name=%22as_component__PNGCOJINIPILRSBFUVHAAAKRQR7F7X5DOV45DHY3HPYOUZICQITA%22><path class=%22layer_1_0%22 d=%22M 9.889000,3.500000 0.000000,1.275000 0.000000,-1.275000 9.889000,-3.500000 16.000000,-3.500000 16.000000,3.500000 z%22 /><path class=%22layer_2_0%22 d=%22M 0.000000,-0.250000 10.000000,-2.500000 10.000000,2.500000 0.000000,0.250000 z%22 /><rect class=%22layer_2_0%22 x=%2210.300000%22 y=%22-2.500000%22 width=%220.300000%22 height=%225.000000%22 /><rect class=%22layer_2_0%22 x=%2210.900000%22 y=%22-2.500000%22 width=%220.300000%22 height=%225.000000%22 /><rect class=%22layer_2_0%22 x=%2211.500000%22 y=%22-2.500000%22 width=%220.300000%22 height=%225.000000%22 /><rect class=%22layer_2_0%22 x=%2212.100000%22 y=%22-2.500000%22 width=%220.300000%22 height=%225.000000%22 /><rect class=%22layer_2_0%22 x=%2212.700000%22 y=%22-2.500000%22 width=%220.300000%22 height=%225.000000%22 /><rect class=%22layer_2_0%22 x=%2213.300000%22 y=%22-2.500000%22 width=%220.300000%22 height=%225.000000%22 /><rect class=%22layer_2_0%22 x=%2213.900000%22 y=%22-2.500000%22 width=%220.300000%22 height=%225.000000%22 /><rect class=%22layer_2_0%22 x=%2214.500000%22 y=%22-2.500000%22 width=%220.300000%22 height=%225.000000%22 /><rect class=%22layer_2_0%22 x=%2215.100000%22 y=%22-2.500000%22 width=%220.300000%22 height=%225.000000%22 /><rect class=%22layer_2_0%22 x=%2215.700000%22 y=%22-2.500000%22 width=%220.300000%22 height=%225.000000%22 /></g><g id=%22C286%22 data-name=%22s_bend_l_5P371897949825243_o_18P01615934909531_p_Strip%22><path class=%22layer_1_0%22 d=%22M 0.000000,-1.250000 0.292000,-1.243000 0.583000,-1.222000 0.873000,-1.188000 1.161000,-1.139000 1.446000,-1.078000 1.728000,-1.002000 2.007000,-0.914000 2.280000,-0.812000 2.549000,-0.697000 2.812000,-0.570000 3.068000,-0.431000 3.318000,-0.279000 3.560000,-0.116000 3.794000,0.058000 4.019000,0.244000 4.236000,0.440000 4.443000,0.646000 4.640000,0.861000 4.827000,1.086000 5.002000,1.319000 5.167000,1.560000 5.319000,1.809000 5.460000,2.065000 5.589000,2.327000 5.705000,2.595000 5.808000,2.868000 5.898000,3.146000 5.975000,3.428000 6.038000,3.713000 6.088000,4.000000 6.124000,4.290000 6.146000,4.581000 6.154000,4.873000 6.149000,5.165000 6.130000,5.456000 6.097000,5.746000 6.050000,6.035000 5.989000,6.320000 5.916000,6.603000 5.828000,6.881000 5.728000,7.155000 5.615000,7.425000 5.489000,7.688000 5.351000,7.945000 5.201000,8.196000 5.039000,8.439000 4.865000,8.674000 4.681000,8.900000 4.486000,9.118000 4.281000,9.326000 4.067000,9.524000 3.843000,9.711000 3.611000,9.888000 3.371000,10.054000 3.090000,10.257000 2.830000,10.486000 2.592000,10.739000 2.380000,11.013000 2.195000,11.306000 2.038000,11.615000 1.911000,11.938000 1.816000,12.271000 1.752000,12.612000 1.721000,12.957000 1.723000,13.304000 1.757000,13.648000 1.824000,13.989000 1.923000,14.321000 2.053000,14.642000 2.213000,14.950000 2.402000,15.241000 2.617000,15.512000 2.857000,15.763000 3.119000,15.989000 3.402000,16.190000 3.702000,16.362000 4.018000,16.506000 4.346000,16.619000 4.683000,16.700000 5.026000,16.750000 5.372000,16.766000 5.372000,19.266000 5.080000,19.259000 4.789000,19.238000 4.499000,19.204000 4.211000,19.156000 3.926000,19.094000 3.644000,19.018000 3.365000,18.930000 3.092000,18.828000 2.823000,18.713000 2.560000,18.586000 2.304000,18.447000 2.054000,18.295000 1.812000,18.132000 1.578000,17.958000 1.353000,17.772000 1.136000,17.576000 0.929000,17.370000 0.732000,17.155000 0.546000,16.930000 0.370000,16.697000 0.205000,16.456000 0.053000,16.207000 -0.088000,15.951000 -0.217000,15.689000 -0.333000,15.421000 -0.436000,15.148000 -0.526000,14.870000 -0.603000,14.588000 -0.666000,14.303000 -0.716000,14.016000 -0.752000,13.726000 -0.774000,13.435000 -0.782000,13.143000 -0.777000,12.851000 -0.758000,12.560000 -0.725000,12.270000 -0.678000,11.981000 -0.617000,11.696000 -0.544000,11.413000 -0.456000,11.135000 -0.356000,10.861000 -0.243000,10.591000 -0.117000,10.328000 0.021000,10.071000 0.171000,9.820000 0.333000,9.577000 0.507000,9.342000 0.691000,9.116000 0.886000,8.898000 1.091000,8.690000 1.305000,8.492000 1.529000,8.305000 1.761000,8.128000 2.001000,7.962000 2.282000,7.759000 2.542000,7.530000 2.780000,7.277000 2.992000,7.003000 3.177000,6.710000 3.334000,6.401000 3.461000,6.078000 3.556000,5.745000 3.620000,5.404000 3.651000,5.059000 3.649000,4.712000 3.615000,4.368000 3.548000,4.027000 3.449000,3.695000 3.319000,3.374000 3.159000,3.066000 2.970000,2.775000 2.755000,2.504000 2.515000,2.253000 2.253000,2.027000 1.970000,1.826000 1.670000,1.654000 1.354000,1.510000 1.026000,1.397000 0.689000,1.316000 0.346000,1.266000 0.000000,1.250000 z%22 /><path class=%22layer_2_0%22 d=%22M 0.000000,-0.250000 0.244000,-0.244000 0.488000,-0.227000 0.731000,-0.198000 0.972000,-0.157000 1.211000,-0.106000 1.448000,-0.043000 1.681000,0.032000 1.910000,0.117000 2.135000,0.213000 2.355000,0.319000 2.570000,0.436000 2.779000,0.563000 2.981000,0.700000 3.177000,0.846000 3.366000,1.001000 3.548000,1.165000 3.721000,1.338000 3.886000,1.518000 4.042000,1.706000 4.189000,1.902000 4.327000,2.104000 4.455000,2.312000 4.573000,2.526000 4.681000,2.746000 4.778000,2.970000 4.864000,3.199000 4.940000,3.432000 5.004000,3.668000 5.057000,3.906000 5.099000,4.147000 5.129000,4.390000 5.147000,4.634000 5.154000,4.878000 5.150000,5.123000 5.134000,5.367000 5.106000,5.610000 5.067000,5.851000 5.016000,6.090000 4.954000,6.327000 4.881000,6.560000 4.797000,6.790000 4.703000,7.015000 4.597000,7.236000 4.481000,7.451000 4.356000,7.661000 4.220000,7.864000 4.075000,8.061000 3.920000,8.251000 3.757000,8.433000 3.586000,8.607000 3.406000,8.773000 3.219000,8.930000 3.024000,9.078000 2.823000,9.217000 2.641000,9.342000 2.465000,9.476000 2.296000,9.618000 1.979000,9.925000 1.692000,10.261000 1.561000,10.439000 1.325000,10.812000 1.221000,11.006000 1.040000,11.409000 0.964000,11.617000 0.898000,11.827000 0.842000,12.041000 0.761000,12.475000 0.736000,12.694000 0.718000,13.135000 0.724000,13.356000 0.741000,13.576000 0.768000,13.795000 0.806000,14.013000 0.854000,14.229000 0.912000,14.442000 0.980000,14.652000 1.145000,15.061000 1.349000,15.453000 1.589000,15.823000 1.722000,16.000000 2.012000,16.332000 2.168000,16.488000 2.332000,16.636000 2.503000,16.776000 2.863000,17.032000 3.246000,17.252000 3.444000,17.348000 3.647000,17.435000 3.854000,17.512000 4.065000,17.579000 4.278000,17.636000 4.712000,17.719000 4.931000,17.745000 5.151000,17.761000 5.372000,17.766000 5.372000,18.266000 5.128000,18.260000 4.884000,18.243000 4.641000,18.214000 4.400000,18.173000 4.161000,18.122000 3.924000,18.059000 3.691000,17.984000 3.462000,17.899000 3.237000,17.803000 3.017000,17.697000 2.802000,17.580000 2.593000,17.453000 2.391000,17.316000 2.195000,17.170000 2.006000,17.015000 1.824000,16.851000 1.651000,16.678000 1.486000,16.498000 1.330000,16.310000 1.183000,16.114000 1.045000,15.912000 0.917000,15.704000 0.799000,15.490000 0.691000,15.270000 0.594000,15.046000 0.508000,14.817000 0.432000,14.584000 0.368000,14.348000 0.315000,14.110000 0.273000,13.869000 0.243000,13.626000 0.225000,13.382000 0.218000,13.138000 0.222000,12.893000 0.238000,12.649000 0.266000,12.406000 0.305000,12.165000 0.356000,11.926000 0.418000,11.689000 0.491000,11.456000 0.575000,11.226000 0.670000,11.001000 0.775000,10.780000 0.891000,10.565000 1.016000,10.355000 1.152000,10.152000 1.297000,9.955000 1.452000,9.765000 1.615000,9.583000 1.786000,9.409000 1.966000,9.243000 2.153000,9.086000 2.348000,8.938000 2.549000,8.799000 2.731000,8.674000 2.907000,8.540000 3.076000,8.398000 3.393000,8.091000 3.680000,7.755000 3.811000,7.577000 4.047000,7.204000 4.151000,7.010000 4.332000,6.607000 4.408000,6.399000 4.474000,6.189000 4.530000,5.975000 4.611000,5.541000 4.636000,5.322000 4.650000,5.101000 4.648000,4.660000 4.631000,4.440000 4.604000,4.221000 4.566000,4.003000 4.460000,3.574000 4.392000,3.364000 4.227000,2.955000 4.023000,2.563000 3.783000,2.193000 3.509000,1.847000 3.204000,1.528000 3.040000,1.380000 2.869000,1.240000 2.509000,0.984000 2.126000,0.764000 1.928000,0.668000 1.725000,0.581000 1.518000,0.504000 1.307000,0.437000 1.094000,0.380000 0.660000,0.297000 0.441000,0.271000 0.221000,0.255000 0.000000,0.250000 z%22 /></g><g id=%22C287%22 data-name=%22as_component__PNGCOJINIPILRSBFUVHAAAKRQR7F7X5DOV45DHY3HPYOUZICQITA%22><path class=%22layer_1_0%22 d=%22M 9.889000,3.500000 0.000000,1.275000 0.000000,-1.275000 9.889000,-3.500000 16.000000,-3.500000 16.000000,3.500000 z%22 /><path class=%22layer_2_0%22 d=%22M 0.000000,-0.250000 10.000000,-2.500000 10.000000,2.500000 0.000000,0.250000 z%22 /><rect class=%22layer_2_0%22 x=%2210.300000%22 y=%22-2.500000%22 width=%220.300000%22 height=%225.000000%22 /><rect class=%22layer_2_0%22 x=%2210.900000%22 y=%22-2.500000%22 width=%220.300000%22 height=%225.000000%22 /><rect class=%22layer_2_0%22 x=%2211.500000%22 y=%22-2.500000%22 width=%220.300000%22 height=%225.000000%22 /><rect class=%22layer_2_0%22 x=%2212.100000%22 y=%22-2.500000%22 width=%220.300000%22 height=%225.000000%22 /><rect class=%22layer_2_0%22 x=%2212.700000%22 y=%22-2.500000%22 width=%220.300000%22 height=%225.000000%22 /><rect class=%22layer_2_0%22 x=%2213.300000%22 y=%22-2.500000%22 width=%220.300000%22 height=%225.000000%22 /><rect class=%22layer_2_0%22 x=%2213.900000%22 y=%22-2.500000%22 width=%220.300000%22 height=%225.000000%22 /><rect class=%22layer_2_0%22 x=%2214.500000%22 y=%22-2.500000%22 width=%220.300000%22 height=%225.000000%22 /><rect class=%22layer_2_0%22 x=%2215.100000%22 y=%22-2.500000%22 width=%220.300000%22 height=%225.000000%22 /><rect class=%22layer_2_0%22 x=%2215.700000%22 y=%22-2.500000%22 width=%220.300000%22 height=%225.000000%22 /></g><g id=%22C288%22 data-name=%22s_bend_l_8P83180234111591_o_5P9538946990554225_p_Strip%22><path class=%22layer_1_0%22 d=%22M 0.000000,-1.250000 0.297000,-1.243000 0.594000,-1.221000 0.889000,-1.184000 1.181000,-1.133000 1.471000,-1.067000 1.758000,-0.987000 2.040000,-0.894000 2.317000,-0.786000 2.588000,-0.665000 2.853000,-0.530000 3.111000,-0.383000 3.362000,-0.223000 3.604000,-0.051000 3.837000,0.133000 4.061000,0.329000 4.276000,0.535000 4.479000,0.751000 4.672000,0.977000 4.854000,1.213000 5.023000,1.457000 5.180000,1.709000 5.325000,1.969000 5.456000,2.235000 5.575000,2.508000 5.721000,2.823000 5.897000,3.122000 6.102000,3.403000 6.334000,3.661000 6.590000,3.896000 6.868000,4.104000 7.165000,4.283000 7.478000,4.433000 7.805000,4.551000 8.142000,4.636000 8.485000,4.687000 8.832000,4.704000 8.832000,7.204000 8.535000,7.197000 8.238000,7.175000 7.943000,7.138000 7.651000,7.087000 7.361000,7.021000 7.074000,6.941000 6.792000,6.848000 6.515000,6.740000 6.244000,6.619000 5.979000,6.484000 5.721000,6.337000 5.470000,6.177000 5.228000,6.005000 4.995000,5.821000 4.771000,5.625000 4.556000,5.419000 4.353000,5.203000 4.160000,4.977000 3.978000,4.741000 3.809000,4.497000 3.652000,4.245000 3.507000,3.985000 3.376000,3.719000 3.257000,3.446000 3.111000,3.131000 2.935000,2.832000 2.730000,2.551000 2.498000,2.293000 2.242000,2.058000 1.964000,1.850000 1.667000,1.671000 1.354000,1.521000 1.027000,1.403000 0.690000,1.318000 0.347000,1.267000 0.000000,1.250000 z%22 /><path class=%22layer_2_0%22 d=%22M 0.000000,-0.250000 0.248000,-0.244000 0.495000,-0.226000 0.741000,-0.195000 0.985000,-0.152000 1.227000,-0.098000 1.465000,-0.031000 1.700000,0.047000 1.931000,0.137000 2.158000,0.238000 2.379000,0.350000 2.594000,0.473000 2.803000,0.606000 3.005000,0.750000 3.199000,0.903000 3.386000,1.066000 3.565000,1.238000 3.735000,1.418000 3.895000,1.607000 4.046000,1.803000 4.188000,2.007000 4.319000,2.217000 4.439000,2.434000 4.549000,2.656000 4.648000,2.883000 4.737000,3.088000 4.835000,3.288000 4.944000,3.483000 5.062000,3.672000 5.189000,3.855000 5.325000,4.032000 5.470000,4.202000 5.623000,4.364000 5.784000,4.519000 5.952000,4.666000 6.127000,4.804000 6.309000,4.933000 6.497000,5.053000 6.691000,5.164000 6.890000,5.265000 7.093000,5.356000 7.301000,5.436000 7.513000,5.507000 7.728000,5.567000 7.945000,5.616000 8.165000,5.654000 8.386000,5.682000 8.832000,5.704000 8.832000,6.204000 8.584000,6.198000 8.337000,6.180000 8.091000,6.149000 7.847000,6.106000 7.605000,6.052000 7.367000,5.985000 7.132000,5.907000 6.901000,5.817000 6.674000,5.716000 6.453000,5.604000 6.238000,5.481000 6.029000,5.348000 5.827000,5.204000 5.633000,5.051000 5.446000,4.888000 5.267000,4.716000 5.097000,4.536000 4.937000,4.347000 4.786000,4.151000 4.644000,3.947000 4.513000,3.737000 4.393000,3.520000 4.283000,3.298000 4.184000,3.071000 4.095000,2.866000 3.997000,2.666000 3.888000,2.471000 3.770000,2.282000 3.643000,2.099000 3.507000,1.922000 3.362000,1.752000 3.209000,1.590000 3.048000,1.435000 2.880000,1.288000 2.705000,1.150000 2.523000,1.021000 2.335000,0.901000 2.141000,0.790000 1.942000,0.689000 1.739000,0.598000 1.319000,0.447000 1.104000,0.387000 0.887000,0.338000 0.667000,0.300000 0.446000,0.272000 0.223000,0.256000 0.000000,0.250000 z%22 /></g><g id=%22C289%22 data-name=%22as_component__PNGCOJINIPILRSBFUVHAAAKRQR7F7X5DOV45DHY3HPYOUZICQITA%22><path class=%22layer_1_0%22 d=%22M 9.889000,3.500000 0.000000,1.275000 0.000000,-1.275000 9.889000,-3.500000 16.000000,-3.500000 16.000000,3.500000 z%22 /><path class=%22layer_2_0%22 d=%22M 0.000000,-0.250000 10.000000,-2.500000 10.000000,2.500000 0.000000,0.250000 z%22 /><rect class=%22layer_2_0%22 x=%2210.300000%22 y=%22-2.500000%22 width=%220.300000%22 height=%225.000000%22 /><rect class=%22layer_2_0%22 x=%2210.900000%22 y=%22-2.500000%22 width=%220.300000%22 height=%225.000000%22 /><rect class=%22layer_2_0%22 x=%2211.500000%22 y=%22-2.500000%22 width=%220.300000%22 height=%225.000000%22 /><rect class=%22layer_2_0%22 x=%2212.100000%22 y=%22-2.500000%22 width=%220.300000%22 height=%225.000000%22 /><rect class=%22layer_2_0%22 x=%2212.700000%22 y=%22-2.500000%22 width=%220.300000%22 height=%225.000000%22 /><rect class=%22layer_2_0%22 x=%2213.300000%22 y=%22-2.500000%22 width=%220.300000%22 height=%225.000000%22 /><rect class=%22layer_2_0%22 x=%2213.900000%22 y=%22-2.500000%22 width=%220.300000%22 height=%225.000000%22 /><rect class=%22layer_2_0%22 x=%2214.500000%22 y=%22-2.500000%22 width=%220.300000%22 height=%225.000000%22 /><rect class=%22layer_2_0%22 x=%2215.100000%22 y=%22-2.500000%22 width=%220.300000%22 height=%225.000000%22 /><rect class=%22layer_2_0%22 x=%2215.700000%22 y=%22-2.500000%22 width=%220.300000%22 height=%225.000000%22 /></g><g id=%22C290%22 data-name=%22s_bend_l_12P045187049616377_o_19P860861254933308_p_Strip%22><path class=%22layer_1_0%22 d=%22M 0.000000,-1.250000 0.317000,-1.244000 0.634000,-1.225000 0.949000,-1.194000 1.264000,-1.150000 1.576000,-1.094000 1.886000,-1.026000 2.192000,-0.945000 2.496000,-0.853000 2.795000,-0.749000 3.091000,-0.632000 3.381000,-0.505000 3.666000,-0.366000 3.945000,-0.216000 4.219000,-0.055000 4.485000,0.117000 4.745000,0.299000 4.997000,0.491000 5.242000,0.693000 5.478000,0.905000 5.706000,1.126000 5.925000,1.355000 6.135000,1.593000 6.335000,1.839000 6.526000,2.093000 6.706000,2.354000 6.876000,2.622000 7.035000,2.896000 7.183000,3.176000 7.320000,3.463000 7.446000,3.754000 7.560000,4.050000 7.662000,4.350000 7.752000,4.654000 7.830000,4.961000 7.897000,5.272000 7.950000,5.584000 7.992000,5.899000 8.021000,6.215000 8.037000,6.531000 8.041000,6.849000 8.033000,7.166000 8.012000,7.482000 7.978000,7.798000 7.932000,8.111000 7.874000,8.423000 7.804000,8.733000 7.721000,9.039000 7.626000,9.342000 7.520000,9.640000 7.402000,9.935000 7.272000,10.224000 7.131000,10.508000 6.944000,10.904000 6.790000,11.312000 6.667000,11.732000 6.579000,12.160000 6.524000,12.594000 6.504000,13.030000 6.506000,13.249000 6.538000,13.685000 6.603000,14.117000 6.703000,14.542000 6.836000,14.959000 7.001000,15.364000 7.197000,15.754000 7.424000,16.128000 7.679000,16.482000 7.962000,16.816000 8.270000,17.126000 8.601000,17.411000 8.954000,17.669000 9.326000,17.898000 9.715000,18.097000 10.119000,18.265000 10.534000,18.401000 10.959000,18.504000 11.391000,18.572000 11.826000,18.607000 12.045000,18.611000 12.045000,21.111000 11.728000,21.105000 11.411000,21.086000 11.096000,21.055000 10.781000,21.011000 10.469000,20.955000 10.159000,20.887000 9.853000,20.806000 9.549000,20.714000 9.250000,20.610000 8.954000,20.493000 8.664000,20.366000 8.379000,20.227000 8.100000,20.077000 7.826000,19.916000 7.560000,19.744000 7.300000,19.562000 7.048000,19.370000 6.803000,19.168000 6.567000,18.956000 6.339000,18.735000 6.120000,18.506000 5.910000,18.268000 5.710000,18.022000 5.519000,17.768000 5.339000,17.507000 5.169000,17.239000 5.010000,16.965000 4.862000,16.685000 4.725000,16.399000 4.599000,16.107000 4.485000,15.811000 4.383000,15.511000 4.293000,15.207000 4.215000,14.900000 4.148000,14.589000 4.095000,14.277000 4.053000,13.962000 4.024000,13.646000 4.008000,13.330000 4.004000,13.012000 4.012000,12.695000 4.033000,12.379000 4.067000,12.063000 4.113000,11.750000 4.171000,11.438000 4.241000,11.128000 4.324000,10.822000 4.419000,10.519000 4.525000,10.221000 4.643000,9.926000 4.773000,9.637000 4.914000,9.353000 5.011000,9.157000 5.182000,8.755000 5.321000,8.340000 5.426000,7.916000 5.498000,7.485000 5.535000,7.049000 5.539000,6.612000 5.527000,6.394000 5.479000,5.960000 5.396000,5.530000 5.280000,5.109000 5.131000,4.698000 4.950000,4.300000 4.738000,3.918000 4.497000,3.553000 4.228000,3.209000 3.932000,2.887000 3.612000,2.589000 3.270000,2.318000 2.907000,2.074000 2.526000,1.859000 2.130000,1.676000 1.720000,1.524000 1.299000,1.404000 0.871000,1.319000 0.437000,1.267000 0.000000,1.250000 z%22 /><path class=%22layer_2_0%22 d=%22M 0.000000,-0.250000 0.278000,-0.245000 0.555000,-0.228000 0.831000,-0.201000 1.106000,-0.163000 1.651000,-0.054000 1.920000,0.017000 2.185000,0.098000 2.448000,0.189000 2.706000,0.291000 2.960000,0.403000 3.210000,0.524000 3.455000,0.656000 3.694000,0.797000 3.928000,0.947000 4.155000,1.107000 4.376000,1.275000 4.590000,1.452000 4.797000,1.637000 4.997000,1.830000 5.189000,2.031000 5.372000,2.239000 5.548000,2.455000 5.872000,2.905000 6.021000,3.140000 6.160000,3.380000 6.290000,3.626000 6.410000,3.876000 6.520000,4.132000 6.620000,4.391000 6.709000,4.654000 6.788000,4.920000 6.857000,5.189000 6.915000,5.461000 6.962000,5.734000 6.998000,6.010000 7.023000,6.286000 7.038000,6.564000 7.041000,6.842000 7.034000,7.119000 7.015000,7.396000 6.986000,7.673000 6.946000,7.947000 6.895000,8.220000 6.833000,8.491000 6.761000,8.759000 6.678000,9.024000 6.585000,9.286000 6.481000,9.544000 6.368000,9.797000 6.244000,10.046000 6.129000,10.277000 5.928000,10.752000 5.841000,10.995000 5.764000,11.241000 5.640000,11.742000 5.592000,11.996000 5.555000,12.251000 5.511000,12.765000 5.507000,13.281000 5.520000,13.539000 5.544000,13.796000 5.621000,14.306000 5.675000,14.558000 5.812000,15.056000 5.895000,15.300000 6.090000,15.778000 6.322000,16.238000 6.590000,16.680000 6.736000,16.892000 7.054000,17.298000 7.403000,17.679000 7.588000,17.858000 7.980000,18.194000 8.185000,18.351000 8.613000,18.639000 9.063000,18.892000 9.531000,19.109000 10.015000,19.288000 10.511000,19.429000 11.017000,19.530000 11.529000,19.591000 12.045000,19.611000 12.045000,20.111000 11.767000,20.106000 11.490000,20.089000 11.214000,20.062000 10.939000,20.024000 10.394000,19.915000 10.125000,19.844000 9.860000,19.763000 9.597000,19.672000 9.339000,19.570000 8.835000,19.337000 8.590000,19.205000 8.351000,19.064000 8.117000,18.914000 7.669000,18.586000 7.455000,18.409000 7.248000,18.224000 7.048000,18.031000 6.856000,17.830000 6.673000,17.622000 6.497000,17.406000 6.173000,16.956000 6.024000,16.721000 5.885000,16.481000 5.755000,16.235000 5.635000,15.985000 5.525000,15.729000 5.425000,15.470000 5.336000,15.207000 5.257000,14.941000 5.188000,14.672000 5.130000,14.400000 5.083000,14.127000 5.047000,13.851000 5.022000,13.575000 5.007000,13.297000 5.004000,13.019000 5.011000,12.742000 5.030000,12.465000 5.059000,12.189000 5.099000,11.914000 5.150000,11.641000 5.212000,11.370000 5.284000,11.102000 5.367000,10.837000 5.460000,10.575000 5.564000,10.317000 5.677000,10.064000 5.801000,9.815000 5.916000,9.584000 6.021000,9.348000 6.204000,8.866000 6.281000,8.620000 6.348000,8.370000 6.453000,7.865000 6.490000,7.610000 6.534000,7.096000 6.541000,6.838000 6.525000,6.322000 6.501000,6.065000 6.424000,5.555000 6.370000,5.303000 6.233000,4.805000 6.150000,4.561000 5.955000,4.083000 5.723000,3.623000 5.593000,3.399000 5.309000,2.969000 4.991000,2.563000 4.642000,2.182000 4.457000,2.003000 4.264000,1.831000 3.860000,1.510000 3.432000,1.222000 2.982000,0.969000 2.514000,0.752000 2.030000,0.573000 1.534000,0.432000 1.028000,0.331000 0.516000,0.270000 0.000000,0.250000 z%22 /></g><g id=%22C291%22 data-name=%22as_component__PNGCOJINIPILRSBFUVHAAAKRQR7F7X5DOV45DHY3HPYOUZICQITA%22><path class=%22layer_1_0%22 d=%22M 9.889000,3.500000 0.000000,1.275000 0.000000,-1.275000 9.889000,-3.500000 16.000000,-3.500000 16.000000,3.500000 z%22 /><path class=%22layer_2_0%22 d=%22M 0.000000,-0.250000 10.000000,-2.500000 10.000000,2.500000 0.000000,0.250000 z%22 /><rect class=%22layer_2_0%22 x=%2210.300000%22 y=%22-2.500000%22 width=%220.300000%22 height=%225.000000%22 /><rect class=%22layer_2_0%22 x=%2210.900000%22 y=%22-2.500000%22 width=%220.300000%22 height=%225.000000%22 /><rect class=%22layer_2_0%22 x=%2211.500000%22 y=%22-2.500000%22 width=%220.300000%22 height=%225.000000%22 /><rect class=%22layer_2_0%22 x=%2212.100000%22 y=%22-2.500000%22 width=%220.300000%22 height=%225.000000%22 /><rect class=%22layer_2_0%22 x=%2212.700000%22 y=%22-2.500000%22 width=%220.300000%22 height=%225.000000%22 /><rect class=%22layer_2_0%22 x=%2213.300000%22 y=%22-2.500000%22 width=%220.300000%22 height=%225.000000%22 /><rect class=%22layer_2_0%22 x=%2213.900000%22 y=%22-2.500000%22 width=%220.300000%22 height=%225.000000%22 /><rect class=%22layer_2_0%22 x=%2214.500000%22 y=%22-2.500000%22 width=%220.300000%22 height=%225.000000%22 /><rect class=%22layer_2_0%22 x=%2215.100000%22 y=%22-2.500000%22 width=%220.300000%22 height=%225.000000%22 /><rect class=%22layer_2_0%22 x=%2215.700000%22 y=%22-2.500000%22 width=%220.300000%22 height=%225.000000%22 /></g><g id=%22C292%22 data-name=%22s_bend_l_5P105669163846475_o_4P645710471385195_p_Strip%22><path class=%22layer_1_0%22 d=%22M 0.000000,-1.250000 0.256000,-1.241000 0.510000,-1.216000 0.763000,-1.173000 1.012000,-1.113000 1.256000,-1.037000 1.495000,-0.945000 1.727000,-0.837000 1.951000,-0.713000 2.166000,-0.575000 2.372000,-0.423000 2.567000,-0.257000 2.751000,-0.078000 2.922000,0.112000 3.079000,0.314000 3.223000,0.525000 3.353000,0.746000 3.467000,0.975000 3.566000,1.211000 3.649000,1.453000 3.715000,1.700000 3.765000,1.951000 3.797000,2.205000 3.826000,2.379000 3.877000,2.548000 3.951000,2.708000 4.045000,2.857000 4.158000,2.992000 4.289000,3.111000 4.434000,3.211000 4.591000,3.291000 4.757000,3.349000 4.930000,3.384000 5.106000,3.396000 5.106000,5.896000 4.850000,5.887000 4.596000,5.862000 4.343000,5.819000 4.094000,5.759000 3.850000,5.683000 3.611000,5.591000 3.379000,5.483000 3.155000,5.359000 2.940000,5.221000 2.734000,5.069000 2.539000,4.903000 2.355000,4.724000 2.184000,4.534000 2.027000,4.333000 1.883000,4.121000 1.753000,3.900000 1.639000,3.671000 1.540000,3.435000 1.457000,3.193000 1.391000,2.946000 1.341000,2.695000 1.309000,2.441000 1.280000,2.267000 1.229000,2.098000 1.155000,1.938000 1.061000,1.789000 0.948000,1.654000 0.817000,1.535000 0.672000,1.435000 0.515000,1.355000 0.349000,1.297000 0.176000,1.262000 0.000000,1.250000 z%22 /><path class=%22layer_2_0%22 d=%22M 0.000000,-0.250000 0.189000,-0.244000 0.377000,-0.225000 0.563000,-0.193000 0.747000,-0.149000 0.927000,-0.093000 1.103000,-0.025000 1.274000,0.055000 1.440000,0.146000 1.598000,0.248000 1.750000,0.360000 1.894000,0.483000 2.029000,0.614000 2.156000,0.755000 2.272000,0.904000 2.378000,1.060000 2.474000,1.223000 2.558000,1.392000 2.631000,1.566000 2.692000,1.744000 2.741000,1.927000 2.778000,2.112000 2.802000,2.299000 2.822000,2.454000 2.852000,2.606000 2.892000,2.756000 2.942000,2.903000 3.002000,3.046000 3.150000,3.319000 3.333000,3.570000 3.548000,3.793000 3.667000,3.894000 3.792000,3.986000 3.922000,4.070000 4.058000,4.145000 4.199000,4.211000 4.344000,4.267000 4.492000,4.313000 4.643000,4.349000 4.796000,4.375000 4.951000,4.391000 5.106000,4.396000 5.106000,4.896000 4.917000,4.890000 4.729000,4.871000 4.543000,4.839000 4.359000,4.795000 4.179000,4.739000 4.003000,4.671000 3.832000,4.591000 3.666000,4.500000 3.508000,4.398000 3.356000,4.286000 3.212000,4.163000 3.077000,4.032000 2.950000,3.891000 2.834000,3.742000 2.728000,3.586000 2.632000,3.423000 2.548000,3.254000 2.475000,3.080000 2.414000,2.902000 2.365000,2.719000 2.328000,2.534000 2.304000,2.347000 2.284000,2.193000 2.254000,2.040000 2.214000,1.890000 2.164000,1.743000 2.104000,1.600000 1.956000,1.327000 1.773000,1.076000 1.558000,0.853000 1.439000,0.752000 1.315000,0.660000 1.184000,0.576000 1.048000,0.501000 0.907000,0.435000 0.762000,0.379000 0.614000,0.333000 0.463000,0.297000 0.310000,0.271000 0.155000,0.255000 0.000000,0.250000 z%22 /></g><g id=%22C293%22 data-name=%22as_component__PNGCOJINIPILRSBFUVHAAAKRQR7F7X5DOV45DHY3HPYOUZICQITA%22><path class=%22layer_1_0%22 d=%22M 9.889000,3.500000 0.000000,1.275000 0.000000,-1.275000 9.889000,-3.500000 16.000000,-3.500000 16.000000,3.500000 z%22 /><path class=%22layer_2_0%22 d=%22M 0.000000,-0.250000 10.000000,-2.500000 10.000000,2.500000 0.000000,0.250000 z%22 /><rect class=%22layer_2_0%22 x=%2210.300000%22 y=%22-2.500000%22 width=%220.300000%22 height=%225.000000%22 /><rect class=%22layer_2_0%22 x=%2210.900000%22 y=%22-2.500000%22 width=%220.300000%22 height=%225.000000%22 /><rect class=%22layer_2_0%22 x=%2211.500000%22 y=%22-2.500000%22 width=%220.300000%22 height=%225.000000%22 /><rect class=%22layer_2_0%22 x=%2212.100000%22 y=%22-2.500000%22 width=%220.300000%22 height=%225.000000%22 /><rect class=%22layer_2_0%22 x=%2212.700000%22 y=%22-2.500000%22 width=%220.300000%22 height=%225.000000%22 /><rect class=%22layer_2_0%22 x=%2213.300000%22 y=%22-2.500000%22 width=%220.300000%22 height=%225.000000%22 /><rect class=%22layer_2_0%22 x=%2213.900000%22 y=%22-2.500000%22 width=%220.300000%22 height=%225.000000%22 /><rect class=%22layer_2_0%22 x=%2214.500000%22 y=%22-2.500000%22 width=%220.300000%22 height=%225.000000%22 /><rect class=%22layer_2_0%22 x=%2215.100000%22 y=%22-2.500000%22 width=%220.300000%22 height=%225.000000%22 /><rect class=%22layer_2_0%22 x=%2215.700000%22 y=%22-2.500000%22 width=%220.300000%22 height=%225.000000%22 /></g><g id=%22C294%22 data-name=%22s_bend_l_11P376743418222073_o_18P770140009611655_p_Strip%22><path class=%22layer_1_0%22 d=%22M 0.000000,-1.250000 0.315000,-1.244000 0.628000,-1.224000 0.941000,-1.192000 1.253000,-1.147000 1.562000,-1.089000 1.869000,-1.019000 2.172000,-0.936000 2.472000,-0.841000 2.767000,-0.733000 3.058000,-0.614000 3.344000,-0.482000 3.624000,-0.339000 3.899000,-0.185000 4.166000,-0.019000 4.427000,0.157000 4.680000,0.344000 4.925000,0.541000 5.162000,0.748000 5.390000,0.965000 5.609000,1.190000 5.819000,1.425000 6.019000,1.668000 6.208000,1.919000 6.388000,2.177000 6.556000,2.443000 6.714000,2.715000 6.860000,2.993000 6.995000,3.278000 7.117000,3.567000 7.228000,3.862000 7.327000,4.160000 7.413000,4.463000 7.487000,4.769000 7.549000,5.077000 7.597000,5.388000 7.633000,5.701000 7.656000,6.014000 7.666000,6.329000 7.663000,6.643000 7.647000,6.957000 7.619000,7.271000 7.577000,7.583000 7.523000,7.892000 7.456000,8.200000 7.377000,8.504000 7.285000,8.805000 7.181000,9.102000 7.065000,9.394000 6.936000,9.681000 6.797000,9.963000 6.616000,10.347000 6.468000,10.744000 6.352000,11.152000 6.271000,11.568000 6.223000,11.989000 6.211000,12.413000 6.233000,12.836000 6.290000,13.256000 6.381000,13.670000 6.506000,14.075000 6.663000,14.469000 6.853000,14.848000 7.072000,15.211000 7.321000,15.554000 7.597000,15.876000 7.899000,16.174000 8.223000,16.446000 8.569000,16.691000 8.934000,16.906000 9.316000,17.091000 9.711000,17.244000 10.118000,17.364000 10.533000,17.451000 10.953000,17.503000 11.377000,17.520000 11.377000,20.020000 11.062000,20.014000 10.749000,19.994000 10.436000,19.962000 10.124000,19.917000 9.815000,19.859000 9.508000,19.789000 9.205000,19.706000 8.905000,19.611000 8.610000,19.503000 8.319000,19.384000 8.033000,19.252000 7.753000,19.109000 7.478000,18.955000 7.211000,18.789000 6.950000,18.613000 6.697000,18.426000 6.452000,18.229000 6.215000,18.022000 5.987000,17.806000 5.768000,17.580000 5.558000,17.345000 5.358000,17.102000 5.169000,16.851000 4.989000,16.593000 4.821000,16.327000 4.663000,16.055000 4.517000,15.777000 4.382000,15.492000 4.260000,15.203000 4.149000,14.908000 4.050000,14.610000 3.964000,14.307000 3.890000,14.001000 3.828000,13.693000 3.780000,13.382000 3.744000,13.069000 3.721000,12.756000 3.711000,12.441000 3.714000,12.127000 3.730000,11.813000 3.758000,11.499000 3.800000,11.187000 3.854000,10.878000 3.921000,10.570000 4.000000,10.266000 4.092000,9.965000 4.196000,9.668000 4.312000,9.376000 4.441000,9.089000 4.580000,8.807000 4.761000,8.423000 4.909000,8.026000 5.025000,7.618000 5.106000,7.202000 5.154000,6.781000 5.166000,6.357000 5.144000,5.934000 5.087000,5.514000 4.996000,5.100000 4.871000,4.695000 4.714000,4.301000 4.524000,3.922000 4.305000,3.559000 4.056000,3.216000 3.780000,2.894000 3.478000,2.596000 3.154000,2.324000 2.808000,2.079000 2.443000,1.864000 2.061000,1.679000 1.666000,1.526000 1.259000,1.406000 0.844000,1.319000 0.424000,1.267000 0.000000,1.250000 z%22 /><path class=%22layer_2_0%22 d=%22M 0.000000,-0.250000 0.273000,-0.244000 0.547000,-0.228000 0.819000,-0.200000 1.089000,-0.160000 1.358000,-0.110000 1.625000,-0.049000 1.889000,0.023000 2.149000,0.106000 2.406000,0.200000 2.659000,0.303000 2.908000,0.418000 3.152000,0.542000 3.390000,0.676000 3.623000,0.820000 4.069000,1.136000 4.282000,1.307000 4.488000,1.487000 4.687000,1.676000 4.877000,1.872000 5.060000,2.076000 5.234000,2.287000 5.399000,2.505000 5.701000,2.961000 5.838000,3.198000 5.965000,3.440000 6.082000,3.687000 6.189000,3.939000 6.285000,4.195000 6.371000,4.455000 6.446000,4.718000 6.511000,4.984000 6.564000,5.252000 6.606000,5.522000 6.637000,5.794000 6.657000,6.067000 6.666000,6.340000 6.664000,6.614000 6.650000,6.887000 6.625000,7.159000 6.589000,7.430000 6.542000,7.700000 6.484000,7.967000 6.415000,8.232000 6.335000,8.493000 6.244000,8.752000 6.143000,9.006000 6.032000,9.256000 5.910000,9.501000 5.798000,9.727000 5.695000,9.958000 5.601000,10.194000 5.517000,10.432000 5.380000,10.919000 5.326000,11.166000 5.282000,11.416000 5.249000,11.666000 5.226000,11.918000 5.213000,12.171000 5.219000,12.677000 5.237000,12.929000 5.266000,13.181000 5.305000,13.431000 5.414000,13.925000 5.563000,14.408000 5.652000,14.645000 5.859000,15.107000 5.977000,15.331000 6.239000,15.764000 6.383000,15.971000 6.697000,16.369000 6.865000,16.557000 7.225000,16.913000 7.613000,17.238000 8.026000,17.530000 8.241000,17.663000 8.687000,17.902000 8.917000,18.008000 9.389000,18.191000 9.874000,18.334000 10.121000,18.391000 10.369000,18.437000 10.871000,18.499000 11.124000,18.515000 11.377000,18.520000 11.377000,19.020000 10.830000,18.998000 10.558000,18.970000 10.288000,18.930000 10.019000,18.880000 9.752000,18.819000 9.488000,18.747000 9.228000,18.664000 8.971000,18.571000 8.718000,18.467000 8.469000,18.352000 8.225000,18.228000 7.987000,18.094000 7.754000,17.950000 7.308000,17.634000 7.095000,17.463000 6.889000,17.283000 6.690000,17.094000 6.500000,16.898000 6.317000,16.694000 6.143000,16.483000 5.978000,16.265000 5.676000,15.809000 5.539000,15.572000 5.412000,15.330000 5.295000,15.083000 5.188000,14.831000 5.092000,14.575000 5.006000,14.315000 4.931000,14.052000 4.866000,13.786000 4.813000,13.518000 4.771000,13.248000 4.740000,12.976000 4.720000,12.703000 4.711000,12.430000 4.713000,12.156000 4.727000,11.883000 4.752000,11.611000 4.788000,11.340000 4.835000,11.070000 4.893000,10.803000 4.962000,10.538000 5.042000,10.277000 5.133000,10.018000 5.234000,9.764000 5.345000,9.514000 5.467000,9.269000 5.579000,9.043000 5.682000,8.812000 5.776000,8.576000 5.860000,8.338000 5.997000,7.851000 6.051000,7.604000 6.095000,7.354000 6.128000,7.104000 6.151000,6.852000 6.164000,6.599000 6.158000,6.093000 6.140000,5.841000 6.111000,5.589000 6.072000,5.339000 5.963000,4.845000 5.814000,4.362000 5.725000,4.125000 5.518000,3.663000 5.400000,3.439000 5.138000,3.006000 4.994000,2.799000 4.680000,2.401000 4.512000,2.213000 4.152000,1.857000 3.764000,1.532000 3.351000,1.240000 3.136000,1.107000 2.915000,0.983000 2.690000,0.868000 2.460000,0.762000 1.988000,0.579000 1.503000,0.436000 1.256000,0.379000 1.008000,0.333000 0.506000,0.271000 0.253000,0.255000 0.000000,0.250000 z%22 /></g><g id=%22C295%22 data-name=%22as_component__PNGCOJINIPILRSBFUVHAAAKRQR7F7X5DOV45DHY3HPYOUZICQITA%22><path class=%22layer_1_0%22 d=%22M 9.889000,3.500000 0.000000,1.275000 0.000000,-1.275000 9.889000,-3.500000 16.000000,-3.500000 16.000000,3.500000 z%22 /><path class=%22layer_2_0%22 d=%22M 0.000000,-0.250000 10.000000,-2.500000 10.000000,2.500000 0.000000,0.250000 z%22 /><rect class=%22layer_2_0%22 x=%2210.300000%22 y=%22-2.500000%22 width=%220.300000%22 height=%225.000000%22 /><rect class=%22layer_2_0%22 x=%2210.900000%22 y=%22-2.500000%22 width=%220.300000%22 height=%225.000000%22 /><rect class=%22layer_2_0%22 x=%2211.500000%22 y=%22-2.500000%22 width=%220.300000%22 height=%225.000000%22 /><rect class=%22layer_2_0%22 x=%2212.100000%22 y=%22-2.500000%22 width=%220.300000%22 height=%225.000000%22 /><rect class=%22layer_2_0%22 x=%2212.700000%22 y=%22-2.500000%22 width=%220.300000%22 height=%225.000000%22 /><rect class=%22layer_2_0%22 x=%2213.300000%22 y=%22-2.500000%22 width=%220.300000%22 height=%225.000000%22 /><rect class=%22layer_2_0%22 x=%2213.900000%22 y=%22-2.500000%22 width=%220.300000%22 height=%225.000000%22 /><rect class=%22layer_2_0%22 x=%2214.500000%22 y=%22-2.500000%22 width=%220.300000%22 height=%225.000000%22 /><rect class=%22layer_2_0%22 x=%2215.100000%22 y=%22-2.500000%22 width=%220.300000%22 height=%225.000000%22 /><rect class=%22layer_2_0%22 x=%2215.700000%22 y=%22-2.500000%22 width=%220.300000%22 height=%225.000000%22 /></g><g id=%22C296%22 data-name=%22s_bend_l_8P856155163361986_o_18P991673657235328_p_Strip%22><path class=%22layer_1_0%22 d=%22M 0.000000,-1.250000 0.307000,-1.243000 0.613000,-1.223000 0.918000,-1.190000 1.221000,-1.143000 1.522000,-1.083000 1.820000,-1.010000 2.114000,-0.925000 2.405000,-0.826000 2.690000,-0.715000 2.971000,-0.591000 3.246000,-0.456000 3.515000,-0.308000 3.777000,-0.149000 4.032000,0.021000 4.280000,0.203000 4.519000,0.395000 4.750000,0.597000 4.971000,0.809000 5.183000,1.031000 5.386000,1.261000 5.578000,1.501000 5.759000,1.748000 5.929000,2.003000 6.089000,2.265000 6.236000,2.534000 6.372000,2.809000 6.495000,3.090000 6.606000,3.376000 6.705000,3.666000 6.791000,3.961000 6.864000,4.259000 6.924000,4.560000 6.970000,4.863000 7.004000,5.168000 7.024000,5.474000 7.030000,5.780000 7.024000,6.087000 7.004000,6.393000 6.970000,6.698000 6.924000,7.001000 6.864000,7.302000 6.791000,7.600000 6.705000,7.895000 6.606000,8.185000 6.495000,8.471000 6.372000,8.752000 6.236000,9.027000 6.088000,9.296000 5.929000,9.558000 5.759000,9.813000 5.578000,10.060000 5.386000,10.299000 5.145000,10.613000 4.933000,10.946000 4.750000,11.297000 4.599000,11.662000 4.480000,12.039000 4.394000,12.425000 4.343000,12.817000 4.326000,13.212000 4.343000,13.606000 4.394000,13.998000 4.480000,14.384000 4.599000,14.761000 4.750000,15.126000 4.933000,15.477000 5.145000,15.810000 5.386000,16.124000 5.653000,16.415000 5.944000,16.682000 6.257000,16.923000 6.591000,17.135000 6.941000,17.318000 7.307000,17.469000 7.683000,17.588000 8.069000,17.673000 8.461000,17.725000 8.856000,17.742000 8.856000,20.242000 8.549000,20.235000 8.243000,20.215000 7.938000,20.182000 7.635000,20.135000 7.334000,20.075000 7.036000,20.002000 6.742000,19.917000 6.451000,19.818000 6.166000,19.707000 5.885000,19.583000 5.610000,19.448000 5.341000,19.300000 5.079000,19.141000 4.824000,18.971000 4.576000,18.789000 4.337000,18.597000 4.106000,18.395000 3.885000,18.183000 3.673000,17.961000 3.470000,17.731000 3.278000,17.491000 3.097000,17.244000 2.927000,16.989000 2.767000,16.727000 2.620000,16.458000 2.484000,16.183000 2.361000,15.902000 2.250000,15.616000 2.151000,15.326000 2.065000,15.031000 1.992000,14.733000 1.932000,14.432000 1.886000,14.129000 1.852000,13.824000 1.832000,13.518000 1.826000,13.212000 1.832000,12.905000 1.852000,12.599000 1.886000,12.294000 1.932000,11.991000 1.992000,11.690000 2.065000,11.392000 2.151000,11.097000 2.250000,10.807000 2.361000,10.521000 2.484000,10.240000 2.620000,9.965000 2.768000,9.696000 2.927000,9.434000 3.097000,9.179000 3.278000,8.932000 3.470000,8.693000 3.711000,8.379000 3.923000,8.046000 4.106000,7.695000 4.257000,7.330000 4.376000,6.953000 4.462000,6.567000 4.513000,6.175000 4.530000,5.780000 4.513000,5.386000 4.462000,4.994000 4.376000,4.608000 4.257000,4.231000 4.106000,3.866000 3.923000,3.515000 3.711000,3.182000 3.470000,2.868000 3.203000,2.577000 2.912000,2.310000 2.599000,2.069000 2.265000,1.857000 1.915000,1.674000 1.549000,1.523000 1.173000,1.404000 0.787000,1.319000 0.395000,1.267000 0.000000,1.250000 z%22 /><path class=%22layer_2_0%22 d=%22M 0.000000,-0.250000 0.263000,-0.244000 0.526000,-0.227000 0.787000,-0.198000 1.047000,-0.158000 1.305000,-0.107000 1.561000,-0.045000 1.813000,0.029000 2.063000,0.114000 2.308000,0.209000 2.549000,0.315000 2.785000,0.431000 3.015000,0.558000 3.240000,0.694000 3.459000,0.841000 3.671000,0.996000 3.876000,1.161000 4.074000,1.334000 4.264000,1.516000 4.446000,1.706000 4.620000,1.904000 4.784000,2.109000 4.940000,2.322000 5.086000,2.540000 5.222000,2.765000 5.349000,2.996000 5.465000,3.232000 5.571000,3.473000 5.667000,3.718000 5.751000,3.967000 5.825000,4.220000 5.887000,4.475000 5.939000,4.733000 5.979000,4.993000 6.025000,5.517000 6.025000,6.043000 6.007000,6.306000 5.979000,6.568000 5.939000,6.828000 5.887000,7.086000 5.825000,7.341000 5.751000,7.594000 5.667000,7.843000 5.571000,8.088000 5.465000,8.329000 5.349000,8.565000 5.222000,8.796000 5.086000,9.021000 4.940000,9.239000 4.784000,9.452000 4.620000,9.657000 4.468000,9.845000 4.326000,10.039000 4.192000,10.240000 4.067000,10.446000 3.844000,10.874000 3.659000,11.320000 3.514000,11.780000 3.410000,12.251000 3.373000,12.490000 3.347000,12.730000 3.331000,12.970000 3.331000,13.453000 3.347000,13.694000 3.373000,13.933000 3.410000,14.172000 3.457000,14.409000 3.514000,14.643000 3.659000,15.103000 3.844000,15.549000 3.950000,15.765000 4.192000,16.183000 4.326000,16.384000 4.468000,16.578000 4.619000,16.766000 4.945000,17.122000 5.301000,17.448000 5.489000,17.599000 5.684000,17.742000 5.885000,17.876000 6.091000,18.001000 6.302000,18.117000 6.519000,18.224000 6.740000,18.321000 6.964000,18.408000 7.193000,18.486000 7.425000,18.554000 7.659000,18.611000 7.896000,18.658000 8.134000,18.695000 8.374000,18.721000 8.615000,18.737000 8.856000,18.742000 8.856000,19.242000 8.593000,19.236000 8.330000,19.219000 8.069000,19.190000 7.809000,19.150000 7.551000,19.099000 7.295000,19.037000 7.043000,18.963000 6.793000,18.878000 6.548000,18.783000 6.307000,18.677000 6.071000,18.561000 5.841000,18.434000 5.616000,18.298000 5.397000,18.151000 5.185000,17.996000 4.980000,17.831000 4.782000,17.658000 4.592000,17.476000 4.410000,17.286000 4.236000,17.088000 4.072000,16.883000 3.916000,16.670000 3.770000,16.452000 3.634000,16.227000 3.507000,15.996000 3.391000,15.760000 3.285000,15.519000 3.189000,15.274000 3.105000,15.025000 3.031000,14.772000 2.969000,14.517000 2.917000,14.259000 2.877000,13.999000 2.831000,13.475000 2.831000,12.949000 2.849000,12.686000 2.877000,12.424000 2.917000,12.164000 2.969000,11.906000 3.031000,11.651000 3.105000,11.398000 3.189000,11.149000 3.285000,10.904000 3.391000,10.663000 3.507000,10.427000 3.634000,10.196000 3.770000,9.971000 3.916000,9.753000 4.072000,9.540000 4.236000,9.335000 4.388000,9.147000 4.530000,8.953000 4.664000,8.752000 4.789000,8.546000 5.012000,8.118000 5.197000,7.672000 5.342000,7.212000 5.446000,6.741000 5.483000,6.502000 5.525000,6.022000 5.525000,5.539000 5.509000,5.298000 5.483000,5.059000 5.446000,4.820000 5.399000,4.583000 5.342000,4.349000 5.197000,3.889000 5.012000,3.443000 4.906000,3.227000 4.664000,2.809000 4.530000,2.608000 4.388000,2.414000 4.237000,2.226000 3.911000,1.870000 3.555000,1.544000 3.367000,1.393000 3.172000,1.250000 2.971000,1.116000 2.765000,0.991000 2.554000,0.875000 2.337000,0.768000 2.116000,0.671000 1.892000,0.584000 1.663000,0.506000 1.431000,0.438000 1.197000,0.381000 0.960000,0.334000 0.722000,0.297000 0.482000,0.271000 0.241000,0.255000 0.000000,0.250000 z%22 /></g><g id=%22C297%22 data-name=%22as_component__PNGCOJINIPILRSBFUVHAAAKRQR7F7X5DOV45DHY3HPYOUZICQITA%22><path class=%22layer_1_0%22 d=%22M 9.889000,3.500000 0.000000,1.275000 0.000000,-1.275000 9.889000,-3.500000 16.000000,-3.500000 16.000000,3.500000 z%22 /><path class=%22layer_2_0%22 d=%22M 0.000000,-0.250000 10.000000,-2.500000 10.000000,2.500000 0.000000,0.250000 z%22 /><rect class=%22layer_2_0%22 x=%2210.300000%22 y=%22-2.500000%22 width=%220.300000%22 height=%225.000000%22 /><rect class=%22layer_2_0%22 x=%2210.900000%22 y=%22-2.500000%22 width=%220.300000%22 height=%225.000000%22 /><rect class=%22layer_2_0%22 x=%2211.500000%22 y=%22-2.500000%22 width=%220.300000%22 height=%225.000000%22 /><rect class=%22layer_2_0%22 x=%2212.100000%22 y=%22-2.500000%22 width=%220.300000%22 height=%225.000000%22 /><rect class=%22layer_2_0%22 x=%2212.700000%22 y=%22-2.500000%22 width=%220.300000%22 height=%225.000000%22 /><rect class=%22layer_2_0%22 x=%2213.300000%22 y=%22-2.500000%22 width=%220.300000%22 height=%225.000000%22 /><rect class=%22layer_2_0%22 x=%2213.900000%22 y=%22-2.500000%22 width=%220.300000%22 height=%225.000000%22 /><rect class=%22layer_2_0%22 x=%2214.500000%22 y=%22-2.500000%22 width=%220.300000%22 height=%225.000000%22 /><rect class=%22layer_2_0%22 x=%2215.100000%22 y=%22-2.500000%22 width=%220.300000%22 height=%225.000000%22 /><rect class=%22layer_2_0%22 x=%2215.700000%22 y=%22-2.500000%22 width=%220.300000%22 height=%225.000000%22 /></g><g id=%22C298%22 data-name=%22s_bend_l_4P938156007855066_o_3P3902938960297786_p_Strip%22><path class=%22layer_1_0%22 d=%22M 0.000000,-1.250000 0.260000,-1.241000 0.519000,-1.215000 0.776000,-1.172000 1.029000,-1.112000 1.278000,-1.034000 1.521000,-0.941000 1.757000,-0.831000 1.985000,-0.706000 2.205000,-0.566000 2.414000,-0.412000 2.613000,-0.243000 2.800000,-0.062000 2.975000,0.131000 3.136000,0.335000 3.284000,0.550000 3.416000,0.774000 3.534000,1.006000 3.636000,1.246000 3.714000,1.415000 3.814000,1.572000 3.935000,1.715000 4.073000,1.840000 4.227000,1.945000 4.393000,2.029000 4.569000,2.090000 4.752000,2.128000 4.938000,2.140000 4.938000,4.640000 4.678000,4.631000 4.419000,4.605000 4.162000,4.562000 3.909000,4.502000 3.660000,4.424000 3.417000,4.331000 3.181000,4.221000 2.953000,4.096000 2.733000,3.956000 2.524000,3.802000 2.325000,3.633000 2.138000,3.452000 1.963000,3.259000 1.802000,3.055000 1.654000,2.840000 1.522000,2.616000 1.404000,2.384000 1.302000,2.144000 1.224000,1.975000 1.124000,1.818000 1.003000,1.675000 0.865000,1.550000 0.711000,1.445000 0.545000,1.361000 0.369000,1.300000 0.186000,1.262000 0.000000,1.250000 z%22 /><path class=%22layer_2_0%22 d=%22M 0.000000,-0.250000 0.193000,-0.244000 0.386000,-0.224000 0.577000,-0.192000 0.765000,-0.147000 0.950000,-0.090000 1.131000,-0.020000 1.306000,0.061000 1.476000,0.154000 1.639000,0.258000 1.795000,0.373000 1.943000,0.498000 2.082000,0.633000 2.211000,0.776000 2.331000,0.928000 2.441000,1.088000 2.539000,1.254000 2.627000,1.427000 2.702000,1.605000 2.765000,1.753000 2.837000,1.895000 2.919000,2.033000 3.009000,2.165000 3.108000,2.291000 3.216000,2.410000 3.331000,2.521000 3.453000,2.624000 3.582000,2.719000 3.717000,2.806000 4.003000,2.950000 4.305000,3.055000 4.461000,3.092000 4.619000,3.119000 4.778000,3.135000 4.938000,3.140000 4.938000,3.640000 4.745000,3.634000 4.552000,3.614000 4.361000,3.582000 4.173000,3.537000 3.988000,3.480000 3.807000,3.410000 3.632000,3.329000 3.462000,3.236000 3.299000,3.132000 3.143000,3.017000 2.996000,2.892000 2.856000,2.757000 2.727000,2.614000 2.607000,2.462000 2.497000,2.302000 2.399000,2.136000 2.311000,1.963000 2.236000,1.785000 2.173000,1.637000 2.101000,1.495000 1.929000,1.225000 1.830000,1.099000 1.722000,0.980000 1.607000,0.869000 1.485000,0.766000 1.221000,0.584000 0.935000,0.440000 0.633000,0.335000 0.477000,0.298000 0.319000,0.271000 0.160000,0.255000 0.000000,0.250000 z%22 /></g><g id=%22C299%22 data-name=%22as_component__PNGCOJINIPILRSBFUVHAAAKRQR7F7X5DOV45DHY3HPYOUZICQITA%22><path class=%22layer_1_0%22 d=%22M 9.889000,3.500000 0.000000,1.275000 0.000000,-1.275000 9.889000,-3.500000 16.000000,-3.500000 16.000000,3.500000 z%22 /><path class=%22layer_2_0%22 d=%22M 0.000000,-0.250000 10.000000,-2.500000 10.000000,2.500000 0.000000,0.250000 z%22 /><rect class=%22layer_2_0%22 x=%2210.300000%22 y=%22-2.500000%22 width=%220.300000%22 height=%225.000000%22 /><rect class=%22layer_2_0%22 x=%2210.900000%22 y=%22-2.500000%22 width=%220.300000%22 height=%225.000000%22 /><rect class=%22layer_2_0%22 x=%2211.500000%22 y=%22-2.500000%22 width=%220.300000%22 height=%225.000000%22 /><rect class=%22layer_2_0%22 x=%2212.100000%22 y=%22-2.500000%22 width=%220.300000%22 height=%225.000000%22 /><rect class=%22layer_2_0%22 x=%2212.700000%22 y=%22-2.500000%22 width=%220.300000%22 height=%225.000000%22 /><rect class=%22layer_2_0%22 x=%2213.300000%22 y=%22-2.500000%22 width=%220.300000%22 height=%225.000000%22 /><rect class=%22layer_2_0%22 x=%2213.900000%22 y=%22-2.500000%22 width=%220.300000%22 height=%225.000000%22 /><rect class=%22layer_2_0%22 x=%2214.500000%22 y=%22-2.500000%22 width=%220.300000%22 height=%225.000000%22 /><rect class=%22layer_2_0%22 x=%2215.100000%22 y=%22-2.500000%22 width=%220.300000%22 height=%225.000000%22 /><rect class=%22layer_2_0%22 x=%2215.700000%22 y=%22-2.500000%22 width=%220.300000%22 height=%225.000000%22 /></g><g id=%22C300%22 data-name=%22s_bend_l_2P840735604174978_o_2P6606696420077482_p_Strip%22><path class=%22layer_1_0%22 d=%22M 0.000000,-1.250000 0.251000,-1.238000 0.500000,-1.203000 0.745000,-1.144000 0.983000,-1.063000 1.212000,-0.960000 1.430000,-0.835000 1.636000,-0.691000 1.828000,-0.528000 2.003000,-0.347000 2.160000,-0.151000 2.299000,0.059000 2.417000,0.281000 2.514000,0.513000 2.588000,0.753000 2.640000,0.999000 2.668000,1.249000 2.673000,1.281000 2.684000,1.312000 2.701000,1.340000 2.722000,1.364000 2.748000,1.384000 2.777000,1.399000 2.809000,1.408000 2.841000,1.411000 2.841000,3.911000 2.590000,3.899000 2.341000,3.864000 2.096000,3.805000 1.858000,3.724000 1.629000,3.621000 1.411000,3.496000 1.205000,3.352000 1.013000,3.189000 0.838000,3.008000 0.681000,2.812000 0.542000,2.602000 0.424000,2.380000 0.327000,2.148000 0.253000,1.908000 0.201000,1.662000 0.173000,1.412000 0.168000,1.380000 0.157000,1.349000 0.140000,1.321000 0.119000,1.297000 0.093000,1.277000 0.064000,1.262000 0.032000,1.253000 0.000000,1.250000 z%22 /><path class=%22layer_2_0%22 d=%22M 0.000000,-0.250000 0.157000,-0.243000 0.313000,-0.220000 0.466000,-0.184000 0.615000,-0.133000 0.759000,-0.068000 0.895000,0.010000 1.024000,0.100000 1.144000,0.202000 1.254000,0.315000 1.352000,0.438000 1.439000,0.569000 1.513000,0.708000 1.573000,0.853000 1.620000,1.004000 1.652000,1.158000 1.670000,1.314000 1.682000,1.424000 1.705000,1.532000 1.780000,1.739000 1.832000,1.837000 1.893000,1.929000 1.962000,2.015000 2.123000,2.166000 2.309000,2.284000 2.514000,2.365000 2.731000,2.406000 2.841000,2.411000 2.841000,2.911000 2.684000,2.904000 2.528000,2.881000 2.375000,2.845000 2.226000,2.794000 2.082000,2.729000 1.946000,2.651000 1.817000,2.561000 1.697000,2.459000 1.587000,2.346000 1.489000,2.223000 1.402000,2.092000 1.328000,1.953000 1.268000,1.808000 1.221000,1.657000 1.189000,1.503000 1.171000,1.347000 1.159000,1.237000 1.136000,1.129000 1.061000,0.922000 1.009000,0.824000 0.879000,0.646000 0.718000,0.495000 0.532000,0.377000 0.327000,0.296000 0.110000,0.255000 0.000000,0.250000 z%22 /></g><g id=%22C301%22 data-name=%22as_component__PNGCOJINIPILRSBFUVHAAAKRQR7F7X5DOV45DHY3HPYOUZICQITA%22><path class=%22layer_1_0%22 d=%22M 9.889000,3.500000 0.000000,1.275000 0.000000,-1.275000 9.889000,-3.500000 16.000000,-3.500000 16.000000,3.500000 z%22 /><path class=%22layer_2_0%22 d=%22M 0.000000,-0.250000 10.000000,-2.500000 10.000000,2.500000 0.000000,0.250000 z%22 /><rect class=%22layer_2_0%22 x=%2210.300000%22 y=%22-2.500000%22 width=%220.300000%22 height=%225.000000%22 /><rect class=%22layer_2_0%22 x=%2210.900000%22 y=%22-2.500000%22 width=%220.300000%22 height=%225.000000%22 /><rect class=%22layer_2_0%22 x=%2211.500000%22 y=%22-2.500000%22 width=%220.300000%22 height=%225.000000%22 /><rect class=%22layer_2_0%22 x=%2212.100000%22 y=%22-2.500000%22 width=%220.300000%22 height=%225.000000%22 /><rect class=%22layer_2_0%22 x=%2212.700000%22 y=%22-2.500000%22 width=%220.300000%22 height=%225.000000%22 /><rect class=%22layer_2_0%22 x=%2213.300000%22 y=%22-2.500000%22 width=%220.300000%22 height=%225.000000%22 /><rect class=%22layer_2_0%22 x=%2213.900000%22 y=%22-2.500000%22 width=%220.300000%22 height=%225.000000%22 /><rect class=%22layer_2_0%22 x=%2214.500000%22 y=%22-2.500000%22 width=%220.300000%22 height=%225.000000%22 /><rect class=%22layer_2_0%22 x=%2215.100000%22 y=%22-2.500000%22 width=%220.300000%22 height=%225.000000%22 /><rect class=%22layer_2_0%22 x=%2215.700000%22 y=%22-2.500000%22 width=%220.300000%22 height=%225.000000%22 /></g><g id=%22C302%22 data-name=%22s_bend_l_2P549662477878709_o_2P4353223926182768_p_Strip%22><path class=%22layer_1_0%22 d=%22M 0.000000,-1.250000 0.240000,-1.239000 0.479000,-1.204000 0.712000,-1.147000 0.940000,-1.069000 1.159000,-0.969000 1.367000,-0.848000 1.563000,-0.708000 1.745000,-0.551000 1.911000,-0.376000 2.059000,-0.187000 2.189000,0.015000 2.299000,0.229000 2.388000,0.453000 2.456000,0.684000 2.501000,0.920000 2.524000,1.160000 2.524000,1.165000 2.526000,1.170000 2.529000,1.174000 2.532000,1.178000 2.536000,1.181000 2.540000,1.183000 2.545000,1.185000 2.550000,1.185000 2.550000,3.685000 2.310000,3.674000 2.071000,3.639000 1.838000,3.582000 1.610000,3.504000 1.391000,3.404000 1.183000,3.283000 0.987000,3.143000 0.805000,2.986000 0.639000,2.811000 0.491000,2.622000 0.361000,2.420000 0.251000,2.206000 0.162000,1.982000 0.094000,1.751000 0.049000,1.515000 0.026000,1.275000 0.026000,1.270000 0.024000,1.265000 0.021000,1.261000 0.018000,1.257000 0.014000,1.254000 0.010000,1.252000 0.005000,1.250000 0.000000,1.250000 z%22 /><path class=%22layer_2_0%22 d=%22M 0.000000,-0.250000 0.145000,-0.243000 0.289000,-0.222000 0.430000,-0.188000 0.568000,-0.140000 0.700000,-0.080000 0.826000,-0.007000 0.944000,0.077000 1.054000,0.172000 1.154000,0.278000 1.244000,0.392000 1.323000,0.515000 1.389000,0.644000 1.443000,0.779000 1.484000,0.918000 1.511000,1.061000 1.525000,1.206000 1.552000,1.399000 1.616000,1.584000 1.713000,1.753000 1.841000,1.901000 1.995000,2.022000 2.079000,2.071000 2.261000,2.143000 2.452000,2.180000 2.550000,2.185000 2.550000,2.685000 2.405000,2.678000 2.261000,2.657000 2.120000,2.623000 1.982000,2.575000 1.850000,2.515000 1.724000,2.442000 1.606000,2.358000 1.496000,2.263000 1.396000,2.157000 1.306000,2.043000 1.227000,1.920000 1.161000,1.791000 1.107000,1.656000 1.066000,1.517000 1.039000,1.374000 1.025000,1.229000 0.998000,1.036000 0.934000,0.851000 0.837000,0.682000 0.776000,0.605000 0.635000,0.470000 0.471000,0.364000 0.382000,0.324000 0.194000,0.269000 0.000000,0.250000 z%22 /></g></defs><g transform=%22scale(1 -1)%22><g id=%22C0%22 data-name=%22GRID_2_1%22><use transform=%22translate(-197.396500 -197.484000)%22 href=%22%23C1%22 /><use transform=%22translate(212.800500 -181.960000)%22 href=%22%23C2%22 /></g></g></svg>)
%22><rect x=%22-30.00%22 y=%22-30.00%22 width=%2260.00%22 height=%2260.00%22 fill=%22%23f4f5f7%22 stroke=%22%23232530%22 stroke-width=%221%22/></g><text x=%2240.00%22 y=%2240.00%22 font-size=%226.5%22 fill=%22%23232530%22 font-weight=%22400%22 text-anchor=%22middle%22 dominant-baseline=%22middle%22 stroke=%22%23ffffff%22 stroke-width=%222.27%22 stroke-linejoin=%22round%22 paint-order=%22stroke%22>PACK_0</text><text x=%2240.00%22 y=%2271.80%22 font-size=%229%22 fill=%22%23232530%22 font-weight=%22400%22 text-anchor=%22middle%22 dominant-baseline=%22hanging%22 stroke=%22%23ffffff%22 stroke-width=%223.15%22 stroke-linejoin=%22round%22 paint-order=%22stroke%22>PACK_0_1</text><g transform=%22matrix(1 -0 0 1 200.000 40.000)%22><rect x=%22-30.00%22 y=%22-30.00%22 width=%2260.00%22 height=%2260.00%22 fill=%22%23f4f5f7%22 stroke=%22%23232530%22 stroke-width=%221%22/></g><text x=%22200.00%22 y=%2240.00%22 font-size=%226.5%22 fill=%22%23232530%22 font-weight=%22400%22 text-anchor=%22middle%22 dominant-baseline=%22middle%22 stroke=%22%23ffffff%22 stroke-width=%222.27%22 stroke-linejoin=%22round%22 paint-order=%22stroke%22>PACK_1</text><text x=%22200.00%22 y=%2271.80%22 font-size=%229%22 fill=%22%23232530%22 font-weight=%22400%22 text-anchor=%22middle%22 dominant-baseline=%22hanging%22 stroke=%22%23ffffff%22 stroke-width=%223.15%22 stroke-linejoin=%22round%22 paint-order=%22stroke%22>PACK_1_1</text><g fill=%22none%22 stroke-width=%222%22></g></svg>)