

Getting Started
Installation
Section titled “Installation”PhotonForge 2.0 Community is free, for research and commercial use. It is a Python package. Install it with one command (Python 3.10 or newer):
pip install photonforgeThat is all you need to design on your computer: layout, schematic, routing and circuit simulation. DRC and LVS also need KLayout 0.29.12 or newer, installed separately (see Layout Verification). If you already use Tidy3D in a virtual environment, install PhotonForge in the same environment.
To check the installation, print the installed version:
python -c 'import photonforge as pf; print(pf.__version__)'Open the Local GUI
Section titled “Open the Local GUI”The local GUI shows your design in the browser, with the layout and the schematic side by side. It runs on your computer. Open it from Python:
from photonforge.live_viewer import LiveViewer
viewer = LiveViewer()
The command prints the address to open in your browser. The Quick Start builds and simulates a first circuit in it, at no cost.
Install Open PDKs
Section titled “Install Open PDKs”Open PDKs install with pip.
For example, to install the SiEPIC OpenEBL and Luxtelligence LNOI400 and LTOI300 PDKs:
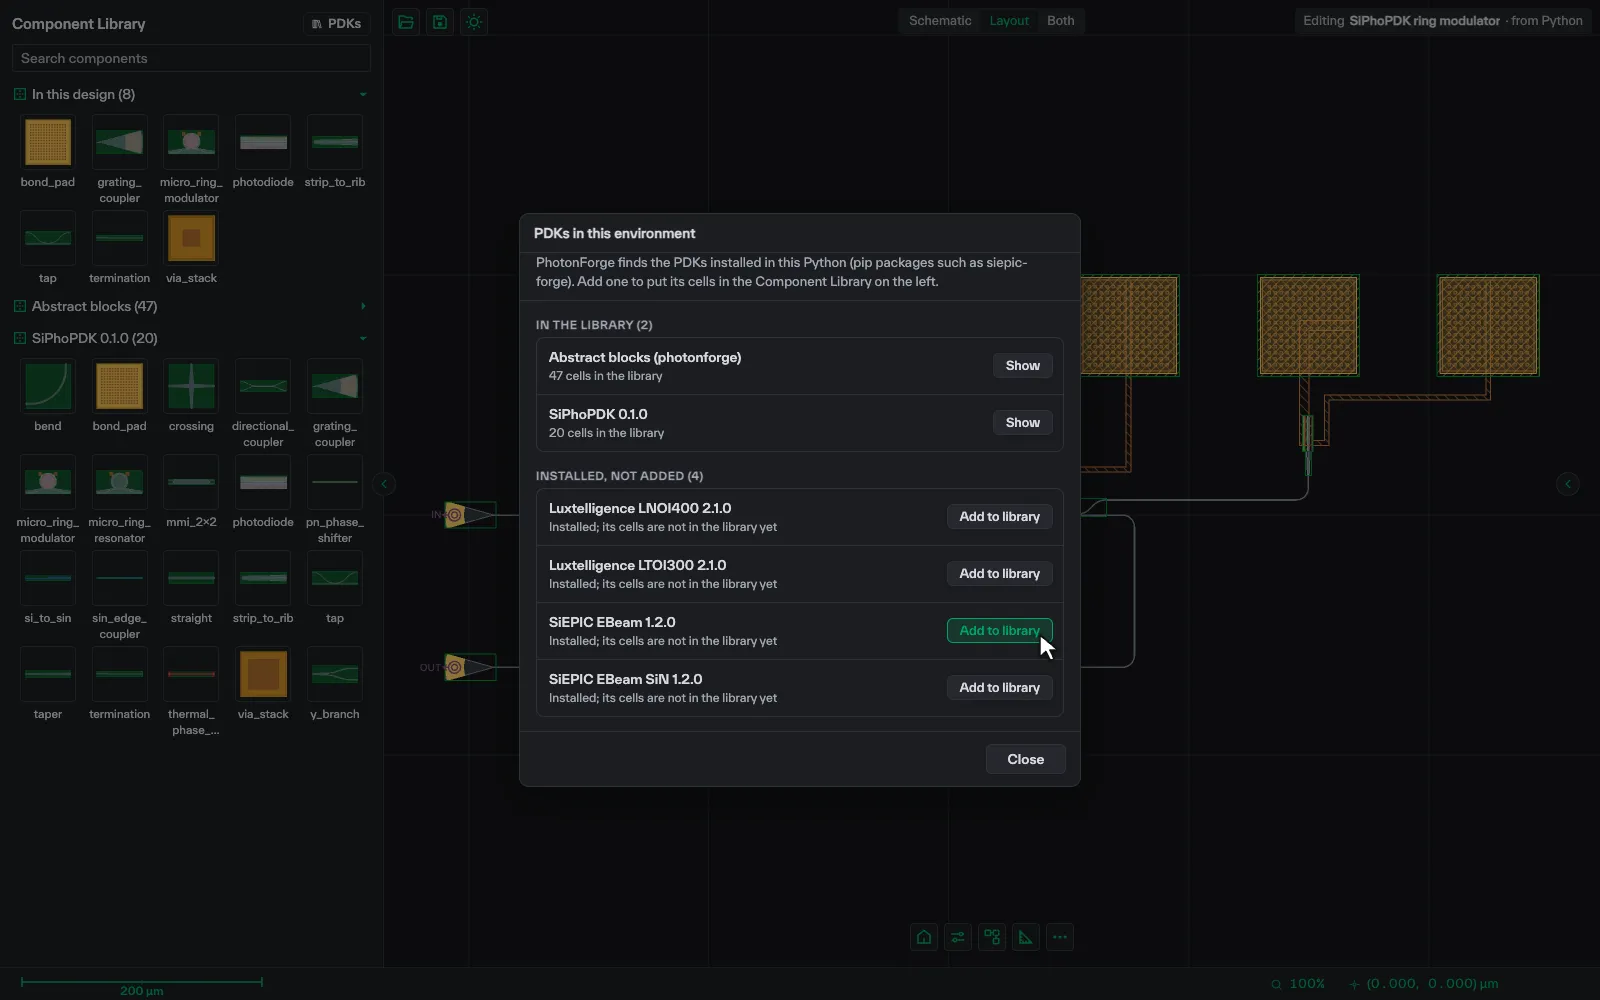
pip install siepic-forgepip install siepic-sin-forgepip install luxtelligence-lnoi400-forgepip install luxtelligence-ltoi300-forgeThe PDKs you install are listed in the Component Library of the local GUI.
To add one, click PDKs above the library, then Add to library.
A public PDK that is not installed yet is listed under Not installed, with its pip command and an Install button.
Foundry PDKs come with PhotonForge Enterprise and load as PhotonForge technologies. Each foundry PDK package has its own installation instructions.
Run Tidy3D Simulations
Section titled “Run Tidy3D Simulations”Device simulations (FDTD, EME, mode solver, charge, heat and RF) run in the Tidy3D cloud and use FlexCredits. To run them, sign up for a free account at tidy3d.simulation.cloud, get your API key, and configure it with this command:
tidy3d configureOn Windows, it is easier to use pipx to find the path to the configuration tool:
pip install pipxpipx run tidy3d configureMore information about the installation and configuration of Tidy3D is in the Tidy3D documentation.
This script builds a parametric S bend, runs a 3D FDTD simulation on it, and plots the S parameters:
import numpy as npimport photonforge as pf
# Set the default project technologypf.config.default_technology = pf.basic_technology()
# Create an S bend from the parametric component library using the "Strip"# waveguide profile defined in the Basic Technology, set up for a 3D FDTD simulations_bend = pf.parametric.s_bend(port_spec="Strip", length=4, offset=1.5, model=pf.Tidy3DModel())
# Computing the S matrix runs the Tidy3D simulation in the clouds_matrix = s_bend.s_matrix(pf.C_0 / np.linspace(1.5, 1.6, 11))
# We can easily plot the S parameters with the following utilityfig, ax = pf.plot_s_matrix(s_matrix)
The parametric.s_bend function creates a parametric component with 2 ports, and the model argument attaches a Tidy3DModel to it.
In a Jupyter notebook, the s_bend component shows as an SVG drawing of the geometry and the ports:

When the S parameters are calculated in line 12, the model creates a Tidy3D simulation, runs it, and returns the scattering coefficients.
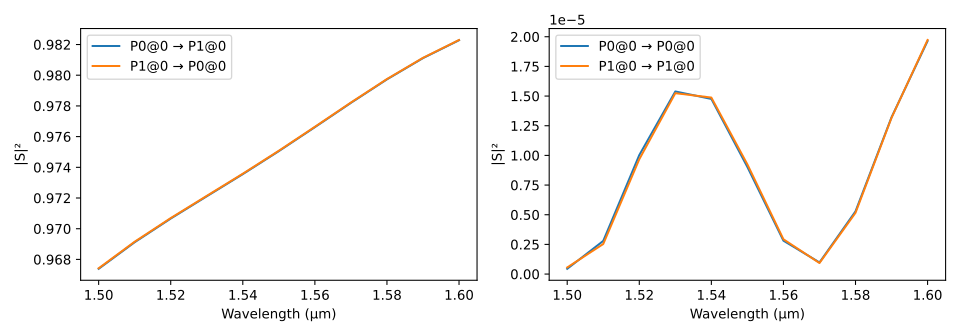
Line 15 uses the plot_s_matrix function to plot the S parameters:
Next Steps
Section titled “Next Steps”- Key Concepts: the main ideas of PhotonForge.
- Quick Start I: build an MZI in the local GUI and simulate it in Python.
- Quick Start II: build and simulate a passive circuit on an open PDK.
- Quick Start III: make the circuit active and simulate a transmitter link.
- Frequently Asked Questions: answers to common questions.
- The front page: the whole design flow on one chip.