Getting Started#
Installation and Setup#
Before using Flow360, you need to:
Sign up for a user account at flow360.simulation.cloud.
Obtain your API key from your account profile.
Install Flow360 Python API and configure your API key.
Package Installation#
It is highly recommended to install and use the Python API in a Python virtual environment. This eliminates the risk of conflicting dependencies with other packages you may have installed on your system and also provides a easy switch between different versions of the Python API.
The Flow360 Python API is available on PyPI and can be installed using pip.
pip install flow360
To verify the successful download, you can run the following command:
flow360 version
This will display the version of the Python API and the available solver versions.
Note
Supported Python versions depend on the Flow360 release you are using:
Version 25.8 and earlier — Python 3.9, 3.10, 3.11, 3.12, or 3.13
Version 25.9 and later — Python 3.10, 3.11, 3.12, or 3.13
Python 3.8 and earlier are not supported by any current release. Python 3.14 and later have not yet been tested.
Upgrading the Package#
To upgrade an existing installation of the Flow360 Python API to the latest release, run:
pip install -U flow360
After upgrading, re-run flow360 version to confirm the new version is active.
API Versioning#
Python API version numbers are directly associated with the Flow360 solver version you want to use. New projects created with the Python API will by default use the corresponding solver version.
For example if you want to use Flow360 solver version “release-25.8”, you should install the Python API version “v25.8.*”.
Cloud resources (project, geometry, surface mesh, volume mesh, case) and their configurations are backward compatible. Meaning that an old cloud resource can be loaded into any newer Python API version and/or submitted to any newer solver version. However forward compatibility is not guaranteed.
Note
Cloud resources’ versions are determined by the solver version they are created with. It is generally recommended to use the corresponding Python API version associated with the solver version you want to work with to avoid compatibility issues.
Install a specific version of the Python API#
To install a specific version of Python API:
pip install "flow360==25.8.*" --ignore-installed
To install a specific Github branch of Python API, for example develop branch:
pip install git+https://github.com/flexcompute/Flow360.git@develop --ignore-installed
If you need to manage multiple versions of the Python API for different projects, please see the advanced section below:
Advanced: Multi-version Python API Installation and Management
For users who need to work with multiple solver versions simultaneously, we recommend installing each version of the Python API in a separate isolated environment. The following scenario demonstrates how to install the Python API for both “release-25.7” and “release-25.6” using Conda.
1. Create and configure environment for Release 25.7
# Create a new conda environment named 'flow360-25.7'
conda create -n flow360-25.7 -y

# Activate the environment
conda activate flow360-25.7

# Install the specific version of Flow360 API
pip install "flow360==25.7.*"
2. Create and configure environment for Release 25.6
# Create a new conda environment named 'flow360-25.6'
conda create -n flow360-25.6 -y

# Activate the environment
conda activate flow360-25.6

# Install the specific version of Flow360 API
pip install "flow360==25.6.*"
3. List available virtual environments
 conda env list

you should see the following output:
# conda environments:
#
# * -> active
# + -> frozen
base                     C:\ProgramData\miniconda3
flow360-25.6         *   C:\Users\UserName\.conda\envs\flow360-25.6
flow360-25.7             C:\Users\UserName\.conda\envs\flow360-25.7
4. Switch between versions
You can now easily switch between different API versions by activating the corresponding Conda environment:
# Switch to 25.7 environment and use solver version "release-25.7"
conda activate flow360-25.7

python submit_to_25.7.py

# Switch to 25.6 environment and use solver version "release-25.6"
conda activate flow360-25.6

python submit_to_25.6.py
API Key Configuration#
Most of the functionalities (like uploading mesh and submitting case) of Flow360 Python API requires setting up proper API key for authentication. The API key can be obtained from the Flow360 WebUI by clicking on your avatar on the top right of your workspace then clicking on your Account then Python Authentication. To copy the API key, click on the Show button and then click on the copy icon. If you don’t see any characters shownn, click on New API key to generate a new API key. Please contact customer support for more information.
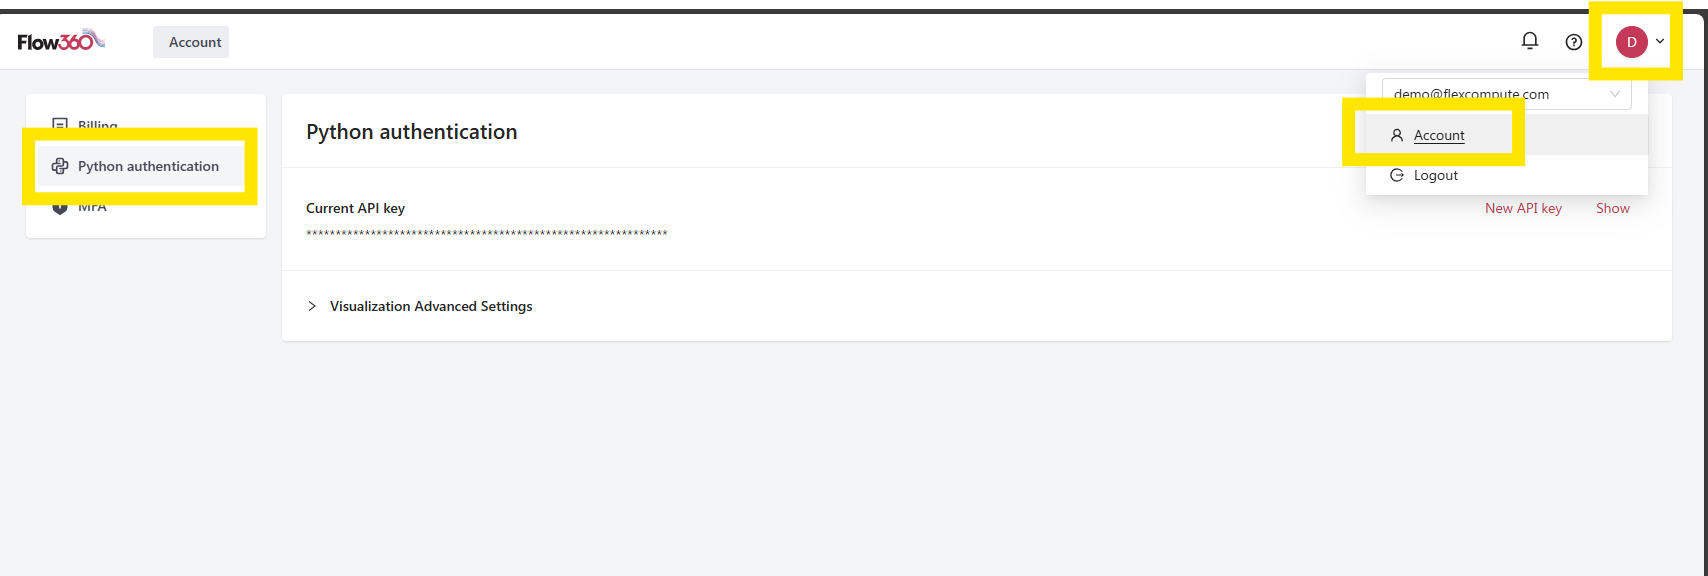
Accessing your API key.#
Your Flow360 API key is stored locally in a configuration file at:
~/.flow360/config.toml
Important
The API key is sensitive information and should be kept confidential. Do not share it with anyone.
To setup the API key authentication, you can use one of the following methods:
Method 1: Global Configuration (Recommended)#
In the command line. Run the following command.
flow360 configure --apikey XXX
If you want to configure the API key on Windows, you can run the following command in the command prompt.
flow360 configure --apikey XXX
This will prompt you to enter your API key and store it in ~/.flow360
Method 2: Configure via Python Code#
import flow360 as fl
fl.configure(apikey='XXX')
Testing Your Installation#
To verify your installation is working correctly:
flow360 version       # Display latest versions of Python API.
flow360 show_projects # Should list all projects you have access to if APIKey is configured correctly.
Managing Profiles#
It is possible to check all the current profiles that are set in flow360 by typing the following line in the terminal:
flow360 configure
The first added account will be set as default account. To add an API Key for a profile type:
flow360 configure --apikey XXX --profile my-profile
To use a profile in a python code, change the profile at the beginning of the code by adding the following lines:
import flow360.user_config as uc
uc.UserConfig.set_profile("my-profile")
See also
The flow360 command shown above offers many more commands for managing
projects, assets, drafts, and runs from the terminal. See the
CLI reference for the full list.